
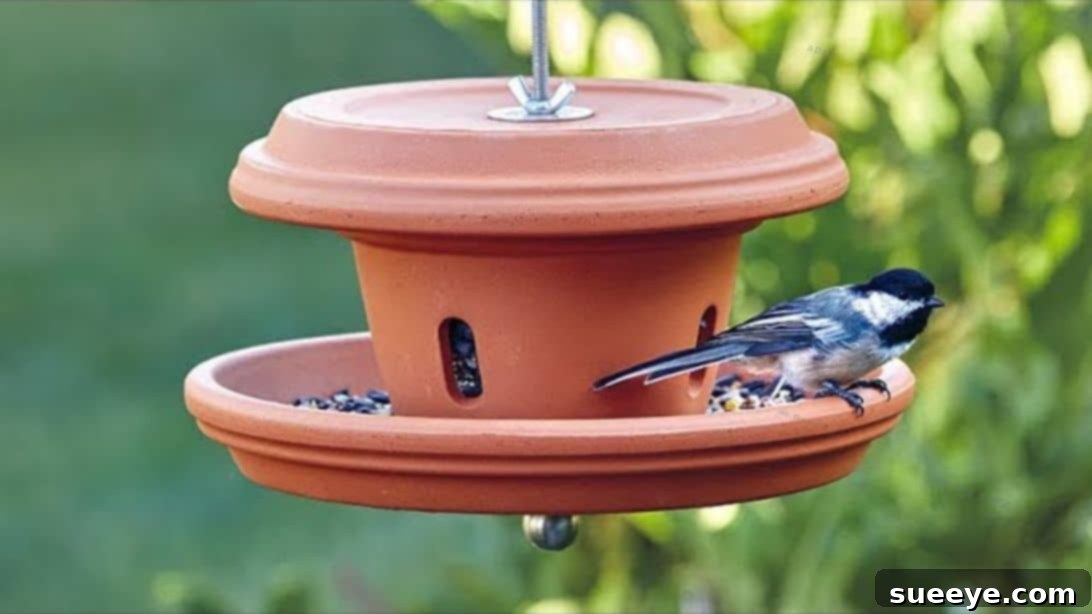
Craft Your Own Terra Cotta Bird Feeder: A Charming DIY Project for Every Garden
There’s an undeniable joy in creating something with your own hands, especially when that creation brings life and beauty into your outdoor space. Bird feeders have recently captivated many DIY enthusiasts, offering a delightful blend of creativity and functionality. From ingenious plastic bottle bird feeders to charming teacup designs, the possibilities are endless and the instructions are often surprisingly simple. If you’re looking for an innovative way to repurpose common household items or elevate your garden’s aesthetic, these projects are fantastic starting points.
However, if you’ve already explored those popular DIY avenues and are seeking a fresh, unique challenge, then prepare to be inspired by the DIY Terra Cotta Bird Feeder. This project stands out for its rustic charm, durability, and the unexpected use of everyday garden materials. Inspired by the brilliant ideas from Garden Gate Magazine, this feeder not only provides a welcoming haven for local birds but also adds a touch of artisanal elegance to any garden or patio.
RELATED: If you love resourceful crafting, don’t miss learning How to Make a Tin Can Bird Feeder.
Why Choose a Terra Cotta Bird Feeder for Your Garden?
As the name suggests, this project leverages the humble terra cotta pot – a staple in many gardening sheds. But don’t be fooled into thinking these versatile items are only for planting! Terra cotta offers a wealth of creative opportunities, from crafting an easy terra cotta fountain to building intricate garden sculptures. It’s all about unleashing your creativity and seeing beyond the conventional uses.
Terra cotta is an excellent material for a bird feeder for several compelling reasons. Firstly, its natural, earthy tone blends seamlessly with any garden landscape, providing an aesthetic that feels organic and timeless. Unlike plastic, terra cotta is heavy and stable, making the feeder less prone to tipping over in windy conditions. It’s also remarkably durable and weather-resistant, able to withstand the elements year after year, offering a long-lasting solution for feeding your feathered friends. Furthermore, terra cotta is porous, which helps to keep bird seed dry by absorbing excess moisture, preventing mold and spoilage. This natural ventilation is a huge advantage over non-porous materials that can trap humidity.
Crafting this bird feeder requires only a short amount of your time and a minimal investment, making it an ideal weekend project. While the actual assembly is quick, remember that an essential preparatory step involves soaking the terra cotta components overnight. This crucial process is often overlooked but plays a vital role in ensuring a smooth drilling experience and preventing potential cracking. We’ll delve into the specifics of this and other tips to guarantee your project’s success.
Attracting Feathered Friends: The Benefits of a Garden Bird Feeder
Installing a bird feeder in your garden is more than just a decorative choice; it’s an investment in your local ecosystem and your personal well-being. Attracting birds to your yard offers numerous benefits:
- Natural Pest Control: Many birds feed on insects, slugs, and snails, providing a natural and eco-friendly way to manage garden pests without resorting to harmful chemicals.
- Pollination: Nectar-feeding birds like hummingbirds contribute to the pollination of flowers and plants, supporting biodiversity.
- Weed Control: Some bird species consume weed seeds, helping to keep unwanted plants from sprouting in your garden beds.
- Stress Reduction: The simple act of watching birds feed and interact can be incredibly calming and meditative, reducing stress and enhancing mental well-being.
- Educational Opportunity: Bird feeders offer a fantastic educational opportunity for children and adults alike to learn about different bird species, their behaviors, and local ecology.
- Aesthetic Appeal: The vibrant colors and lively movements of birds add dynamic beauty and a sense of vitality to any garden space.
- Conservation: Providing food, especially during harsh winter months or breeding seasons, can be vital for the survival of many bird populations, contributing to local wildlife conservation efforts.
Essential Materials for Your DIY Terra Cotta Bird Feeder
Gathering all your materials before you begin will ensure a seamless crafting experience. Most of these items are readily available at hardware stores, garden centers, or craft shops. Pay close attention to the sizing notes to ensure proper fit and function for your feeder.
- Terra Cotta Orchid Pot: Choose one with good drainage holes, as this will form the central body of your feeder where the seed will be dispensed. An orchid pot typically has more holes, which can be advantageous for this design.
- Two Terra Cotta Saucers (in two different sizes): You will need one larger saucer for the seed tray and one smaller saucer that will serve as the roof.
- Note on Saucer Sizing: It’s crucial that the *smaller* saucer (for the roof) is larger in diameter than the *pot* itself. This ensures the roof provides adequate coverage and protection for the bird seed from rain and direct sun. The larger saucer (for the base) should be wide enough to comfortably hold a good quantity of bird seed.
- Masking Tape: Used to mark drilling spots and, more importantly, to help prevent chipping or cracking when drilling through the terra cotta.
- Container: A bucket or basin large enough to submerge your terra cotta saucers for soaking.
- Water: For soaking the terra cotta components.
- E6000 Adhesive (or similar strong, waterproof epoxy): A robust, waterproof adhesive is essential for securely bonding the pot to the bottom saucer. Ensure it’s suitable for outdoor use and can bond ceramic/terra cotta.
- Drill: A power drill is needed for making holes in the terra cotta saucers. Make sure you have appropriate drill bits for ceramic or masonry.
- 12-inch Threaded Rod: This is the central support structure that holds all the components together. The length can be adjusted based on desired feeder height, but 12 inches is a good starting point.
- Nut (standard hex nut): To secure the bottom of the threaded rod assembly.
- Washers: Several washers will be needed to provide a stable surface for tightening nuts and protecting the terra cotta from direct pressure.
- Bolt and Nuts (for initial assembly, then superseded by other hardware): The original instructions mention “bolt and nuts” but the steps clarify the use of specific nuts and a threaded rod system. Focus on the nuts and washers listed with the threaded rod.
- Decorative Finial: This optional but highly recommended element adds a beautiful, finished look to the bottom of your feeder. Choose one that fits the threaded rod.
- Wing Nut: Used to secure the top saucer (roof) in place. Its design allows for easy tightening by hand.
- Coupling Nut: Connects the eye bolt to the top of the threaded rod.
- Eye Bolt: This crucial piece allows you to hang your finished bird feeder. Ensure it’s sturdy enough to bear the weight of the feeder and birds.
- Marker: For accurately marking drilling points.
Step-by-Step Guide: How to Make Your Terra Cotta Bird Feeder
Follow these detailed instructions carefully to construct a beautiful and functional bird feeder that will be the envy of your feathered friends and garden visitors alike.
Step 1: Preparing Your Terra Cotta – The Overnight Soak
This initial step is critical for preventing damage during drilling. Submerge both terra cotta saucers completely in a container filled with water. Allow them to soak overnight, or for at least 8-12 hours. This process hydrates the porous terra cotta, making it less brittle and significantly reducing the risk of cracking or chipping when you introduce the drill bit. The water also helps to keep the drill bit cool, extending its life and making for a cleaner cut.
Step 2: Precise Marking and Protective Taping
After soaking, remove the saucers from the water and gently pat them dry. Using your marker, carefully locate and mark the exact center of each saucer. Precision here ensures your feeder will be balanced. Once marked, place a piece of masking tape directly over each marked spot on both sides of the saucer. The tape serves a dual purpose: it provides a stable surface for the drill bit to start, preventing it from skidding, and it acts as a barrier to minimize surface chipping and cracking as the drill bit passes through the material.
Step 3: Drilling Holes with Care
With your saucers marked and taped, it’s time to drill. Secure each saucer firmly to a stable work surface (using clamps if possible) to prevent movement. Using your power drill fitted with a ceramic or masonry drill bit, carefully drill a hole through the center of each saucer where you marked and taped. Start with a slow speed and apply gentle, consistent pressure. It’s often helpful to keep a small spray bottle of water nearby to periodically mist the drilling area; this further cools the bit and reduces dust. Drill slowly and steadily until the bit passes completely through the terra cotta, creating a clean, central hole in both saucers.
Step 4: Assembling the Base Structure – Pot to Saucer Adhesion
Take the larger of the two saucers and place it right side up; this will be the base and seed tray of your feeder. Apply a generous amount of E6000 adhesive (or your chosen waterproof epoxy) to the bottom rim of the terra cotta orchid pot. Carefully center the orchid pot onto the middle of the larger saucer, ensuring that the drainage hole of the pot aligns perfectly with the drilled hole in the saucer. Press firmly and allow the adhesive to cure completely according to the manufacturer’s instructions. This usually takes several hours, so plan for adequate drying time to ensure a strong, lasting bond.
Step 5: Securing the Central Rod and Bottom Finial
Now, let’s build the central support. Take your 12-inch threaded rod. Thread a standard hex nut onto the rod, working it almost to the very bottom, but leaving a small gap. Next, slide a washer onto the rod, followed by the glued-together orchid pot and larger saucer assembly. Ensure the threaded rod passes through the aligned holes. On the other end of the rod (which will be the bottom of your feeder), add another washer and then thread on your decorative finial. Finally, tighten the initial lock nut (the one you placed almost at the bottom of the rod) securely against the top of the finial. This creates a stable anchor for the entire structure.
Step 6: Creating the Protective Roof
Take the smaller saucer (which is destined to be the roof) and invert it, placing it upside down on top of the orchid pot assembly. The threaded rod should pass through its central hole. Slide a washer down the rod, resting it on the inverted saucer. Follow this with a wing nut. Tighten the wing nut firmly against the washer and the saucer. This securely holds the “roof” in place, protecting the bird seed inside the pot and on the larger saucer from rain, snow, and direct sunlight, keeping it fresh for your avian visitors.
Step 7: Finalizing for Suspension – The Hanging Mechanism
To complete your feeder, you need a way to hang it. On the very top of the threaded rod (above the wing nut), thread a coupling nut. Secure it about halfway onto the remaining exposed end of the threaded rod. Next, screw the eye bolt into the open end of the coupling nut. Ensure both the coupling nut and the eye bolt are tightened securely to create a robust hanging point. With the eye bolt in place, your DIY Terra Cotta Bird Feeder is ready to be hung! Choose a sturdy branch, a decorative garden bracket, or a dedicated bird feeder pole in your garden to display your beautiful creation.
Tips for Success and Enjoyment
- Placement is Key: Hang your feeder in a location that is easily visible from your home but also provides nearby cover (like trees or shrubs) for birds to feel safe from predators. Ensure it’s out of reach of squirrels and other critters if possible.
- Regular Cleaning: To prevent the spread of disease among birds, clean your feeder regularly. Disassemble it (if possible) and wash all parts with a mild soap and water solution, followed by a diluted bleach solution (1 part bleach to 9 parts water) to disinfect. Rinse thoroughly and allow to dry completely before refilling.
- Choose the Right Seed: Offer a variety of seeds to attract different bird species. Black oil sunflower seeds are a universal favorite. Avoid cheap mixes with a lot of filler seeds like milo, which birds often just discard.
- Patience is a Virtue: It might take a few days or even weeks for birds to discover and get used to your new feeder. Be patient, keep it filled, and they will eventually come!
- Customization: Consider painting your terra cotta components with non-toxic, outdoor-safe paints before assembly for a personalized touch. Earthy tones or bright colors can both look stunning.
Your DIY Terra Cotta Bird Feeder: A Rewarding Garden Project
There’s immense satisfaction in watching birds flock to a feeder you’ve crafted with your own hands. This DIY Terra Cotta Bird Feeder project is not just about making an object; it’s about creating a living, breathing connection with nature in your own backyard. It’s a testament to the beauty of repurposing, the joy of simple craftsmanship, and the profound pleasure of attracting and observing the vibrant life that surrounds us.
So, gather your materials, follow these detailed steps, and embark on a delightful journey to enhance your garden with this charming and practical creation. Get ready to enjoy countless moments of birdwatching, bringing a peaceful and lively ambiance to your outdoor sanctuary!