
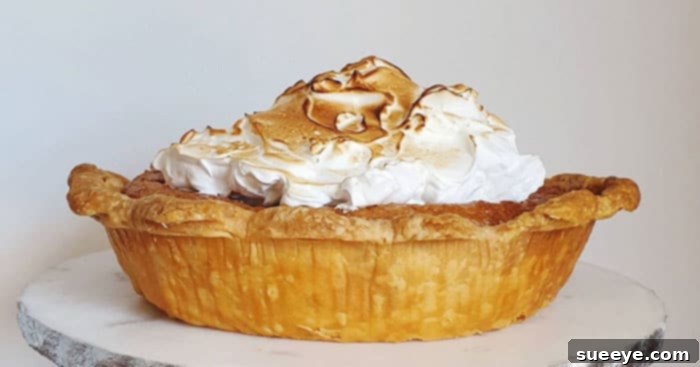
Indulge in the Timeless Delight: The Ultimate Homemade Butterscotch Meringue Pie Recipe
There’s something truly magical about a homemade pie, and this butterscotch meringue pie is no exception. With its lusciously creamy filling, rich butterscotch flavor, and a cloud-like meringue topping, it’s a dessert that promises to captivate your taste buds and leave everyone asking for seconds. Forget complicated recipes and endless hours in the kitchen; this pie, inspired by the wonderful culinary insights from Whippoorwill Holler, is designed to be accessible, enjoyable to make, and utterly irresistible. Whether you’re a seasoned baker or just starting your journey into the world of pies – perhaps you’ve explored banana cream or strawberry cream pies – this butterscotch creation will quickly become a cherished favorite. Its light texture, perfectly balanced sweetness, and delicate meringue crown make it a showstopper for any occasion.
Why Butterscotch Pie is a Must-Try
Butterscotch, a classic flavor often associated with warmth and comfort, perfectly embodies the essence of a comforting dessert. Unlike caramel, which typically relies on granulated sugar, butterscotch gets its distinctive deep, rich flavor from brown sugar and butter, creating a nuanced sweetness with hints of molasses. When combined into a smooth, thick custard and encased in a flaky pie crust, it becomes an experience that transcends mere sweetness. The addition of a airy, golden-brown meringue topping not only adds visual appeal but also introduces a delightful textural contrast, making each bite a symphony of creamy, crunchy, and sweet. This recipe truly simplifies the process, ensuring you can achieve bakery-quality results right in your own kitchen with ingredients you likely already have on hand.
Essential Ingredients for Your Irresistible Butterscotch Pie
Crafting the perfect butterscotch pie begins with a selection of common, yet crucial, ingredients. The beauty of this recipe lies in its simplicity and the readily available nature of its components. Here’s a detailed look at what you’ll need to create both the decadent butterscotch filling and the ethereal meringue topping:
- Brown Sugar: The star of the butterscotch flavor, providing deep molasses notes and a rich hue.
- Cornstarch: Acts as the primary thickening agent for the custard, ensuring a smooth, firm set.
- Salt: A pinch of salt is vital to balance the sweetness and enhance the overall flavor profile of the pie.
- Milk: Forms the liquid base of the custard, contributing to its creamy texture. Whole milk is recommended for richer results.
- Heavy Cream: Adds an extra layer of richness and velvety smoothness to the butterscotch filling.
- Butter: Essential for that signature buttery flavor and contributes to the luxurious mouthfeel of the custard.
- Vanilla Extract: A splash of vanilla rounds out the flavors beautifully, adding warmth and complexity.
- Egg Yolks: Provide richness, color, and additional thickening to the filling, creating a classic custard consistency.
- Pie Crust: A pre-baked 9-inch pie crust is recommended for convenience. You can use store-bought or your favorite homemade recipe.
- Egg Whites: The foundation of your light and fluffy meringue topping. Ensure they are completely free of any yolk.
- Granulated Sugar: Sweetens and stabilizes the meringue, giving it structure and a glossy finish.
- Cream of Tartar: A crucial ingredient for meringue, cream of tartar helps stabilize the egg whites, allowing them to whip up to greater volume and maintain their structure without weeping.
For precise measurements of each ingredient, please refer to the original video description box from Whippoorwill Holler, linked below, to ensure the perfect balance for your pie.
Step-by-Step Directions to Bake Your Dream Butterscotch Pie
Creating this magnificent butterscotch pie is a straightforward process, broken down into easy-to-follow steps. Pay close attention to the details, especially regarding consistency, to ensure a perfect pie every time.
Step One: Crafting the Creamy Butterscotch Filling
Begin by preparing the luscious butterscotch custard. In a medium-sized, heavy-bottomed saucepan, combine the brown sugar, cornstarch, and a half teaspoon of salt. Whisk these dry ingredients together thoroughly to eliminate any lumps of cornstarch. Gradually pour in the milk and heavy cream, whisking continuously until smooth. Finally, add the egg yolks, whisking them in until fully incorporated. Place the saucepan over medium-high heat on your stove.
Stir the mixture constantly with a whisk or a heat-proof spatula. As the mixture heats, it will begin to thicken. This is a critical stage; you want to ensure it cooks evenly and doesn’t scorch at the bottom. Bring the mixture to a gentle boil, continuing to stir for about 1-2 minutes. The consistency should resemble a thick pudding. Once it reaches this stage, reduce the heat to medium-low and continue to stir for another minute or two, ensuring it’s well-cooked and robustly thick before proceeding. This step is crucial for the pie to set properly.
Image by Whippoorwill Holler via YouTube video.
Step Two: Incorporating the Butter and Vanilla
Once your butterscotch custard has reached the desired thick consistency (it should cling to the back of a spoon and hold its shape slightly), remove it from the heat. This is the moment to add the butter and vanilla extract. Stir vigorously until the butter is completely melted and smoothly incorporated into the hot custard. The butter adds richness and a silken texture, while the vanilla enhances the overall aroma and flavor. Ensure the custard is thick enough before adding the butter; if it’s too thin, the pie might not set correctly, resulting in a runny filling.
Pour the warm butterscotch filling into your pre-baked pie crust. Using a spatula, spread it evenly across the bottom. Allow the pie filling to cool slightly at room temperature before refrigerating it. While the pie cools, you can begin preparing the meringue.
Step Three: Preparing the Meringue – The Frothy Stage
Now it’s time to create the show-stopping meringue topping. In a clean, dry stand mixer bowl (or a large bowl if using a hand mixer), add four large egg whites. It is crucial that there is absolutely no trace of egg yolk, grease, or water in the bowl or on your beaters, as these can prevent the egg whites from whipping properly. Begin whipping the egg whites on medium-high speed. Continue to beat until they become frothy and foamy, similar to the head on a beer. At this point, add 1/8th of a teaspoon of cream of tartar. Cream of tartar is an acidic salt that helps stabilize the egg whites, allowing them to reach greater volume and a firmer structure.
Image by Whippoorwill Holler via YouTube video.
Step Four: Achieving Soft Peaks and Incorporating Sugar
Continue whipping the egg whites and cream of tartar mixture. The frothy texture will gradually transform into soft, billowy peaks. This stage is known as “soft peak” – when you lift the whisk, the peaks will stand up but curl over at the tip. Once you reach the soft peak stage, gradually add the granulated sugar, one tablespoon at a time, while the mixer is still running. Continue to whip the meringue on high speed. The sugar will dissolve into the egg whites, creating a glossy, thick, and stable meringue. Keep beating until you achieve stiff, glossy peaks that hold their shape firmly when the whisk is lifted.
The meringue should be thick but still creamy and smooth, not grainy. It should look bright white and have a beautiful sheen. Be careful not to over-beat, as this can cause the meringue to become dry and crumbly.
Step Five: Topping and Baking Your Meringue Pie
Carefully spoon the prepared meringue onto the cooled butterscotch filling in the pie crust. Use a spatula to spread the meringue evenly, making sure to seal the edges of the meringue to the pie crust all around the perimeter. This sealing technique is important to prevent the meringue from shrinking or “weeping” during baking. You can create decorative swirls or peaks with your spatula for an appealing finish.
Preheat your oven to 400 degrees Fahrenheit (200 degrees Celsius). Place the pie into the preheated oven and bake for approximately 8-12 minutes, or until the meringue turns a beautiful golden brown color on the peaks and edges. Keep a close eye on it, as meringue can brown quickly. Once the meringue is perfectly golden and lightly toasted, remove the pie from the oven.
Step Six: Cooling and Serving
Allow the butterscotch meringue pie to cool completely at room temperature for at least 2-3 hours. Then, transfer it to the refrigerator and chill for at least 4 hours, or preferably overnight, before slicing and serving. Chilling is essential for the filling to fully set and for the flavors to meld beautifully. Serve chilled slices of this divine butterscotch pie and watch it disappear!
Tips for the Perfect Butterscotch Meringue Pie
- Perfectly Cooked Custard: Don’t rush the custard cooking process. Stir constantly and ensure it reaches a thick, pudding-like consistency. This is crucial for the pie to set.
- Spotless Meringue Bowl: Any fat or grease (even a tiny speck of egg yolk) will prevent egg whites from whipping properly. Ensure your bowl and beaters are impeccably clean and dry.
- Gradual Sugar Addition: When making meringue, add sugar slowly. This allows the sugar to dissolve completely, resulting in a stable, glossy meringue without a grainy texture.
- Seal the Meringue: Always spread the meringue right to the edges of the pie crust and press it gently to create a seal. This helps prevent “weeping,” where moisture seeps out from under the meringue during baking.
- Chilling Time is Key: Patience is a virtue with custard pies. Allow ample cooling and chilling time for the filling to set and the flavors to fully develop.
Serving Suggestions and Storage
This butterscotch meringue pie is a showstopper all on its own, but you can elevate the experience further. Serve it with a dollop of extra whipped cream, a sprinkle of sea salt flakes to enhance the butterscotch, or a drizzle of homemade caramel sauce for an extra touch of decadence. It’s the perfect dessert for family gatherings, holidays, or simply as a comforting treat on a cozy evening.
To store any leftover pie, cover it loosely with plastic wrap and refrigerate. The pie is best enjoyed within 2-3 days. While meringue pies are generally best on the day they are made due to the meringue’s delicate nature, proper refrigeration will help maintain its freshness.
Easy Butterscotch Pie Recipe: A Sweet Conclusion
There you have it – a comprehensive guide to creating a truly unforgettable butterscotch meringue pie. This recipe, perfected with simple steps and readily available ingredients, proves that creating an extraordinary dessert doesn’t have to be daunting. The rich, creamy butterscotch filling combined with a light, airy, and perfectly toasted meringue topping offers a symphony of flavors and textures that will undoubtedly impress anyone who takes a bite. So, roll up your sleeves, gather your ingredients, and prepare to bake a pie that will earn you rave reviews. Enjoy the process, and savor every single decadent slice of your homemade butterscotch masterpiece!