
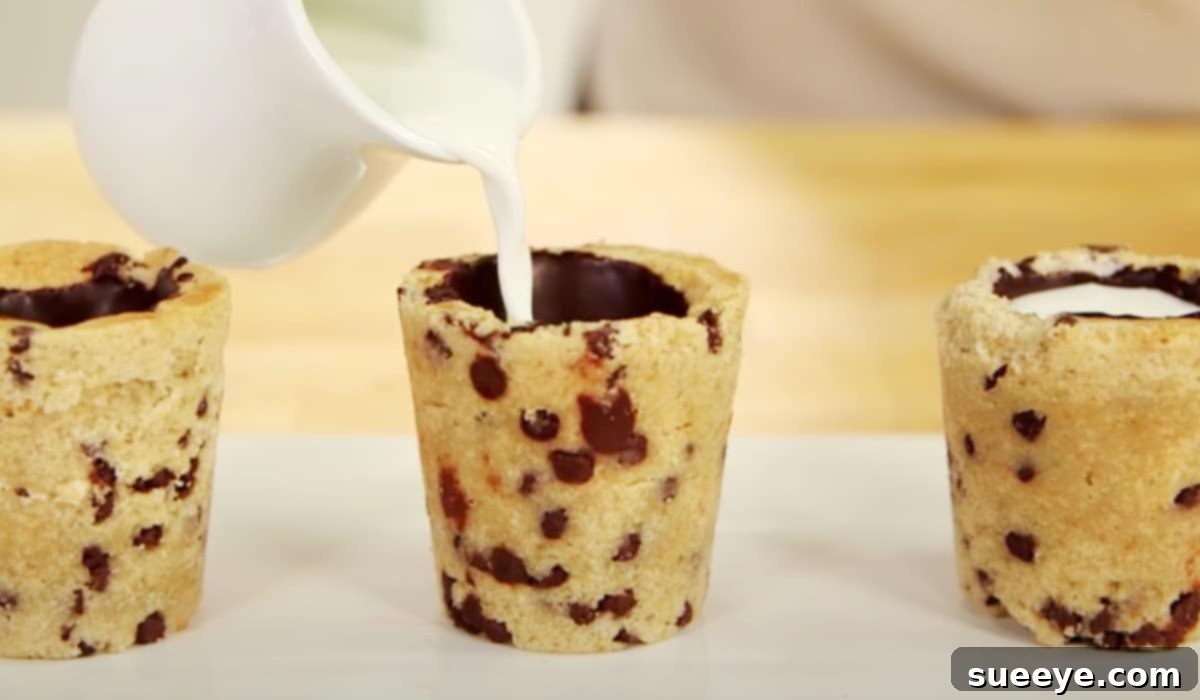
Indulge in Homemade Chocolate Chip Cookie Shots: A Fun and Delicious Recipe
Who can resist the classic comfort of a warm chocolate chip cookie? Now, imagine that joy transformed into an edible shot glass, perfect for holding a sweet milky “nectar” or your favorite dessert filling. That’s the magic of chocolate chip cookie shots! Inspired by an incredibly creative recipe from Popsugar on YouTube, this guide will walk you through crafting these delightful treats that are sure to be the highlight of any gathering. Whether you’re a seasoned baker or a kitchen novice, this recipe is designed to be straightforward and immensely rewarding. Get ready to bake, fill, and sip your way to pure dessert bliss!
Why You’ll Love These Chocolate Chip Cookie Shots
Chocolate chip cookie shots aren’t just a dessert; they’re an experience. Here’s why they’ll become your new favorite treat:
- Unique Presentation: Forget traditional cookies on a plate! These edible shot glasses add a novel and exciting touch to any party or family meal. They’re a guaranteed conversation starter.
- Irresistibly Delicious: Combining the chewy, chocolatey goodness of a homemade cookie with a creamy filling creates a symphony of flavors and textures in every bite and sip.
- Fun for All Ages: Kids will adore the concept of drinking milk from a cookie, while adults can enjoy them with milk, coffee, or even a shot of their favorite liqueur for a grown-up twist.
- Surprisingly Simple: While they look impressive, the process is quite manageable, especially with our detailed step-by-step instructions. You can even use store-bought cookie dough for a quicker shortcut!
- Customizable: Easily adapt the cookie flavor, chocolate coating, and filling to suit your preferences and occasion. The possibilities are endless!
Ingredients for Irresistible Cookie Shots
Crafting the perfect chocolate chip cookie shot involves two main components: the delectable cookie cup and the rich chocolate coating that seals it, followed by your chosen filling. Here’s what you’ll need:
For the Chocolate Chip Cookie Dough:
- 1 cup of shortening: This is key for creating a tender, stable cookie cup that holds its shape well. Shortening provides a crispier edge and a softer interior, perfect for shot glasses.
- 1/3 cup of white sugar: Adds sweetness and helps with browning.
- 1/2 cup of brown sugar: Contributes moisture, a chewy texture, and a deeper, caramel-like flavor that complements the chocolate chips beautifully.
- 1 large egg yolk: Provides richness and acts as a binding agent, ensuring the dough comes together smoothly. Using just the yolk adds tenderness without making the cookie too cakey.
- 2 teaspoons of vanilla extract: A staple in almost any cookie recipe, vanilla enhances all the other flavors.
- 2 cups of all-purpose flour (sifted): Sifting the flour removes lumps and ensures a light, airy texture for your cookies. It’s the structural backbone of your cookie cups.
- 1/2 teaspoon of salt: Balances the sweetness and brings out the flavor of the chocolate. Don’t skip it!
- 1 cup of mini chocolate chips: Mini chips are ideal for cookie shots as they distribute evenly in the smaller mold and melt beautifully without creating large gaps.
For the Chocolate Coating and Filling:
- 1 cup of dark chocolate candy melts: These are specifically designed for easy melting and setting, providing a strong, smooth, and delicious barrier inside your cookie cups. They are crucial for waterproofing the cookie shot.
- 1 & 1/2 cups of milk: The classic “nectar” to fill your cookie shots. Any type of milk (dairy or non-dairy) works perfectly.
- 1 & 1/2 teaspoons of vanilla extract: Added to the milk for a touch of fragrant sweetness, enhancing the overall flavor experience.
Essential Equipment for Baking Cookie Shots
Having the right tools makes all the difference in ensuring your cookie shots turn out perfectly. Here’s a list of what you’ll need:
- Cookie Shot Molds: These are specialized molds designed to create the shot glass shape. They typically come in silicone or metal. If you don’t have them, consider improvising with small, oven-safe shot glasses or even inverted muffin tins (though the shape won’t be as precise).
- Large Mixing Bowl: For combining your cookie dough ingredients.
- Electric Mixer (Stand or Handheld): While you can mix by hand, an electric mixer makes creaming the shortening and sugars much easier and ensures an even consistency.
- Spatula or Wooden Spoon: For scraping down the sides of the bowl and folding in ingredients.
- Measuring Cups and Spoons: For accurate ingredient measurement.
- Baking Sheet: To place your cookie molds on before baking.
- Wire Cooling Rack: For cooling your baked cookie cups.
- Small Microwave-Safe Bowl or Double Boiler: For melting the chocolate candy melts.
- Pastry Brush or Small Spoon: For spreading the melted chocolate evenly inside the cookie cups.
Step-by-Step Directions for Making Chocolate Chip Cookie Shots
Follow these detailed steps to create your own batch of delightful cookie shots. Precision and patience are your best friends here!
Step 1: Prepare the Cookie Dough
- Cream the Fats and Sugars: In your large mixing bowl, combine the 1 cup of shortening, 1/3 cup of white sugar, and 1/2 cup of brown sugar. Using an electric mixer, beat on medium speed until the mixture is light, fluffy, and well combined. This usually takes about 2-3 minutes.
- Add Wet Ingredients: Incorporate the large egg yolk and 2 teaspoons of vanilla extract into the creamed mixture. Beat again until everything is fully blended.
- Combine Dry Ingredients: In a separate bowl, whisk together the 2 cups of sifted all-purpose flour and 1/2 teaspoon of salt. Gradually add this dry mixture to your wet ingredients, mixing on low speed until just combined. Be careful not to overmix, as this can lead to tough cookies.
- Fold in Chocolate Chips: Gently fold in the 1 cup of mini chocolate chips using a spatula or wooden spoon until they are evenly distributed throughout the dough.
- Chill the Dough (Optional but Recommended): For best results and easier handling, wrap the cookie dough in plastic wrap and refrigerate for at least 30 minutes. Chilling helps the dough firm up, preventing the cookie cups from spreading too much during baking.
Step 2: Form and Bake the Cookie Cups
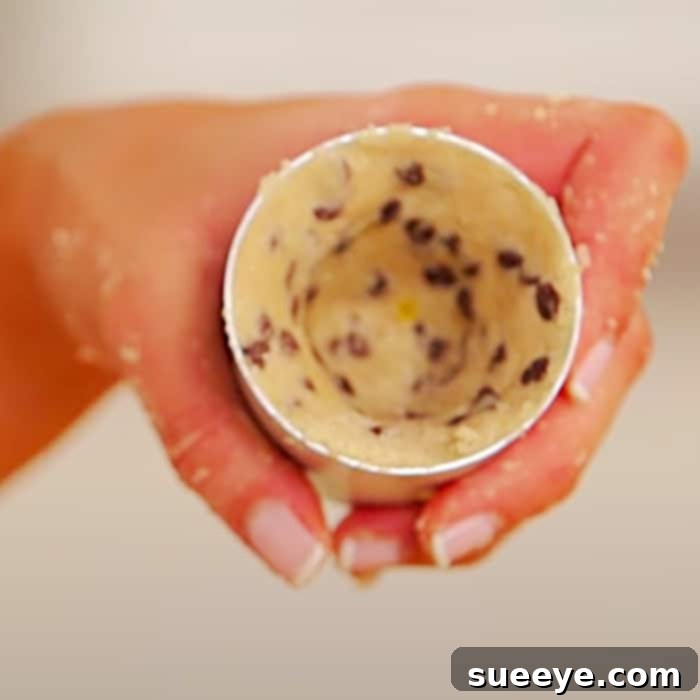
- Preheat Oven and Prepare Molds: Preheat your oven to 350°F (175°C). Lightly grease your cookie shot molds (if not non-stick) to ensure easy removal after baking.
- Mold the Dough: Take small portions of cookie dough and press them firmly into each cavity of your cookie shot molds. Make sure the dough is evenly distributed and covers the bottom and sides without being too thick or too thin. Leave a small well in the center for your filling. The goal is a uniform thickness for even baking.
- Bake the Cookie Cups: Place the filled molds on a baking sheet. Bake for 20 to 30 minutes, or until the edges are golden brown and the cookies are set. Baking time may vary depending on your oven and mold material.
- Cool the Cookies: Once baked, remove the molds from the oven. Let the cookie cups cool in the molds for about 10-15 minutes before carefully removing them. If they stick, gently loosen the edges with a knife. Transfer the cooled cookie cups to a wire rack to cool completely. This is crucial before the next step.
Step 3: Coat the Inside with Chocolate
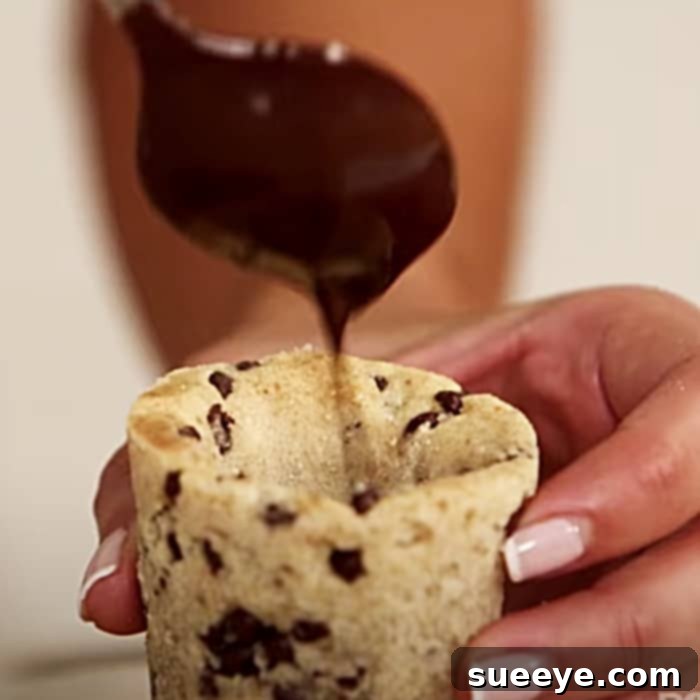
- Melt the Dark Chocolate: Place the dark chocolate candy melts in a microwave-safe bowl. Microwave in 30-second intervals, stirring well after each, until the chocolate is smooth and fully melted. Alternatively, use a double boiler on the stovetop for a more controlled melt.
- Coat the Cookie Cups: Once the cookie cups are completely cool, use a small pastry brush or spoon to spread a generous layer of melted dark chocolate inside each cookie cup. Ensure the entire inner surface is coated, creating a waterproof barrier. This step is essential to prevent your filling from soaking into the cookie and making it soggy.
- Chill to Set: Place the chocolate-coated cookie cups back on the wire rack or a baking sheet lined with parchment paper. Refrigerate for at least 15-20 minutes, or until the chocolate is completely set and hardened.
Step 4: Prepare the “Nectar” and Serve!
- Prepare the Filling: In a small pitcher or bowl, combine the 1 & 1/2 cups of milk with 1 & 1/2 teaspoons of vanilla extract. Stir gently.
- Fill and Enjoy: Just before serving, carefully pour the vanilla milk into your chocolate-lined cookie shots. Serve immediately and savor the delightful combination of chewy cookie, rich chocolate, and creamy milk. So yummy!
Tips for Perfect Chocolate Chip Cookie Shots
To ensure your cookie shots are a roaring success, keep these expert tips in mind:
- Don’t Overmix the Dough: Overmixing develops gluten, leading to tough cookies. Mix just until ingredients are combined.
- Chill the Dough: This prevents the cookies from spreading too much in the oven, helping them maintain their shot glass shape.
- Grease Molds Properly: Even with non-stick molds, a light greasing can prevent breakage when removing the delicate cookie cups.
- Don’t Overbake: Overbaked cookies will be dry and brittle, making them prone to cracking. Remove them from the oven when the edges are golden, even if the center still looks slightly soft. They will continue to set as they cool.
- Ensure Cookies Are Completely Cool: Before coating with chocolate, the cookie cups must be fully cooled. Warm cookies will cause the chocolate to melt and run, creating a messy situation.
- Even Chocolate Coating: A consistent and complete layer of chocolate inside is vital for waterproofing. Ensure there are no gaps or thin spots.
- Use Quality Candy Melts: Candy melts are formulated to set quickly and firmly, making them superior to regular chocolate chips for this application, which can be too soft.
- Serve Immediately After Filling: While the chocolate coating provides a good barrier, cookie shots are best enjoyed right after they are filled to prevent any potential sogginess.
Variations and Customizations
The beauty of cookie shots is their versatility! Once you master the basic recipe, feel free to experiment with these exciting variations:
- Cookie Flavors:
- Peanut Butter: Add 1/2 cup of creamy peanut butter to the dough.
- Oatmeal Raisin: Replace 1/2 cup of flour with rolled oats and add raisins.
- Red Velvet: Add cocoa powder and red food coloring to the dough.
- Spice Cookies: Incorporate cinnamon, nutmeg, and ginger for a festive twist.
- Chocolate Coating:
- White Chocolate: Use white chocolate candy melts for a contrasting look and flavor.
- Milk Chocolate: For a sweeter, creamier interior.
- Flavored Chocolate: Explore mint chocolate, orange chocolate, or strawberry-flavored melts.
- Sprinkles: Add sprinkles to the wet chocolate coating for extra festivity.
- Filling Ideas:
- Flavored Milks: Chocolate milk, strawberry milk, or even eggnog for holidays.
- Coffee or Espresso: For an adult treat or a fun coffee break.
- Liqueurs (for adults): Baileys Irish Cream, Kahlúa, or a hazelnut liqueur for a decadent dessert cocktail.
- Hot Chocolate: Mini hot chocolate servings, especially appealing during colder months.
- Mousses or Puddings: Fill with a light chocolate mousse, vanilla pudding, or fruit compote.
- Mini Scoops of Ice Cream: Perfect for a summer treat, just serve immediately!
Serving and Storage Suggestions
These cookie shots are best enjoyed fresh, but here’s how to handle them:
- Serving: Present them upright on a tray. You can pre-fill them just before guests arrive or offer a “filling station” where guests can choose their preferred milk or other beverage. They are fantastic for birthday parties, holiday gatherings, potlucks, or even a cozy movie night at home.
- Storage (Unfilled): Empty, chocolate-lined cookie cups can be stored in an airtight container at room temperature for up to 3-4 days, or in the refrigerator for up to a week. If stacking, place parchment paper between layers to prevent sticking.
- Storage (Filled): Once filled, cookie shots should be consumed immediately. The moisture from the filling will eventually soften the cookie, even with the chocolate barrier. They are not suitable for make-ahead storage once filled.
Frequently Asked Questions (FAQs)
Here are answers to some common questions about making chocolate chip cookie shots:
Q: Can I use store-bought cookie dough?
A: Absolutely! Using pre-made cookie dough is a fantastic shortcut if you’re short on time. Just ensure it’s a sturdy dough that will hold its shape when pressed into the molds. You might need to adjust baking times slightly as per package instructions.
Q: What if I don’t have cookie shot molds?
A: You can try improvising with small, oven-safe shot glasses or mini muffin tins. For shot glasses, invert them and mold the dough around the outside. For muffin tins, press dough into the cavity and then use a smaller object (like the back of a small spice jar) to create the well in the center. The shape might not be as perfect, but it will still be delicious!
Q: Why did my cookie shots crack or break when I removed them from the mold?
A: This can happen for a few reasons:
- Overbaking: If they’re too dry, they become brittle.
- Not cooling enough in the mold: Allow them to firm up slightly before attempting removal.
- Not greasing the mold properly: Even silicone molds can benefit from a light spray.
- Dough consistency: If the dough was too sticky or too dry to begin with.
Gently twist and pull to remove them, don’t force it.
Q: How can I make these gluten-free or vegan?
A: For gluten-free, substitute all-purpose flour with a 1:1 gluten-free baking flour blend. For vegan, replace shortening with a vegan butter alternative or more plant-based shortening, swap the egg yolk for a flax egg (1 tbsp ground flaxseed + 3 tbsp water, let sit for 5 mins), and ensure your chocolate chips and candy melts are dairy-free. Use plant-based milk for filling.
Q: Can I make these ahead of time?
A: Yes, you can prepare the cookie cups (baked and chocolate-lined) several days in advance and store them as described in the “Storage” section. However, only fill them just before you plan to serve them.
Conclusion: Your Next Dessert Adventure Awaits!
These chocolate chip cookie shots are more than just a recipe; they’re an invitation to bring a touch of playful creativity and delicious innovation to your kitchen. Inspired by the brilliant concept from Popsugar, this guide empowers you to craft edible delights that are as fun to make as they are to eat. Whether you’re hosting a festive gathering, celebrating a special occasion, or simply indulging in a unique treat, these cookie shots are guaranteed to impress. So, gather your ingredients, follow our detailed steps, and get ready to experience the joy of baking and sharing these absolutely charming and utterly delicious chocolate chip cookie shots with everyone you love. Happy baking!