
Irresistible Cheese & Sausage Breakfast Sliders: Your Ultimate Easy Breakfast Recipe
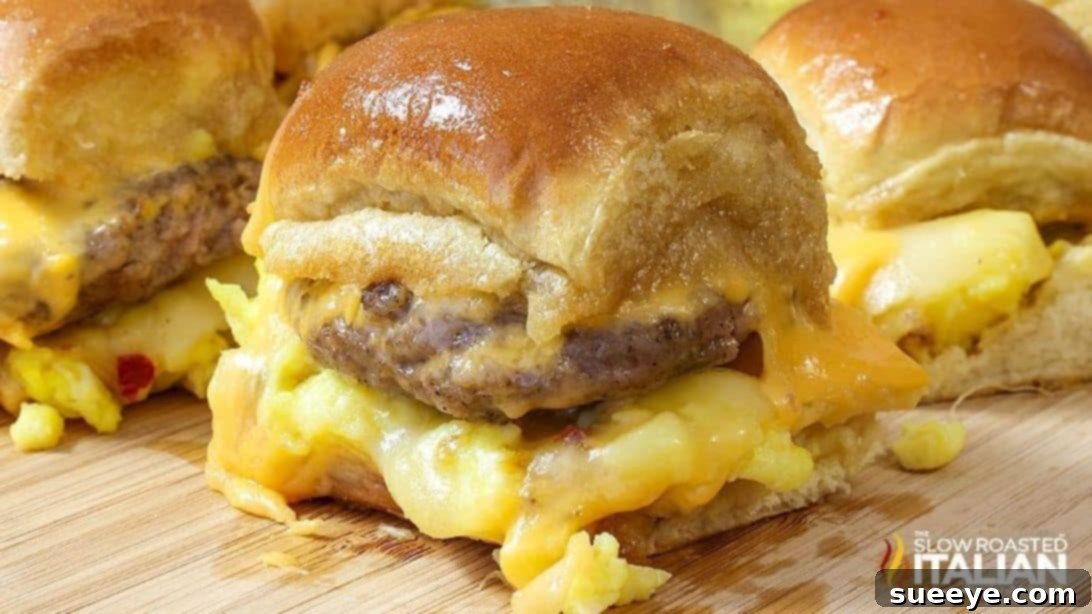
Kickstart your morning with a burst of flavor and energy! Breakfast is arguably the most crucial meal of the day, setting the tone for your entire schedule. To truly seize the day, you need a breakfast that’s not only satisfying but also incredibly delicious and, ideally, easy to prepare. Look no further than these mouth-watering Cheese and Sausage Breakfast Sliders, a fantastic recipe inspired by the culinary experts at The Slow Roasted Italian on YouTube. These sliders are an absolute game-changer, promising a delightful start for everyone, even the pickiest eaters in your household. Whether you’re feeding a crowd, planning a special brunch, or simply want a fuss-free yet gourmet-tasting breakfast, these sliders tick all the boxes. They’re packed with savory sausage, fluffy scrambled eggs, a duo of perfectly melted cheeses, all nestled in soft Hawaiian rolls, and glazed with a sweet and savory butter-maple syrup blend. Prepare to make these a regular on your breakfast menu – they’re that good!
Why These Breakfast Sliders Are a Game-Changer for Any Morning
Beyond their incredible taste, these cheese and sausage breakfast sliders offer a host of benefits that make them a preferred choice for countless households:
- Effortless Preparation: Despite their gourmet appeal and impressive presentation, these sliders are surprisingly simple to assemble. This makes them an ideal solution for busy weekday mornings or more leisurely weekend brunches when you want maximum flavor with minimum fuss.
- Unanimous Crowd-Pleaser: There’s something universally appealing about these savory and slightly sweet bites. From energetic kids to discerning adults, everyone loves the combination of soft buns, rich sausage, and melted cheese. They are perfectly suited for family gatherings, potlucks, tailgating breakfasts, or any event where you need to feed a happy crowd.
- Make-Ahead Friendly: One of their greatest advantages is their potential for meal prepping. You can assemble these sliders the night before, store them in the refrigerator, and simply pop them in the oven in the morning. This saves precious time when you need a delicious breakfast without the morning rush.
- Perfectly Portable & Convenient: Once baked and sliced, these individual sliders are easy to hold and eat, making them a superb grab-and-go option for busy schedules, commutes, or even packed lunches.
- Infinitely Customizable: The basic recipe serves as a fantastic foundation, but it’s incredibly flexible. Easily adapt the recipe to suit different tastes and dietary preferences, from incorporating various vegetables to experimenting with different cheese varieties or even alternative meats.
- Balanced Flavor Profile: The genius of this recipe lies in its balance. The sweet notes of the Hawaiian rolls and maple glaze beautifully complement the savory richness of the sausage, eggs, and cheeses, creating a truly harmonious taste experience.
Ingredients for Your Delicious Breakfast Sliders
Gathering your ingredients is the exciting first step towards creating these incredible breakfast sliders. We’ve chosen a blend of classic components, each playing a vital role in ensuring maximum flavor and universal appeal. The combination of sweet Hawaiian rolls, savory sausage, fluffy eggs, and a duo of perfectly melting cheeses creates a harmonious balance that’s simply hard to resist.
- 24 ounces (approx. 1.5 lbs) Ground Pork Sausage or 2 Breakfast Sausage Rolls, like Jimmy Dean: This is the savory heart of our sliders. Ground pork sausage offers a rich, robust flavor that truly defines a classic breakfast. If you opt for pre-made breakfast sausage rolls, they can save a little prep time. Choose a brand you trust for the best flavor; mild or spicy varieties both work wonderfully.
- 12 Hawaiian Buns, or other slider buns: The iconic King’s Hawaiian rolls are highly recommended for their distinct sweet, soft, and slightly chewy texture. Their interconnected structure also makes the assembly process incredibly easy, allowing you to slice and build the entire batch at once. Other soft dinner rolls or brioche slider buns can be used as alternatives.
- 8 Large Eggs, Scrambled: Fluffy, well-scrambled eggs add a light, protein-packed, and comforting layer to the sliders. We’ll be aiming for a soft, creamy scramble rather than dry or overcooked eggs, as they will continue to warm in the oven.
- 6 Slices Pepper Jack Cheese: This cheese brings a wonderful, subtle kick and fantastic meltability. Its creamy texture and mild spice add depth and excitement to the overall flavor profile without being overpowering.
- 8 Slices American Cheese: Renowned for its superior melting qualities, American cheese ensures a gooey, comforting layer that binds all the ingredients together beautifully. It melts smoothly and contributes a classic, mild creaminess.
- ½ cup (1 stick) Unsalted Butter, Melted: Butter forms the rich, golden base of our irresistible glaze. It adds incredible flavor, helps the rolls achieve a beautiful golden-brown crust, and prevents them from drying out during baking.
- ¼ cup Pure Maple Syrup: The maple syrup in the glaze is a key ingredient, providing that wonderful touch of sweetness and classic breakfast flavor that perfectly complements the savory elements. It caramelizes slightly on the buns, adding an extra layer of deliciousness.
Step-by-Step Directions: Crafting Your Perfect Breakfast Sliders
Follow these detailed instructions to create breakfast sliders that will impress everyone with their ease and deliciousness. Precision in each step ensures a perfect outcome, from perfectly cooked sausage to a golden, irresistible glaze.
Step 1: Prepare the Sausage and Buns for Assembly
- Preheat Your Oven: Begin by preheating your oven to 350°F (175°C). This ensures it’s perfectly warmed and ready to bake your sliders as soon as they’re assembled, allowing for even cooking and optimal cheese melting.
- Cook the Sausage Patties: Place a large skillet pan on your stove over medium heat and allow it to warm up for a few minutes. While the pan is heating, divide your 24 ounces of ground pork sausage into 12 equal portions. Gently shape each portion into a flat, round patty, ensuring they are slightly larger in diameter than your individual slider rolls. This accounts for any shrinkage during cooking and ensures they’ll provide full coverage on your buns.
- Sear for Flavor: Place the sausage patties onto the warm skillet. Cook them thoroughly, turning them once or twice, until they are golden brown on both sides and cooked all the way through, typically about 3-5 minutes per side depending on thickness. Once cooked, remove them from the pan and transfer them to a plate lined with paper towels to drain any excess grease. This step is crucial to prevent soggy buns.
- Prepare the Slider Buns: Take your Hawaiian buns (or preferred slider buns) and carefully slice them horizontally through the middle, creating a single top half and a single bottom half, without separating the individual rolls. A large serrated knife works best for a clean cut.
- Arrange the Bottom Layer: Gently place the entire bottom half of the connected buns into the bottom of a 9×13 inch (or similar size) baking dish. Set the top half aside for later.
Step 2: Assemble and Bake Your Sliders to Golden Perfection
- Add the Fluffy Eggs: Once the bottom layer of buns is securely in the baking dish, scoop your prepared scrambled eggs and spread them evenly over the entire surface of the bottom buns. Ensure every part gets a generous, consistent coating of fluffy eggs, providing a tender base for the other fillings.
- Layer the Cheeses and Sausage: Next, carefully arrange the 6 slices of pepper jack cheese over the scrambled eggs. Try to cover as much surface as possible. The subtle spice and fantastic melt will add a great dimension. Follow this with your cooked sausage patties, placing one patty on top of each roll, ensuring even distribution. Finally, lay the 8 slices of American cheese on top of the sausage patties. This layering technique ensures even melting and a harmonious blend of flavors in every bite.
- Crown with the Top Buns: Gently place the top half of the connected rolls back onto the assembled layers, creating a complete slider “sandwich.” Press down lightly to ensure everything is snugly fit.
- Prepare the Sweet & Savory Glaze: In a small bowl, whisk together the ½ cup of melted unsalted butter and ¼ cup of pure maple syrup until they are thoroughly combined. This creates a rich, sweet, and slightly savory glaze that will transform your sliders.
- Brush with Flavor: Using a pastry brush, generously brush the butter-maple syrup mixture all over the tops and sides of the assembled rolls. Don’t be shy; this glaze is key to the sliders’ irresistible golden-brown finish, tender texture, and signature sweet-savory flavor.
- Bake to Perfection: Carefully place the baking dish into your preheated oven. Allow the sliders to bake for approximately 15 to 20 minutes, or until the cheese is wonderfully bubbly, melted, and gooey, and the tops of the rolls are gloriously golden brown and slightly crisp.
- Serve and Enjoy: Once baked, remove the dish from the oven. Let the sliders cool for about 5 minutes (this helps the cheese set slightly, making slicing easier) before slicing them into individual portions or serving them as a whole pull-apart loaf. Serve warm and savor every bite of your delightful, homemade breakfast sliders!
Tips for Achieving Breakfast Slider Perfection Every Time
To ensure your cheese and sausage breakfast sliders are absolutely perfect every time, consider these expert tips and tricks designed to enhance flavor, texture, and overall success:
- Quality Ingredients Make a Difference: While the recipe is straightforward, the quality of your core ingredients significantly impacts the final taste. Opt for good quality sausage, fresh eggs, and your preferred brand of Hawaiian rolls for the best results.
- Scramble Eggs Gently: Avoid overcooking your scrambled eggs. Remove them from the heat just when they are set but still moist and slightly soft. Remember, they will continue to cook a little in the oven, so slightly underdone is better than rubbery.
- Don’t Overcrowd the Pan (Sausage): When cooking sausage patties, ensure you don’t overcrowd your skillet. Cook them in batches if necessary. This allows for even browning and proper cooking, preventing them from steaming instead of searing.
- Drain Excess Grease: After cooking, always place your sausage patties on a paper towel-lined plate to drain any excess grease. This crucial step prevents the bottom buns from becoming soggy during baking.
- Even Glaze Distribution: When brushing on the butter-maple glaze, ensure you apply it evenly over the entire top surface of the buns, including the sides where they touch the dish. This guarantees a uniformly golden-brown crust and consistent sweet-savory flavor in every bite.
- Cover for Moisture Control: If you notice the tops of your rolls browning too quickly before the cheese is fully melted and bubbly, you can loosely tent the baking dish with aluminum foil for the last few minutes of baking. This prevents over-browning while allowing the internal ingredients to finish cooking.
- Allow Them to Rest: After baking, resist the urge to slice and serve immediately. Let the sliders rest for about 5-10 minutes in the baking dish. This allows the hot cheese to set slightly, making for cleaner cuts and preventing the delicious fillings from sliding out when serving.
- Use the Right Dish Size: A 9×13 inch baking dish is typically ideal for 12 sliders. Ensure your buns fit snugly without being overly crammed or having too much empty space around them.
Creative Variations & Customizations for Your Breakfast Sliders
One of the best things about these cheese and sausage breakfast sliders is their incredible versatility! Feel free to experiment with different ingredients to suit your taste, dietary preferences, or simply to use what you have on hand. These ideas can transform the recipe for endless delicious possibilities:
- Cheese Swaps: Don’t limit yourself to pepper jack and American! Try sharp cheddar for a classic tang, provolone for a milder melt, Monterey Jack for extra creaminess, or even smoked gouda for a sophisticated smoky flavor. A blend of different cheeses can add wonderful complexity.
- Introduce Some Veggies: Boost nutrition and flavor by adding finely diced and sautéed vegetables. Onions, bell peppers, spinach, or mushrooms can be folded into the egg mixture before scrambling or layered with the cheese for an extra boost of color and vitamins.
- Spice It Up: For those who love heat, a dash of your favorite hot sauce mixed into the egg batter, a sprinkle of red pepper flakes over the sausage, or even thinly sliced fresh jalapeños layered with the cheese can add a welcome kick.
- Different Meats for Variety: Instead of pork sausage, consider using turkey sausage for a leaner option, or pre-cooked and crumbled bacon or ham for a different flavor profile. For a delicious meat-free version, substitute with your favorite vegetarian breakfast sausage patties.
- Bun Alternatives: While Hawaiian rolls are a beloved classic, brioche slider buns offer a richer, buttery taste, and even small plain dinner rolls can work well. Remember, the slight sweetness of Hawaiian rolls is part of the original recipe’s charm!
- Herbaceous Additions: Fresh chives, chopped parsley, or a pinch of dried Italian herbs can be mixed into the scrambled eggs or sprinkled over the cheese layers for added aroma and a fresh, herbaceous touch.
- Savory Glaze Option: If you prefer a less sweet profile, you can create a purely savory glaze. Melted butter can be combined with garlic powder, onion powder, a dash of Worcestershire sauce, and a sprinkle of dried herbs like oregano or Italian seasoning for an equally delicious, non-sweet topping.
- Add a Sauce Layer: A thin layer of Dijon mustard or a sweet-and-spicy jam spread on the bottom bun can add an unexpected layer of flavor complexity.
Serving Suggestions & Perfect Pairings
While these breakfast sliders are incredibly satisfying on their own, they also pair wonderfully with a variety of sides to create a complete and memorable breakfast or brunch spread for any occasion.
- Fresh Fruit Salad: A vibrant and colorful bowl of mixed berries, sliced melon, grapes, and citrus segments offers a refreshing and light contrast to the rich, savory sliders.
- Crispy Hash Browns or Home Fries: Classic breakfast sides like crispy hash browns, seasoned home fries, or roasted potato wedges perfectly complement the savory notes of the sliders, adding a satisfying crunch.
- Yogurt Parfaits: For a lighter, healthier option, offer individual yogurt parfaits layered with granola, fresh fruit, and a drizzle of honey.
- Beverage Essentials: No breakfast or brunch is complete without a fresh glass of orange juice, apple juice, or cranberry juice. And, of course, a steaming cup of your favorite coffee, a variety of teas, or even hot cocoa.
- Brunch Cocktails: If you’re hosting a celebratory brunch, consider serving Mimosas (orange juice and sparkling wine) or classic Bloody Marys to elevate the occasion.
- Hot Sauce Bar: For guests who love a bit of heat, set up a small hot sauce bar with a selection of mild to fiery options, allowing everyone to customize their spice level.
- Green Salad: A simple, lightly dressed green salad can add a refreshing counterpoint, especially if serving these for a lighter lunch or dinner.
Storage and Reheating Instructions for Convenience
One of the many benefits of these sliders is their excellent make-ahead potential and ease of storage, making them perfect for future meals or busy mornings.
- To Store Leftovers: If you have any baked sliders left, allow them to cool completely to room temperature. Once cool, transfer them to an airtight container or wrap them tightly in plastic wrap. Store in the refrigerator for up to 3-4 days.
- To Freeze (Baked Sliders): For longer storage, wrap individual baked sliders (or the entire dish) tightly in plastic wrap, then an additional layer of aluminum foil. This helps prevent freezer burn. Freeze for up to 1 month. Thaw overnight in the refrigerator before reheating.
- To Freeze (Unbaked & Assembled Sliders): You can assemble the sliders up to the point of brushing with the glaze. Wrap the entire unbaked dish tightly in plastic wrap and then foil. Freeze for up to 1 month. When ready to bake, thaw overnight in the refrigerator, then brush with glaze and bake as directed, potentially adding 5-10 minutes to the baking time since they are starting from cold.
- To Reheat Baked Sliders (Oven Method – Best Results): For the best texture, reheat baked sliders in a preheated oven at 300°F (150°C) for about 10-15 minutes, or until they are warmed through and the cheese is soft again. You can loosely cover them with foil to prevent excessive browning.
- To Reheat Baked Sliders (Microwave Method): For a quicker option, individual sliders can be microwaved for 30-60 seconds, or until heated through. Be aware that the buns might not be as crispy as when reheated in the oven.
- Make-Ahead Assembly (Refrigerated): You can fully assemble the sliders (up to the point of brushing with the glaze) the night before. Cover the baking dish tightly with plastic wrap and refrigerate. In the morning, uncover, brush with the butter-maple glaze, and bake as directed, potentially adding an extra 5-10 minutes to the baking time to account for starting with a cold dish.
Frequently Asked Questions (FAQs) About Breakfast Sliders
- Can I use a different type of bun?
- Yes, while Hawaiian rolls are highly recommended for their unique sweetness and soft texture, you can certainly use other slider buns or small dinner rolls. Just ensure they are large enough to comfortably hold the fillings without being too difficult to manage.
- Can I make these vegetarian?
- Absolutely! To make these sliders vegetarian, simply substitute the pork sausage with your favorite brand of plant-based breakfast sausage patties. Ensure they are cooked according to package directions before adding them to the layers.
- How do I prevent the buns from getting soggy?
- To prevent soggy buns, ensure your sausage patties are thoroughly cooked and any excess grease is drained before assembling. Also, avoid overly wet scrambled eggs. The butter-maple glaze helps to create a barrier and crisps up the top buns during baking.
- Can I add other toppings or ingredients?
- Definitely! Cooked and crumbled bacon, sautéed mushrooms, caramelized onions, or bell peppers can be wonderful additions. You can also sprinkle dried herbs like parsley or chives into the egg mixture. Just be mindful not to overfill the sliders to maintain their structural integrity.
- What’s the best way to serve these for a crowd?
- Bake them as a whole unit in a large casserole dish. Once out of the oven and rested for a few minutes, you can easily slice them into individual sliders right before serving. They’re perfect as a pull-apart appetizer or a main dish for a brunch buffet, allowing guests to grab their own.
- Can I prepare these in an air fryer?
- While an air fryer can cook individual sliders, it might be challenging to bake the entire batch at once due to size constraints. If attempting, reduce the temperature slightly and monitor closely, as air fryers cook faster and can brown quickly. An oven is generally recommended for consistent results with a full tray.
Conclusion: Your New Go-To Breakfast Sensation Awaits!
These Cheese and Sausage Breakfast Sliders are more than just a meal; they’re a convenient, crowd-pleasing, and incredibly tasty solution for any breakfast or brunch occasion. With their irresistible combination of savory sausage, fluffy eggs, perfectly melted cheese, and a hint of sweet maple glaze, they offer a burst of harmonious flavor in every single bite. Whether you’re preparing a quick weekday breakfast for the family, a leisurely weekend brunch with friends, or feeding a hungry crowd, this recipe, inspired by the culinary genius of The Slow Roasted Italian, is guaranteed to be a resounding hit. So, roll up your sleeves, gather your ingredients, and get ready to create a breakfast sensation that will have everyone coming back for more!
*Special thanks to The Slow Roasted Italian via YouTube for sharing this wonderful recipe inspiration and for the images used in this article. We encourage you to visit their channel for more fantastic culinary creations and delicious recipes!
Cheese & Sausage Breakfast Sliders Recipe Summary