
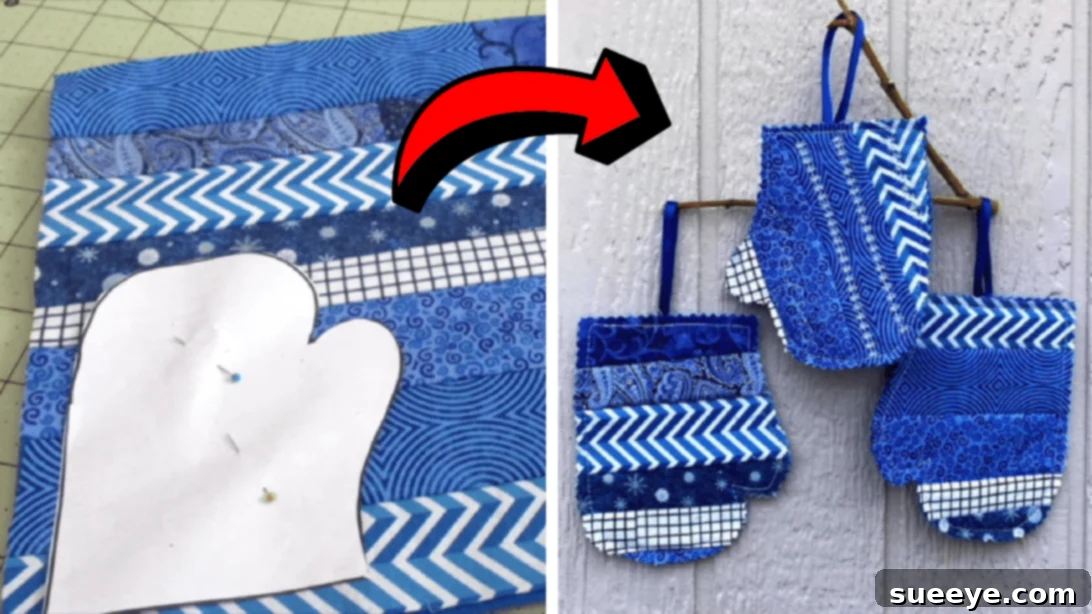
DIY Scrappy Mitten Ornaments: Crafting Festive Cheer with Fabric Scraps
Embrace the warmth and charm of handmade holiday decorations this season with these delightful scrappy mitten ornaments. Perfect for adorning your Christmas tree, gracing gift packages, or even offering as thoughtful, personalized presents, these ornaments are more than just simple crafts – they’re miniature expressions of festive joy. This project is a fantastic way to utilize those beloved fabric scraps you’ve been saving, transforming them into something truly magical. Whether you’re a seasoned quilter looking for a quick project or a sewing beginner eager to try a new skill, this tutorial guides you through creating these adorable mittens with ease and confidence. Get ready to add a touch of unique, homemade charm to your festive celebrations!
RELATED: Easy DIY Scrappy Fabric Butterflies Tutorial
The beauty of this scrap-busting project lies in its simplicity and versatility. It’s incredibly satisfying to see small pieces of fabric come together to form a charming, recognizable shape that evokes cozy winter days. You’ll be amazed at how quickly these come together; many crafters find they can complete a single mitten ornament in just one sitting, even on their very first attempt. The process is intuitive, allowing for creative freedom in fabric selection and design. We’ll walk you through each step, ensuring a smooth and enjoyable crafting experience. Learn how to craft your own unique collection of scrappy mitten ornaments today by following this comprehensive video tutorial by Debs Days on YouTube, complemented by our detailed written instructions below.
Why Choose Scrappy Mitten Ornaments for Your Holiday Decor?
These charming fabric mittens offer numerous advantages, making them a standout choice for your holiday crafting:
- Sustainable Crafting: Reduce fabric waste by utilizing small scraps from previous projects. It’s an eco-friendly approach to decorating.
- Personalized Touch: Customize each mitten with specific colors, patterns, and embellishments to match your home’s decor or the recipient’s taste.
- Budget-Friendly: Since they primarily use fabric scraps and basic sewing supplies, these ornaments are incredibly economical to make.
- Beginner-Friendly: The straightforward strip-piecing technique and simple shape make this an ideal project for those new to sewing or quilting.
- Thoughtful Gifts: Handmade gifts carry a special sentiment. These mittens make perfect little tokens of affection for friends, family, and colleagues.
- Versatile Decor: Beyond the tree, hang them on doorknobs, use them as gift tags, string them into a garland, or even incorporate them into wreaths.
- Quick to Make: The simple design ensures that you can whip up several ornaments in a short amount of time, perfect for last-minute decorating or gifting needs.
Embrace the joy of creation and the satisfaction of giving with these adorable, easy-to-make ornaments!
Essential Materials for Your Scrappy Mitten Ornaments:
Gathering your materials is the first exciting step in any DIY project. For these scrappy mitten ornaments, you’ll find that most items are readily available in your crafting stash or at any fabric store. Here’s what you’ll need to create your cozy holiday decor:
- Fabric Strips: These are the star of the show! Dig into your scrap bin for an array of colors and patterns. Strips can be varying widths, typically 1.5 to 2.5 inches wide, and at least 6-8 inches long, depending on your template size. Cotton fabrics work best for their ease of handling.
- Backing Fabric: A single piece of fabric for the back of your ornament. Choose a coordinating solid or subtle print that complements your scrap strips. This piece should be slightly larger than your batting/felt.
- Batting or Felt: This provides structure and a soft, padded feel to your mitten. A thin cotton batting or a piece of craft felt works perfectly. Cut it slightly larger than your finished mitten size.
- Ribbon, for hanging: A small length of ribbon (about 4-6 inches) to create a loop for hanging your ornament. Choose a color that matches your fabrics.
- Pinking Shears: These specialized scissors cut a zigzag edge, which helps prevent fabric fraying and adds a decorative finish to the edges of your mitten.
- Marking Pen, Pencil, or Chalk: Essential for tracing your template onto the fabric. A disappearing ink pen or tailor’s chalk is ideal.
- Ruler: For precise cutting of your fabric strips and measuring.
- Scissors or Rotary Cutter and a Cutting Mat: A rotary cutter offers quick and accurate cuts for your fabric strips, especially when paired with a mat. Regular sharp fabric scissors will also work perfectly.
- Fabric Pins: To hold your fabric layers securely in place during stitching.
- Needle and Thread: For any small hand-stitching details, though most of the project will be machine-sewn.
- Iron, for pressing: Crucial for pressing seams flat, ensuring a professional and neat finish.
- Sewing Machine: Your primary tool for stitching the fabric strips and the mitten shape.
- Template(Click here to download the template): This provides the essential mitten shape. Ensure you print it at 100% scale for accurate sizing.
Step-by-Step Guide: Crafting Your Own Scrappy Mitten Ornaments
Now that you have all your materials ready, let’s dive into the fun part: bringing your scrappy mitten ornaments to life! Follow these simple steps for a beautiful result.
Step 1: Preparation – Template, Fabric Strips, and Layering Your Base
Begin by ensuring your template is ready. Download and print the mitten template, making sure it’s printed at 100% scale for the correct size, then carefully cut it out. Next, prepare your fabric strips. Dig into your collection of fabric scraps and select an assortment of colors and patterns that appeal to you. Cut these scraps into strips. They don’t need to be perfectly uniform; varying widths (e.g., from 1.5 to 2.5 inches) can add a lovely patchwork effect. Ensure each strip is long enough to span the widest part of your mitten template, plus a little extra for seam allowances.
Once your strips are ready, prepare your base layers. Place your chosen backing fabric on your work surface with its wrong side facing upwards. This is the side that will eventually be hidden. Center your batting or felt piece directly on top of the backing fabric. The batting adds body and softness to your ornament. Now, take your first fabric strip. Position it horizontally across the top edge of your batting, making sure its edges are neatly lined up with the top edge of the batting and backing fabric. This strip will form the initial piece of your scrappy patchwork.
Step 2: Constructing the Scrappy Fabric Panel
With your first strip in place, it’s time to start piecing! Take your second fabric strip and place it directly on top of the first one, ensuring their right sides (the pretty, patterned sides) are facing each other. Carefully align their long edges. Using your sewing machine, stitch a straight seam along this aligned long edge. A standard ¼-inch seam allowance works well for this project. Once stitched, gently open up the two strips, pressing the seam flat with your iron. Pressing is a crucial step that ensures your patchwork lays flat and neat.
Continue this process: place another fabric strip right sides together with the last one you added, stitch along the long edge, and then press the seam open. Repeat this additive process, adding strip after strip, until the entire surface of your felt or batting is completely covered by your fabric strips. Don’t worry if the strips extend beyond the edges of the batting; you’ll trim those later. Once the batting is fully covered, carefully trim any significant excess fabric from the edges, creating a somewhat rectangular or square scrappy fabric panel. This panel will be the front of your mitten ornament, showcasing your beautiful patchwork.
Step 3: Shaping, Finishing, and Adding the Hanging Loop
Now for the exciting part – transforming your scrappy fabric panel into a mitten! Place your paper mitten template centrally on top of your newly created scrappy fabric panel. Pin the template securely in place, ensuring it doesn’t shift as you work. Using your sewing machine, carefully stitch around the perimeter of the mitten shape, directly through the template, the scrappy fabric panel, the batting, and the backing fabric. Maintain a consistent seam allowance, following the outline of the template closely. Once you’ve stitched all the way around, remove the paper template and any pins.
Next, take your pinking shears. These specialized scissors will create a decorative zigzag edge and help prevent fraying. Carefully cut out the mitten shape, cutting just outside your stitched line. The pinking shears will give your mitten a charming, finished look without the need for additional edge binding. Almost done! To create the hanging mechanism, take a length of ribbon (about 4 to 6 inches long). Fold it in half to form a loop. Hand-stitch or machine-stitch the raw ends of this ribbon loop securely to the top edge of your mitten ornament, centered where the cuff would typically be. Finally, you can add an optional quilting detail to your mitten. Quilt however you want – this could be simple straight lines stitched across the mitten, following the direction of your fabric strips, or even a free-motion quilting design for a more artistic touch. Once your ribbon is attached and any desired quilting is complete, your adorable scrappy mitten ornament is finished and ready to hang!
Tips for Elevating Your Scrappy Mitten Ornaments
While the basic steps are simple, a few extra tips can take your scrappy mitten ornaments from charming to absolutely stunning:
- Fabric Selection Strategy: Don’t be afraid to mix and match! Combine different fabric types (as long as they are similar in weight like quilting cottons), various patterns (florals, geometrics, solids), and a wide range of colors. For a cohesive look, try sticking to a specific color palette (e.g., traditional reds and greens, icy blues and silvers, or rustic browns and creams).
- Embellishment Ideas: Add small buttons, beads, sequins, or tiny bells for extra sparkle and dimension. You could even embroider a small initial or a simple snowflake design onto the finished mitten for a truly personalized touch.
- Varying Sizes: Experiment with resizing the template to create mittens of different sizes. A collection of varying-sized mittens can add dynamic interest to your tree or garland.
- Gifting Presentation: When gifting, consider tying a small handwritten tag to the ribbon with a personal message. Package a set of mittens in a simple kraft paper box tied with twine for a rustic, heartfelt presentation. They also make wonderful additions to holiday gift baskets.
- Quilting Patterns: Beyond simple straight lines, try machine-stitching small stippling patterns, spirals, or even echo quilting around the mitten shape to add texture and visual interest. For a more rustic feel, simple hand-quilting stitches can be used.
- Double-Sided Design: If you want a more finished look from both sides, create a second scrappy panel or use a decorative fabric for the backing. However, for most tree ornaments, a simple backing fabric is perfectly sufficient.
- Storage: To keep your handmade ornaments looking fresh year after year, store them carefully. A box with tissue paper or individual small bags will protect them from dust and damage.
By keeping these tips in mind, you can transform a simple scrap-busting project into a truly unique and cherished part of your holiday traditions.
*All these images are credited to Debs Days via YouTube. We highly recommend visiting her channel and subscribing for more inspiring DIY craft tutorials and creative ideas!
Conclusion: Embrace the Joy of Handmade Holiday Decor
There’s an undeniable magic in creating something beautiful with your own hands, especially during the festive season. These easy scrappy mitten ornaments offer a wonderful opportunity to channel your creativity, utilize forgotten fabric scraps, and produce charming decorations that tell a story. Whether you make one or a dozen, each mitten will carry the unique imprint of your effort and style, adding a heartfelt warmth to your holiday setup. They are proof that even small pieces of fabric can be transformed into something truly special and memorable.
So, gather your scraps, fire up your sewing machine, and embark on this delightful crafting journey. You’ll not only create adorable ornaments but also cultivate a sense of accomplishment and contribute to more sustainable decorating. Share your creations with loved ones, hang them with pride, and let these little scrappy mittens be a reminder of the joy and warmth that handmade items bring to the most wonderful time of the year. Happy crafting!