
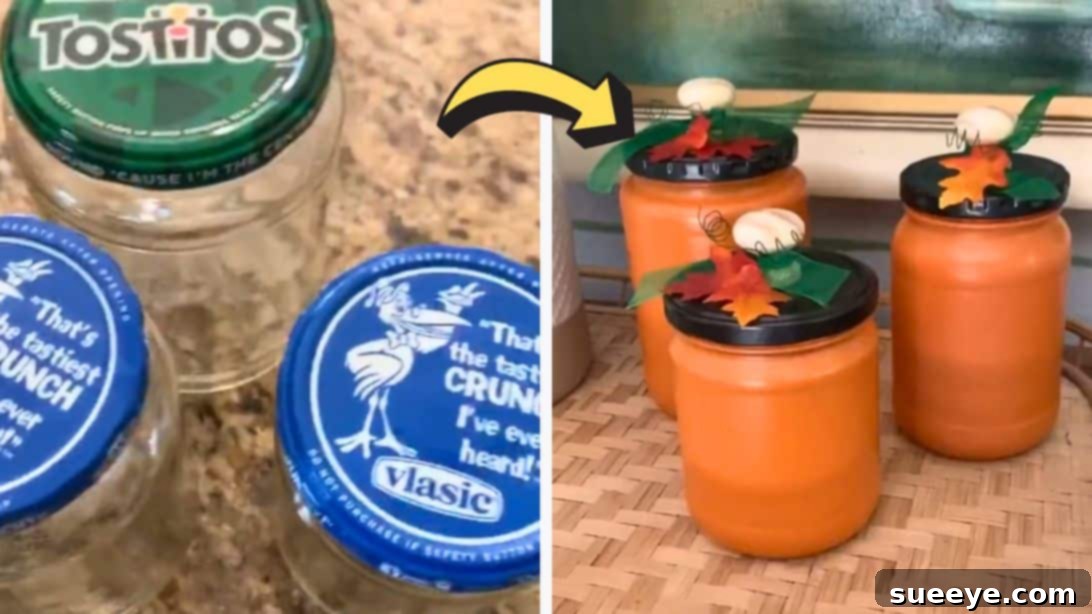
As the vibrant hues of autumn begin to paint the landscape, many of us eagerly seek ways to infuse our homes with the cozy spirit of the season. Whether you’re gearing up for a festive fall harvest celebration or preparing for the spooktacular excitement of Halloween, finding easy and budget-friendly decorations is often a top priority. Look no further! You’ve landed on the perfect page to discover a delightful DIY project that transforms ordinary household items into charming seasonal accents. Get ready to gather those forgotten glass jars from your pantry, along with some spray paints and a few scraps you might have lying around. This ingenious craft not only offers a fantastic way to upcycle but also allows you to create unique, personalized decor pieces in mere minutes. Instead of tossing out those nearly empty pickle or dip jars, give them a new life as beautiful, handmade pumpkin decorations. They are incredibly simple to make, highly versatile, and promise to add a touch of rustic elegance or playful spookiness to any corner of your home.
These upcycled jar pumpkins are more than just decorative; they can double as clever storage solutions or even serve as enchanting luminaries. Imagine placing battery-operated candles inside, casting a warm, inviting glow that perfectly captures the essence of crisp autumn evenings. They are ideal for adorning your side tables, gracing your mantelpiece, or becoming the captivating centerpiece of your dining table. This innovative crafting idea recently gained significant traction online, demonstrating its widespread appeal and ease of execution. It’s a testament to how simple materials and a little creativity can yield truly remarkable results.
The inspiration for this charming craft comes from TikTok, where content creator @averagebutinspired shared a brilliant video showcasing her method for transforming plain glass jars into these gorgeous pumpkins for the fall season. The video quickly went viral, capturing the attention of countless DIY enthusiasts and garnering approximately 209K views at the time of writing. It also accumulated a flood of likes and positive comments from users who were captivated by the simplicity and charm of the project. This viral sensation highlights a growing trend in home decor: the desire for sustainable, affordable, and personalized items that truly reflect individual style and seasonal cheer. It’s a prime example of how everyday objects can be reimagined and given a second life through the magic of crafting.
@averagebutinspired Hope you all like these better than my last pumpkin craft! 😂 #diyfalldecor #falldecordiy #pumpkindecor #upcycleddecor #craftymoms #easycrafts
♬ CRAFT – OFEKNIV
How to Craft Your Own Upcycled Jar Pumpkins: A Step-by-Step Guide
Creating these delightful upcycled jar pumpkins is surprisingly simple and requires minimal crafting experience. The process is quick, satisfying, and yields charming results that will enhance your fall and Halloween decor. Here’s a detailed guide to help you bring these adorable pumpkins to life:
Step 1: Gathering Your Supplies
Before you begin, ensure you have all the necessary materials. The beauty of this project lies in its flexibility, allowing you to use items you might already have around the house. You will need:
- Glass Jars: Any size or shape will work, from small jam jars to larger pickle or sauce jars. Ensure they are thoroughly cleaned and completely dry.
- Spray Paint: Choose classic pumpkin orange for the jar bodies and a metallic brown, bronze, or even a dark green for the lids to mimic a pumpkin stem base. Look for matte or satin finishes for a more rustic look.
- Stems: This is where your creativity can truly shine! Drawer knobs, small sticks or twigs from your yard, wine corks, or even small wood scraps can serve as excellent pumpkin stems.
- Adhesive: Strong craft glue or hot glue is ideal for attaching the stems and embellishments securely.
- Ribbon: A small piece of burlap, plaid, or any fall-themed ribbon to tie around the stem.
- Floral Wire: Green or brown floral wire for creating charming pumpkin tendrils.
- Pencil or Dowel: For curling the floral wire.
- Autumn Leaves: Faux autumn leaves for a final decorative touch.
- Optional: Newspaper or a carton box for a protected spray-painting area, sandpaper for smoothing rough edges on wood stems, clear sealant spray for added durability.
Step 2: Preparing Your Jars and Painting
The TikTok creator began her video with the catchy caption, “Grab those jars before the recycling goes out!” a perfect reminder to rescue these versatile containers from the bin. To start your project, find a well-ventilated outdoor area or a garage, and lay down newspaper or place a large carton box to protect your surroundings from overspray. Carefully place your clean, lid-free glass jars inside the box. Holding the spray paint can about 6-8 inches away from the jars, apply even, sweeping strokes of orange spray paint. It’s better to apply several thin coats rather than one thick coat to prevent drips and ensure a smooth, professional finish. Allow each coat to dry completely according to the manufacturer’s instructions before applying the next. While the jars are drying, spray-paint the lids metallic brown (or your chosen stem base color). This contrasting color will help define the “stem” area of your pumpkin. Repeat the thin coat application and drying process for the lids as well. Patience during the drying phase is key to achieving a flawless finish.
Step 3: Assembling the Stems and Embellishments
Once both the jars and lids are thoroughly dry and cured, it’s time to bring your pumpkins to life. Screw the freshly painted lids back onto their respective jars. Next, take your chosen stem material – whether it’s a decorative drawer knob, a rustic stick, or a charming wine cork – and securely glue it to the center of the painted lid. For drawer knobs, a strong adhesive like E6000 or a hot glue gun can provide an instant bond. If you’re using natural sticks or wood scraps, ensure they are clean and dry, and possibly even sanded slightly for a better adhesion surface. This step truly transforms the jar into a recognizable pumpkin silhouette.
Following the stem attachment, enhance the festive appeal with a touch of ribbon. Select a small piece of burlap, plaid, or any autumnal-themed ribbon and tie it artfully around the base of the stem. A simple bow or a knot with trailing ends adds a lovely textural element. To mimic the whimsical tendrils found on real pumpkins, grab a piece of floral wire. Wrap the middle section of the wire around the stem a few times, securing it in place. Then, carefully curl the ends of the wire around a pencil or a thin dowel. This creates those charming, spiraling tendrils that give your pumpkin an authentic, organic look. You can make them as tight or as loose as you prefer, adjusting for a natural, flowing effect.
Step 4: Adding Finishing Touches and Customization
For the ultimate finishing touch, glue a few faux autumn leaves around the base of the stem or nestled amongst the ribbon and tendrils. These leaves add a burst of seasonal color and complete the pumpkin aesthetic. And just like that, your upcycled jar pumpkin is done! How easy and gratifying is that? The beauty of this craft lies not only in its simplicity but also in its versatility. You can customize these pumpkins to match any decor style or specific holiday theme. For a spooky Halloween vibe, consider spray painting some jars black, white, or deep purple, and adding googly eyes or spiderweb embellishments. For a more rustic farmhouse look, use burlap ribbons and natural twine. If elegance is your goal, opt for metallic paints, satin ribbons, and perhaps some glitter accents.
Making the Most of Your Upcycled Jar Pumpkins
One of the best advantages of these DIY jar pumpkins is their durability. Unlike real pumpkins, they won’t rot or attract pests, meaning you can proudly display them throughout the entire fall season, from September right through Thanksgiving. Furthermore, they are fully reusable! Carefully pack them away once the season ends, and they’ll be ready to bring joy to your home year after year. This makes them an incredibly sustainable and economical decoration choice. You can also use them in various creative ways:
- Candle Holders: Place battery-operated LED candles or fairy lights inside for a soft, ambient glow, perfect for evenings.
- Treat Jars: Fill them with candy corn, small chocolates, or other festive treats for guests.
- Vases: Use them to hold small arrangements of dried flowers, wheat stalks, or artificial fall foliage.
- Centerpieces: Arrange a collection of different-sized jar pumpkins on a tray with additional fall elements like pinecones and acorns for a stunning dining table display.
- Gift Ideas: Fill a finished jar pumpkin with homemade cookies or small gifts for a charming, personalized present.
This DIY project is an excellent activity for crafters of all ages, including families looking for a fun and easy way to decorate for the holidays. It’s a wonderful opportunity to teach children about recycling and creative repurposing while making something beautiful. The transformation of a simple glass jar into a captivating piece of seasonal decor is truly rewarding, adding a personal touch that store-bought decorations often lack. So, next time you reach for that empty jar, remember its potential. With a little paint, a few simple additions, and a dash of creativity, you can contribute to a more sustainable lifestyle while creating memorable fall and Halloween decorations that will be admired for seasons to come. Embrace the spirit of DIY and let your imagination flourish!