
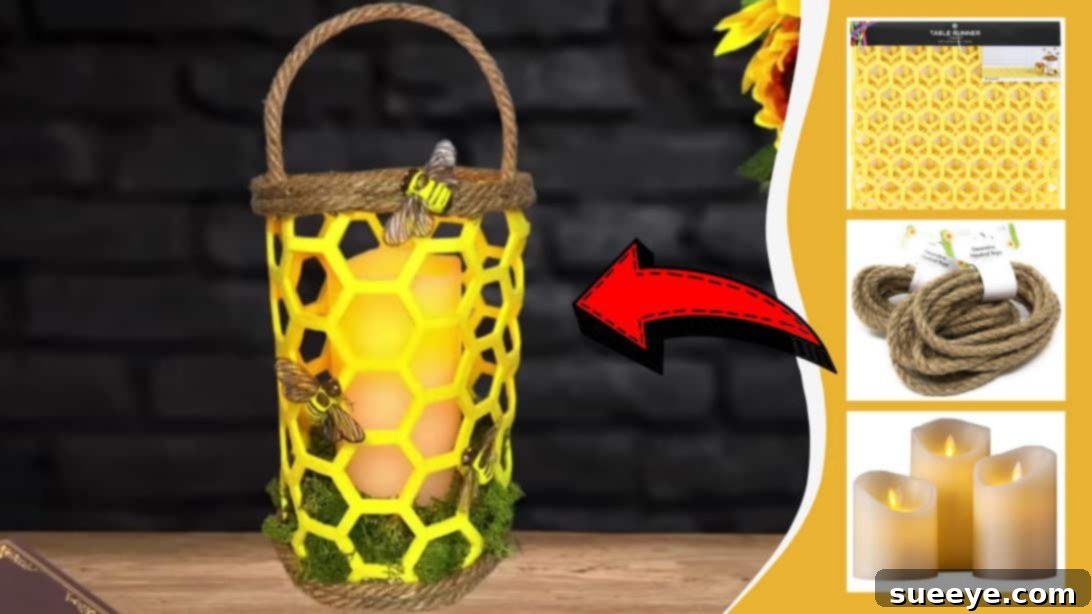
DIY Honey Bee Lantern: Whimsical Decor Made Easy
Are you looking to add a touch of charming warmth and a whimsical glow to your living space? Crafting your own home decor is not only incredibly rewarding but also allows for unique personalization that store-bought items simply can’t match. For a while now, I’ve been eager to embark on another creative project for my room, something that radiates an utterly adorable light when illuminated. After sifting through a myriad of ideas and inspirations, one particular craft stood out with its irresistible charm and simplicity: an enchanting honey bee lantern.
This delightful project, inspired by the fantastic tutorial from This Southern Girl Can on YouTube, truly captured my imagination. The instructions are remarkably straightforward and easy to grasp, making the entire process enjoyable even for novice crafters. I was pleasantly surprised by how quickly I could complete the piece, and the result was nothing short of awesome and truly whimsical. I’m already planning to create another set for my living room, and I’m confident that you, too, will adore having one (or several!) of these charming bee lanterns grace your home.
This DIY honey bee lantern is more than just a craft; it’s a delightful accent that brings a cozy, nature-inspired feel to any room. It’s perfect for adding a soft ambient glow to a bedroom, a playful touch to a child’s room, or a unique conversation starter in your living area. Plus, it’s an excellent way to incorporate the beauty of the outdoors into your interior design, celebrating the industrious little bees that contribute so much to our world. Let’s dive into creating your very own enchanting bee-themed decor!
Why You’ll Love This DIY Honey Bee Lantern
- Simple & Accessible: Utilizes readily available and affordable materials, many of which can be found at dollar stores.
- Charming Aesthetic: Creates an undeniably cute and whimsical look, especially when lit.
- Quick to Complete: The straightforward steps mean you can finish your lantern in a relatively short amount of time.
- Versatile Decor: Perfect for bedrooms, living rooms, nurseries, or as a unique gift.
- Beginner-Friendly: The tutorial is designed for ease, making it suitable for crafters of all skill levels.
- Customizable: Offers room for personal touches and variations to match your home’s style.
Gather Your Materials: What You’ll Need
One of the best aspects of this DIY project is its reliance on simple, inexpensive materials. You might even have some of these items lying around your home already! Here’s a comprehensive list of what you’ll need to create your adorable honey bee lantern:
- 5-inch Round Wooden Plaque: This serves as the sturdy base and top for your lantern. Its compact size is perfect for a tabletop or shelf display. You can often find these in the craft section of most general stores or dedicated craft shops.
- Felt Yellow Honeycomb Table Runner or Felt Fabric: The key to achieving that distinctive bee hive look. A table runner often provides ample material, but a roll of yellow felt cut into a honeycomb pattern or simply a plain yellow felt sheet will work wonderfully. The felt’s softness makes it easy to work with and provides a warm, diffused light.
- Decorative Nautical Rope (Dollar Tree or similar): This adds a rustic, charming texture to your lantern. Its natural look complements the bee theme beautifully. The Dollar Tree is a fantastic source for this, offering great value.
- Bumble Bee Floral Picks: These small, pre-made bee embellishments bring the project to life. Look for them in the floral or seasonal decor aisles. If you can’t find picks, small bee stickers or handmade felt bees can also work.
- Battery-Operated LED Candle: Essential for providing a safe, warm glow without the hazards of an open flame. LED candles come in various sizes and flicker realistically, creating a cozy ambiance. Ensure it fits comfortably within the plaque’s diameter.
- Sharp Scissors: For precise cutting of felt and rope. A good pair of craft scissors will make a noticeable difference in the neatness of your cuts.
- Hot Glue Gun and Glue Sticks: Your primary tool for assembly. A hot glue gun offers quick bonding, which is ideal for this project. Always exercise caution when using a hot glue gun to avoid burns.
- Artificial Moss: A beautiful finishing touch that adds a natural, garden-like element around the base of your candle, enhancing the bee’s natural habitat theme.
Step-by-Step Guide: Crafting Your Honey Bee Lantern
Now that you’ve gathered all your materials, let’s get started on bringing your charming honey bee lantern to life! Follow these simple steps carefully for the best results. Remember, crafting is about enjoying the process, so don’t be afraid to add your own personal flair.
Step 1: Preparing the Felt Base
The first step involves creating the main body of your lantern using the felt. This will form the “hive” structure.
- Measure and Cut the Felt: Begin by placing your 5-inch round wooden plaque squarely on top of your yellow honeycomb table runner or felt piece. Carefully measure out the amount of felt needed to completely cover the entire circumference of the plaque, allowing for a slight overlap for gluing. You’ll want enough height to create the lantern body, so measure generously, ensuring it’s tall enough to house your LED candle with plenty of room above. Once measured, carefully cut the felt to size. Precision here helps achieve a clean finish.
- Wrap and Secure the Felt: Take your cut felt piece and wrap it properly around the edges of the wooden plaque. Ensure that the plaque is neatly positioned at the bottom, forming a stable base for your lantern. Bring the two short ends of the felt together to form a cylinder. Apply a generous bead of hot glue along one edge, then press the other edge firmly over it to create a secure seam. Hold it in place until the glue sets.
- Attach Felt to the Plaque: Once the felt cylinder is formed and secured, apply hot glue generously around the top edge of the wooden plaque. Carefully align the bottom edge of the felt cylinder with the glued edge of the plaque and press down firmly. Ensure the felt is taut and evenly distributed around the plaque. This creates a strong base for your lantern.
- Prepare for the Candle: Briefly place your battery-operated LED candle inside the newly formed felt structure. This helps you gauge the required height. Cut off any excess felt from the top, making sure to leave enough headspace above the candle. This space is crucial for the light to diffuse properly and for adding the top rope embellishments later. Once you’ve determined the ideal height, remove the candle and set it aside for later assembly.
Step 2: Adding Decorative Elements and Finishing Touches
Now it’s time to add the charming details that will truly make your honey bee lantern shine.
- Adorn with Nautical Rope (Bottom): Take your decorative nautical rope. Starting at the seam of your felt cylinder, begin wrapping and attaching the rope around the bottom edges of the felt, just above where it meets the wooden plaque. Apply hot glue in small sections as you go, pressing the rope firmly into place. Continue until you’ve completed one full layer, then carefully cut the excess rope. For a more substantial and polished look, add a second layer of rope directly above the first, gluing it securely. This adds visual weight and a charming, rustic touch.
- Craft the Handle: Cut a separate piece of nautical rope, about 6-8 inches long, depending on how prominent you want the handle to be. Apply a dab of hot glue to each end of this rope piece, then firmly attach the ends to opposite inner sides of the felt lantern, near the top edge. Hold each end in place until the glue dries completely, ensuring it’s strong enough to act as a decorative handle. Referencing the original video if unsure about placement can be helpful.
- Adorn with Nautical Rope (Top): Similar to the bottom, hot glue two layers of the decorative nautical rope around the top edges of the felt piece. This creates a cohesive look and finishes the top rim of your lantern neatly. Ensure the seams of the rope layers are aligned or carefully hidden for a professional appearance.
- Attach the Bumble Bees: Take your bumble bee floral picks. Using wire cutters or strong scissors, carefully snip the wires off each bee, leaving just the bee itself. Decide on the desired placement for your bees around the felt lantern. Apply a small amount of hot glue to the back of each bee and press them firmly onto the felt. You can arrange them as if they are buzzing around a hive, creating a dynamic and adorable scene. Feel free to add as many or as few as you like!
- Insert the Candle: Once all the glue has dried and your embellishments are secure, carefully place your battery-operated LED candle inside the lantern. Turn it on to see your creation come to life!
- Add Artificial Moss: For the final touch, take small clumps of artificial moss. Using hot glue, carefully attach the moss around the very bottom of the candle, inside the lantern. This creates a lovely, naturalistic base, mimicking a patch of grass or woodland floor, and beautifully frames the glowing candle. Be mindful not to get glue on the candle itself.
And there you have it! Your very own handcrafted honey bee lantern, ready to cast a warm, inviting glow. This project is a testament to how simple materials and a little creativity can yield truly enchanting results.
Personalize Your Bee Lantern: Tips & Tricks
While the tutorial provides a fantastic foundation, don’t hesitate to infuse your unique style into this project. Here are a few ideas to get your creative juices flowing:
- Vary the Felt: Experiment with different shades of yellow, or even a subtle cream or light brown felt for a more rustic beehive look. You could even use a different patterned felt if honeycomb isn’t available.
- Alternative Embellishments: If bumble bee picks are hard to find, consider painting small wooden beads with bee stripes, using bee-themed buttons, or even cutting out small bee shapes from black and yellow felt. Tiny fabric flowers or green leaves could also be added for a garden touch.
- Rope Variations: Instead of nautical rope, try a thinner jute twine for a more delicate look, or a colorful ribbon for a playful vibe.
- Scented Options: For an extra sensory experience, you could carefully add a few drops of essential oil (like lavender or chamomile) to the artificial moss, providing a subtle, pleasant aroma.
- Gifting Idea: These lanterns make thoughtful, handmade gifts for friends and family. Personalize them further by adding a small tag with a heartfelt message.
- Seasonal Touches: Adapt your lantern for different seasons. In autumn, add tiny faux leaves; for spring, miniature flowers.
Bring Whimsy Home with Your DIY Honey Bee Lantern
Crafting this DIY Honey Bee Lantern is a truly delightful experience that yields a stunning piece of home decor. It’s an excellent project for anyone looking to add a personal, whimsical touch to their space without breaking the bank. The warm glow of the LED candle combined with the charming bee motif creates an inviting and cozy atmosphere perfect for any room, from a peaceful bedroom sanctuary to a lively living room accent.
We hope this expanded tutorial inspires you to unleash your inner crafter and create your own beautiful honey bee lantern. Remember, the joy is in the making, and the reward is a unique piece that reflects your creativity. So, gather your materials, follow these simple steps, and prepare to illuminate your home with the adorable charm of these buzzing beauties!
*All image credit belongs to This Southern Girl Can via YouTube. Follow and subscribe to her channel for more amazing DIY inspiration!