
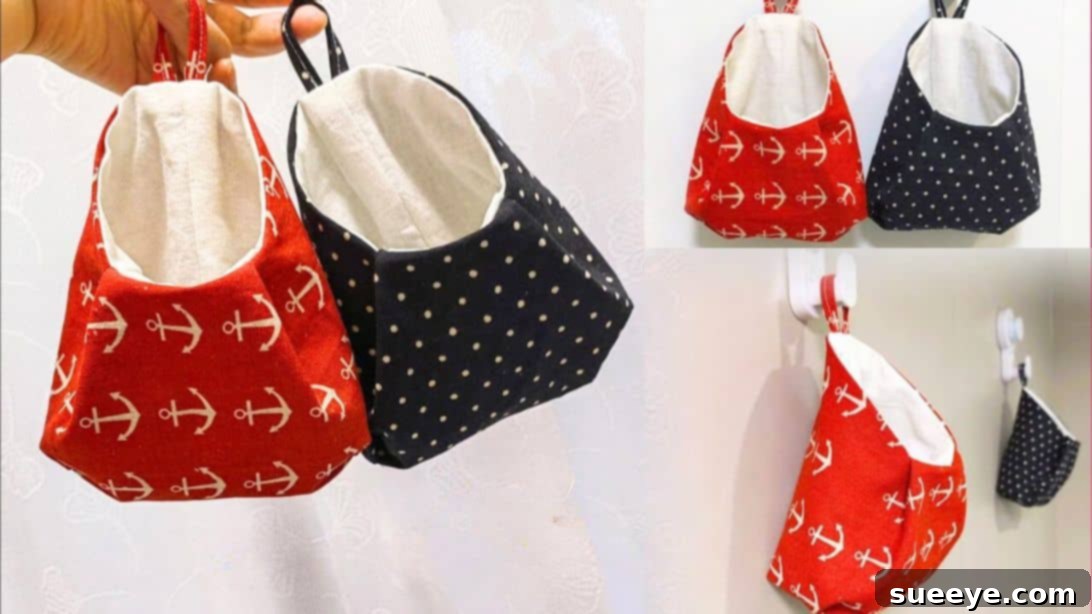
Transform Your Fabric Scraps into Adorable DIY Hanging Storage Bags
Effortless Organization and Charming Decor with This Simple Sewing Project
Are your craft drawers overflowing with beautiful fabric remnants from past sewing adventures? Don’t let those precious scraps gather dust! It’s time to unleash your creativity and give them a new, purposeful life. We’re thrilled to share an incredibly sweet and practical DIY project that will help you transform those leftover fabrics into versatile and cute hanging storage bags. This brilliant idea, brought to us by Cici Yi’s Sewing Diary, offers a fantastic way to add a touch of handmade charm to your home while tackling clutter.
Imagine these delightful fabric organizers adorning your walls, ready to hold everything from keys, loose change, and cherished pieces of jewelry to various small knick-knacks that often get misplaced. Beyond their functional appeal, these homemade hanging bags serve as wonderful decorative accents, seamlessly blending practicality with aesthetic charm. Whether you’re an experienced sewist or just starting your journey with a sewing machine, this project is designed to be accessible, enjoyable, and incredibly rewarding.
Why You’ll Love Making These DIY Hanging Storage Bags
This project isn’t just about creating a functional item; it’s about mindful crafting, sustainable living, and adding personality to your space. Here are a few compelling reasons to pick up your sewing machine and give these hanging storage bags a try:
- Sustainable Crafting: Give new life to fabric scraps that might otherwise end up discarded. It’s a wonderful way to practice upcycling and reduce waste.
- Perfect for Beginners: The steps are straightforward and don’t require advanced sewing skills. It’s an excellent project for those looking to build confidence with their sewing machine.
- Customizable & Versatile: Experiment with different fabric patterns, colors, and textures to create bags that perfectly match your home decor or personal style.
- Quick & Rewarding: These bags come together relatively quickly, offering instant gratification and a tangible sense of accomplishment.
- Practical Home Organization: Say goodbye to clutter! These bags are ideal for storing small items that need a designated spot, making your home tidier and more organized.
- Charming Decor: Beyond storage, they add a cozy, handmade aesthetic to any room, from bedrooms and bathrooms to craft rooms and entryways.
Aside from everyday organization, these hanging storage bags are also fantastic for special occasions. During the holidays, they can be transformed into unique decorations—think small pockets for holding flowers, cute festive toys, colorful ornaments, or delicious chocolates for guests. Their versatility knows no bounds, making them a year-round favorite for creative crafters.
If you enjoy creative sewing projects like this, you might also like to explore other inspiring ideas. For instance, check out the DIY Doll-Shaped Wall Hanging Organizer for another charming way to tidy up your space, or try your hand at learning how to Make a Bag Using Fabric Circles for a different take on fabric bag construction. These resources provide even more avenues to express your creativity through fabric!
Easy DIY Hanging Storage Bag Materials
Before you begin this delightful sewing journey, gather all your necessary supplies. Opt for medium-weight cotton fabrics for durability and ease of sewing. Quilting cottons, old shirts, or even sturdy linen scraps work wonderfully for this project.
- Main Fabric: One piece measuring approximately 40 x 20 cm (15.75 x 7.87 inches). This will form the exterior of your storage bag. Choose a fabric with a pattern or color that you love!
- Lining Fabric: One piece measuring approximately 40 x 20 cm (15.75 x 7.87 inches). This will create a neat interior for your bag and add structure. It can be a coordinating solid or a subtle pattern.
- Hanging Loop Fabric: A small piece of main fabric, approximately 3 x 10 cm (1.18 x 3.94 inches). This will be fashioned into the sturdy loop from which your bag will hang.
- Matching Thread: High-quality polyester thread that complements your fabric colors.
- Basic Sewing Kit: This includes sharp fabric scissors or a rotary cutter and mat, sewing pins or wonder clips, a fabric marker or tailor’s chalk, a ruler or measuring tape, an iron and ironing board, and a sewing machine equipped with a universal needle.
How to Make a Hanging Storage Bag: Step-by-Step Tutorial
Follow these detailed instructions to craft your very own hanging storage bag. Precision in cutting and sewing will ensure a beautiful, professional finish.
Step 1: Preparing Your Fabric Pieces
Take your 40 x 20 cm main fabric piece and fold it in half, ensuring the wrong sides are together. This means the right, printed side of the fabric will be facing outwards. Carefully measure and mark the exact dimensions for shaping, as indicated in the tutorial video or accompanying diagrams – these specific cuts will define the unique silhouette of your hanging bag. Next, take your 40 x 20 cm lining fabric, fold it in half in the same manner (wrong sides together), and place it directly on the back of your folded main fabric. This allows you to cut both layers simultaneously for perfect symmetry. Now, precisely cut the “x part” (the marked corner/curve portion) from both fabric layers, creating the distinctive shape for the top opening and sides of your bag. This initial shaping is crucial for the bag’s final aesthetic.
Step 2: Marking and Folding the Top Edges
With both your main and lining fabric pieces prepared, unfold them. Now, measure 2 cm (approximately 0.8 inches) inwards from the center line on each side along the top edge of both the lining and main fabric. Following this, measure 3 cm (approximately 1.2 inches) outwards from these 2 cm marks, creating distinct points. These measurements are crucial for creating the neat, folded top edge of your bag. Once marked, carefully fold the sides of both the main fabric and the lining fabric inwards at the points you’ve just marked. This creates a clean finish for the bag’s opening. Secure these folds firmly in place using sewing pins or fabric clips to prevent them from shifting during the next steps. Pressing these folds with an iron can also help to set them precisely.
Step 3: Constructing the Bag Body and Boxing Corners
Begin by taking your lining fabric. Fold it in half again, this time with the wrong sides together, aligning the raw side edges. Stitch along this side edge with a consistent seam allowance (e.g., 1 cm or 3/8 inch), backstitching at the beginning and end to secure your stitches. Repeat this exact process for the main fabric, ensuring the wrong sides are together and sewing along the side edge. Once sewn, carefully press the seams open on both the main and lining fabric pieces using a warm iron. This creates a flatter, neater finish. Next, sew the bottom part of both the main and lining fabric pieces closed, making sure that the center seams are perfectly aligned. For the lining fabric, it’s essential to leave a 5-7 cm (2-3 inch) opening unsewn along the bottom edge; this will be used later for turning the bag right side out. Now, to create the charming boxed corners that give the bag its depth, draw a 3 cm by 3 cm (approximately 1.2 x 1.2 inch) square on the bottom corners of both the lining and main fabric. Carefully open one corner, flattening it so the side seam and bottom seam align, creating a pointed end. Sew precisely along the marked 3 cm line. Repeat this process for the other corner on the same fabric piece, and then repeat for both corners of the remaining fabric piece. Once sewn, carefully trim off the excess fabric from these newly formed boxed corners, leaving a small seam allowance, to reduce bulk and ensure crisp, clean lines.
Step 4: Crafting the Hanging Loop
Take the small 3 x 10 cm piece of main fabric designated for your hanging loop. To create a sturdy and neat loop, first fold both of the long raw edges towards the center of the fabric strip. Press firmly with an iron to create crisp creases. Then, fold the strip in half lengthwise once more, completely encasing the raw edges within the fold. This will result in a clean, quadruple-layered strip of fabric. Stitch very close to the edges along both long sides of this folded strip. This double line of stitching not only secures the raw edges but also adds significant durability and a professional finish to your hanging loop.
Step 5: Attaching the Hanging Loop
Now it’s time to integrate the loop onto your main bag fabric. Take the finished fabric loop from Step 4 and fold it in half, creating a loop shape. Position this folded loop at the center top of the main fabric piece, specifically on the wrong side (the interior side) of the fabric, ensuring the raw ends of the loop align with the raw top edge of the main fabric. Stitch the raw ends of the loop securely to the main fabric within the seam allowance. You might want to make a couple of passes with your sewing machine over this area to ensure it’s very strong, as this loop will bear the weight of the bag and its contents when hung.
Step 6: Assembling Main Bag and Lining
With your main bag fabric now having its hanging loop attached, turn the lining fabric piece right side out. Carefully insert the right-side-out lining bag inside the main fabric bag (which should still be wrong side out). This means the right sides of both the main fabric and the lining fabric will be facing each other, and the wrong sides will be facing outwards. Align the top raw edges of both bags perfectly. Pin them together all the way around the entire top opening, making sure to match any seams or markings. Stitch all the way around this top edge with your sewing machine, creating a secure seam that joins the two bag pieces together.
Step 7: Finishing and Closing the Opening
Once the main bag and lining are sewn together at the top, it’s time to turn your creation right side out. Carefully reach into the bag through the opening you left in the bottom of the lining fabric in Step 3. Gently pull the entire bag assembly through this opening until the right sides of both the main fabric and the lining fabric are fully visible. Take your time to push out all the corners and edges to achieve a crisp shape. Finally, to close the opening in the lining, you have two options: you can machine stitch it very close to the edge for a quick and durable finish, or for a more invisible look, hand-sew the opening shut using a ladder stitch (also known as a slip stitch). Once the opening is closed, tuck the lining neatly inside the main bag, and press the top edge of the bag with an iron to give it a polished, finished appearance.
DIY Cute Hanging Storage Bag: Tips for Success and Customization
Now that you’ve mastered the basic construction, let’s explore ways to personalize and perfect your DIY hanging storage bags:
- Fabric Play: Don’t limit yourself to just cotton. Consider denim for a more rugged look, canvas for extra durability, or even flannel for a softer feel. Mix and match patterns and solids between the main fabric and lining for contrasting appeal.
- Size Variations: Experiment with different dimensions to create bags for various purposes. A smaller bag might be perfect for earrings, while a larger one could hold craft supplies or small toys.
- Add Embellishments: Elevate your bag with decorative touches! Consider adding lace trim along the top edge, sewing on some cute buttons, applying a small embroidered motif, or even incorporating fabric appliques for extra flair.
- Reinforce the Loop: For bags intended to hold heavier items, consider using a stronger fabric for the hanging loop or adding a layer of interfacing to the loop fabric before construction to give it more stability.
- Consider Interfacing: If your chosen fabric is very thin or you desire a stiffer bag, you can iron a lightweight fusible interfacing onto the wrong side of both the main and lining fabric pieces before cutting. This will add body and structure.
- Gift Idea: These handmade bags make thoughtful and personalized gifts! Fill them with small treats, toiletries, or other little treasures for a truly unique present.
Care and Maintenance for Your Fabric Storage Bags
To ensure your beautiful handmade hanging storage bags last for years to come, proper care is essential. Most fabric bags made from cotton can be machine washed on a gentle cycle with cold water. It’s always a good idea to air dry them to prevent shrinkage and maintain their shape. If your bag has delicate embellishments, hand washing might be a safer option. A quick iron after drying will help them look crisp and new.
Unleash Your Creativity with Handmade Home Decor
And there you have it – a charming, functional, and eco-friendly DIY hanging storage bag, ready to bring order and beauty to your home! This project by Cici Yi’s Sewing Diary is a testament to how simple sewing techniques can yield incredibly useful and adorable results. Not only have you created a practical organizer, but you’ve also contributed to sustainable living by upcycling your fabric scraps.
We encourage you to dive into your fabric stash, experiment with different designs, and personalize these bags to reflect your unique style. Share your beautiful creations with us and inspire others to embark on their own sewing adventures. Happy sewing!