
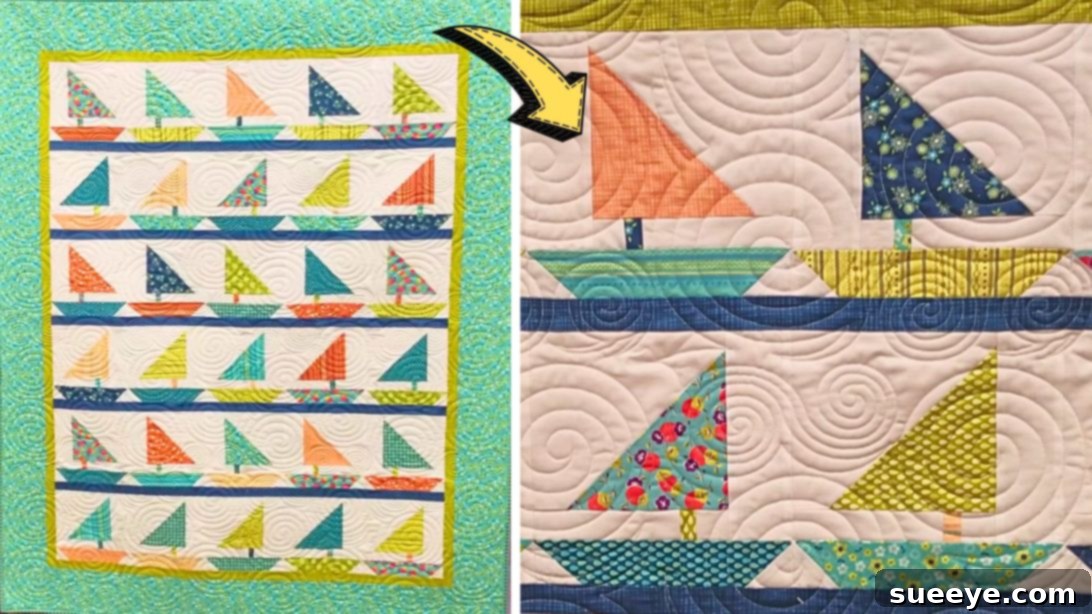
Mastering the Easy Boat Sail Quilt Block: A Comprehensive Tutorial for Stunning Quilts
Quilting offers a unique blend of creativity, precision, and heartfelt artistry. There’s an undeniable joy in transforming simple fabric pieces into a beautiful, functional masterpiece. For enthusiasts of charming shapes and delightful patterns, the adorable Boat Sail Quilt Block idea from Jordan Fabrics on YouTube stands out as a truly captivating project. This particular block has quickly become a recent favorite, not just for its visual appeal, but for its remarkable simplicity and satisfying results.
What truly sets this quilt block apart is its approachable nature. It’s incredibly easy and straightforward to assemble, making it an excellent choice for both novice quilters taking their first stitches and experienced crafters looking for a quick yet impactful project. The real magic, however, lies in the final outcome: a neat, aesthetically pleasing design that evokes a sense of calm and seaside charm. The clean lines and graphic quality of the boat sail motif are incredibly satisfying to behold, promising a finished quilt that will be cherished for years to come. This is undoubtedly a pattern that beckons for repeated creation, offering endless possibilities for color combinations and personalized touches.
Whether you dream of a nautical-themed nursery quilt, a refreshing throw for your living room, or a unique gift for a loved one, the Boat Sail Quilt Block provides the perfect foundation. In this comprehensive guide, we’ll delve deep into the process, from selecting your fabrics to adding the final binding, ensuring you have all the knowledge and confidence to create your own stunning quilt. Let’s embark on this creative voyage together!
Essential Materials for Your Boat Sail Quilt Block Project
Before you begin piecing together your charming boat sails, gathering all the necessary materials is crucial. High-quality tools and fabrics will ensure a smoother process and a more professional-looking finished quilt. Here’s a detailed list of what you’ll need:
- Fat Quarters or 10-inch Squares: These are pre-cut fabric pieces that are perfect for quilt blocks. Fat quarters typically measure 18×22 inches, while 10-inch squares (often called “layer cakes”) are ideal for quick cutting. Choose a variety of prints and solids that complement each other and align with your desired aesthetic for the “sails” and other patterned elements of your boat blocks.
- Background Fabric: This fabric will form the “sky” or “water” around your boat sails. Opt for a solid or subtle print that contrasts well with your chosen sail fabrics, allowing the boat shape to truly pop. Light blues, creams, or even crisp whites are popular choices for a classic nautical look.
- Sashing Fabric: Sashing strips are used to separate individual quilt blocks, adding definition and an organized look to your quilt top. A neutral color that harmonizes with your background fabric often works best, but a contrasting sashing can also create a bold design statement.
- Border Fabric 1: The inner border adds a frame to your quilt top, often echoing a color from your blocks or providing a gentle transition.
- Border Fabric 2: The outer border provides a substantial frame, allowing for more design impact and giving your quilt a finished, polished edge. Choose a fabric that ties all the elements of your quilt together or offers a striking contrast.
- Backing Fabric: This is the fabric for the underside of your quilt. It should be wide enough to accommodate your finished quilt top with a few inches to spare on all sides. You can choose a single wide fabric or piece together several narrower fabrics.
- Binding Fabric: Binding is the final fabric edge that encases the raw edges of your quilt sandwich, giving it a neat and durable finish. It can match your borders, contrast boldly, or even be scrappy from leftover fabrics.
- Needle and Thread: High-quality polyester or cotton thread is essential for strong seams. Choose a neutral color (like white, grey, or cream) that blends with most of your fabrics, or a color that specifically matches your dominant fabric if you want the stitches to be less visible. A sharp sewing needle (80/12 or 90/14 for quilting) is recommended for your machine.
- Ruler: A clear acrylic quilting ruler with precise measurements is indispensable for accurate cutting. A 6×24 inch ruler is versatile, but smaller squares can also be helpful.
- Scissors or Rotary Cutter and a Cutting Mat: While scissors are useful for small snips, a rotary cutter with a sharp blade and a self-healing cutting mat are paramount for precise, efficient fabric cutting, especially for multiple pieces. Always ensure your blade is sharp for clean cuts and safety.
- Iron, for pressing: A good iron with steam settings is vital for flattening seams and preparing fabric. A dry iron or steam iron works, but steam can be particularly helpful for setting seams. An ironing board or wool pressing mat will also be beneficial.
- Sewing Machine: A reliable sewing machine with a 1/4-inch piecing foot (or a good seam guide) will make the stitching process much easier and more consistent.
- Pattern (Click here to download the Regatta pattern by Cozy Quilt Designs, as featured by Jordan Fabrics.)
Step-by-Step Directions: Crafting Your Boat Sail Quilt
Precision and patience are key in quilting. Follow these detailed steps to bring your charming Boat Sail Quilt Block to life. Remember to always maintain a consistent 1/4-inch seam allowance throughout your piecing process for the best results.
Step 1: Fabric Preparation and Block Assembly
The journey begins with careful fabric preparation and accurate cutting. This foundational step will greatly influence the final appearance of your quilt blocks.
- Fabric Selection and Pressing: Begin by laying out all your chosen fabrics. Consider how the different patterns and colors will interact within each boat block and across the entire quilt. Once satisfied with your selection, give all fabrics a thorough press with a hot iron. This step is crucial for removing any wrinkles or creases, ensuring your fabric is perfectly flat and stable for precise cutting.
- Template Preparation: If your pattern requires templates (which the Regatta pattern often does for its unique shapes), carefully cut them out. For added durability and ease of use, consider taping these paper templates onto a clear plastic ruler or a piece of template plastic. This makes tracing and cutting much more manageable and repeatable.
- Precise Cutting: Using your prepared templates and a rotary cutter on a cutting mat, meticulously cut your background squares and print fabric strips to the exact sizes and shapes specified in the pattern. This precision is paramount for ensuring all your quilt pieces fit together perfectly. Take your time, double-check measurements, and use a sharp rotary blade for clean edges.
- Laying Out the Boat Block: Now for the exciting part – arranging your cut pieces! Lay them out onto a flat surface or a design wall (if you have one) to form the distinct boat sail shape. Refer to the Jordan Fabrics video tutorial or the pattern diagram to ensure each piece is oriented correctly, creating the iconic “boat” silhouette. This visual step allows you to confirm your fabric choices and layout before committing to stitches.
- Stitching the Block Pieces: With your layout confirmed, begin stitching the pieces together, one by one. Always place two pieces with their “right sides facing” (the printed or front sides of the fabric) and align their edges perfectly. Use pins to secure them, especially at corners and along longer seams, to prevent shifting. Stitch slowly and carefully, maintaining your consistent 1/4-inch seam allowance. This small, precise seam allowance is the standard in quilting and ensures your blocks will square up correctly.
- Trimming Excess Fabric: After stitching each seam, carefully trim any excess fabric from the seam allowance, if necessary, to maintain that perfect 1/4-inch width. This helps reduce bulk and keeps your block neat.
Step 2: Pressing, Assembling Quilt Top, and Finishing Touches
Once your individual boat sail blocks are pieced, the next phase involves transforming them into a cohesive quilt top and adding the essential layers that make a quilt warm and beautiful.
- Pressing Your Blocks: After stitching each section or the entire block, take it to your iron. Press the seams open or to one side (usually towards the darker fabric to prevent shadowing). The key is to press, not iron (which can stretch fabric). Pressing helps to flatten the seams, creating crisp, professional-looking blocks that will lie flat and square up accurately.
- Assembling More Blocks: Repeat the entire process from Step 1 and the initial pressing of Step 2 until you have created all the individual Boat Sail Quilt Blocks required for your desired quilt size. As you create more blocks, you might consider chain piecing to increase efficiency – sewing multiple sets of pieces one after another without lifting the presser foot completely.
- Laying Out Your Quilt Top: Once all blocks are ready, arrange them on your design wall, floor, or any large flat surface. Experiment with different layouts, rotating blocks, and swapping positions until you achieve a visually appealing arrangement. Take a photo to remember your final design!
- Sewing Blocks into Rows: Stitch your blocks together to form horizontal rows. Again, pay close attention to your 1/4-inch seam allowance and pin carefully, especially when joining blocks where seams meet, to ensure points align perfectly.
- Adding Sashing: If your design incorporates sashing, now is the time to add it. Sew sashing strips in between each block within a row, and then sew sashing strips between the completed rows. Sashing adds a visual break and can help square up your quilt top if your blocks aren’t perfectly uniform. Press all these new seams flat.
- Joining Rows and Squaring Up: Sew the completed rows together to form your full quilt top. Press these long seams carefully. At this stage, it’s wise to “square up” your quilt top if needed, trimming any uneven edges to ensure it’s perfectly rectangular. This makes adding borders much easier.
- Attaching Borders: Measure your quilt top carefully for your inner (Border Fabric 1) and outer (Border Fabric 2) borders. Cut your border strips to the exact length of the quilt sides and sew them on, pressing seams away from the center. Borders frame your design and can add significant visual weight and dimension.
Step 3: The Quilt Sandwich, Quilting, and Binding
With your quilt top complete, the final steps involve layering it with batting and backing, adding the quilting stitches, and applying the binding for a professional finish.
- Creating the Quilt Sandwich: Lay your backing fabric wrong side up on a clean, flat surface, taping it down securely if needed. Next, place your batting smoothly on top of the backing. Finally, center your finished quilt top right side up on top of the batting. This three-layer assembly is known as the “quilt sandwich.”
- Basting the Layers: Secure these three layers together to prevent shifting during the quilting process. You can use safety pins (often called “basting pins”), temporary spray adhesive designed for quilting, or hand-basting stitches. Ensure the layers are smooth and free of wrinkles.
- Quilting Your Project: Now, for the actual quilting! This is where you stitch through all three layers (quilt top, batting, and backing) to hold them together and add texture and dimension. You can quilt it however you want:
- Machine Quilting: Using your sewing machine for straight lines (stitch-in-the-ditch along seams, straight lines across the blocks), free-motion quilting (drawing designs with your needle), or even using a walking foot for simple wavy lines.
- Hand Quilting: For a more traditional, soft look, you can hand quilt with a needle and thread, creating small, even stitches.
Choose a quilting design that complements your boat sail blocks and overall aesthetic.
- Preparing and Attaching Binding: Once your quilting is complete, trim the excess backing and batting, squaring up the edges of your quilt. Prepare your binding strips by sewing them together end-to-end to create one long strip, then pressing it in half lengthwise. Attach the binding to the front of your quilt, aligning raw edges, then fold it over to the back and hand-stitch or machine-stitch it down for a clean, durable edge.
These amazing images are all credited to Jordan Fabrics via YouTube. Check out her other fantastic content and follow for more inspiring quilting tutorials and projects!
Pro Tips for a Flawless Boat Sail Quilt
- Always Press, Don’t Iron: When dealing with quilt blocks, use an up-and-down pressing motion rather than sliding the iron. This prevents stretching the fabric and distorting your carefully sewn pieces.
- Consistent Seam Allowance: A perfect 1/4-inch seam allowance is the holy grail of quilting. Use a 1/4-inch foot on your sewing machine or draw a guide line with a removable fabric marker to ensure accuracy, which is vital for your blocks to fit together without issues.
- Sharp Tools Are Safe Tools: A sharp rotary cutter blade makes clean cuts with less effort, reducing the risk of accidents and frayed edges. Replace your blade regularly.
- Pre-wash Your Fabrics: While some quilters skip this, pre-washing ensures all fabrics shrink consistently and that any excess dye is removed, preventing potential bleeding in the finished quilt.
- Take Breaks: Quilting can be intricate. If you feel frustrated or tired, step away for a bit. A fresh perspective often helps resolve challenges.
- Label Your Pieces: Especially for complex patterns or if you’re taking a break, labeling your cut pieces can save time and prevent mistakes later on.
- Practice Makes Perfect: Don’t be discouraged if your first few blocks aren’t perfect. Every stitch is a learning opportunity, and your skills will improve with practice.
Customizing Your Boat Sail Quilt: Endless Possibilities
One of the most exciting aspects of quilting is the ability to infuse your personality into every project. The Boat Sail Quilt Block, with its simple yet striking design, offers a fantastic canvas for customization:
- Color Palette Exploration: Go beyond traditional blues and whites. Imagine sails in vibrant primary colors for a child’s quilt, or elegant pastels for a softer aesthetic. Play with high-contrast combinations for a modern look, or use tone-on-tone fabrics for subtle sophistication.
- Fabric Play: Experiment with different types of fabric prints. Small florals, geometric patterns, or even novelty prints can add unique character to your sails. Consider using striped fabrics for a truly dynamic effect on the boat hulls or sails.
- Quilting Designs: The quilting stitches themselves can add another layer of design. Simple straight lines can create a clean, contemporary look, while free-motion quilting can add waves around the boats or a swirling sky above. Custom quilting can dramatically change the feel of your finished quilt.
- Size and Layout Variations: The beauty of quilt blocks is their versatility. You can make a small wall hanging with just a few blocks, a baby quilt with a dozen, or a full-sized bed quilt with many more. Experiment with rotating blocks to create different visual patterns when assembled.
- Adding Appliqué: For an extra personal touch, consider adding small appliqué elements like birds flying in the sky or tiny fish in the water around your boats.
Embark on Your Next Quilting Adventure!
The Easy Boat Sail Quilt Block, as wonderfully demonstrated by Jordan Fabrics, truly embodies the joy of quilting: simple techniques yielding stunning results. This project is a testament to how basic shapes and thoughtful fabric choices can come together to create something truly special and visually captivating.
We hope this expanded tutorial has provided you with the confidence and detailed instructions needed to embark on your own boat sail quilting adventure. Remember, every stitch tells a story, and the process of creating a handmade quilt is as rewarding as the finished product itself. So, gather your fabrics, fire up your sewing machine, and let your creativity set sail. Happy quilting!