
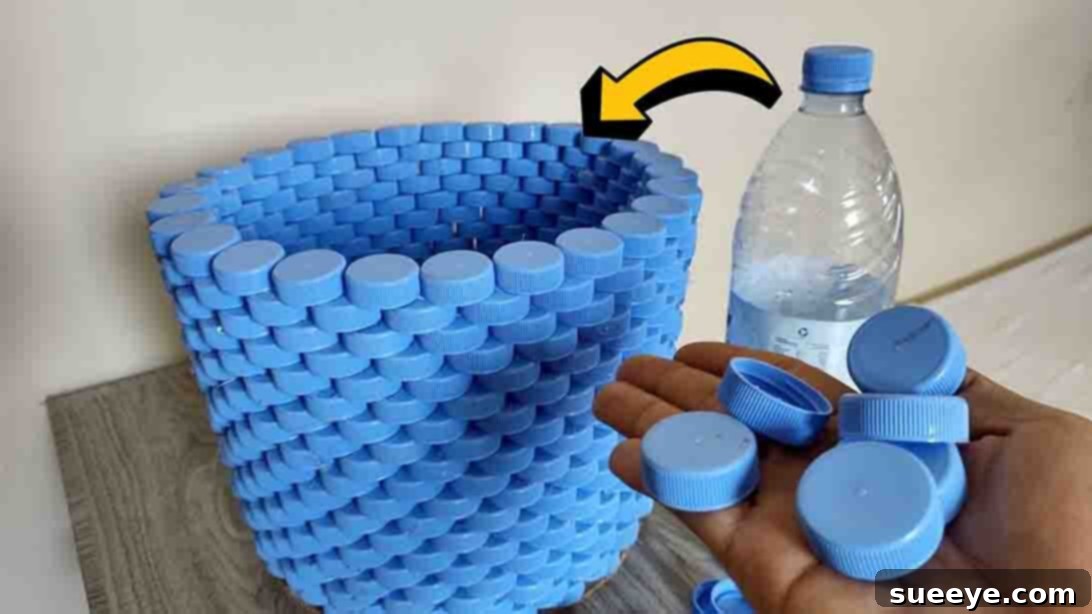
DIY Upcycled Laundry Basket: Transform Plastic Bottle Caps into Functional Art
Are you searching for an engaging and impactful recycling project that truly makes a difference in your home and for the planet? Look no further! This innovative DIY project guides you through creating a sturdy and stylish laundry basket, or a versatile organizer, entirely from recycled plastic bottle caps. Inspired by the creative genius of Tatzkreen Art on YouTube, this craft is not just a fun weekend activity; it’s a powerful statement in sustainable living.
In an era where environmental consciousness is paramount, upcycling everyday waste into practical items is more important than ever. Plastic bottle caps, often overlooked, represent a significant portion of household plastic waste. Instead of letting them accumulate in landfills, imagine transforming hundreds of these small pieces into a robust, beautiful basket that you’ll use daily. This project is incredibly satisfying, cost-effective, and offers a fantastic opportunity to engage friends or family in a meaningful crafting session.
Beyond its primary function as a laundry basket, this remarkably adaptable creation can serve countless purposes around your home. Envision it as a chic organizer for craft supplies, toys, or magazines. With a simple coat of spray paint, it can even become a unique decorative piece, adding a touch of personalized flair to any room. Its durability ensures it will be a long-lasting addition to your home, proving that creativity and sustainability can go hand-in-hand. Dive into this guide to learn the step-by-step instructions and unlock the potential of your collected bottle caps.
RELATED: Explore another innovative upcycling project with our guide on the DIY Plastic Bottle Chandelier.
Why Upcycle Plastic Bottle Caps? The Environmental Impact
Plastic bottle caps, though small, pose a significant threat to our environment. Made from high-density polyethylene (HDPE), polypropylene (PP), or other durable plastics, they are designed to last for centuries. When discarded, they contribute to landfill waste, pollute oceans, and break down into microplastics that harm wildlife and ecosystems. Many municipal recycling programs struggle with bottle caps due to their size, which can interfere with sorting machinery. This makes upcycling a particularly effective solution.
By choosing to upcycle your plastic bottle caps, you are actively participating in reducing waste, conserving natural resources, and mitigating plastic pollution. This project transforms potential pollutants into a valuable household item, showcasing a creative approach to sustainable living. It’s an empowering way to see the direct positive impact of your efforts and inspire others to rethink their waste.
Materials: Gathering Your Creative Toolkit
Before embarking on your crafting journey, ensure you have all the necessary materials. Most of these items are either readily available around your home or can be easily acquired from a craft store. Remember, preparation is key to a smooth and enjoyable DIY experience!
- Plastic Bottle Caps: You’ll need a substantial amount—hundreds, possibly over a thousand, depending on the desired size of your basket. Start collecting them from water bottles, soda bottles, milk jugs, and juice cartons. Ensure they are thoroughly washed and dried before use. Variety in color can create a vibrant, mosaic-like effect, or you can stick to a single color scheme for a more uniform look.
- Laundry Basket (or similar round object) for Tracing: This will serve as your mold and guide for the base and initial structure of your DIY basket. Choose one that reflects the desired size and shape for your finished project.
- Sturdy Cardboard: A large, flat piece of cardboard is crucial for the basket’s base. Repurpose moving boxes, appliance boxes, or any corrugated cardboard that can provide a firm foundation. The thicker and sturdier, the better for long-term durability.
- Hot Glue Gun and Glue Sticks: A reliable hot glue gun is your primary tool for assembling the caps. Ensure you have plenty of glue sticks on hand; this project requires a significant amount. Safety first: always use caution when operating a hot glue gun to prevent burns.
- Pencil or Marker: For tracing the base onto your cardboard. A marker provides a clearer line for cutting.
- Scissors or Box Cutter: Strong scissors are suitable for cutting cardboard, but a box cutter (utility knife) can be more efficient for thicker cardboard. Always use a cutting mat underneath if using a box cutter, and exercise extreme caution to avoid injuries.
- Optional: Protective gloves (for hot glue), a well-ventilated area, and additional decorative elements like spray paint, fabric lining, or rope handles.
Directions: Crafting Your Bottle Cap Basket
Follow these detailed steps to construct your unique and eco-friendly bottle cap basket. Take your time, enjoy the process, and watch your creation come to life!
Step 1: Preparing the Sturdy Base
The foundation of your bottle cap basket is paramount for its stability and shape. Begin by placing your existing laundry basket or chosen round object onto your sturdy piece of cardboard. Using a pencil or marker, carefully trace around the bottom edge of this basket. This will give you the inner circumference of your base.
Next, to create a stable edge for your first layer of bottle caps, you’ll need an outer circle. Place a single plastic bottle cap on the outside edge of your first traced circle and use it as a guide to draw a second, larger circle. This outer circle should be roughly one bottle cap width wider than your inner circle, ensuring enough space for your initial layer of caps to be securely glued. Alternatively, if you prefer precision, you can use a compass to draw the perfect outer circle, measuring the radius from the center.
Once both circles are clearly marked, carefully cut out the circular cardboard shape using sturdy scissors or a box cutter. If using a box cutter, always work on a protected surface like a cutting mat and cut slowly, applying even pressure to achieve a clean, smooth edge. This circular cardboard piece will form the robust base upon which your entire bottle cap structure will be built. A well-cut, stable base is key to the overall integrity and appearance of your finished basket.
Step 2: Laying the Foundation – The First Layer of Caps
Now, it’s time to start assembling! Begin by gluing the first layer of plastic bottle caps onto your cardboard base. Position each cap with its ‘wrong side down’—meaning the open, threaded side of the cap should be facing the cardboard. Apply a generous amount of hot glue to the rim of each cap and press it firmly onto the cardboard.
For the neatest result and strongest bond, start gluing your caps along the outer edge of the cardboard base, following the larger circle you traced in Step 1. Work your way inwards, ensuring each cap is placed snugly next to its neighbors. The goal here is to create a solid, interlocking layer that completely covers the cardboard base. Pay attention to consistent spacing to create a visually appealing pattern. Allow the glue to cool and set properly before moving to the next step, ensuring a secure foundation. This initial layer is critical for the stability of your basket.
Step 3: Building the Walls – Vertical Assembly with a Guide
This step is where your existing laundry basket becomes an invaluable tool. Once your base layer of caps is firmly set, carefully place your laundry basket directly in the center of your newly glued bottle cap base. This existing basket will act as a temporary mold, providing a perfect guide for building the vertical walls of your DIY bottle cap basket.
Begin gluing the next layer of bottle caps, this time attaching them vertically around the base of the laundry basket. Apply hot glue to the sides of the caps and adhere them to the first layer of caps on the base, and also to each other horizontally. Work your way around the entire circumference of the laundry basket. It’s often best to stagger the caps in each new layer, much like bricks in a wall. This interlocking pattern significantly enhances the structural integrity and strength of your basket, preventing wobbling and making it more durable.
Continue building upwards, layer by layer, always keeping the laundry basket inside as your guide to maintain a consistent shape and size. For each new cap, ensure it’s firmly glued to at least two points: the cap below it and the cap next to it. Don’t be shy with the hot glue, but avoid excessive amounts that might seep through and create a messy appearance. Work methodically in circular layers, allowing the glue to set briefly as you progress.
Keep gluing bottle caps until you are satisfied with the height of your DIY basket. If you want a handle, consider leaving a gap and reinforcing the edges, or adding rope handles later. Once you’ve reached your desired height and the glue has thoroughly dried, carefully remove the inner laundry basket. Your fantastic upcycled bottle cap basket is now complete! Take a moment to inspect all joints and reapply glue to any weak spots for maximum durability.
Applications and Beyond: More Than Just a Laundry Basket
The beauty of this DIY bottle cap basket lies in its incredible versatility. While designed with laundry in mind, its robust construction and unique aesthetic open up a world of possibilities for its use in your home:
- Creative Storage Solution: Perfect for organizing children’s toys, craft supplies, magazines, books, or even firewood. Its sturdy build can hold a surprising amount of weight.
- Decorative Accent Piece: Unleash your inner artist! Spray paint your finished basket a single bold color, a metallic shade, or even create intricate patterns with stencils. It can serve as a captivating centerpiece or a unique plant holder (just remember to line it if using for plants to prevent moisture damage).
- Eco-Friendly Recycling Bin: Designate it as a stylish and visible bin for collecting more bottle caps, paper, or other small recyclables, further promoting sustainable habits in your household.
- Pet Toy Organizer: Keep your furry friend’s toys neatly tucked away in a durable and easily accessible basket.
- Garden Tool Holder: For light garden tools or collecting small harvests from your vegetable patch.
The possibilities are truly endless, limited only by your imagination. This project not only provides a functional item but also adds a unique, handmade touch to your home decor, showcasing your commitment to creativity and sustainability.
Customization and Finishing Touches
Once your basket is assembled, consider these ideas to truly make it your own:
- Color Schemes: Plan your cap collection in advance to create specific color patterns, gradients, or even stripes. Using caps of varying sizes can also add interesting texture.
- Painting: Transform the entire basket with spray paint designed for plastic. Metallic, matte, or glossy finishes can dramatically alter its appearance. Always paint in a well-ventilated area.
- Handles: Attach rope handles for easier carrying. Simply drill two small holes on opposite sides of the top rim and thread a sturdy rope through, knotting it securely on the inside.
- Lining: For a softer touch or to prevent small items from falling through, sew a fabric liner that fits snugly inside your basket. This is especially useful if using it for laundry or delicate items.
- Sealant: For added durability and easier cleaning, consider applying a clear sealant or varnish suitable for plastic. This can protect the caps and glue from wear and tear.
Maintenance and Durability Tips
To ensure your upcycled bottle cap basket lasts for years to come, here are a few tips:
- Cleaning: For light cleaning, simply wipe down the basket with a damp cloth. For a deeper clean, a mild soap solution and a brush can be used, but avoid submerging the basket in water, as this could weaken the hot glue bonds over time.
- Reinforce Weak Spots: Periodically check your basket for any loose caps or weakened glue joints. A quick reapplication of hot glue can prevent further damage and extend its lifespan.
- Avoid Overloading: While sturdy, the basket is made from plastic caps and hot glue. Avoid placing excessively heavy items in it that could strain the structure, especially if the base is not reinforced.
- Indoor Use: This basket is best suited for indoor use. Prolonged exposure to direct sunlight or extreme weather conditions (rain, snow) can degrade the plastic and hot glue, affecting its durability and appearance.
Conclusion: A Rewarding and Sustainable Endeavor
Congratulations! You’ve successfully transformed what most people consider waste into a practical, beautiful, and unique item for your home. This DIY bottle cap laundry basket project is a shining example of how creativity, resourcefulness, and a commitment to sustainability can yield truly remarkable results. Not only have you created a functional piece, but you’ve also contributed positively to reducing plastic waste and inspiring others to think differently about recycling.
We encourage you to share your creations and experiences with fellow DIY enthusiasts. The satisfaction of crafting something with your own hands, especially from repurposed materials, is immense. Keep collecting those bottle caps, and let your imagination soar with endless upcycling possibilities! A huge thank you again to Tatzkreen Art for the brilliant inspiration behind this project. Happy crafting!