
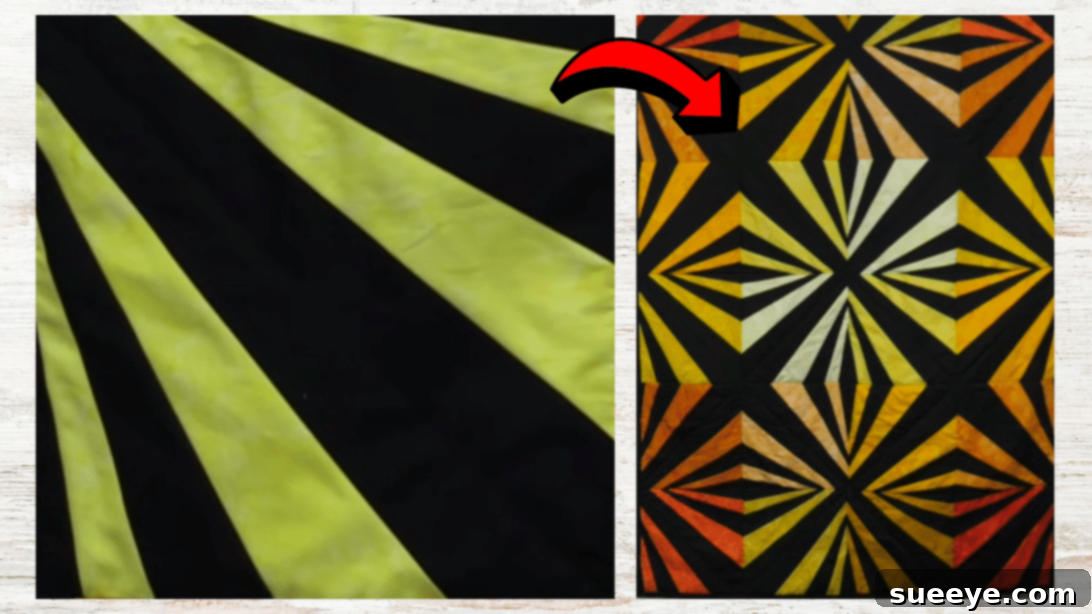
There’s an undeniable magic in quilting, especially when you bring together a vibrant mix of dark and bright fabrics. The contrast creates an incredible visual dynamic, allowing each color to truly shine and making any pattern dramatically pop. Among countless designs, the Burst Quilt Block has quickly become a personal favorite of mine. This captivating design, showcased in a brilliant tutorial by Missouri Star on YouTube, is a fantastic collaboration between two quilting legends: Jenny Doan and Rob Appell. Their combined expertise has resulted in a quilt block that is both stunningly intricate in appearance and surprisingly simple to construct, making it perfect for quilters of all skill levels.
RELATED: Easy Lore Quilt Block Tutorial
Upon first glance, you might assume that the Burst Quilt Block requires advanced piecing techniques and years of experience. However, that couldn’t be further from the truth! Once you dive into the step-by-step video tutorial and follow these detailed written instructions, you’ll be amazed at how easily the pieces come together. This project is specifically designed to be accessible, allowing even absolute beginners to achieve impressive, professional-looking results. If you’ve been searching for a rewarding quilting project that introduces you to fundamental techniques while yielding a spectacular outcome, then look no further. Let’s gather our materials and embark on this creative journey to craft your very own Burst Quilt Block!
Why the Burst Quilt Block is a Must-Try for Every Quilter
The Burst Quilt Block offers a unique blend of elegance and simplicity. Its dynamic design, characterized by wedges radiating from a central point, creates an illusion of depth and movement that is incredibly appealing. The genius of Jenny Doan and Rob Appell’s method lies in breaking down this complex-looking pattern into manageable, repetitive steps. This makes it an excellent choice for those new to quilting who want to build confidence in their piecing and pressing skills, without getting overwhelmed. The stark contrast between dark and bright fabrics not only highlights the “burst” effect but also allows for endless creative possibilities. You can experiment with various color palettes – perhaps cool blues and greens against a deep navy, or warm reds and oranges contrasted with a rich chocolate brown. This versatility ensures that every Burst Quilt project you undertake will be truly unique and reflective of your personal style.
Beyond its aesthetic appeal, crafting a Burst Quilt Block is deeply satisfying. Each perfectly aligned seam and crisply pressed fabric segment brings you closer to a beautiful finished product. It’s a project that encourages precision and patience, fostering a deeper appreciation for the art of quilting. Whether you’re making a single block to practice new skills, a few blocks for a table runner, or multiple blocks for a full-sized quilt, the Burst Quilt Block promises a fulfilling creative experience and a stunning result that you’ll be proud to display or gift.
Essential Materials for Your Burst Quilt Block Project:
To begin your Burst Quilt Block journey, having the right materials and tools on hand is crucial for a smooth and enjoyable experience. Here’s a comprehensive list of what you’ll need, along with some helpful tips for selection:
- 1 pack of 10″ squares, solid or black: These are often referred to as “layer cakes” in the quilting world. For the “burst” effect to truly stand out, choose a solid color that provides a strong contrast to your printed fabrics. Black is a classic choice for maximum impact, but a deep charcoal, navy, or even a rich jewel tone could work beautifully depending on your print selection. Ensure your fabric is good quality to prevent fraying and ensure longevity.
- 1 pack of 10″ squares, print or yellow: Select a pack of prints that complement each other and provide a vibrant contrast to your solid fabric. If you’re going for a sunny, cheerful look, a pack of yellow prints will certainly deliver. Consider prints with varying scales – some large, some small – to add visual interest to your finished block. As with the solid squares, quality fabric is key.
- 2¾ yards of backing fabric: This measurement provides enough fabric for a good-sized quilt using multiple Burst blocks. When choosing your backing, you can either select a fabric that harmonizes with your quilt top’s colors or opt for a contrasting print to add an unexpected element when the quilt is flipped over. Remember to pre-wash your backing fabric along with your other squares to prevent any potential shrinkage or dye bleeding later on.
- Marking pen, pencil, or chalk: Precision is paramount in quilting. A good fabric marker will help you draw accurate lines for cutting and stitching. Test your marker on a scrap piece of fabric first to ensure it erases or washes away completely without leaving a trace.
- Scissors or rotary cutter and a cutting mat: While scissors are always an option, a rotary cutter and a self-healing cutting mat are indispensable tools for quilters. They allow for quick, precise, and straight cuts, which are essential for accurate piecing. A sharp blade makes a significant difference, so ensure yours is in good condition.
- Fabric pins: Essential for holding fabric pieces together before stitching. Opt for fine, sharp pins that won’t distort your fabric or leave large holes.
- Needle and thread: Choose good quality 100% cotton thread that matches your fabric or is a neutral color like white or gray. A fresh needle in your sewing machine ensures smooth stitching.
- Iron, for pressing: A hot iron and a sturdy ironing board are your best friends in quilting. Proper pressing after each seam is crucial for flat, accurate blocks and a professional finish.
- Sewing machine: Any basic sewing machine capable of a straight stitch will work perfectly. Ensure it’s clean, oiled, and in good working order before you begin.
- Burst block template (Click here to download the template): This template is the secret weapon for this block, simplifying the cutting process for the unique wedge shapes. Make sure to print it at 100% scale to maintain accuracy.
How to Make a Burst Quilt Block: A Detailed Step-by-Step Tutorial
Creating the Burst Quilt Block is a satisfying process that combines precise cutting with careful piecing. Follow these steps to bring your vibrant fabric choices to life:
Step 1: Preparing Your Fabric Pieces
Begin by taking your pack of 10″ print squares (e.g., yellow prints). Lay each square flat and carefully cut it in half diagonally from one corner to the opposite corner. This will yield two large triangles from each square. Repeat this for all your print squares, creating a stack of identical triangles. Next, take your pack of 10″ solid squares (e.g., black or chosen solid). Using the provided Burst block template, carefully place it on each solid square and cut out the wedge shapes as indicated. It’s crucial to be precise with these cuts. As you cut, make sure to keep your solid wedges and print triangles sorted into separate, organized piles. The different pieces are not interchangeable, and maintaining order will streamline your assembly process significantly.
Step 2: Assembling the Central Wedge Unit
Now, let’s start piecing! Pick up one of the solid fabric wedges. This will form the core of your burst. Next, select two of your print triangles. You will lay the solid wedge in between these two print triangles. Ensure that the straight edges of the solid wedge align perfectly with the longest straight edges of the print triangles. Pin the pieces together securely, aligning the raw edges. Using a standard 1/4-inch seam allowance, stitch these three pieces together – first one print triangle to one side of the solid wedge, then the second print triangle to the other side. After stitching, take your unit to the iron. Gently press the seams nicely. For this block, pressing the seams open or towards the darker fabric can help reduce bulk and achieve a flatter finish. This completed unit will now have a pointed solid center flanked by print triangles.
Step 3: Shaping the Burst – Adding Solid Triangles
Once your central unit is pressed, return to your cutting mat. Use the wedge template again, this time to trim off any excess fabric on the print sides of the unit. This step ensures that your unit maintains the correct shape and size for subsequent additions. With the excess trimmed, select two more solid triangles from your prepared pile. These will be stitched onto the remaining raw edges of the print triangles on either side of your central unit. Align the raw edges, pin carefully, and stitch them with a 1/4-inch seam allowance. Once stitched, return to the iron and press these new seams nicely. Precision in pressing at each step is vital for a flat and accurate quilt block.
Step 4: Building the Outer Layer with Print Triangles
After pressing the newly added solid triangles, you’ll trim off any excess fabric from these sides, similar to the previous step, using your template to guide you. Now it’s time to introduce the next layer of print triangles. Take two more print triangles and align them with the straight, raw edges of the solid triangles you just added. Pin them securely. Stitch them in place using your consistent 1/4-inch seam allowance. After stitching, trim any excess fabric from these newly added print sides. Then, press your seams open or towards the darker fabric for a clean finish.
Step 5: Completing the Burst with Final Solid Triangles
You’re almost there! For the final touch to complete your Burst Quilt Block, you will attach the last set of solid triangles. Select two more solid triangles and align them with the remaining raw edges of the print triangles. Pin them carefully to ensure alignment. Stitch these final solid triangles onto each side, maintaining that crucial 1/4-inch seam allowance. Trim any last excess fabric as needed to ensure clean edges and proper shaping of the block. Give the entire block a final, thorough press. This last press is important for setting all the seams and achieving a perfectly flat, crisp block.
Step 6: Squaring Up Your Burst Quilt Block
The final step for a professional-looking block is squaring it up. Using a large square quilting ruler and your rotary cutter, carefully trim the edges of your finished Burst Quilt Block to your desired final size (e.g., 12.5 inches square, or whatever size your pattern dictates). This step corrects any slight inaccuracies in piecing and ensures that all your blocks will fit together perfectly when you assemble your quilt top. A precise square block is the foundation for a beautiful, flat quilt. Give it one last gentle press, and your stunning Burst Quilt Block is complete!
*All image credit belongs to Missouri Star via YouTube. Follow and subscribe to their channel for more inspiring quilting tutorials and projects!
Tips for Quilting Success:
- Consistent Seam Allowance: A precise 1/4-inch seam allowance is the cornerstone of accurate quilting. Practice on scraps if needed to ensure your seams are consistent.
- Pressing is Key: Don’t underestimate the power of a good press! Pressing after each seam helps your blocks lie flat and ensures your points and corners align perfectly.
- Use a Fresh Needle: Change your sewing machine needle frequently, especially when working with different fabric types, to prevent skipped stitches and snags.
- Organize Your Pieces: Keeping your cut fabrics organized by type and order of assembly will save you time and prevent errors.
- Don’t Rush: Quilting is a journey, not a race. Take your time, enjoy the process, and don’t be afraid to unpick and re-stitch if something isn’t quite right.
Your Burst Quilt Block Awaits!
With these detailed instructions and a little patience, you’ll be able to create stunning Burst Quilt Blocks that will form the basis of a beautiful quilt, a striking table runner, or even a decorative pillow. This project by Jenny Doan and Rob Appell is a testament to the joy of quilting – a craft that combines artistry, precision, and the warmth of handmade creations. So grab your fabrics, fire up your sewing machine, and prepare to be delighted by the captivating “burst” of color and pattern you’ll bring to life. Happy quilting!