
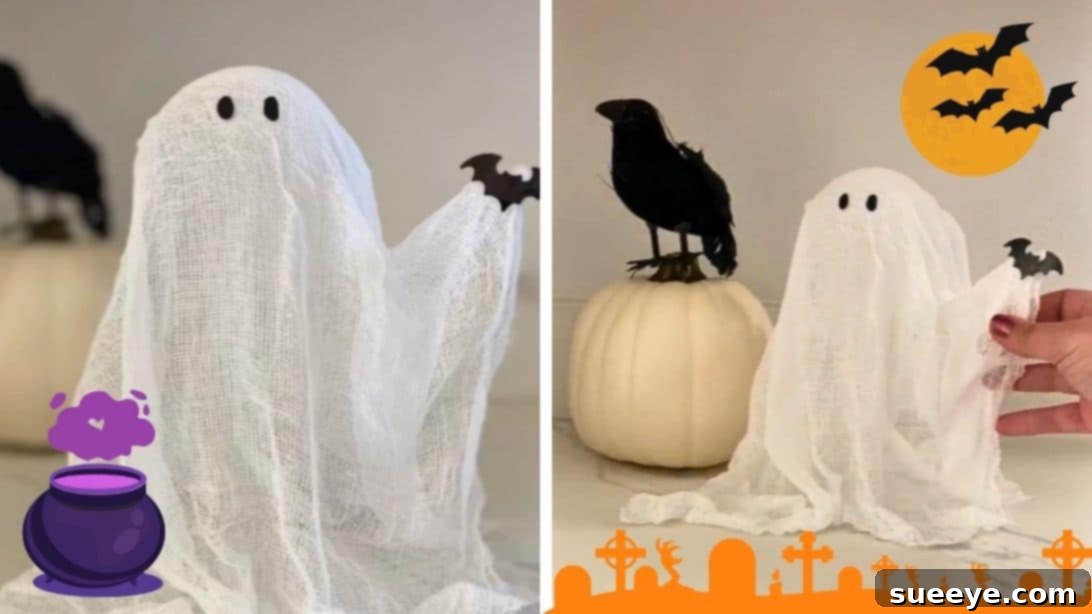
Spooktacularly Simple: Create Adorable DIY Cheesecloth Ghosts for Halloween
Halloween is a magical time of year, filled with enchanting decorations, thrilling costumes, and delightful treats. While store-bought decor can be tempting, there’s a unique joy and satisfaction in crafting your own spooky season masterpieces. Contrary to popular belief, you don’t need to spend a fortune to deck out your home in festive charm. All it takes is a dash of creativity, a few readily available materials, and a little bit of time.
If you’re looking for an incredibly easy, budget-friendly, and incredibly fun DIY project that you can enjoy with the whole family, you’ve come to the right place. We’re about to dive into a craft that has taken social media by storm, thanks to its simplicity and adorable outcome: the DIY cheesecloth ghost.
This charming project gained widespread popularity after TikTok creator houseonparkway shared a video demonstrating how to transform a simple piece of cheesecloth into an irresistibly cute Halloween ghost. Her tutorial quickly garnered millions of views, likes, and comments, inspiring countless individuals to try their hand at this delightful craft. The appeal is clear: it’s an accessible project that delivers impressive results, making it perfect for both seasoned crafters and beginners alike. Let’s get started on creating your own spectral companions!
Why Choose DIY for Your Halloween Decor?
Opting for do-it-yourself Halloween decorations offers a multitude of benefits that extend beyond just saving money:
- Budget-Friendly: Many DIY projects, like our cheesecloth ghost, utilize common household items or inexpensive craft supplies, drastically cutting down on holiday spending.
- Unleash Creativity: It’s a fantastic opportunity to express your personal style and create truly unique decorations that reflect your taste. No two DIY ghosts will ever be exactly alike!
- Family Fun: Crafting together is a wonderful way to bond with children, creating lasting memories and fostering their imaginative skills. This ghost project is particularly kid-friendly, with steps suitable for various age groups.
- Personalized Touch: Your home will stand out with decor that has a story behind it, made with love and effort, rather than mass-produced items.
- Sustainable Choice: Reusing materials or opting for crafts that last for years reduces waste, making your Halloween celebrations a bit greener.
- Sense of Accomplishment: There’s immense satisfaction in seeing your vision come to life and proudly displaying something you’ve made with your own hands.
Materials You’ll Need: Gathering Your Spooky Supplies
One of the best aspects of this DIY ghost project is how few and simple the required materials are. Most of these can be found around your home or purchased for very little cost at any craft or dollar store. Here’s what you’ll need to conjure your adorable apparitions:
- Cheesecloth: This is the star of our show! Its loosely woven texture is perfect for creating a flowing, ethereal ghost form. A standard pack from the grocery or craft store will suffice, offering enough material for several ghosts.
- White Glue: Standard PVA glue, like Elmer’s Glue-All, works perfectly. It dries clear and provides the necessary stiffness for your ghost to hold its shape.
- Water: To dilute the glue and create our magical ghost-making solution.
- Small Balloons: These will serve as the temporary head and body form for your ghosts. Different sizes will yield different ghost sizes, so consider inflating a few for variety.
- Small Bottles or Jars: You’ll need these to support the inflated balloons while your ghosts dry. Water bottles, spice jars, or even small soda cans work well. Ensure they have a narrow neck to hold the balloon securely.
- Felt Paper: Black or white felt is ideal for cutting out eyes and other small decorative elements like bats or spiders.
- Scissors: For cutting the cheesecloth and felt paper.
- A Bowl or Container: For mixing your glue solution.
- Optional Embellishments: Googly eyes, glitter, small LED tea lights (for an illuminated glow), or thin craft wire for more defined arms.
Step-by-Step Guide: Crafting Your Hauntingly Cute Ghosts
Ready to bring your friendly spirits to life? Follow these simple steps to create your very own charming cheesecloth ghosts:
Step 1: Prepare the Ghostly Concoction
In a bowl or container, carefully measure out 1/3 cup of white glue. Then, add one full cup of water to the glue. Using a spoon or craft stick, mix the solution thoroughly until the glue is completely dissolved and you have a smooth, liquid mixture with a milky consistency. The goal is to ensure there are no clumps of glue, as this will help the cheesecloth absorb the mixture evenly.
Step 2: Submerge and Saturate the Cheesecloth
Take your cheesecloth and gently submerge it into the glue and water mixture. Ensure the entire piece of fabric is fully soaked, absorbing the solution evenly. You can gently squeeze and release the cheesecloth a few times to help it absorb the liquid more effectively. Once fully saturated, gently lift the cheesecloth from the bowl, allowing any excess liquid to drip back into the container. You want the cheesecloth to be damp and pliable, not dripping wet.
Step 3: Create Your Ghostly Form
Now, it’s time to give your ghost its shape. Inflate a small balloon – the size of the balloon will determine the head and upper body size of your ghost. Place this inflated balloon securely onto the neck of a small bottle or jar. This will serve as the stable base for your ghost’s head and body during the drying process. Carefully open up your soaked cheesecloth and drape it over the balloon. Arrange the fabric to create the classic ghost shape, allowing the ends of the cheesecloth to fall naturally around the bottle and onto the surface below. The way the fabric drapes will define your ghost’s “body” and “robes.” To create ghostly “arms” or a more dynamic pose, you can strategically place objects like pencils, thin craft wire, or even small twigs under the draped cheesecloth before it dries. Ensure the bottom edge of the cheesecloth rests flat on your drying surface; this will create a stable, flat base for your finished ghost, allowing it to stand freely once dry.
Step 4: The Waiting Game
Patience is key for this step! Allow your cheesecloth ghost to dry completely, which typically takes overnight or even up to 24 hours, depending on humidity levels and the amount of glue mixture used. Place it in a well-ventilated area to expedite the drying process. The cheesecloth must be fully hardened to maintain its shape once removed from its form.
Step 5: The Grand Reveal
Once your ghost form is completely dry and rigid, it’s time for the magical moment! Carefully remove the balloon from inside the hardened cheesecloth. You might need to gently deflate the balloon first, or simply wiggle it free. The cheesecloth should now stand freely, having perfectly retained its ghostly shape.
Step 6: Bringing Your Ghost to Life with Details
With your ghost form ready, it’s time to add personality! Take your felt paper and cut out two small oval shapes for the eyes. You can vary their size and placement to give your ghost different expressions – wide-eyed, sleepy, or even slightly mischievous. Securely glue these felt eyes onto the ghost’s “head.” For a delightful finishing touch, as demonstrated by houseonparkway, you can cut out a small bat shape from felt paper and glue it to one of your ghost’s “hands” or draped fabric. This adds an extra layer of cuteness and character. Feel free to get creative here: use googly eyes, add a glittery smile, or even tiny felt bows.
Tips for Perfecting Your DIY Ghosts
To ensure your cheesecloth ghosts are truly spooktacular and stand the test of time, consider these additional tips:
- Vary Sizes: Create a family of ghosts by using balloons of different sizes. A mix of large, medium, and small ghosts creates a dynamic display.
- Add Illumination: For an enchanting glow, place small battery-operated LED tea lights or fairy lights underneath your ghosts. This will make them softly glow in the dark, adding to their ethereal charm.
- Outdoor Use: If you plan to display your ghosts outdoors, consider using a waterproof sealant spray after they are fully dry and decorated. This will protect them from moisture and help them withstand the elements.
- Creating a Scene: Arrange multiple ghosts in different poses and sizes to create a ghostly tableau. You can have some floating, some standing, and some interacting with other Halloween decor.
- Storage: These ghosts are surprisingly durable! Store them gently in a box wrapped in tissue paper when not in use, and they can be brought out for many Halloweens to come.
- Safety First: When crafting with children, always supervise them, especially when handling scissors or glue. Ensure the area is well-ventilated during the drying process.
- Experiment with Fabric: While cheesecloth is traditional, you can try other light, sheer fabrics like tulle or old sheer curtains for different textures and effects.
Where to Display Your Adorable Apparitions
The versatility of these DIY ghosts is part of their charm. They are perfectly sized and designed to fit into almost any Halloween decor scheme:
- On Shelves and Mantels: Group them together on a fireplace mantel or bookshelf to add a subtle spooky touch.
- Table Centerpieces: Arrange a few ghosts as the centerpiece for your dining table or coffee table, perhaps with some autumn leaves or small pumpkins.
- Work Desks: A tiny ghost can bring a smile to your face on your office desk, reminding you of the festive season.
- Windowsills: Place them on windowsills to greet guests and passersby with their friendly spectral presence.
- Hanging Decorations: Attach a piece of fishing line or clear thread to the top of the ghost’s “head” (before it fully dries, or by carefully poking a hole) and hang them from ceilings, light fixtures, or tree branches (if outdoor-proofed) for a floating effect.
- Entryway Decor: Welcome trick-or-treaters with a display of these charming ghosts near your front door.
Beyond the Basic Ghost: Creative Variations
Once you master the basic cheesecloth ghost, don’t hesitate to experiment and create even more unique variations:
- Spiderweb Ghosts: Lightly spray parts of your ghost with faux spiderweb spray for an extra layer of spooky texture.
- Mummy Ghosts: Instead of draping a single piece of cheesecloth, wrap strips of cheesecloth around your balloon form, leaving gaps to resemble a mummy.
- Colorful Ghosts: While white is traditional, you can try using fabric dye on your cheesecloth before soaking it in glue for pink, green, or even multi-colored ghosts.
- Googly-Eyed Gang: Forget felt eyes and use various sizes of googly eyes for a whimsical and comical effect.
- Ghostly Garland: Create several smaller ghosts and string them together to make a charming Halloween garland for your doorway or fireplace.
Embrace the Spirit of DIY This Halloween!
As you can see, creating adorable and affordable Halloween decor doesn’t require a hefty budget or advanced crafting skills. This TikTok-inspired DIY cheesecloth ghost project is a testament to how a little creativity and a few simple supplies can yield delightful results. It’s a wonderful way to personalize your home, engage in a fun family activity, and truly embrace the spirit of Halloween without breaking the bank.
The finished ghosts are not only charming and not-so-spooky but also incredibly versatile in their placement, adding a touch of whimsical Halloween magic wherever they go. So gather your materials, call the kids, and get ready to conjure your very own squadron of friendly apparitions. Happy crafting, and have a spooktacular Halloween!