
Restore Your Cool: A Comprehensive Guide to Cleaning Your Window Air Conditioner for Peak Performance
Do you find yourself cranking up your window air conditioner to the maximum setting, only for your room to remain stubbornly warm? A common culprit behind an underperforming AC unit isn’t necessarily a broken part, but simply a build-up of dirt and grime. Over time, dust, allergens, and other debris can accumulate on your AC’s coils and filters, drastically reducing its cooling efficiency and even impacting the air quality in your home. The good news is, you don’t need a professional for this task! With a few simple tools and a bit of time, you can restore your AC to its former glory.
This comprehensive guide, inspired by the practical advice from Handyman Hertz’s tutorial, will walk you through the process of cleaning your window air conditioner the easy and effective way. By following these steps, you’ll not only enjoy a cooler home but also benefit from improved air quality, lower energy bills, and a longer lifespan for your appliance. Let’s dive in and learn how to bring back that refreshing chill!
Why Regular AC Cleaning is Essential for Your Home
While often overlooked, regular cleaning of your window air conditioner is more than just a chore; it’s a vital part of home maintenance that offers numerous benefits:
- Significantly Improved Efficiency: A dirty air conditioner has to work much harder to cool your room. Dust and debris act as an insulating layer on the coils, preventing efficient heat exchange. Handyman Hertz points out that accumulated dirt and grime can reduce your system’s efficiency by as much as 5%. This means your AC consumes more energy to achieve the same cooling effect, directly leading to higher electricity bills. A clean unit transfers heat more effectively, providing optimal cooling with less effort.
- Enhanced Air Quality: Your AC unit isn’t just about cooling; it also circulates air. When filters and coils are laden with dust, mold spores, pet dander, and other allergens, these particles are constantly blown back into your living space. This can exacerbate allergies, asthma, and other respiratory issues. Cleaning your AC ensures you’re breathing cleaner, fresher air, contributing to a healthier home environment.
- Extended Unit Lifespan: An AC unit that constantly struggles due to dirt buildup is under immense strain. This overexertion can lead to premature wear and tear on critical components, potentially resulting in costly repairs or even the need for a full unit replacement sooner than expected. Regular cleaning reduces this stress, allowing the unit to operate smoothly and extending its overall lifespan.
- Consistent Cooling Performance: Nobody wants an AC that cools unevenly or weakly. A clean unit delivers consistent, powerful cooling throughout its operational cycle, ensuring your space remains comfortable even on the hottest days.
When to Clean Your Window AC Unit: Frequency Matters
The frequency of cleaning depends on several factors, including how often you use your AC and your home environment. As a general guideline:
- Air Filter: The air filter is your first line of defense against airborne particles. It should be cleaned at least once a month, or even more frequently if you have pets, live in a dusty area, or use your AC heavily.
- Deep Cleaning (Coils and Interior): A thorough deep clean, as outlined in this guide, is recommended at least once per cooling season, typically at the beginning or end of summer. If your AC runs almost continuously or if you notice a significant drop in performance, an mid-season deep clean might be beneficial.
Safety First: Important Precautions Before You Begin
Before you start any maintenance on your AC unit, remember these crucial safety tips:
- Always Unplug the Unit: This is the most critical step. Ensure the air conditioner is completely disconnected from its power source to prevent accidental startup or electrical shock. Never attempt to clean a plugged-in unit.
- Mind Electrical Components: While much of the cleaning involves water and cleaning solutions, always be mindful and keep liquids away from all electrical wiring, connections, and the motor.
- Wear Protective Gear: It’s advisable to wear gloves to protect your hands from cleaning solutions and accumulated grime. Eye protection can also be beneficial to guard against splashes.
- Work in a Well-Ventilated Area: If possible, move the unit to an outdoor or well-ventilated space, especially when using foaming cleaners, to avoid inhaling fumes.
Gathering Your Tools and Materials
To make the cleaning process smooth and efficient, gather these essential items:
- Soapy Water: A gentle solution, such as dish soap mixed with warm water, is perfect for cleaning the air filter and exterior surfaces.
- Foaming Cleaner (Coil Cleaner): Specifically designed for AC coils, this cleaner penetrates and dissolves stubborn dirt and grime without damaging the delicate fins. Look for “no-rinse” coil cleaners, though we’ll still recommend a light rinse for better results.
- Clean Towels or Rags: For wiping surfaces, catching drips, and drying.
- Spray Bottle: For rinsing the coils with clean water.
- Warm Water: For rinsing the coils and cleaning the air filter.
- Screwdriver: To remove the front panel and access the interior.
- Soft Brush (Optional): A soft-bristled brush can help dislodge stubborn dirt from the coils, but use it gently to avoid bending the delicate fins.
- Drop Cloth or Plastic Sheet (Optional): To protect your floor or workspace from drips and dirt.
Step-by-Step Guide: How to Clean a Window Air Conditioner
Follow these detailed steps to give your window AC a thorough and effective cleaning:
Step 1: Unplug and Prepare Your Workspace
First and foremost, unplug your air conditioner from the wall outlet. If possible, move the unit to an area where you have plenty of space to work and where any drips or mess won’t be an issue, such as outdoors or on a covered surface. Lay down a drop cloth if you’re working indoors.
Step 2: Remove and Clean the Air Filter
Locate and carefully remove the air filter from your air conditioner. This is typically a mesh screen found behind the front grille. Once removed, clean it thoroughly with warm, soapy water. Gently scrub away any accumulated dust, pet hair, or debris. Rinse it under running water until all soap residue is gone and the water runs clear. Set the filter aside to air dry completely before reinstallation.
Step 3: Accessing the Interior – Removing the Front Panel
Most window AC units have a front panel that needs to be removed to access the internal components. Look for screws on the sides or top of the unit that secure this panel. Carefully remove these screws. Once the screws are out, gently lift or slide the front panel off. You’ll likely be surprised by the amount of dust and grime that has collected inside.
Step 4: Detach the Temperature Sensor for Safety
Inside, you’ll see the evaporator coils. Before you start spraying, locate the temperature gauge or sensor. This is usually a thin wire with a small bulb at the end, often tucked between the coil fins or snapped into a copper pipe. Carefully pull it out of its position and move it out of the way. This prevents accidental damage and allows better access to the coils for cleaning.
Step 5: Deep Cleaning the Evaporator Coils (Interior)
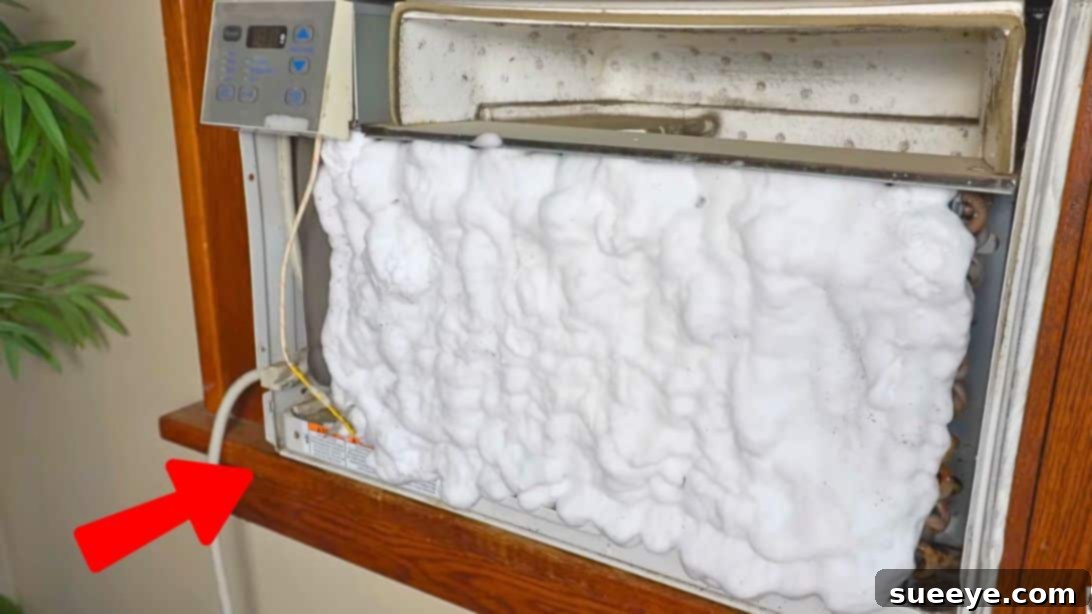
The evaporator coils are the internal components responsible for absorbing heat from your room’s air. They are often covered in a thick layer of dust. Take your foaming coil cleaner and spray it liberally onto the evaporator coils. Ensure good coverage, working from top to bottom. Place a rag or towel underneath the coils to catch any dripping cleaner and loosened dirt. Allow the cleaner to sit and work its magic for about 10 minutes, giving it time to dissolve the grime. This dwell time is crucial for effective cleaning.
After the cleaner has sat, fill your spray bottle with warm, clean water. Gently rinse the coils. While many foaming cleaners claim to be “no-rinse,” a light rinse helps to flush away the dissolved dirt and cleaner residue more effectively. When rinsing, be cautious and avoid spraying directly onto any electrical components of your AC unit. Focus the water spray on the coils themselves, ensuring the runoff collects in your rag or a pan below. Don’t worry about the water draining into the unit’s drip tray; it’s designed to handle moisture.
Step 6: Reattaching the Temperature Sensor
Once the interior coils are rinsed and appear clean, carefully place the temperature sensor back into its original position. This usually involves sliding it gently between the coil fins and snapping it securely onto one of the larger copper plumbing pipes. Ensure it’s firmly in place for accurate temperature readings.
Step 7: Cleaning the Condenser Coils (Exterior)
Now, it’s time to tackle the outside coils – the condenser coils. These are located at the back of the unit and are responsible for releasing the heat collected from inside your room. Give your foaming cleaner a good shake and spray it thoroughly onto the exterior coils, just as you did with the interior ones. Again, ensure good coverage and let the cleaner sit for approximately 10 minutes to break down the accumulated dirt, leaves, and outdoor debris.
Step 8: Rinsing the Exterior Coils
Using your spray bottle filled with water, rinse the exterior condenser coils thoroughly. The goal is to wash away all the dissolved dust, dirt, and cleaner residue. Be careful not to use excessive amounts of water in a way that causes it to splash or flow excessively into the interior of the unit, as this could overfill the internal drainage tray and potentially lead to water overflowing inside your room when the unit is in operation.
Step 9: Reassembling and Thoroughly Drying the Unit
Once both sets of coils are clean and rinsed, it’s time to put your unit back together. Carefully align the front panel with its corresponding holes and plastic tabs, then secure it with the screws you removed earlier. Finally, reinsert the air filter once it’s completely dry. This is a critical step: Do not run your AC unit until it is fully drained and completely dry. Allow ample time for all moisture to evaporate, which could take several hours, or even overnight, especially in humid conditions. Running a wet unit can lead to electrical hazards or damage.
Step 10: Final Checks and Power On
After ensuring the unit is completely dry and reassembled, plug it back into the wall outlet. Turn it on and test its cooling performance. You should immediately notice a difference in the airflow and the cooling capacity. Enjoy your refreshingly clean and efficient window AC!
Additional Maintenance Tips for a Long-Lasting AC
To keep your window AC running optimally between deep cleans, consider these tips:
- Regular Filter Checks: Make it a habit to check and clean your air filter monthly. This is the simplest and most effective way to maintain efficiency.
- Clear Drainage Holes: Periodically check the drainage holes at the bottom of the unit (often located at the back or underneath) to ensure they are not clogged. Clogged holes can cause water to back up and overflow.
- Keep the Area Clear: Ensure there’s nothing obstructing the airflow around the exterior part of the unit (e.g., curtains, plants, or furniture). Good airflow is crucial for efficient heat exchange.
- Consider Winter Storage: If you remove your window AC for the winter, clean it thoroughly before storage and cover it to prevent dust accumulation.
- Professional Servicing: While DIY cleaning covers a lot, consider a professional AC service every few years for a comprehensive check-up and specialized cleaning of hard-to-reach internal components.
Breathe Easier and Stay Cooler
Cleaning your window air conditioner might seem like a daunting task, but as you’ve seen, it’s a straightforward process that yields significant rewards. By following this detailed guide, inspired by Handyman Hertz, you can dramatically improve your AC’s performance, enjoy cleaner air, reduce your energy consumption, and extend the life of your unit. A well-maintained air conditioner isn’t just about comfort; it’s about creating a healthier and more energy-efficient home.
So, the next time your AC feels sluggish, remember these steps. A little effort goes a long way in ensuring your home remains a cool oasis during those warm months. Happy cleaning, and enjoy the crisp, clean air!