
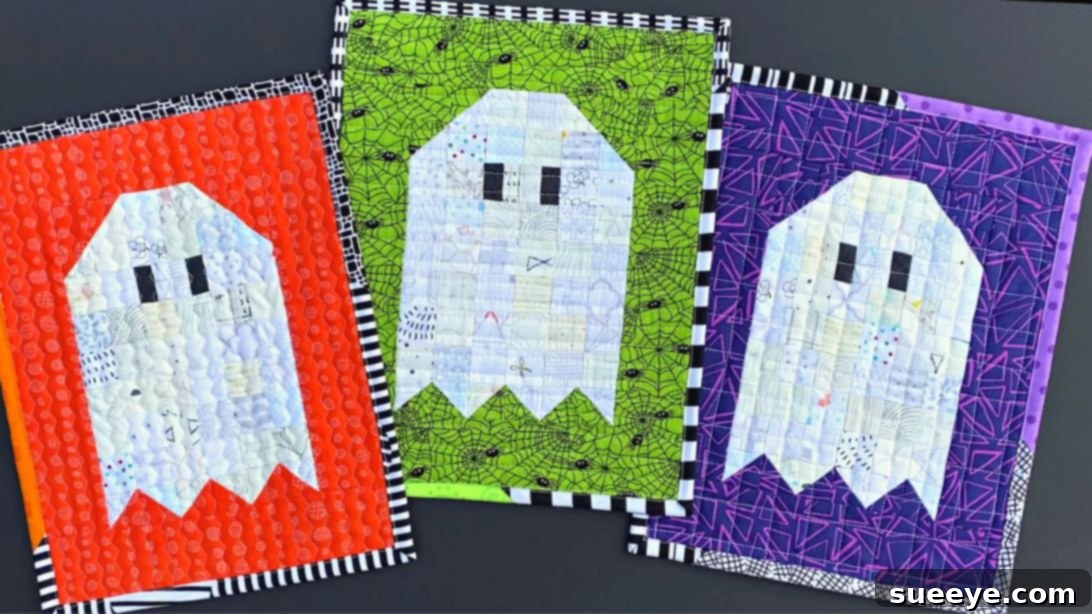
Spooktacularly Simple: Create Your Own Charming Mini Ghost Quilt for Halloween
As autumn leaves begin to fall and a crisp chill fills the air, our thoughts often turn to cozy nights and festive fall decorations. What better way to add a touch of handmade charm to your Halloween decor than with a delightful, ghostly quilt? This comprehensive tutorial will guide you through creating a cute mini ghost quilt, perfect for beginners and seasoned quilters alike. Utilizing fabric scraps and straightforward techniques, you’ll be amazed at how quickly and easily you can piece together this adorable project.
Whether you’re looking for a unique centerpiece, a charming wall hanging, or a thoughtful handmade gift, this mini ghost quilt fits the bill perfectly. It’s an excellent way to breathe new life into those smaller fabric pieces from your stash, transforming them into a whimsical, spooky accent. Get ready to turn simple squares into a captivating design that will bring smiles and a touch of Halloween spirit to any room. Follow along with our detailed instructions, inspired by the fantastic work of Sassafras Lane Designs on YouTube, and create your very own charming ghost quilt today!
Why This Mini Ghost Quilt is Your Next Must-Make Project
Quilting can often seem like a complex craft, but this mini ghost quilt is specifically designed to be accessible, enjoyable, and rewarding for everyone. Here’s why it’s a project you’ll love adding to your Halloween crafting list:
- Beginner-Friendly Design: With clear, step-by-step instructions and a focus on fundamental techniques like Half-Square Triangles (HSTs), even those new to quilting will feel confident in creating a beautiful piece.
- Perfect for Fabric Scraps: This project is an ideal way to use up those treasured fabric scraps you’ve been saving. Small pieces of black, white, and even green fabric can be transformed into the playful ghosts and their distinctive features, reducing waste and giving new life to your stash.
- Quick to Finish: Unlike larger quilting projects that can take weeks or months, this mini quilt is designed to be completed efficiently. You can often finish the entire top in a single weekend, offering immediate satisfaction and a sense of accomplishment.
- Versatile Decor: Once finished, your charming ghost quilt can be used in a multitude of creative ways – as a festive wall hanging, a unique table topper for your Halloween feast, part of a seasonal mantel display, or even as the decorative front for a throw pillow.
- Skill-Building Opportunity: As you work through this project, you’ll master essential quilting skills, including precise fabric cutting, maintaining accurate seam allowances, and efficient block assembly. These foundational techniques will serve you well in all your future quilting endeavors.
- Customizable Appeal: While classic black and white ghosts are traditional, you can easily customize your quilt with different fabric colors and patterns to match your personal style or existing Halloween decor.
Embrace the joy of handmade Halloween decorations with a project that’s as rewarding to make as it is charming to display.
Essential Materials for Your Ghost Quilt Project
Gathering all your materials before you begin quilting ensures a smooth and enjoyable crafting process. For this mini ghost quilt, you’ll need a few essential items, many of which you might already have in your sewing kit:
- Assorted Fabric Scraps: Focus on black, white, and green for traditional ghost features like eyes and outlines. However, don’t limit your creativity! Pastel scraps can create friendly, whimsical ghosts, while vibrant or glow-in-the-dark fabrics can add a unique, modern twist. A good variety of patterns and solids will add character.
- Background Fabric: Choose a color that will make your spooky ghosts truly pop. Light grays, subtle oranges, muted purples, or even a soft cream can work wonderfully to enhance the Halloween theme without overpowering the ghost design. A solid or tone-on-tone print usually works best here.
- Fabric Marking Pen or Pencil: Essential for drawing precise lines on your fabric, particularly when creating Half-Square Triangles. A heat-erasable pen, tailor’s chalk, or a water-soluble marker are all excellent choices.
- Quilter’s Ruler: A clear acrylic ruler with easily visible markings is indispensable for accurate cutting and measuring. A versatile size, such as a 6.5 x 12.5-inch ruler, will be very helpful for this project.
- Sharp Scissors or Rotary Cutter and Cutting Mat: While sharp fabric scissors can be used, a rotary cutter paired with a self-healing cutting mat offers unparalleled precision and speed, especially when working with many small squares. Always ensure your rotary blade is sharp for clean cuts.
- Iron and Ironing Board: Pressing seams open or to the side is a critical, non-negotiable step in quilting. It ensures your blocks lie perfectly flat, your points match up beautifully, and your finished quilt has a polished appearance. A good steam iron is recommended.
- Sewing Machine: Any standard sewing machine in good working order will suffice. A ¼-inch presser foot is highly recommended, as it makes achieving consistent, accurate seam allowances much easier.
- High-Quality Thread: A good quality 50wt cotton thread in a neutral color (such as white, light gray, or cream) is generally sufficient for piecing your quilt top.
- Batting and Backing Fabric: (Optional, but recommended for a finished quilt) If you plan to finish this as a complete mini quilt rather than just a block, you’ll need a small piece of quilt batting and a coordinating backing fabric.
Having all these tools and materials organized and ready will set you up for success and make your creative journey much more enjoyable.
Step-by-Step Directions to Craft Your Cute Mini Ghost Quilt
Now that your materials are perfectly prepared, let’s dive into the exciting process of creating this charming mini ghost quilt. Remember, precision and patience are your best friends, especially when working with smaller fabric pieces.
Step 1: Precise Cutting of All Fabric Pieces
Accurate fabric cutting is the fundamental building block of any successful quilting project. Take your time with this initial step, ensuring all measurements are exact to guarantee your blocks fit together perfectly.
- From Your Assorted Fabric Scraps (White, Green, or desired ghost body colors):
- Cut 40 pieces of 1½ x 1½-inch squares. These will form the main body and lower sections of your ghost.
- Cut 5 pieces of 1⅞ x 1⅞-inch squares. These are specifically designed for creating the Half-Square Triangles (HSTs) that will help shape your ghost’s distinctive curved head.
- Cut 2 pieces of 1 x 1½-inch rectangles. These small pieces will be used for creating the contrasting “eyes” of your ghost.
- From Your Background Fabric:
- Cut 2 pieces of 1½ x 1½-inch squares. These squares will be paired with scrap squares for creating HSTs that define the ghost’s head.
- Cut 5 pieces of 1⅞ x 1⅞-inch squares. These will also pair with your scrap squares to form the HSTs for the ghost’s head.
- Cut 2 pieces of 2½ x 9½-inch rectangles. These pieces will form the essential side borders of your quilt block, framing your ghost.
- Cut 2 pieces of 2½ x 10½-inch rectangles. These larger rectangles will complete the framing, forming the top and bottom borders of your quilt block.
- From Your Black Fabric Scraps (or a designated black fabric):
- Cut 2 pieces of 1 x 1½-inch rectangles. These tiny rectangles will be sewn with your scrap rectangles to form the ghost’s expressive eyes.
Once all your pieces are meticulously cut, it’s highly recommended to organize them by size and purpose. This simple step will save you considerable time and prevent any confusion during the assembly process.
Step 2: Crafting Half-Square Triangles (HSTs) for the Ghost’s Head
Half-Square Triangles are a foundational quilting block, and mastering their creation is a valuable skill that opens up a world of design possibilities. For this ghost quilt, they play a crucial role in creating the distinctive curved top of our adorable apparition.
- Gather your 1⅞ x 1⅞-inch background squares and the corresponding 1⅞ x 1⅞-inch scrap squares. You should have 5 pairs in total, ready for transformation.
- On the wrong side of each background square, use your marking pen or pencil and a quilter’s ruler to draw a precise diagonal line from one corner to the opposite corner. This line will serve as your essential cutting guide.
- Take one background square (marked side facing up) and one scrap square, placing them right sides together. Carefully align all edges perfectly to ensure accuracy.
- Using your sewing machine and a ¼-inch presser foot, stitch a precise ¼-inch seam allowance along both sides of the drawn diagonal line. Ensure your stitches are straight and consistent for the best results.
- Once both seams are sewn, use your rotary cutter and mat to carefully cut along the original diagonal line you drew. This action will yield two identical units from each pair.
- Gently open up each unit, and you will now see two newly formed Half-Square Triangle blocks. Carefully press the seam allowance towards the darker fabric to reduce bulk (or press them open, if that is your preferred method for a flatter finish).
- Repeat this entire process for all 5 pairs of your 1⅞-inch squares. Upon completion, you will have a total of 10 perfectly formed HST units.
- Important Step: Trimming HSTs: To ensure accuracy and that your block comes together flawlessly, trim your HSTs to a consistent 1½ x 1½ inches. Use your quilter’s ruler and rotary cutter to carefully square them up. This step is crucial for maintaining precise block dimensions.
Step 3: Assembling the Ghost Block and Adding Expressive Eyes
Now comes the truly exciting part: watching your adorable ghost come to life as you piece together its distinct shape!
- First, take the two black 1 x 1½-inch rectangles and sew them to the two 1 x 1½-inch scrap rectangles (these could be white or another contrasting color for the ‘whites’ of the eyes). These pairs, once joined, will form the expressive eyes of your ghost. Press the seams open or towards the darker fabric for a neat finish.
- Carefully refer to the video tutorial by Sassafras Lane Designs for the exact arrangement of your 1½ x 1½-inch scrap squares, background squares, and the newly created HSTs. This step typically involves laying out all your pieces into rows to form the iconic ghost shape, with the eye units placed appropriately within the layout.
- Begin sewing your squares into individual rows. Place two pieces right sides together, stitch with your precise ¼-inch seam allowance, and then add the next piece in the row. Consider using chain piecing at this stage to speed up the process by stitching units consecutively without breaking thread.
- Once you have completed sewing all the pieces into individual rows, it’s crucial to press the seams of each row in opposite directions. For example, press the seams of row 1 to the right, row 2 to the left, row 3 to the right, and so on. This “nesting” technique helps to reduce bulk at the seam intersections and makes joining rows much easier, ensuring your points match up perfectly.
- Carefully sew the completed rows together, aligning your seams as you go. Pinning at the seam intersections is highly recommended to keep everything aligned and prevent shifting.
- After all rows are sewn together to form the main ghost block, give the entire block a final, thorough press. You can choose to press these final vertical seams open for a flatter finish, or to one side, depending on your preference and the fabric bulk.
Step 4: Adding Borders for a Polished, Finished Look
Borders frame your quilt block beautifully, giving it a complete, professional, and refined appearance while also adding a bit of stability.
- Take the two 2½ x 9½-inch background fabric rectangles. Attach one to each side of your newly assembled ghost block. Pin meticulously along the entire length, stitch with a consistent ¼-inch seam allowance, and then press the seams towards the background fabric. This technique helps to make your ghost design visually pop forward from the background.
- Next, take the two 2½ x 10½-inch background fabric rectangles. Attach one to the top and one to the bottom of your now-bordered ghost block. Again, pin thoroughly, stitch with a precise ¼-inch seam, and press the seams towards the background fabric.
Congratulations! Your charming mini ghost quilt block is now fully assembled and looking fantastic. Take a moment to step back and admire your handiwork. It’s truly a delightful piece of Halloween artistry!
Step 5: Finishing Your Mini Quilt – Quilting and Binding
Once your quilt top block is completely assembled, you have a few options for finishing it into a functional and beautiful mini quilt:
- Layering Your Quilt Sandwich: Create a “quilt sandwich” by first laying your backing fabric right side down on a clean, flat surface. Next, place your piece of quilt batting smoothly on top of the backing. Finally, center your completed ghost quilt top right side up on top of the batting. Smooth out any wrinkles in all layers.
- Quilting the Layers: This is the creative process of stitching through all three layers (quilt top, batting, and backing) to hold them together securely and add beautiful texture. For a mini quilt, simple straight-line quilting using your walking foot, or free-motion quilting, can be done. You could outline the ghost shape, stitch diagonal lines across the block, or implement a simple grid pattern.
- Binding the Edges: Once the quilting is complete, carefully trim your quilt sandwich layers square and even. Then, create or attach a binding strip around the entire perimeter of your quilt. Binding serves two crucial purposes: it finishes the raw edges of your quilt for a clean look, and it adds durability, protecting the edges from wear and tear. If you are new to binding, there are many excellent tutorials available online to guide you through this final step.
Your beautifully finished mini ghost quilt can now be used in any project your heart desires – perhaps as a festive placemat, a charming wall hanging, or even a decorative pillow cover to adorn your sofa for Halloween!
Expert Tips for Success and Creative Customization
To ensure your ghost quilt project turns out perfectly and to inspire you for future quilting adventures, consider incorporating these valuable tips:
- Embrace the Scant ¼-Inch Seam: Most quilters utilize a “scant” ¼-inch seam, which means it’s just a thread’s width less than a true ¼-inch. This tiny adjustment is critical as it accounts for the thickness of the thread and ensures your finished blocks accurately measure the desired size after pressing.
- Pressing is Your Best Friend: Never underestimate the transformative power of a good press. Pressing your seams after each step, and particularly after each unit or row is sewn, helps your blocks lie perfectly flat, ensures your points match precisely, and significantly contributes to a professional and crisp finish.
- Speed Up with Chain Piecing: To save time and thread, especially when sewing many small, identical units or rows, try chain piecing. Stitch one seam, then without lifting your presser foot or clipping your threads, feed the next unit directly under the needle. Continue this process, then snip all your units apart later.
- Explore Color Variations: While traditional black and white create a classic spooky ghost, don’t hesitate to experiment with different color palettes! A background of vibrant orange, deep purple, or even a whimsical lime green could be incredibly fun. Consider creating “friendly” ghosts in soft pastel colors for a less spooky, more charming look.
- Add Unique Embellishments: Personalize your ghost by adding small details. A tiny stitched bow, a whimsical embroidered mouth, or even using glow-in-the-dark thread for your quilting lines can make your ghost quilt truly one-of-a-kind.
- Practice Makes Perfect: Don’t be discouraged if your first Half-Square Triangle isn’t absolutely perfect. Quilting is a skill that develops and improves with practice. Every stitch you make is a step toward greater mastery and confidence in your craft!
Conclusion: Your Handmade Halloween Masterpiece Awaits!
You have now successfully completed a charming and festive mini ghost quilt, a beautiful testament to your creativity and growing quilting skills. This delightful project not only adds a unique, handmade touch to your Halloween decorations but also provides an excellent opportunity to practice essential quilting techniques in a fun and manageable way. From carefully cutting your fabric scraps to patiently piecing together intricate Half-Square Triangles, you’ve brought an adorable, spooky friend to life with your own hands.
We truly hope this detailed tutorial has inspired you to dive deeper into the wonderful world of quilting or to confidently tackle your next seasonal crafting project. Remember, the inherent beauty of handmade items lies not only in their unique imperfections but also in the love and care poured into every single stitch. We encourage you to share your finished ghost quilts with fellow crafters, friends, and online communities – let your spooky creations shine!
A huge thank you and credit go to Sassafras Lane Designs via YouTube for providing the wonderful original tutorial that served as the inspiration for this comprehensive guide. We highly recommend checking out their channel for even more fantastic quilting ideas, creative inspiration, and expert tips!