
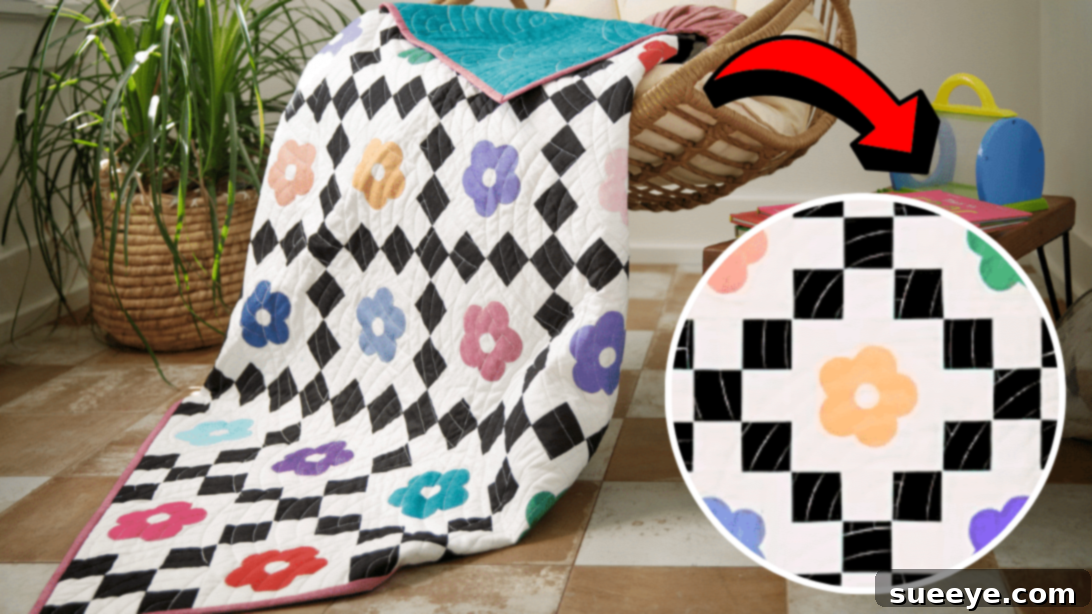
There’s an undeniable joy in crafting something beautiful with your own hands, especially when it’s a quilt designed for comfort and charm. I’ve always been captivated by pretty, neat, and simple quilting patterns, and recently, I had the pleasure of completing another exquisite quilt adorned with delightful flowers in various hues. This project is not only incredibly easy and fun to piece together but also serves as an excellent quilting adventure for beginners who are eager to embrace a rewarding challenge.
The allure of a handmade baby quilt is unparalleled. It’s a gift of warmth, love, and intricate design that can be cherished for years. This particular “Flower Child Baby Quilt” pattern embodies sweetness and simplicity, making it a perfect addition to any nursery or a thoughtful present for a new arrival. Its vibrant floral design brings a touch of whimsical beauty, ensuring it stands out as a truly special creation.
RELATED: How to Make a Cute Heart Baby Quilt
This charming quilt idea, brought to life by the talented creators at Missouri Star on YouTube, comes with instructions that are remarkably clear and simple to follow. This makes it an ideal choice for those new to the art of quilting, guiding them through each step with ease. You’ll be amazed at how quickly the block units come together, making the entire process feel less like a chore and more like a delightful crafting journey.
Why Choose the Flower Child Baby Quilt Pattern?
Beyond its aesthetic appeal, the Flower Child Baby Quilt offers several compelling reasons to become your next quilting project. Its design is inherently versatile, allowing you to experiment with a myriad of fabric colors and patterns to create a truly unique piece. The “flower child” aesthetic evokes a sense of nostalgia and innocence, making it particularly fitting for a baby’s quilt. Furthermore, working with charm squares simplifies the fabric cutting process, saving you time and ensuring uniformity across your blocks. This pattern encourages creativity while providing a structured framework, perfect for building confidence in your quilting skills.
The relatively small size of a baby quilt also makes it a manageable project, even for those with limited time. You can complete it in stages, enjoying the satisfaction of seeing each block come to life before assembling the final piece. The clear instructions from Missouri Star demystify complex quilting techniques, breaking them down into digestible steps that any beginner can master. This quilt isn’t just a blanket; it’s a labor of love, a piece of art, and a comforting embrace for a precious little one.
Essential Materials for Your Flower Child Baby Quilt
Gathering your materials is the first exciting step in any quilting project. For the Flower Child Baby Quilt, the following items are crucial. Quality materials not only make the process smoother but also ensure your finished quilt is durable and beautiful.
- 1 pack of 5″ charm squares: These pre-cut fabric squares are a fantastic time-saver, offering a wonderful assortment of colors and patterns without the need for extensive fabric cutting. Choose a pack that inspires your floral vision.
- 2⅓ yard of white fabric: This will serve as the background for your quilt blocks, providing a clean, bright canvas against which your colorful flowers will pop. Opt for a good quality quilting cotton that is easy to work with.
- 1¼ yard of black fabric: Used for creating contrast in your strip sets, the black fabric adds definition and depth to the overall design. Ensure it’s a solid black that won’t bleed when washed.
- ⅝ yard of binding fabric: The binding fabric frames your quilt, giving it a neat, professional finish. Choose a color that complements your flower squares and background fabrics, or one that provides a striking contrast.
- 1¾ yard of backing fabric: This is the fabric that will make up the back of your quilt. It’s an opportunity to add another layer of design or a solid, comforting color. Flannel or Minky can add extra softness for a baby quilt.
- Light fusible interfacing: This material is key for appliquéing your flower shapes. It adds stability to the fabric, prevents fraying, and makes cutting and positioning your flowers much easier.
- Nesting flower template: A dedicated template ensures all your flowers are uniform in size and shape, contributing to a professional and cohesive look.
- Marking pen or pencil: Essential for tracing your flower shapes onto the fusible interfacing. A fabric-specific pen or pencil ensures lines are clear and easy to follow, yet can be removed or hidden.
- Ruler: A clear quilting ruler with precise measurements is invaluable for accurate cutting of strips and squares, guaranteeing your blocks fit together perfectly.
- Scissors or rotary cutter and a cutting mat: While scissors work, a rotary cutter and self-healing mat will drastically speed up your cutting process and ensure perfectly straight lines, which is crucial for quilting accuracy.
- Needle and thread: For any hand stitching or general sewing needs, though most of this quilt will be machine-sewn.
- Iron, for pressing: Pressing seams flat throughout the process is critical for block accuracy and a smooth quilt top. A good steam iron is a quilter’s best friend.
- Sewing machine: Your primary tool for piecing together the quilt blocks and assembling the final quilt. Ensure it’s in good working order and you have suitable needles for quilting cotton.
Step-by-Step Guide: Crafting Your Flower Child Baby Quilt
Now, let’s dive into the detailed instructions for creating your beautiful Flower Child Baby Quilt. Precision and patience are key, especially in the initial stages, to ensure a stunning final product.
Step 1: Preparing Your Fabric Strips for Contrast Blocks
Begin by meticulously cutting your black and white fabrics into strips. Accuracy in this initial stage is paramount for the success of your quilt blocks. Once cut, you will create two distinct strip sets. For the first set, arrange the strips in a sequence of light, dark, and light. Stitch these three strips together using a precise ¼-inch seam allowance. For the second strip set, reverse the order: dark, light, and dark, and stitch them together with the same ¼-inch seam. After stitching, take them to your ironing board and press the seams flat and neatly. Pressing in opposite directions for the two strip sets (e.g., seams towards the dark fabric for one, and towards the light for the other) can help with nesting later on, reducing bulk and ensuring perfectly matched points.
Step 2: Sub-Cutting and Assembling Block Units
Once your strip sets are sewn and pressed, it’s time for sub-cutting. Carefully fold each strip set in half, aligning the raw edges perfectly to ensure a straight cut. Trim off any selvage edges to create a clean, uniform start. Then, using your ruler and rotary cutter, sub-cut these strip sets into 2.5-inch strip units. Maintain an organized pile for each set to keep them separate and ready for assembly. Now, select three of these sub-strips. Arrange them with the dark sets on each side and the light set positioned precisely in the center. This specific arrangement will form the foundation of your contrasting quilt blocks.
Step 3: Creating the Flower Appliqué Element
With your contrasting block units prepared, it’s time to bring the “Flower Child” essence to life. Cut the white background fabric into 6½-inch squares. These will serve as the canvas for your floral appliqués. Next, cut a piece of light fusible interfacing into a 4¾-inch square. Choose one of your vibrant colored charm squares. Carefully iron the fusible interfacing to the wrong side of this charm square, following the manufacturer’s instructions to ensure a secure bond. Once fused, place your nesting flower template over the fused charm square and trace the flower shape onto the paper side of the fusible interfacing using your marking pen or pencil. Additionally, trace a small circle at the center of the flower. This small detail adds a focal point and can be cut out separately or stitched around later.
Step 4: Attaching and Finishing Your Flower Blocks
Carefully cut out the traced flower shape (and the small central circle if desired) from the fused charm square. Peel off the paper backing from the fusible, exposing the adhesive. Position this flower piece precisely onto the center of your 6½-inch white background square. Once centered, press it firmly with a hot iron to fuse it permanently in place. Now, using your sewing machine, stitch around the edges of the fused flower. You can use a satin stitch, a small zigzag stitch, or a straight stitch close to the edge to secure the appliqué and prevent fraying. Repeat this process to create as many flower blocks as your quilt pattern requires. Refer to the Missouri Star video for guidance on arranging these blocks and the previously created strip-pieced units to form your quilt top. Stitch all the blocks together in rows, and then stitch the rows together. Finally, complete your beautiful quilt by adding a layer of batting, the backing fabric, and then binding all the edges for a professional and durable finish. Don’t forget to quilt through all three layers (top, batting, backing) to secure them, whether by machine or by hand.
Tips for Beginner Quilters
If this is one of your first quilting projects, here are a few extra tips to help you along the way:
- Accurate Seam Allowance: A ¼-inch seam allowance is standard in quilting. Practice maintaining a consistent ¼-inch seam to ensure your blocks fit together perfectly. Many sewing machines have a ¼-inch presser foot or markings on the needle plate to guide you.
- Pressing vs. Ironing: In quilting, we “press” seams, which means lifting and placing the iron down, rather than sliding it. This prevents stretching the fabric and distorts your blocks. Press seams open or to one side consistently.
- Test Your Stitch: Before starting on your quilt fabric, always test your sewing machine’s stitch length and tension on a scrap piece of fabric to ensure it’s set correctly.
- Don’t Fear Mistakes: Every quilter, no matter how experienced, makes mistakes. A seam ripper is your friend! Don’t be afraid to unpick and redo a section for a better result.
- Take Your Time: Quilting is a journey, not a race. Enjoy each step of the process. Rushing often leads to errors and frustration.
- Invest in Good Tools: A sharp rotary cutter, a good quality self-healing mat, and a reliable quilting ruler will make your cutting much more precise and enjoyable.
Caring for Your Handmade Flower Child Quilt
Once your beautiful Flower Child Baby Quilt is complete, proper care will ensure it lasts for years to come. For baby quilts, gentle washing is usually recommended. Use a mild, pH-neutral detergent and wash in cold water on a delicate cycle. Tumble dry on a low setting or, even better, lay flat to dry to prevent shrinking and maintain the integrity of the fabric and stitches. Avoid harsh chemicals or bleach, which can damage the fabric and cause colors to fade. With the right care, your handmade quilt will continue to provide warmth and comfort, becoming a cherished heirloom.
Conclusion: Your Blooming Quilting Journey
The Flower Child Baby Quilt is more than just a sewing project; it’s an opportunity to create something truly special and personal. Whether you’re a beginner looking for a guided challenge or an experienced quilter seeking a delightful and quick project, this pattern offers immense satisfaction. The process of cutting, piecing, and appliquéing these charming flowers culminates in a beautiful, vibrant quilt that reflects your dedication and creativity. Enjoy every stitch, embrace the learning process, and revel in the joy of creating a handmade treasure. Happy quilting, and may your creative journey be as colorful and beautiful as a field of flowers!
*All image credit belongs to Missouri Star via YouTube. Follow and subscribe to her channel for more inspiring quilting tutorials!