
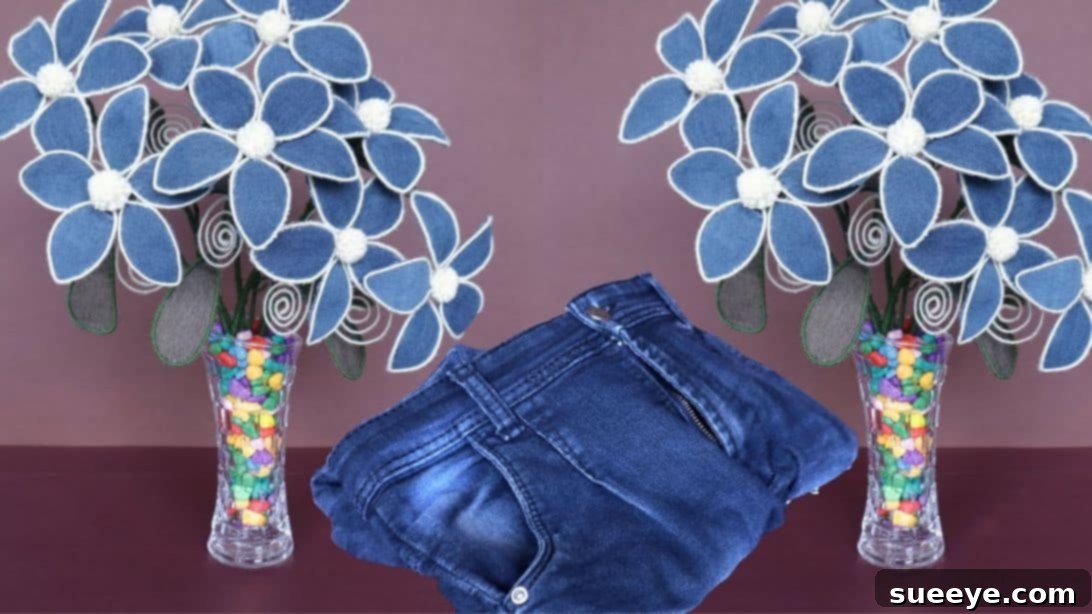
Transform Your Old Jeans into Stunning DIY Denim Flowers: An Eco-Friendly Craft Guide
Are you looking for creative ways to give your worn-out denim a new lease on life? We all have those beloved pairs of jeans that are no longer fit for wearing but hold too many memories to simply toss away. Traditionally, many of us might consider turning them into practical items like tote bags, stylish hats, or even durable patches. I’ve often found myself on that path, crafting useful items for friends and family, or occasionally selling my creations. However, a desire for something truly unique recently sparked an idea that has quickly become one of my favorite DIY projects.
I stumbled upon an inspiring tutorial from Artefacts, demonstrating how to repurpose old jeans into beautiful decorative flowers. The concept instantly captivated me. The moment I completed my first denim flower and placed it prominently on my table, it began to draw an incredible amount of admiration. This simple yet ingenious craft not only offers a fantastic way to upcycle textiles but also results in charming, conversation-starting decor. Join me as we delve into this rewarding project and turn your old denim into everlasting blooms.
Why Repurpose Your Old Jeans into Flowers?
Beyond the sheer joy of crafting, repurposing old jeans into flowers offers a myriad of benefits that align with both creative expression and sustainable living:
- Eco-Friendly & Sustainable: Fast fashion contributes significantly to textile waste. By upcycling your old jeans, you’re directly diverting material from landfills, reducing your environmental footprint, and promoting a circular economy. It’s a small step that makes a big difference.
- Cost-Effective Decor: Why spend money on new decorative items when you can create unique, high-quality pieces from materials you already own? This project is incredibly budget-friendly, requiring only a few basic craft supplies in addition to your denim.
- Unique & Personalized Home Decor: Handmade items add character and warmth to any space. Denim flowers offer a distinctive aesthetic that mass-produced decor cannot replicate. You can customize them to match your home’s color scheme and style, making your decor truly personal.
- Creative Outlet & Stress Relief: Engaging in DIY projects is a wonderful way to relax, unleash your creativity, and develop new skills. The process of transforming a discarded item into something beautiful is incredibly satisfying and can be a fantastic stress reliever.
- Durable & Long-Lasting: Unlike fresh flowers that wilt, or even fabric flowers that can fray, denim is a robust material. Your denim flowers will retain their shape and color for years, providing lasting beauty without the need for watering or maintenance.
Planning Your Denim Flower Project
Before you begin, a little preparation can ensure your crafting experience is smooth and enjoyable. Consider the type of jeans you’ll be using and gather all your materials in a tidy workspace.
- Choosing the Right Denim: Different washes and weights of denim will yield varied results. Lighter, softer denim might be easier to cut and shape, while heavier denim offers more structure. Experiment with various shades – from classic blue to black, white, or even faded washes – to create a diverse and visually interesting bouquet. The texture and color variations will add depth to your finished flowers.
- Preparing Your Jeans: Ensure your old jeans are clean and dry. If they’re particularly stiff, a quick wash might soften them slightly, making them easier to work with.
- Workspace Setup: Designate a clean, well-lit area for your project. Having all your materials within easy reach will prevent interruptions and keep you focused on the creative process. Lay down a protective surface if you’re working with glues.
Materials You’ll Need:
Gathering all your supplies before you start will make the crafting process much smoother. Most of these items are standard craft supplies, easily found at any craft store.
- Thin Wire: Essential for shaping the petals and creating the flower’s structure. Look for flexible craft wire that holds its shape well once bent.
- White and Green Yarn: Used for wrapping the wires, adding color, and creating a finished look. Green yarn will mimic natural stems and leaves, while white is perfect for decorative swirls.
- Sharp Scissors: Crucial for clean cuts through denim. A good pair of fabric scissors will make the job much easier and prevent fraying.
- Old Jeans: The star of our project! One pair of adult jeans can yield several flowers, depending on their size.
- Small Bottle (or similar round object): To help uniformly shape the wire into circular petal bases. A spice jar or a small soda bottle works perfectly.
- Fabric Glue: A strong adhesive specifically designed for textiles. This will secure the denim to the wire frames, ensuring durability.
- Cardboard: A small, sturdy piece of cardboard (from a cereal box, for example) is needed for making pom-poms.
- Thread: To tie the yarn segments when creating the pom-poms. Matching the yarn color is ideal, but any strong thread will do.
- Hot Glue Gun and Glue Sticks: For quick and strong bonds during assembly, especially when attaching petals to stems and securing the pom-pom centers.
- Vase: To display your beautiful finished denim flower bouquet. Choose one that complements your home decor.
- Pebbles or Decorative Stones: Used to anchor the flowers in the vase, providing stability and an attractive base.
Step-by-Step Guide to Crafting Your Denim Flowers
Follow these detailed instructions to transform your old jeans into stunning, everlasting floral decor. Take your time with each step to ensure a beautiful and durable finished product.
Step 1: Preparing Your Wire Petal Frames
Begin by preparing the structural elements for your flower petals. For each flower, cut approximately five pieces of thin wire to a uniform small size. The exact length will depend on how large you want your individual petals to be, but aim for consistency across all five pieces. Once cut, take each wire piece and tightly wrap it with your chosen yarn. This step serves multiple purposes: it adds color, provides a neat finish, and makes the wire more comfortable to handle. Ensure the yarn is wrapped snugly to prevent unraveling.
Step 2: Shaping the Petal Bases
Now, let’s give form to your petal frames. Take one of your yarn-wrapped wires and a small bottle (or any cylindrical object with a diameter suitable for your desired petal size). Carefully bend the wire around the bottle to form a distinct circular or teardrop shape. Once the shape is achieved, twist the two ends of the wire together securely at the bottom to close the loop. Then, pinch the twisted end slightly to create a more defined, leaf-like base or stem for the petal. Repeat this process for all five wire pieces, ensuring each petal frame is consistently shaped for a cohesive flower.
Step 3: Attaching Denim to Petal Frames
Carefully cut a piece of denim from your old jeans, ensuring it’s large enough to accommodate all five of your petal frames. Apply a thin, even layer of fabric glue to one side of the leaf-shaped part of each wire frame (the part that will be covered by denim), avoiding the twisted stem portion. Press each wire frame firmly onto the denim piece, making sure the glue makes good contact. Allow the glue to dry completely according to the manufacturer’s instructions. Once dry, meticulously cut out each denim-backed petal, following the outline of the wire frame. For added realism and dimension, gently bend and shape the denim leaves using a pen or your fingers to give them a natural curve.
Step 4: Crafting the Center Swirl and Accent Leaves
This step adds distinct details to your flower. Cut two additional pieces of medium-length wire. Wrap one piece tightly with green yarn – this will form an accent leaf. Wrap the second piece with white yarn, but only wrap it most of the way, leaving a small unwrapped section at one end. This white-wrapped wire will be rolled just before the other end, creating a decorative swirl for the flower’s center. For the green accent leaf, glue its wire frame onto a piece of denim (perhaps a contrasting color for visual interest) and cut it out once dry, similar to how you made the petals. Repeat this process for each flower you intend to create.
Step 5: Assembling the Flower Stem and Petals
Cut a long piece of wire to serve as the main stem of your flower and cover it completely with green yarn, ensuring a smooth, natural-looking finish. Using a hot glue gun, carefully attach your five denim petals to one end of this main stem, arranging them in a pleasing floral pattern. Once the petals are secure, continue wrapping the main stem with green yarn, overlapping slightly to cover the ends of the attached petals and create a seamless transition. Continue wrapping downwards for a few inches, then strategically insert and hot glue the white swirl and the green accent leaf you prepared in Step 4. Ensure these elements are positioned naturally along the stem. Repeat this entire assembly process for all your desired flowers.
Step 6: Creating and Attaching Pom-Pom Centers
To add a soft, textural element to the center of your flowers, let’s create some yarn pom-poms. Take a small, rectangular piece of cardboard and tightly wrap your chosen yarn (perhaps white or a contrasting color) around it numerous times. The more wraps, the denser your pom-pom will be. Carefully slide the wrapped yarn off the cardboard, keeping its shape. Use a piece of thread to tie the bundled yarn tightly into 1/2-inch segments, effectively creating small, individual mini-bunches. Once tied, cut the yarn in the middle of each segment to release the loops, then fluff and trim them until you have neat, spherical pom-poms. Use hot glue to securely attach one pom-pom into the very center of each assembled denim flower.
Step 7: Arranging Your Bouquet
Once all your individual denim flowers are complete, it’s time to gather them into a beautiful bouquet. Arrange the flowers to your liking, considering variations in height and color. Then, use a piece of green yarn or floral tape to tightly tie the stems together a few inches from the bottom. This will keep your bouquet cohesive and easy to handle when placing it in the vase.
Step 8: Final Display in a Vase
Select your vase and carefully place your tied denim flower bouquet inside. To ensure the flowers stand upright and are securely anchored, fill the vase with pebbles or decorative stones. The pebbles will provide weight at the bottom, preventing the bouquet from toppling over, while also adding an aesthetic touch to your display. Arrange the individual flowers one last time, fanning them out slightly to create a full and appealing arrangement. Step back and admire your beautiful, handmade, eco-chic denim floral creation!
Creative Variations and Personalization
The beauty of DIY lies in customization. Here are some ideas to make your denim flowers truly your own:
- Varying Denim Washes: Mix light, dark, and faded denim washes within a single bouquet for a dynamic, textured look.
- Adding Embellishments: Before gluing denim to wire frames, consider stitching small beads, sequins, or even tiny patches onto the denim petals. Buttons can make excellent flower centers instead of pom-poms.
- Different Flower Shapes: Experiment with cutting your denim petals into different shapes—rounder for daisies, pointed for lilies, or layered for roses. The wire frame can be adapted to almost any petal design.
- Colored Yarn Accents: Don’t limit yourself to white and green yarn. Use vibrant colors for wrapping wires or creating pom-poms to match specific decor themes or seasons.
- Scented Flowers: Lightly spray your finished denim flowers with fabric-safe essential oils or floral scents for an added sensory experience.
- Beyond Bouquets: These denim flowers aren’t just for vases! Attach them to headbands, use them as brooches, decorate gift packages, or create a unique wall art installation.
Caring for Your Denim Flowers
One of the many advantages of crafting denim flowers is their minimal maintenance. To keep your creations looking fresh and vibrant:
- Dusting: Periodically dust your flowers gently with a soft brush or a can of compressed air to remove any accumulated dust.
- Spot Cleaning: If a petal gets a small smudge, gently spot clean with a damp cloth and mild soap, being careful not to saturate the denim or disturb the glue. Allow to air dry completely.
- Sunlight Exposure: While denim is durable, prolonged exposure to direct sunlight might cause some fading over many years. Position your bouquet in a spot where it receives ample light but isn’t constantly in harsh, direct sun to preserve its colors.
Conclusion: Repurposing Old Jeans into Beautiful Flowers
This project of repurposing old jeans into decorative flowers is more than just a craft; it’s a testament to creativity, sustainability, and personal expression. From transforming a mundane pair of trousers into a stunning floral arrangement, you’ve not only saved money and reduced waste but also added a unique, handmade touch to your living space. The satisfaction of creating something beautiful with your own hands, especially from materials that would otherwise be discarded, is truly immeasurable.
So, the next time you find yourself with a pile of old jeans, don’t rush to throw them out. Instead, envision the vibrant, everlasting bouquet they could become. Embrace the spirit of upcycling, unleash your inner artisan, and create something wonderful. Your home, and the planet, will thank you for it. We encourage you to try this delightful DIY and share your beautiful denim flower creations!