
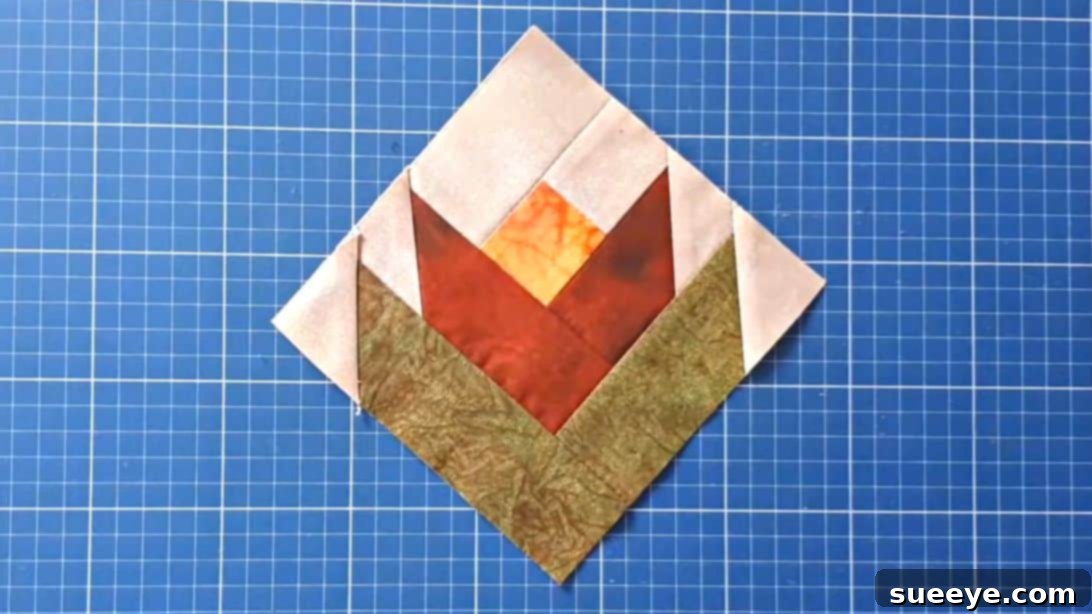
Master the Beautiful Tulip Quilt Block: A Comprehensive Step-by-Step Tutorial for All Skill Levels
Do you adore the timeless beauty of flowers? Imagine capturing that charm in your next sewing endeavor! The Tulip Quilt Block is a perennial favorite among quilters, offering a delightful blend of simplicity and elegance. This comprehensive tutorial, inspired by the fantastic work of Patchwork Facil on YouTube, guides you through creating a vibrant and charming tulip block that will undoubtedly bring a lively touch to any quilting project. Whether you’re a seasoned quilter or just beginning your patchwork journey, you’ll find these steps clear, concise, and incredibly rewarding. Dive into the world of fabric artistry and discover the joy of bringing these beautiful tulips to life with your own hands. This pattern is not just fun to make; it’s also incredibly versatile, allowing you to create stunning quilts, placemats, wall hangings, and so much more. Let’s gather our supplies and begin this creative adventure!
Essential Materials for Your Tulip Quilt Block
Before embarking on any quilting project, having all your materials neatly organized is key to a smooth and enjoyable process. For this lovely Tulip Quilt Block, we’ll focus on a classic color palette, but feel free to experiment with shades that speak to your personal style. High-quality quilting cotton is highly recommended as it’s easy to work with, holds its shape well, and ensures your finished block will stand the test of time.
- Beige or White Fabric: Approximately 1/4 yard. This will serve as your background fabric, making the vibrant tulip colors pop. Choose a solid or a very subtle print for maximum contrast.
- Orange Fabric: Approximately 1/8 yard. This will be one of your primary tulip petal colors. A bright, cheerful orange works wonderfully, but consider reds, pinks, or purples for alternative blooms.
- Green Fabric: Approximately 1/8 yard. Essential for the tulip stem and leaves. A medium to dark green will provide a realistic touch.
- Red Fabric: Approximately 1/8 yard. The second primary color for your tulip petals, adding depth and visual interest. Again, feel free to substitute with other complementary colors.
- Basic Quilting Tools:
- Rotary Cutter: For precise and efficient fabric cutting.
- Quilting Ruler (at least 6″ x 12″ or larger): Transparent rulers with clear markings are indispensable for accurate measurements.
- Self-Healing Cutting Mat: Protects your work surface and extends the life of your rotary blade.
- Sewing Machine: A standard machine is perfect. Ensure it’s in good working order and threaded correctly.
- Good Quality Thread: Matching or neutral-colored cotton thread.
- Iron and Ironing Board: Crucial for pressing seams, ensuring flat and accurate blocks.
- Fabric Scissors: For trimming threads and small adjustments.
- Pins or Fabric Clips: To hold fabric pieces together securely before sewing.
- Fabric Marking Pen or Pencil: Essential for drawing diagonal lines.
Step-by-Step Instructions: Crafting Your Tulip Quilt Block
Precision is paramount in quilting, especially when working with smaller pieces. Take your time with each cut and seam, and remember that consistent 1/4-inch seam allowances are the secret to perfectly fitting blocks. Follow these detailed steps to construct your beautiful Tulip Quilt Block.
Step 1: Preparing Your Main Petal Piece
Begin by taking your chosen orange fabric. Using your rotary cutter and ruler, carefully cut one perfect 2-inch by 2-inch square. This precise square will form the initial core of one of your tulip’s petals. Accuracy here is key, as all subsequent pieces will build upon this foundation. Ensure your fabric is pressed flat before cutting to prevent distortion.
Step 2: Cutting the Background Squares
Next, grab your beige or white background fabric. Using your ruler, measure and cut two consistent 2-inch wide strips. From these strips, you will need to cut a total of five pieces of 2-inch by 2-inch squares. Trim any ragged edges from your strips first to ensure clean, straight cuts for your squares. These squares will be vital for framing your tulip petals and creating the background definition of your block.
Step 3: Preparing the Additional Petal and Stem Fabrics
Now, turn your attention to the remaining colored fabrics. From both the green and red fabrics, measure and cut two pieces of 2-inch wide strips from each. These strips don’t need to be cut into squares yet; their length will be used in upcoming steps to build out the block’s various components. Make sure your cuts are straight and the width is consistent across all strips.
Step 4: Assembling the Initial Petal Segment
Take one of your orange 2×2 squares and one of your beige 2×2 squares. Place them right sides together, aligning one edge perfectly. Sew along this aligned edge using a consistent 1/4-inch seam allowance. Press the seam open or to one side (usually towards the darker fabric to prevent ‘shadowing’). Now, take a 2-inch wide beige strip (from Step 2). Place your newly sewn orange and beige unit right sides together with one edge of the beige strip. Sew along this edge, again using a 1/4-inch seam allowance. Carefully trim off the excess fabric from the strip, ensuring your newly formed unit maintains a straight edge. This unit is the first building block of your tulip. Press your seams again for a flat finish.
Step 5: Adding the Red Petal Details
Now, take one of your red 2-inch wide strips. With right sides together, carefully align it along the raw edge of your previously assembled orange and beige unit. Sew along this edge with a precise 1/4-inch seam allowance. Press the seam. Trim off any excess red fabric from the strip so that it’s flush with your block unit. Next, take another red 2-inch wide strip. Place it right sides together along the adjacent edge where the three colors (orange, beige, and the first red strip) meet. Sew with a 1/4-inch seam allowance. After pressing this seam, you should now have a partially formed block with a prominent red section. Trim this entire unit into a clean square, ensuring all edges are straight and at right angles. This forms the upper part of your tulip bloom.
Step 6: Shaping the Tulip’s Upper Points (Snowball Method)
Orient your block so that the largest red corner is pointing downwards. This will help you visualize the tulip’s orientation. Retrieve two of your remaining beige 2×2 squares. On the wrong side of each beige square, use a fabric marking pen to draw a diagonal line from one corner to the opposite corner. This line will serve as your sewing guide. Place one marked beige square on the left corner of the red section of your block, right sides together, ensuring the drawn line runs vertically, pointing towards the center of the block. Place the second marked beige square on the right corner of the red section in the same manner. Pin them securely. Carefully sew directly along the drawn diagonal lines on both beige squares. Once sewn, use your ruler and rotary cutter to trim the excess fabric from the corners, leaving a 1/4-inch seam allowance beyond your sewn line. Press these newly formed ‘snowball’ seams open or towards the beige fabric. This technique creates sharp, defined points for your tulip’s upper petals.
Step 7: Attaching the Green Stem Base
Re-position your block so the red corner (and the recently formed petal points) is still pointing downwards. This is the top of your tulip. Now, it’s time to add the green stem. Take one of your green 2-inch wide strips. Place it right sides together along the bottom edge of the red fabric on the right side of your block. Align the raw edges carefully. Sew using a 1/4-inch seam allowance. Press the seam open or towards the green fabric. Trim any excess green fabric. Repeat this exact process for the left bottom edge of the red fabric, attaching the second green strip. These strips will form the base of your tulip’s stem.
Step 8: Finishing the Stem and Squaring Up the Block
Take your two remaining beige 2×2 squares. As in Step 6, draw a diagonal line on the wrong side of each square. Place one marked beige square on the left corner of the green fabric at the bottom of your block, right sides together, with the line running vertically. Repeat for the right corner of the green fabric. Pin securely. Sew precisely along the drawn diagonal lines. With your ruler and rotary cutter, trim off the triangle corners, leaving a 1/4-inch seam allowance beyond your stitch line. Press these seams open. This final step completes the stem, giving it a classic tapered look. Carefully trim off any excess threads and square up your entire block to its desired finished size (e.g., a perfect 6.5-inch or 12.5-inch square, depending on your initial cuts and desired finished block size). A precise squaring-up ensures all your blocks will fit together seamlessly in a larger project.
Why Choose the Tulip Quilt Block?
The Tulip Quilt Block is more than just a pretty pattern; it’s a testament to the enduring appeal of floral designs in quilting. Its simple geometric construction cleverly creates the illusion of a delicate bloom, making it a favorite for several reasons:
- Versatility: This block can be used in a myriad of projects. Imagine a full quilt covered in a field of tulips, a charming table runner for spring, decorative placemats, or even accent pillows. Its adaptability makes it a valuable addition to any quilter’s repertoire.
- Beginner-Friendly: Despite its intricate appearance, the Tulip Quilt Block relies on fundamental quilting techniques: accurate cutting, straight seams, and precise pressing. This makes it an ideal learning project for those new to quilting, building confidence with each successful step.
- Design Potential: While our tutorial uses classic orange, red, green, and beige, the design truly shines with creative color choices. Experiment with different shades, patterned fabrics, or even seasonal palettes to create unique effects. Imagine pastels for spring, vibrant hues for summer, or even muted tones for a more sophisticated look.
- Symbolism: Tulips often symbolize perfect love, happiness, and new beginnings. Incorporating them into a quilt can add a layer of personal meaning and warmth to your handmade gifts or home decor.
Tips for Successful Quilting and Block Creation
To ensure your Tulip Quilt Block (and all future quilting projects) turns out beautifully, keep these essential tips in mind:
- Press, Don’t Iron: When quilting, it’s generally best to ‘press’ your fabric, meaning you lift and lower the iron rather than sliding it. This prevents stretching and distorting your fabric pieces.
- Accurate 1/4-Inch Seam Allowance: This is the golden rule of quilting. Test your seam allowance on scrap fabric before you start. Many sewing machines have a 1/4-inch foot or a guide to help you maintain consistency.
- Use Good Lighting: Proper lighting can significantly reduce eye strain and help you see your markings and fabric alignment more clearly.
- Sharp Tools: A sharp rotary cutter blade makes clean, precise cuts with less effort. Dull blades can lead to frayed edges and inaccurate shapes.
- Starch for Stability: Lightly starching your fabric before cutting can add crispness, making it easier to cut and sew accurately, especially for smaller pieces.
- Chain Piecing: For efficiency, especially when making multiple blocks, consider chain piecing. This involves feeding one unit after another through your sewing machine without cutting the thread in between, creating a “chain” of sewn pieces.
- Square Up Regularly: After creating each major unit or section, take a moment to square it up. This ensures your block remains perfectly square and avoids issues when assembling multiple blocks.
Frequently Asked Questions (FAQs) About Quilting and This Block
Q: What kind of fabric is best for quilting?
A: 100% quilting cotton is generally recommended for its ease of use, durability, and wide range of colors and patterns. It has a stable weave that resists stretching, which is crucial for precise piecing.
Q: Can I make this Tulip Quilt Block in a different size?
A: Absolutely! To scale the block, you’ll need to adjust all initial square and strip measurements proportionately. For example, if you wanted a larger block, you might start with 2.5-inch or 3-inch squares instead of 2-inch, and then follow the same ratios for your strips and other pieces. Remember that even small changes require precise calculations to maintain the design’s integrity.
Q: What if my seams aren’t perfectly straight?
A: Don’t worry! Practice makes perfect. Focus on guiding the fabric, not pulling it, and keep your eye on the seam allowance guide on your machine. If a seam is significantly off, it’s always best to unpick it and re-sew it for a cleaner finish, especially if you plan to join multiple blocks.
Q: How do I choose colors for my quilt block?
A: Color choice is personal and fun! Consider using a color wheel to find complementary or analogous colors. Think about contrast (light vs. dark) to make your design stand out. You can also draw inspiration from existing photos, nature, or even fabric collections designed to work together.
Q: What can I do with my finished Tulip Quilt Blocks?
A: Once you have several blocks, you can assemble them into a larger quilt! Arrange them in rows and columns, adding sashing (strips of fabric between blocks) if desired, and then a border. Beyond quilts, single blocks make beautiful pot holders, sections of tote bags, decorative wall hangings, or even front panels for cushions.
Your Beautiful Tulip Quilt Block Awaits!
Congratulations! You’ve successfully navigated the steps to create a charming Tulip Quilt Block. This project is a wonderful way to hone your quilting skills and produce a piece that’s both beautiful and personally satisfying. Each stitch tells a story, and every completed block is a testament to your creativity and patience. Don’t hesitate to experiment with different fabric combinations and colors to make your tulips truly unique. Share your finished blocks with friends, family, or online quilting communities; the joy of quilting is often amplified by sharing your creations. Keep exploring, keep creating, and most importantly, keep enjoying the wonderful art of quilting. Happy sewing!