
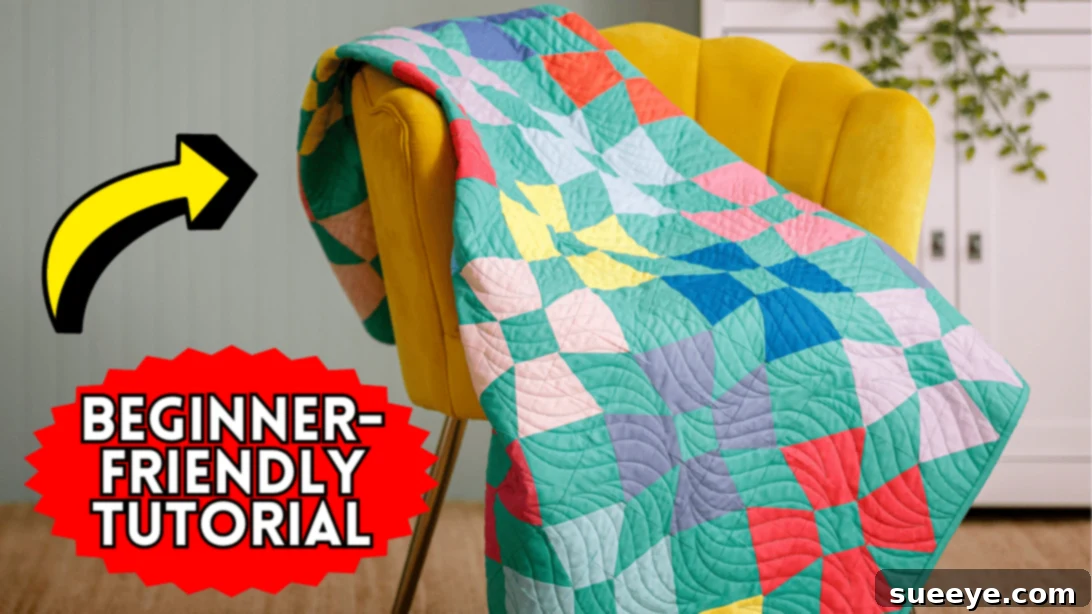
In the expansive world of quilting, where creativity knows no bounds and every stitch tells a story, discovering a design that truly captivates your imagination is a special moment. For many enthusiasts, whether seasoned quilters or eager beginners, the allure of a new project lies in its potential for both beauty and rewarding craftsmanship. Among the myriad of patterns available, certain designs stand out for their innovative structure, visual appeal, and ease of execution. The ‘Dogwood Blossoms Quilt’ by the renowned Missouri Star on YouTube is undoubtedly one such gem. Its charming, organic feel breaks away from traditional linear patterns, offering a fresh perspective on quilt making that is both engaging and surprisingly achievable.
I’ve explored countless quilt designs over the years, from vibrant, intricate masterpieces to elegantly minimalist creations. My favorites often blend a captivating aesthetic with a straightforward construction process, making the journey as enjoyable as the finished product. The Dogwood Blossoms Quilt immediately caught my eye with its distinctive pattern, evoking the gentle curves and delicate beauty of blooming flowers. It’s a design that transcends the ordinary, inviting quilters to experiment with a spectrum of fabric colors and prints to achieve truly personalized results. This tutorial is designed to guide you through creating your own stunning Dogwood Blossoms Quilt, perfect for adding a touch of handmade artistry to your home or gifting to a loved one.
Why the Dogwood Blossoms Quilt is a Must-Try for Every Quilter
What sets the Dogwood Blossoms Quilt apart is its unique visual texture and versatile design. Unlike many conventional quilts that rely on a grid of straight lines and sharp angles, this pattern embraces a softer, more fluid appearance. The blocks come together to create a delightful “wobbly and curved” illusion, adding a dynamic quality that is both modern and timeless. This organic flow is incredibly appealing, giving the quilt a cozy, inviting feel that complements any decor style, from rustic farmhouse to contemporary chic. It’s a testament to how simple geometric units can be combined to achieve complex and captivating visual effects.
The beauty of this quilt also lies in its adaptability. Imagine the possibilities! A selection of bright, cheerful florals could make your dogwood blossoms pop with springtime exuberance. Alternatively, subtle earth tones and muted prints could create a sophisticated, understated elegance. For a bolder statement, consider high-contrast fabrics that emphasize the unique block shapes. Even beginners will find this project incredibly rewarding. The construction involves foundational quilting techniques—tri-recs units, half-square triangles, and corner-square triangles—all taught in a clear, accessible manner. This makes it an excellent project for honing your skills while producing a stunning piece of textile art. If you’re ready to embark on a delightful quilting adventure, this tutorial is your perfect starting point.
Essential Materials for Your Dogwood Blossoms Quilt Project
Before you dive into the exciting world of cutting and stitching, it’s crucial to gather all your materials. High-quality fabric and precise tools are the foundation for a successful and enjoyable quilting experience. The Dogwood Blossoms Quilt utilizes standard quilting supplies, making it easy to get started. Remember, the choice of fabric can dramatically alter the final look of your quilt, so take your time selecting colors and prints that truly inspire you.
- 1 package of 10″ squares (Layer Cake): This is often referred to as a “Layer Cake” in quilting terms. These pre-cut squares are fantastic for speeding up the cutting process and ensuring color coordination if you choose a designer collection. Select a package that features colors and patterns you adore, as these will form the “blossoms” of your quilt.
- 2 yards of background fabric: This fabric will highlight your blossom blocks and provide visual breathing room. A solid or tone-on-tone print often works best to allow the main blocks to shine, but don’t be afraid to experiment with subtle patterns that complement your 10″ squares.
- 3 yards of backing fabric: The backing fabric is often an overlooked opportunity for creativity! While it serves a functional purpose, it also adds to the overall aesthetic of your quilt. Choose a fabric that coordinates with your quilt top, or pick a contrasting print for a delightful surprise.
- Marking pen, pencil, or chalk: Essential for drawing accurate lines on your fabric, especially for half-square triangles. Make sure your chosen marker is easily visible on your fabric and will disappear with heat or washing.
- Ruler (quilting ruler recommended): A good quality quilting ruler, preferably a non-slip design, is indispensable for precise cutting and marking. Accuracy in cutting translates directly to accuracy in piecing.
- Scissors or rotary cutter and a cutting mat: While scissors can work, a rotary cutter and self-healing cutting mat are highly recommended for quilters. They allow for faster, more accurate cuts, especially when dealing with multiple layers of fabric. Always use a fresh blade for crisp edges and exercise caution.
- Needle and thread: A good quality 100% cotton thread is ideal for piecing quilts. Choose a neutral color like white, cream, or light gray that blends well with most fabrics.
- Iron, for pressing, and ironing board: Pressing seams correctly is as important as sewing them accurately. A hot iron and sturdy ironing surface are vital for flat, professional-looking blocks.
- Sewing machine: A reliable sewing machine with a quarter-inch foot (or a good understanding of your quarter-inch seam allowance) will make this project a breeze.
- Pattern (Click here to get the pattern): The written pattern complements the video tutorial, providing specific cutting instructions and diagrams. Always refer to it for precise measurements and guidance.
How to Create Your Beautiful Dogwood Blossoms Quilt
Creating the Dogwood Blossoms Quilt is a delightful process that builds confidence with each step. Precision and careful pressing are key to achieving those beautiful, flowing curves. Take your time, enjoy the journey, and don’t hesitate to refer to the video tutorial by Missouri Star for visual guidance on any step. This step-by-step guide will walk you through piecing together the charming blocks that form the heart of this quilt.
Step 1: Preparing Your Fabrics and Forming Tri-Recs Units
Begin by carefully cutting all your fabrics according to the precise measurements provided in the accompanying pattern and video tutorial. Accuracy at this stage is paramount for successful piecing later on. Once your pieces are cut, you’ll start constructing the foundational tri-recs units. For each unit, take the large triangle piece and center it between two slimmer, smaller triangles. Ensure all raw edges are aligned perfectly. Using a consistent quarter-inch seam allowance, sew the slimmer triangles to each side of the large center triangle. After sewing, gently press the seams open. This technique helps reduce bulk and ensures your units lie flat. You will need to create a total of four identical tri-recs units for each block, so repeat this process carefully. Set these completed units aside as you move to the next components of the block.
Step 2: Crafting the Half-Square Triangle Units (HSTs)
Next, you’ll create the versatile half-square triangle units, a staple in many quilt patterns. Begin by taking two squares of fabric—one from your 10″ squares and one from your background fabric—and place them right sides together. Using your marking tool and ruler, draw a diagonal line from one corner to the opposite corner on the lighter of the two squares. This line will serve as your guide. Now, sew a seam a quarter-inch away from *each side* of this marked diagonal line. It’s crucial to maintain that consistent quarter-inch seam allowance. Once both seams are sewn, carefully cut the unit apart along the original marked diagonal line. You will now have two half-square triangle units. Gently press these open, pressing the seam towards the darker fabric to minimize bulk. Finally, trim each HST unit to the specified size from the pattern, ensuring they are perfectly square and precise. This trimming step is essential for achieving accurate blocks and a flat quilt top.
Step 3: Assembling the Remaining Block Unit (Corner-Square Triangles)
Now it’s time to create the third distinct unit for your Dogwood Blossoms block, often referred to as a corner-square triangle or a “snowball” block technique. Take a large square piece (typically from your 10″ squares) and position a small square (usually from your background fabric) on one of its corners. Ensure their right sides are facing each other and align the raw edges precisely. Stitch diagonally from one corner to the opposite corner of the small square. This seam will create a new corner for your larger square. For best results, you can lightly draw a diagonal line as a guide before sewing. This technique is key to creating the illusion of curves within the overall quilt.
Step 4: Completing the Block and Assembling the Quilt Top
After stitching the diagonal line in the previous step, carefully cut off the excess fabric layers, leaving a quarter-inch seam allowance beyond your stitched line. This not only removes bulk but also creates a clean, new corner. Gently press the newly formed triangle open, revealing the new corner of your block. Repeat this exact process for all four corners of the large square, attaching a small square to each corner. Once all four corners are complete, you will have a finished block unit with unique triangular corners. Now comes the exciting part: assembling your complete Dogwood Blossoms block! Arrange all the units you’ve created—the tri-recs units, the half-square triangles, and the corner-square units—into the block layout as demonstrated in the video. Pay close attention to the orientation of each piece to ensure the pattern flows correctly. Stitch the units together row by row, pressing the seams as you go, ideally in alternating directions for each row. This allows the seams to “nest” when you join the rows, reducing bulk and helping your quilt top lie beautifully flat. Finally, stitch the rows to each other to form the complete Dogwood Blossoms Quilt top, carefully matching all intersections and pressing your seams open or to one side as preferred.
Tips for Quilting Success
Creating a quilt, especially one as visually captivating as the Dogwood Blossoms, is a journey that benefits from a few tried-and-true quilting practices. Here are some tips to help ensure your project is a resounding success:
- Accurate Cutting is Key: Invest in a sharp rotary cutter and a good quality ruler. Even a slight variation in your cut fabric pieces can lead to distorted blocks and wavy seams. “Measure twice, cut once” is a quilter’s mantra for a reason.
- Consistent Seam Allowance: A perfect quarter-inch seam allowance is crucial in quilting. Practice on scraps if needed, and consider using a quarter-inch foot on your sewing machine. This consistency ensures all your pieces fit together perfectly.
- Press, Don’t Iron: When quilting, we “press” rather than “iron.” Ironing involves moving the iron back and forth, which can stretch your fabric. Pressing means lifting and placing the iron down firmly, allowing the heat to set the seams without distortion. Pressing seams open often results in flatter blocks, while pressing to one side can help nest seams.
- Chain Piecing: To save time and thread, especially when making multiple identical units (like HSTs), consider chain piecing. This involves feeding units through your machine one after another without cutting the thread in between.
- Layout Before Sewing: Before stitching your blocks or rows together, lay them out on a design wall, the floor, or a large table. This allows you to visualize the overall pattern, ensure correct orientation, and catch any misplaced blocks before they’re permanently sewn.
- Patience is a Virtue: Quilting is a meditative art form. Don’t rush the process. If a seam isn’t perfect, take the time to unpick it and re-sew. The extra effort will be worth it in the final product.
- Watch the Video: The Missouri Star tutorial is an invaluable resource. Watch it thoroughly before you start and refer back to it if you encounter any difficulties. Visual demonstrations often clarify complex steps.
Fabric Choices and Design Variations for Your Dogwood Blossoms Quilt
One of the most exciting aspects of quilting is the ability to personalize your project through fabric selection. The Dogwood Blossoms Quilt, with its distinct shapes, offers a fantastic canvas for creative expression. Consider the following when choosing your fabrics and contemplating variations:
- High Contrast for Impact: Using a strong contrast between your 10″ squares (blossoms) and background fabric will make the unique curved design pop. For instance, vibrant prints against a crisp white or deep charcoal background can be stunning.
- Subtle Blends for Softness: If you prefer a more gentle aesthetic, choose fabrics with less contrast, perhaps different shades of the same color family or tone-on-tone prints. This can create a dreamy, watercolor effect, allowing the texture of the quilting stitches to become more prominent.
- Theme and Season: Align your fabric choices with a theme. Florals and greens for a spring-themed quilt, rich reds and golds for autumn, or cool blues and silvers for winter. Dogwood blossoms naturally lend themselves to spring and summer palettes.
- Quilting Cotton is Your Friend: While other fabrics can be used, standard quilting cotton is recommended for beginners due to its ease of cutting, sewing, and pressing. It holds its shape well and comes in an incredible array of designs.
- Beyond the Basic Layout: While the pattern provides a beautiful layout, once you understand the block construction, you might consider varying the block rotation for a different overall pattern, or perhaps adding sashing between blocks for a more defined look.
Embrace the Art of Quilting with the Dogwood Blossoms Quilt
The Dogwood Blossoms Quilt is more than just a sewing project; it’s an opportunity to create something truly beautiful and functional with your own hands. This engaging pattern, expertly shared by Missouri Star, combines fundamental quilting techniques with a visually captivating design that will delight quilters of all skill levels. Whether you’re drawn to its unique wobbly curves, the endless fabric possibilities, or its beginner-friendly nature, this quilt promises a rewarding experience from the first cut to the final stitch. Remember to enjoy each step, embrace any imperfections as part of the handmade charm, and take pride in your completed work. Once your quilt top is assembled, you’ll simply need to add batting and backing, then quilt and bind it to bring your stunning Dogwood Blossoms masterpiece to life. Happy quilting!
*All image credit belongs to Missouri Star via YouTube. Follow and subscribe to her channel for more inspiring quilting tutorials and projects!