
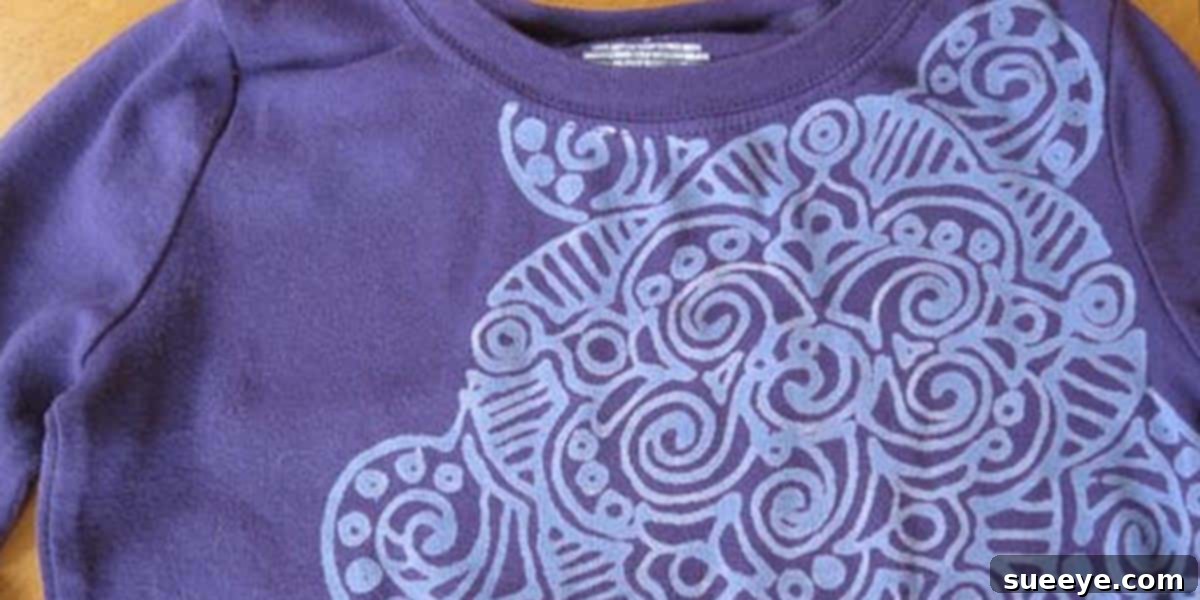
Unleash Your Creativity: The Ultimate Guide to DIY Bleach Pen T-Shirt Design
There’s an undeniable joy in wearing something that truly reflects your personality, something that no one else has. In a world saturated with mass-produced fashion, the allure of custom-made apparel is stronger than ever. Imagine crafting a piece of clothing that not only looks fantastic but also carries the unique stamp of your own creativity. Forget complicated screen printing or expensive custom orders – there’s a surprisingly simple, incredibly fun, and highly effective method that’s taking the DIY fashion world by storm: designing t-shirts with a bleach pen!
This technique has quickly become my latest obsession, transforming plain cotton tees into striking works of art. The reactions I get when I wear my personalized creations are priceless; people are often astounded to learn I made them myself! They instantly want to know how they can create their own unique designs. It’s an incredibly satisfying feeling to explain that such a professional-looking result comes from something as readily available as a bleach pen. The possibilities truly feel endless once you start, and I’m certain you’ll find yourself hooked, just like I am, eager to create a whole wardrobe of custom pieces.
Why Choose Bleach Pens for Fabric Design?
You might be thinking, “Bleach on a shirt? Won’t that just ruin it?” The magic of a bleach pen lies in its controlled application. Unlike pouring liquid bleach or attempting intricate designs with a brush and diluted solution, a bleach pen allows for remarkable precision. Its gel-like consistency ensures that the bleach stays exactly where you apply it, preventing accidental drips or widespread damage. This level of control is what makes it so appealing to both beginners and seasoned DIY enthusiasts.
Beyond precision, bleach pens offer several compelling advantages over other fabric decoration methods:
- Unmatched Uniqueness: Your design will be one-of-a-kind. No two bleach pen creations are ever exactly alike, guaranteeing a truly personalized item.
- Effortless Application: It’s as easy as drawing with a pen! If you can doodle, you can design a bleach pen t-shirt.
- Cost-Effective: The materials needed are minimal and inexpensive, making it an accessible craft for anyone.
- Versatility: While bleach pens create a distinctive decolorized effect, they can be combined with other mediums like fabric paints or markers for layered looks.
- Revitalize Old Clothes: Give tired, plain t-shirts, jeans, or even canvas bags a new lease on life, transforming them into fashionable statements.
- A Unique Aesthetic: The bleaching process creates a subtle, almost vintage-distressed effect that is difficult to replicate with other methods, offering a cool, edgy vibe.
While I’ve always admired the vibrant chaos of tie-dye, I truly believe this controlled bleach method has become my favorite way to decorate fabric. It offers a sophisticated yet playful approach to customization that is simply delightful.
Gathering Your Essential Supplies for Bleach Pen Art
Before you dive into the exciting world of bleach pen design, it’s crucial to gather the right tools. Having everything at hand will ensure a smooth and enjoyable creative process. Most of these items are likely already in your home or easily found at any general store or craft shop.
The Non-Negotiable Fabric Choice: 100% Cotton
This is perhaps the most critical piece of advice: always use 100% cotton t-shirts or other 100% cotton fabric items. Bleach works by removing dye, and natural fibers like cotton react beautifully and predictably to this process, showing a clear color change. Synthetic fibers, such as polyester, rayon, or blends, do not react well with bleach in the same way. At best, they might show very little color change; at worst, the fabric could be damaged or even melt. Always check the fabric content label before you begin. If in doubt, a small test on an inconspicuous area is always recommended.
Your Bleach Pen of Choice
Any standard bleach pen designed for laundry stain removal will work. These typically contain a gel bleach formula that is thick enough to stay put. Brands like Clorox Bleach Pen are popular and effective. Ensure the pen is full and the tip is clear of any dried gel to allow for smooth application.
Protect Your Workspace and Your Shirt
- Cardboard Insert or Plastic Sheet: Essential for preventing the bleach from soaking through to the back of your shirt or staining your work surface. Slide a piece of cardboard or a plastic cutting mat inside the shirt, directly beneath the area you plan to design.
- Gloves: Bleach is a strong chemical. Always wear rubber or latex gloves to protect your hands from irritation and dryness.
- Apron or Old Clothes: Protect your clothing from accidental splatters. Even a small drop of bleach can leave an unwanted mark.
- Well-Ventilated Area: Work in a space with good airflow, such as near an open window or outdoors, to minimize inhalation of bleach fumes.
Design Tools and Inspiration
- Pencil or Fabric Chalk: For sketching your design lightly onto the fabric before applying bleach. This allows for adjustments and ensures you’re happy with the layout.
- Stencils (Optional): If you prefer precise shapes, lettering, or intricate patterns, stencils can be incredibly helpful. You can buy them or make your own from cardstock or contact paper.
- Inspiration: Websites like Pinterest are treasure troves of ideas for t-shirt designs, throw pillows, skirts, jeans, and all kinds of textile art. You’ll be awestruck by the creativity you find there. Gather ideas, sketch them out, or simply let your imagination run wild!
Step-by-Step: Creating Your Bleach Pen Masterpiece
Now that you have all your supplies, let’s get to the fun part: bringing your vision to life! This step-by-step tutorial will guide you through the process, ensuring a fantastic outcome.
Step 1: Prepare Your Workspace and Fabric
- Wash and Dry Your Shirt: It’s important to wash your new t-shirt before decorating it. This removes any sizing or chemicals that might interfere with the bleaching process and pre-shrinks the fabric.
- Iron Flat (Optional but Recommended): A smooth surface makes drawing much easier.
- Insert Protection: Place your cardboard insert or plastic sheet firmly inside the t-shirt, ensuring it’s flat beneath the fabric you intend to bleach. This creates a stable surface and prevents bleed-through.
- Gear Up: Put on your gloves and apron, and ensure you’re working in a well-ventilated area.
Step 2: Plan Your Design
This is where your creativity shines! Consider what you want to create:
- Freehand Drawing: Lightly sketch your design onto the fabric with a pencil or fabric chalk. Don’t press too hard, as pencil marks can sometimes be difficult to remove completely.
- Using Stencils: Secure your stencil firmly to the fabric with tape. Ensure all edges are pressed down to prevent the bleach from seeping underneath.
- Abstract Patterns: Sometimes the most striking designs are simply swirls, dots, or random lines. Don’t overthink it if you’re going for an organic look.
Step 3: Apply the Bleach Pen
With your design outlined or stencil in place, it’s time to apply the bleach pen. Press the tip gently onto the fabric and squeeze to release the gel. Draw or fill in your design, applying even pressure. A thin line will give a delicate effect, while a thicker application will create a bolder, more defined bleach mark. Avoid excessive squeezing, as too much bleach can saturate the fabric and spread beyond your desired lines. The bleach will begin to activate almost immediately, but the full effect takes time to develop.
Step 4: Let It Develop
This is the waiting game. The bleach needs time to remove the dye from the fabric. The development time can vary depending on the fabric, the dye color, and the specific bleach pen. Typically, it takes anywhere from 5 to 20 minutes. Keep a close eye on your design; you’ll see the color gradually lighten. For a lighter effect, you can rinse sooner; for a more dramatic, whiter effect, let it sit longer. Be careful not to let it sit for too long, as it could weaken the fabric.
Step 5: Rinse and Neutralize
Once you’re happy with the color change, it’s crucial to stop the bleaching process:
- Rinse Thoroughly: Carefully remove the cardboard insert. Take the shirt to a sink or bucket and rinse it under cold, running water. Rinse until all traces of the bleach gel are gone and the water runs clear. This can take a few minutes.
- Optional Neutralizing Soak: To fully neutralize the bleach and prevent any further chemical reaction, you can soak the shirt in a bucket of cold water mixed with a tablespoon of hydrogen peroxide for about 5-10 minutes. Hydrogen peroxide helps break down any remaining bleach. Rinse again with plain cold water.
Step 6: Wash and Dry
After rinsing, it’s time for a proper wash:
- Machine Wash: Place your bleach-designed t-shirt in the washing machine. It’s best to wash it alone or with other similar dark-colored items (if you used hydrogen peroxide and rinsed well, it should be fine, but caution is always wise for the first wash). Use a cold water cycle and a gentle detergent.
- Dry: You can air dry your shirt by hanging it up, or tumble dry on a low setting.
And just like that, your custom, one-of-a-kind t-shirt is ready to wear!
Expert Tips for Stunning Results and Lasting Designs
To ensure your bleach pen creations are consistently amazing and durable, consider these additional tips:
- Practice Makes Perfect: If you’re new to this, start with an old, inexpensive t-shirt or a scrap of 100% cotton fabric to get a feel for the bleach pen and how quickly the color changes.
- Understand Your Fabric: Different shades and types of 100% cotton will react differently. A dark navy shirt might turn a rusty orange, while a black shirt might go from dark grey to a light tan. Embrace these unique variations!
- Layering for Dimension: For more complex designs, you can apply bleach in layers, allowing some areas to lighten more than others for a multi-tonal effect.
- Combine with Fabric Paint: Once your bleach design is complete, washed, and dried, you can add another layer of customization with fabric paint pens or textile markers for vibrant color accents. This looks awesome with jeans or white pants!
- Consider Negative Space: Instead of bleaching the main subject, try bleaching the area *around* it. This creates a striking reverse stencil effect where your design remains the original fabric color.
- Keep the Pen Moving: For smooth lines, try to draw in one continuous motion rather than short, choppy strokes.
- Don’t Rush the Rinse: Insufficient rinsing can leave bleach residue that continues to lighten the fabric or even damage it over time. Be thorough!
Beyond T-Shirts: Expanding Your Bleach Art Horizons
The beauty of bleach pen art isn’t limited to just t-shirts! Once you’ve mastered the technique, you’ll find inspiration everywhere. Look on Pinterest for all kinds of lovely designs that extend to other fabric items. You can easily apply this method to a variety of other 100% cotton or natural fiber goods:
- Jeans and Denim Jackets: Create intricate patterns, distressed looks, or personalized motifs.
- Throw Pillows and Cushion Covers: Design unique home decor accents that match your personal style.
- Canvas Tote Bags: Turn a plain canvas bag into a fashionable accessory or a thoughtful gift.
- Skirts and Dresses: Add subtle or bold designs to simple garments.
- Sneakers: With careful application, you can even customize canvas sneakers for truly unique footwear.
The creative possibilities are truly boundless. You will be awe-struck by the creations you can achieve with this simple tool.
Caring for Your Bleach-Designed Apparel
To ensure your custom bleach pen creations last for a long time and maintain their integrity, proper care is essential:
- Wash Inside Out: Turning your garment inside out before washing protects the design during the wash cycle.
- Cold Water, Gentle Cycle: Always wash in cold water on a gentle cycle with a mild detergent. This helps preserve both the fabric and the bleached design.
- Avoid Re-Bleaching: Do not use bleach or harsh stain removers on your bleach-designed items, as this could further alter or damage the design.
- Air Dry or Low Heat: Air drying is always the gentlest option. If you must use a dryer, opt for a low heat setting to prevent any potential damage to the fabric or design.
Conclusion: Your Creative Journey Awaits
Who would have ever thought that putting a design on a t-shirt with a bleach pen could be so incredibly rewarding? From the initial idea to the final reveal, the process is engaging, surprisingly simple, and yields truly remarkable results. The satisfaction of wearing something you’ve designed and created with your own hands is immense. Nobody ever believes I made it myself, and then they want to know how to get their own!
This method offers an accessible entry point into the world of personalized fashion, allowing you to express your unique style without breaking the bank. So, whether you’re looking to refresh an old wardrobe, create thoughtful handmade gifts, or simply unleash your inner artist, grab a bleach pen and a 100% cotton shirt. Watch online tutorials and step-by-step guides to get started and see how others achieve amazing results. Dive in, experiment, and prepare to fall in love with your new obsession. Your wardrobe, and your creative spirit, will thank you!