
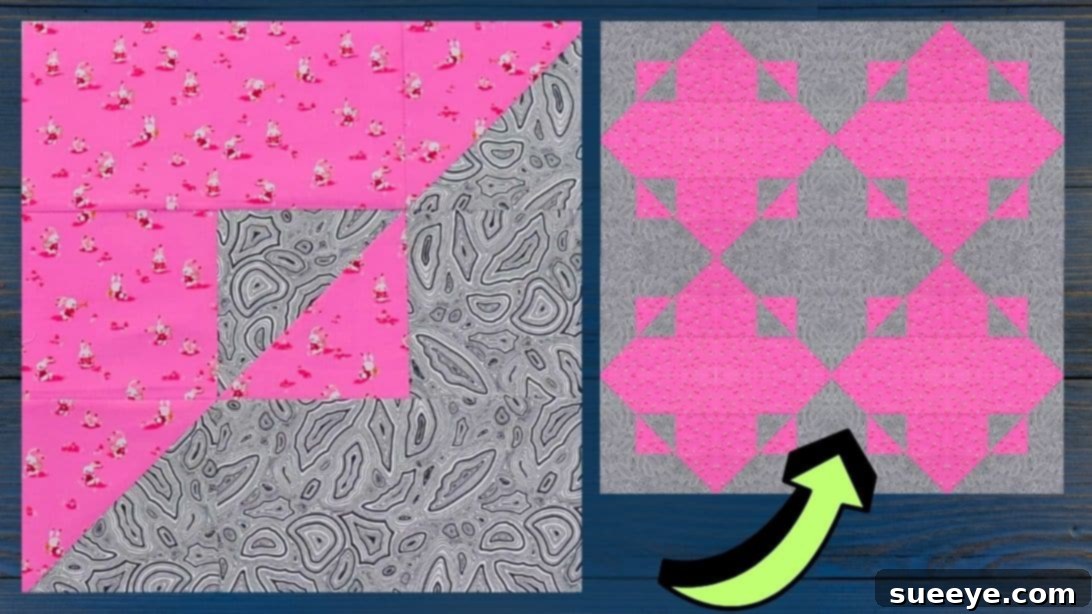
Mastering the Betty’s Delight Quilt Block: An Easy Patchwork Tutorial for Every Skill Level
Embark on a delightful journey into the world of quilting with the “Betty’s Delight” quilt block, a design renowned for its elegant simplicity and accessibility. Created by the talented Ange Wilson of GnomeAngel, this particular block stands out as one of the most straightforward and rewarding patterns you can tackle today. Whether you’re taking your very first stitches or you’re a seasoned quilter looking for a quick and satisfying project, Betty’s Delight offers an exceptional experience.
What makes this block truly remarkable is its minimalist approach, requiring just two distinct fabrics. This simplicity, however, doesn’t compromise its versatility. You have complete creative freedom to choose any pattern, print, or color combination that speaks to your aesthetic. Imagine vibrant florals contrasting with solid hues, or subtle tone-on-tone designs creating a sophisticated texture. The possibilities are truly endless, allowing each block you create to be a unique reflection of your personal style.
One of the most appealing aspects of the Betty’s Delight block is its rapid completion time. You can often finish a single block within mere minutes, making it an ideal choice for quick gifts, stash-busting projects, or when you simply crave the instant gratification of seeing a beautiful design come to life. Furthermore, this single, foundational block serves as a cornerstone for countless larger patterns and projects. From intricate quilt tops to charming home decor items, mastering Betty’s Delight opens up a universe of quilting potential.
Even if you’re a complete novice to the craft of quilting, rest assured that you can achieve a perfect Betty’s Delight block on your very first attempt. Its design is intuitively structured, guiding you through each step with clarity and ease. There’s no need to feel intimidated by complex techniques or a daunting list of materials; this project is designed for success from the get-go. Dive in by reading the detailed instructions below, and for a comprehensive visual guide, make sure to watch the accompanying video tutorial from Ange Wilson.
RELATED: Learn How to Sew a Simple Quilted Heart for Another Beginner-Friendly Project
Why the Betty’s Delight Quilt Block is Your Next Must-Make Project
Simplicity Meets Striking Design
The beauty of the Betty’s Delight block lies in its deceptively simple construction that yields a visually dynamic result. Utilizing only two fabrics, typically one print and one contrasting solid or texture, it forms a striking geometric pattern. This inherent simplicity means fewer seams, less complex cutting, and a faster pathway to a finished block. Yet, when multiple Betty’s Delight blocks are arranged together, they can create intricate secondary patterns, adding depth and sophistication to any quilt. It’s a testament to good design – easy to make, hard to stop admiring.
The Perfect Gateway for New Quilters
For those new to the art of quilting, the initial steps can sometimes feel overwhelming. Betty’s Delight is specifically tailored to demystify the process and build confidence. It introduces fundamental quilting skills such as accurate cutting, precise piecing of half-square triangles (HSTs), and careful pressing, without demanding advanced techniques. This foundational experience is invaluable, equipping beginners with the core competencies needed to tackle more complex projects down the line. It’s a stepping stone that provides immediate success and fosters a love for the craft.
Unleashing Endless Creative Potential
Despite its two-fabric constraint, the Betty’s Delight block is a chameleon when it comes to design. By altering your fabric choices, you can completely transform the block’s mood and appearance. Opt for bright, bold colors for a modern, playful feel, or choose muted, complementary tones for a more traditional or serene aesthetic. The arrangement of these blocks in a larger project also offers limitless possibilities. Rotate blocks to create pinwheel effects, checkerboards, or more abstract patterns. This adaptability ensures that no two Betty’s Delight quilts ever have to be exactly alike, encouraging boundless creativity.
Essential Materials for Crafting Your Betty’s Delight Quilt Block
Gathering your materials is the first exciting step in any quilting project. For the Betty’s Delight block, the list is wonderfully concise, making it easy to get started. Here’s everything you’ll need to create your beautiful block, along with a few tips for selecting the best tools and fabrics:
- Print Fabric: Choose a beautiful patterned fabric that inspires you. This will be the focal point of your block. Consider the scale of the print – smaller prints often work well in individual blocks, while larger prints can be stunning in repeating patterns.
- Contrasting Fabric: Select a fabric that beautifully complements or dramatically contrasts with your print fabric. A solid color often works best here, allowing the print to pop, but a subtle texture or tone-on-tone print can also add interest. Ensure there’s enough visual difference between your two fabrics so the pattern of the block is clear.
- Quilting Ruler: An essential tool for precise cutting. A clear acrylic ruler, preferably 6″ x 24″ or a square ruler (like 6.5″ x 6.5″ or 12.5″ x 12.5″), will be incredibly helpful for squaring up your half-square triangles and other pieces.
- Marking Pen, Pencil, or Chalk: For drawing lines on fabric. A disappearing ink pen, a fabric pencil, or tailor’s chalk are all excellent choices for marking your sewing lines and cutting guides. Test your marker on a scrap piece of fabric first to ensure it removes easily.
- Fabric Scissors or Rotary Cutter and a Cutting Mat: While sharp fabric scissors are fine, a rotary cutter and a self-healing cutting mat are highly recommended for speed and accuracy in quilting. A 45mm rotary cutter is a versatile choice for most fabric weights.
- Needle and Thread: For piecing your fabric. Choose a good quality 100% cotton thread in a neutral color (like white, grey, or ecru) that blends with both your chosen fabrics. A sharp needle appropriate for your sewing machine and fabric weight will ensure smooth stitches.
- Iron and Ironing Board (for pressing): A hot, dry iron is crucial for setting seams and ensuring your blocks lie flat. Pressing is often considered as important as stitching in quilting, as it contributes significantly to the final look and accuracy of your block.
- Sewing Machine: Any standard sewing machine in good working order will suffice. Ensure it’s clean, oiled (if applicable), and has a fresh needle. A ¼ inch presser foot can be a game-changer for maintaining consistent seam allowances.
- Pattern: The specific cutting instructions and layout guide for the Betty’s Delight block. You can click here to download the free pattern directly from GnomeAngel’s website. Always print your pattern at 100% scale to ensure accurate measurements.
Step-by-Step Tutorial: Crafting Your Betty’s Delight Quilt Block
Now that you have all your materials ready, let’s dive into the exciting process of bringing your Betty’s Delight quilt block to life. Follow these detailed steps carefully, and remember that precision in quilting leads to beautiful results.
Step 1: Preparation is Key – Downloading and Cutting Your Fabric
The foundation of a great quilt block is accurate preparation. Begin by downloading and printing the Betty’s Delight pattern. Ensure that your printer settings are configured to print at 100% scale (actual size) to avoid any distortion in your measurements. Once printed, carefully review the pattern guide for the specific dimensions required for each fabric piece. The pattern will instruct you on how to cut your print and contrasting fabrics into squares and rectangles that will form the basis of your half-square triangles (HSTs) and other block components.
Using your rotary cutter, cutting mat, and quilting ruler, meticulously cut all the fabric pieces according to the sizes provided in the pattern. This precision is paramount for a block that comes together neatly. Take your time with this step, ensuring straight cuts and accurate measurements. Once all your pieces are cut, lay them out according to the block diagram shown in Ange Wilson’s video tutorial. This visual layout helps you confirm you have all the necessary pieces and understand how they will fit together.
Step 2: Mastering Half-Square Triangles (HSTs)
Half-Square Triangles (HSTs) are a cornerstone of many quilt blocks, and the Betty’s Delight block utilizes them beautifully. To create your HSTs, take two fabric squares that the pattern designates for these units (typically one print and one contrasting). Place these two squares right sides together, aligning all edges perfectly. Using your marking pen, draw a diagonal line from one corner to the opposite corner across the back of the lighter fabric square. This line will serve as your cutting guide later.
Now, using your sewing machine, stitch a seam ¼ inch away from each side of the marked diagonal line. You will have two parallel stitch lines, one on either side of your marked line. Once stitched, take your fabric unit to your cutting mat and carefully cut along the original diagonal line you drew. This action will yield two unpressed half-square triangle units. Now, you’ll press these open. To do this, gently press the seam allowance towards the darker fabric. This “setting the seam” technique helps the block lay flatter. Repeat this process for all the fabric squares designated for HSTs, ensuring you create enough units as instructed by the pattern.
Step 3: Assembling Your Quilt Block Rows
Once all your half-square triangles are complete and pressed, it’s time to start assembling the block. Refer back to the layout diagram from the pattern or the video tutorial. The Betty’s Delight block is typically constructed in rows, similar to building a small puzzle. Arrange your prepared fabric pieces and HSTs into the correct rows on a flat surface, such as your design wall or a tabletop. This step is crucial for visualizing the finished block and preventing errors.
Begin by taking the pieces for your first row and joining them together using a consistent ¼ inch seam allowance. For instance, if a row consists of an HST, a plain square, and another HST, stitch the first HST to the plain square, then stitch the second HST to the plain square’s other side. As you join each seam, take a moment to press the seam allowance. Generally, pressing seams in alternate directions for adjacent rows (e.g., press left for row 1, press right for row 2) helps reduce bulk and allows for “nesting” seams, which aids in alignment when joining rows. Continue joining all the pieces within each row, pressing as you go until all rows are complete.
Step 4: The Final Touch – Pressing and Finishing Your Block
With all your rows expertly sewn, the final step in constructing your Betty’s Delight block is to join these rows together. Carefully align the first row with the second row, ensuring that your seam intersections (if you’ve pressed opposing seams) “nest” together perfectly. Pin generously at these intersections and along the length of the seam to prevent shifting. Stitch the rows together using your reliable ¼ inch seam allowance. Repeat this process, attaching the subsequent rows until your entire block is formed.
After all rows are joined, it’s time for the final press. Take your completed block to the ironing board. Give the entire block a thorough, gentle press, ensuring all seams lie flat and the block is square. You may also want to use your quilting ruler to “square up” the block, trimming any slight inconsistencies along the outer edges to achieve the exact finished size specified in the pattern. This final press and squaring up will give your Betty’s Delight block a crisp, professional finish, ready to be incorporated into a larger quilt project or admired on its own.
Exploring Design Variations with Betty’s Delight
The true magic of a simple block like Betty’s Delight lies in its adaptability. Once you’ve mastered the basic construction, you can start experimenting with different fabric combinations and layout strategies to create unique and stunning projects.
Fabric Pairings and Color Play
The choice of your two fabrics profoundly impacts the block’s final look. Consider these ideas:
- High Contrast: Pair a bold, graphic print with a stark solid (e.g., black and white, or a vibrant floral with a deep navy). This creates a dramatic and modern aesthetic.
- Subtle Harmony: Choose fabrics within the same color family but with different textures or prints (e.g., a light blue floral with a darker blue tone-on-tone print). This results in a softer, more traditional feel.
- Themed Fabrics: Utilize holiday-themed prints, juvenile patterns for a baby quilt, or fabrics that reflect a specific hobby or interest.
- Scrappy Approach: Instead of cutting from yardage, use scraps from your stash for the individual components of the block. This can create a wonderfully eclectic and unique “scrappy Betty’s Delight.”
Layout Possibilities for Larger Projects
Once you have multiple Betty’s Delight blocks, the fun really begins with arranging them into larger quilt tops:
- Straight Set: Simply sew blocks together in a grid, row by row. This is classic and effective.
- On Point: Rotate your blocks 45 degrees so they form a diamond shape. This requires half-blocks and corner triangles but creates a dynamic, engaging layout.
- Alternating Blocks: Combine Betty’s Delight blocks with solid squares or other simple quilt blocks (like a four-patch or nine-patch) to create visual breaks and secondary patterns.
- Sashing and Cornerstones: Introduce strips of fabric (sashing) between your blocks and small squares (cornerstones) at the intersections of the sashing. This can frame your blocks beautifully and add another layer of design interest.
Pro Tips for Aspiring Quilters
To further enhance your quilting experience and achieve professional-looking results, keep these tips in mind:
- Maintain a Consistent Seam Allowance: The ¼ inch seam allowance is standard in quilting. Practice maintaining it precisely. A ¼ inch foot for your sewing machine can be immensely helpful.
- Pressing is Key: Don’t underestimate the power of a good press. Pressing after each seam helps your blocks lie flat and ensures accurate alignment when joining pieces. Avoid “ironing” (gliding the iron); instead, use an up-and-down motion to “press” your seams.
- Use Good Quality Tools: Sharp rotary blades, a fresh sewing machine needle, and quality thread can make a significant difference in your results and your enjoyment of the process.
- Square Up Your Blocks: After assembling and pressing, use your square quilting ruler to trim your block to the exact desired size. This ensures all your blocks are uniform and will fit together without puckering.
- Chain Piecing: For efficiency, especially when making multiple identical units (like HSTs), use chain piecing. Stitch one unit, then feed the next unit directly under the needle without cutting the thread between them. This saves time and thread.
- Breathe and Enjoy: Quilting is a journey, not a race. If a seam isn’t perfect, seam rip it and try again. The process should be enjoyable and relaxing.
Beyond the Block: Projects to Create with Betty’s Delight
Once you’ve made a few Betty’s Delight blocks, you’ll quickly realize their potential for a wide array of projects:
- Throw Quilt: Combine 9, 12, or 16 blocks for a charming lap or throw quilt.
- Pillow Covers: One or two blocks can make a stunning decorative pillow cover.
- Placemats: A single block, framed with a border, makes an elegant placemat.
- Tote Bags: Incorporate Betty’s Delight blocks into the design of a handmade tote bag.
- Table Runners: Arrange several blocks in a row for a beautiful table runner.
- Wall Hangings: Frame a few blocks with complementary borders for a unique piece of textile art.
The Joy of Quilting: A Rewarding Craft
Quilting is more than just sewing fabric together; it’s a deeply rewarding craft that offers numerous benefits. It provides a wonderful creative outlet, allowing you to express your artistic vision through color, pattern, and texture. The rhythmic motion of sewing can be incredibly meditative and stress-reducing, offering a peaceful escape from daily demands. There’s immense satisfaction in transforming simple pieces of fabric into a beautiful, functional, and often heirloom-quality item.
Furthermore, quilting often fosters a strong sense of community. Through online groups, local guilds, and workshops, you can connect with fellow enthusiasts, share ideas, learn new techniques, and find inspiration. The quilts you create can also serve as meaningful gifts, expressing love and care to friends and family, or provide comfort and warmth to those in need. Betty’s Delight is an excellent starting point for anyone looking to tap into this rich and fulfilling world.
Frequently Asked Questions (FAQs) About Betty’s Delight Quilt Block
Here are some common questions beginners often ask when starting with the Betty’s Delight quilt block:
What size should my fabric pieces be?
The exact size of your initial fabric squares will depend on the desired finished size of your Betty’s Delight block. Always refer to the specific pattern provided by Ange Wilson – GnomeAngel. The pattern will give you precise cutting dimensions for all components, including the squares used for your half-square triangles.
Can I use more than two fabrics for the Betty’s Delight block?
While the classic Betty’s Delight block is designed for two contrasting fabrics to highlight its distinct pattern, you absolutely can experiment! For example, you could use different print fabrics for each of the half-square triangle units while keeping a consistent solid for the center square. This will create a “scrappier” or more complex look, though it might make the block’s original pattern less distinct. Feel free to play around with combinations once you’ve mastered the basic two-fabric version.
What’s the best way to ensure accurate seams?
Accuracy is crucial in quilting. To ensure your ¼ inch seams are consistent:
- Test your seam allowance: Sew a few scrap strips together, press, and measure the resulting strip width. Adjust your needle position or use a specialized ¼ inch presser foot until your measurement is exact.
- Use a guide: Many sewing machines have markings on the needle plate, or you can place a piece of painter’s tape on your machine’s bed as a visual guide for your fabric edge.
- Pinning: Use pins strategically, especially at intersections, to keep fabric layers from shifting.
- Slow down: There’s no rush! Sewing at a consistent, moderate speed helps maintain accuracy.
Conclusion: Your Quilting Journey Starts Here
The Betty’s Delight quilt block, as taught by Ange Wilson – GnomeAngel, is more than just a pattern; it’s an invitation to experience the joy and satisfaction of quilting. Its simplicity makes it the perfect project for beginners, while its versatility ensures it remains a favorite for experienced quilters. With just two fabrics and a few minutes, you can create a beautiful block that can evolve into an endless array of stunning projects.
We hope this detailed guide empowers you to confidently approach your sewing machine and create your very own Betty’s Delight blocks. Remember to enjoy every stitch, embrace the creative process, and celebrate each finished block as a testament to your growing skills. Happy quilting!
*A special thank you to Ange Wilson – GnomeAngel via YouTube for her inspiring tutorial and all the illustrative images used in this guide. Her clear instructions and wonderful designs are a treasure for the quilting community. If you enjoyed crafting this project, we highly recommend visiting her YouTube channel and subscribing to discover more fantastic quilting ideas and tutorials!