
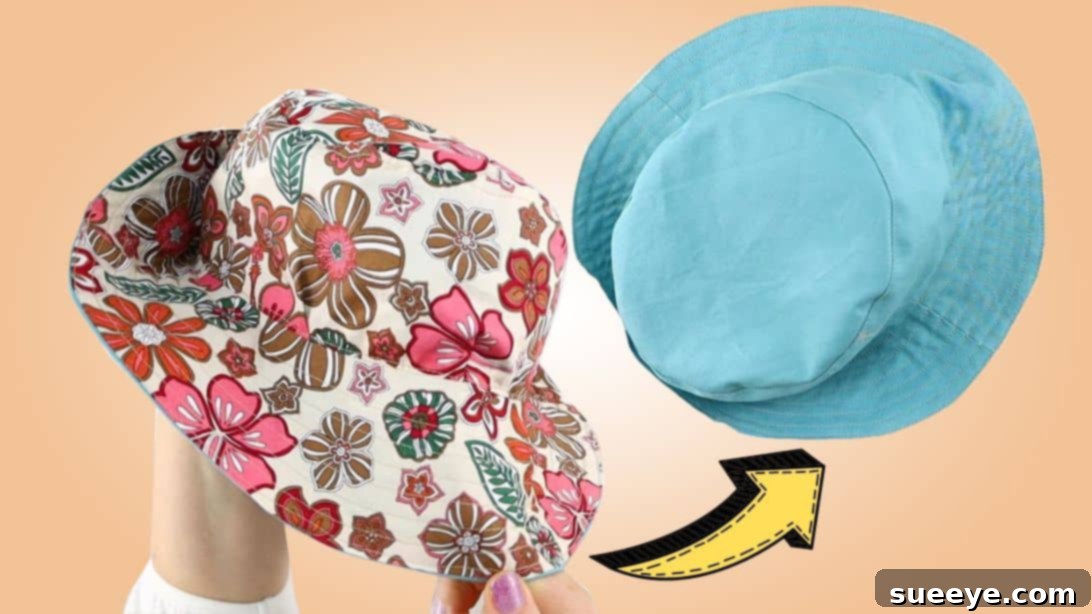
Step out in style and shield yourself from the sun with a fashionable accessory you made yourself! If you adore outdoor activities, from leisurely walks to bustling errands or enjoying your favorite al fresco dining spots, a well-crafted hat is an indispensable companion. And what could be better than a versatile, reversible bucket hat that perfectly complements any outfit? This comprehensive guide will walk you through creating your very own super cute and reversible bucket hat, inspired by the fantastic tutorial from Hello Sewing on YouTube. Get ready to embark on a rewarding sewing journey that results in a practical, stylish, and completely personalized accessory.
Creating your own reversible bucket hat is not just a fulfilling craft project; it’s an opportunity to express your unique style. Imagine a hat that offers two distinct looks, easily changeable to match your mood or outfit of the day. This project is ideal for beginners, offering clear, step-by-step instructions that break down the process into manageable tasks. You’ll learn essential sewing techniques, from precise fabric cutting and accurate seam allowances to the art of pressing and decorative topstitching. By the end, you’ll not only have a fabulous new hat but also a boost in your sewing confidence and a deeper appreciation for handmade accessories. Let’s gather our materials and turn some fabric into a wearable work of art!
Gather Your Essential Sewing Supplies
Before diving into the exciting world of sewing, it’s crucial to have all your materials and tools ready. Choosing the right fabrics and ensuring you have the necessary equipment will make your project smoother and more enjoyable. Here’s a detailed list of what you’ll need to create your reversible bucket hat:
- 2 Coordinating Cotton Fabrics: Select two medium-weight cotton fabrics that complement each other, as they will form the outer and inner (lining) layers of your reversible hat. Cotton is an excellent choice for hats because it’s breathable, comfortable, and relatively easy to work with. Consider patterns, colors, and textures that reflect your personal style. Ensure you have enough fabric for all pattern pieces, typically about 0.5 to 1 yard of each, depending on the pattern size.
- Matching Thread: Choose high-quality polyester all-purpose thread that either matches your chosen fabrics or provides a subtle, intentional contrast. Using good quality thread prevents breakage and ensures durable seams. If your fabrics have different dominant colors, select a neutral color like white, grey, or beige that blends well with both, or opt for two different spools of thread.
- Scissors or Rotary Cutter: A sharp pair of fabric shears is essential for precise cutting. Alternatively, a rotary cutter paired with a self-healing cutting mat and a quilting ruler can offer even greater accuracy and speed, especially for straight lines and curves. Whichever you choose, ensure your blades are sharp to avoid fraying and uneven edges.
- Ruler or Measuring Tape: Accuracy is key in sewing. A clear quilting ruler is perfect for measuring fabric pieces and seam allowances, while a flexible measuring tape is invaluable for checking curves and larger dimensions.
- Iron, for pressing: An iron is arguably one of the most important tools in sewing. Pressing seams as you go is critical for achieving a professional, crisp finish. It helps to set stitches, flatten seams, and give your hat a polished look. Don’t skip this step!
- Fabric Clips and Pins: These will hold your fabric pieces together securely before and during stitching. Fabric clips are excellent for thicker fabrics or areas where pins might leave marks, while pins are versatile for holding curves and matching edges. Have a good supply of both on hand.
- Fabric Marking Pen or Chalk: You’ll need a tool to transfer pattern markings onto your fabric, such as center points, seam lines, or topstitching guides. A disappearing ink pen, tailor’s chalk, or a washable fabric marker will work perfectly.
- Sewing Machine: A basic sewing machine capable of a straight stitch is all you need for this project. Ensure it’s in good working order, threaded correctly, and that you have a fresh needle suitable for medium-weight fabrics (a universal needle size 80/12 is usually a good starting point).
- Pattern: The foundation of your hat! You’ll need to download and print the bucket hat pattern. Click the link to download the pattern directly from Hello Sewing. Ensure you print it at 100% scale for accurate sizing.
Step-by-Step Guide: Crafting Your Perfect Reversible Bucket Hat
With your materials ready, let’s begin the exciting process of sewing your reversible bucket hat. Each step is designed to guide you carefully, ensuring a beautiful and durable finished product. Take your time, focus on precision, and enjoy the creative journey!
Step 1: Preparing Your Pattern and Fabric Pieces
The success of any sewing project often begins with accurate cutting. This initial stage lays the groundwork for all subsequent steps, so precision here is paramount.
- Download and Print the Pattern: Begin by downloading the bucket hat pattern from the provided link. When printing, it is absolutely crucial to select the “no scaling” or “print at 100%” option on your printer settings. This ensures your pattern pieces are the correct size and your hat will fit as intended. After printing, carefully cut out all the pattern pieces using your paper scissors.
- Prepare Your Fabric: Press both of your coordinating cotton fabrics to remove any wrinkles or creases. This makes cutting much more accurate. Lay your fabrics flat and smooth.
- Cut the Fabric Pieces: Following the pattern instructions, place all pattern pieces on the fold of your fabric where indicated. For the main outer hat, you will need to cut:
- 2 Crown Side Pieces: These form the cylindrical part of the hat.
- 2 Brim Pieces: These create the brim that shields your face.
- 1 Oval Crown Piece: This forms the very top of your hat.
Repeat this entire cutting process for your second fabric to create the lining pieces. You will now have a complete set of outer hat pieces and a complete set of lining pieces.
- Assemble the Crown Side Pieces (Outer Fabric): Take the two crown side pieces for your outer fabric. Lay them together with their right sides facing each other. Align the straight side edges carefully. Stitch along each of these side edges with a 3/8-inch (approximately 1 cm) seam allowance. Press the seams open for a clean finish. You should now have a continuous loop that forms the side wall of your hat’s crown.
- Test the Fit: Gently open the crown piece you’ve just created and place it on your head. This is a crucial step to check the fit of the hat’s circumference. Adjust if needed; for instance, if it’s too loose, you might take a slightly larger seam allowance on the side seams, or if it’s too tight, you could add a small strip of fabric (though adjusting the pattern before cutting is always ideal). Once you’re satisfied with the fit, give the entire crown piece a good press. Then, topstitch on either side of each seam you just created. Topstitching not only adds a professional touch but also helps to keep the seam allowances flat and reinforced.
- Mark the Oval Crown Piece (Outer Fabric): Take your oval crown piece. Fold it vertically in half and press the fold gently to create a crease. Mark the creased ends with your fabric marking pen. Unfold, then fold it horizontally in half, press, and mark the new creased ends. These four marks (front, back, left side, right side) will serve as important alignment points for attaching it to the crown side piece.
The initial steps of pattern preparation and precise cutting are fundamental. Taking the time to ensure accuracy here will prevent frustrations later on and contribute significantly to a beautifully finished hat. Remember to press after each sewing step to maintain crisp lines and a professional appearance.
Step 2: Assembling the Outer Hat Layers
Now that your individual components are cut and prepared, it’s time to bring them together to form the main structure of your outer hat. This step involves carefully joining the crown and brim sections, which requires attention to detail and smooth curves.
- Attach the Oval Crown to the Crown Side Piece: Take your crown side piece (the loop you created in Step 1) and your marked oval crown piece. Find the center points on all four sides of the crown side loop (e.g., by folding it in half and marking the folds, then folding it again to find the quarter marks). Line up the marked center points of the oval crown piece with the corresponding center points on the crown side piece. Pin these four points together securely – for example, the front mark of the oval to the front mark of the crown, and so on. Also, align the side seams of the crown piece with the side marks on the oval.
- Pin and Sew the Crown: Once the key alignment points are pinned, carefully ease and pin the remaining raw edges of the oval crown to the top edge of the crown side piece. The goal is to distribute the fabric evenly around the curve. This is a critical step for a smooth crown. Sew around the entire circumference with a 3/8-inch seam allowance, carefully removing pins as you sew to avoid stitching over them. Go slowly around the curves, gently guiding the fabric.
- Press and Topstitch the Crown Seam: After sewing, press the seam allowance down towards the crown side piece. This helps the hat maintain its shape. Then, topstitch all around the hat, just above the seam you just created, to secure the seam allowance and add decorative detail. This topstitching also reinforces the structure of the hat.
- Prepare the Brim Pieces: Take the two brim pieces for your outer fabric. Place them right sides together and sew along their outer curved edge and inner curved edge with a 3/8-inch seam allowance, leaving the straight side seam open for now. This will create a donut-like shape. Press the seams open.
- Mark the Brim: Now, take your assembled brim (the donut shape) and fold it in half, matching the seams, and crease to mark the center points on each side. Repeat by folding again to find the quarter marks. These marks will help you align the brim with the main crown section.
- Attach the Brim to the Crown: With the crown piece inside out, align the marked center points of the brim with the corresponding center points on the bottom edge of the crown (the same way you attached the oval crown). Pin the brim seams to the side seams of the crown, then match the remaining center marks. Carefully pin the entire brim to the bottom edge of the crown piece, distributing any fullness evenly around the curve.
- Sew and Finish the Brim: Stitch along the pinned edges with a 3/8-inch seam allowance, again taking care to remove pins as you go and sew smoothly around the curve. Once sewn, turn the seam allowance upward, towards the crown. Press this seam thoroughly. Finally, topstitch along the outside of this seam to secure it and give your hat a neat finish. At this point, your outer hat is fully formed and looking fantastic!
The construction of the outer hat is a testament to careful pinning and smooth stitching. Each curve presents a small challenge, but with patience and precise seam allowances, you’ll achieve a professional-looking result. Remember that pressing is your best friend throughout this process, helping to shape the fabric and ensure all components lay flat and neat.
Step 3: Crafting the Lining and Bringing It All Together
Now that your outer hat is complete, it’s time to create its reversible twin – the lining. This step involves repeating many of the previous techniques and then expertly joining the outer and lining hats, turning it right side out, and adding the final, stabilizing topstitching.
- Construct the Lining Hat: Using your second coordinating fabric, repeat all the instructions from Step 1 and Step 2. That means:
- Cut all the crown side, brim, and oval crown pieces for the lining.
- Sew the crown side pieces together, press, and topstitch.
- Attach the oval crown piece to the crown side loop, press, and topstitch.
- Assemble the brim pieces, attach them to the crown, press, and topstitch.
By the end of this sub-step, you should have two complete, individual bucket hats – one made from your outer fabric and one from your lining fabric. The only difference is that the lining hat will not have the concentric circles on the brim yet.
- Join the Outer and Lining Hats: Take your outer hat and your lining hat. Place the two hats together with their right sides facing each other. This means the outer fabric of one hat should be touching the outer fabric of the other hat. Carefully align the brim edges all the way around. Ensure that the seams of the lining hat perfectly match up with the seams of the outer fabric hat (e.g., side seams of the crown, brim seams). Pin them securely around the entire brim edge.
- Stitch the Brims Together: Stitch around the pinned brim edge with a 3/8-inch seam allowance. However, it’s crucial to leave a 3 to 4-inch gap unstitched along one section of the brim. This opening is essential for turning the hat right side out later. Backstitch at the beginning and end of this gap to reinforce the stitching.
- Prepare for Turning: Carefully trim the seam allowance around the brim, especially around the curved edges, to reduce bulk. You can also make small notches into the seam allowance (being careful not to cut through the stitch line) around the curves of the brim. This will help the brim lay flat and smooth once turned.
- Turn the Hat Right Side Out: Reach through the 3-inch gap you left in the brim and carefully pull the entire hat right side out. Take your time with this step, gently pushing out all the seams, especially around the brim. Use a point turner or a blunt object to carefully poke out the edges and ensure they are crisp.
- Close the Opening: Once the hat is turned right side out, push the raw edges of the unstitched gap inward so they are flush with the sewn seam. Press this opening flat. You can either hand-stitch this opening closed using a ladder stitch for an invisible finish, or if preferred, you can machine topstitch very close to the edge. The subsequent concentric topstitching on the brim will also help secure this opening.
- Press and Prepare for Brim Topstitching: Give the entire hat a good press, paying special attention to the brim seam, ensuring it lies perfectly flat. For a professional and structured brim, you’ll now add concentric circles of topstitching. First, measure the width of your brim from the crown seam to the outer edge.
- Mark Topstitching Lines: Based on the brim’s width, determine how many concentric circles you want to create. A spacing of about 1/2 inch (1.25 cm) or slightly closer (3/8 inch or 1 cm) is generally recommended. Use your fabric marking pen or chalk to draw these evenly spaced lines all around the brim. Aim for 5 to 6 lines to provide good stability and a nice aesthetic. These stitch lines help to stabilize the hat, giving the brim structure and preventing it from flopping.
- Topstitch the Brim: Starting from the inner edge of the brim (closest to the crown), begin topstitching along your first marked line. Continue stitching in concentric circles outwards, following your marked lines. Ensure you are catching the lining fabric underneath to secure it and keep it from shifting. Take your time to keep your stitches even and straight, especially on the curves. This final topstitching step is crucial for the hat’s structure and overall finish.
Congratulations! You’ve successfully completed your reversible bucket hat. This final stage requires patience and attention to detail, especially with the turning and topstitching. The result is a beautifully structured hat that’s ready to wear and impress.
Elevate Your Style with a Handmade Reversible Bucket Hat
Now that you’ve completed your reversible bucket hat, you have a truly unique and versatile accessory at your fingertips. This hat isn’t just a stylish statement; it’s also incredibly practical, offering excellent sun protection whether you’re enjoying a sunny park stroll, running errands, or simply adding a chic touch to your daily ensemble. The beauty of its reversibility means you effectively have two hats in one, allowing you to switch up your look to match any outfit or mood. From casual daytime wear to a fun festival accessory, your handmade hat will surely turn heads and spark conversations.
Essential Tips for a Flawless Finish
Achieving a professional-looking result, especially as a beginner, involves more than just following steps. Here are some invaluable tips to ensure your bucket hat turns out perfectly:
- Press, Press, Press: This cannot be emphasized enough. Pressing after every seam helps to set stitches, flatten seam allowances, and ensure your fabric lies smoothly. It makes a significant difference in the final appearance of your hat.
- Choose Your Fabric Wisely: While cotton is recommended, consider the weight and drape. Medium-weight cottons like quilting cotton, denim, or twill work best as they offer good structure. Avoid very lightweight or slippery fabrics if you’re a beginner, as they can be challenging to handle.
- Use the Right Needle: A fresh, sharp universal needle (size 80/12 or 90/14) is suitable for most cotton fabrics. A dull or incorrect needle can cause skipped stitches, fabric snags, or thread breakage.
- Take Your Time with Curves: Sewing curves can be tricky. Slow down your machine speed, especially around the brim and crown. You can also slightly shorten your stitch length to give you more control and a smoother curve.
- Accurate Seam Allowances: Consistently sewing with a 3/8-inch seam allowance is vital for the hat to fit correctly. Use the seam allowance guides on your sewing machine’s throat plate or mark your stitching line with a fabric pen for extra precision.
- Practice Makes Perfect: Don’t be discouraged if your first attempt isn’t flawless. Sewing is a skill that improves with practice. Each project teaches you something new.
- Don’t Skimp on Pins (or Clips): Use plenty of pins or clips to hold your fabric pieces together, especially when attaching curved pieces. This prevents shifting and helps to achieve an even seam.
Customize Your Bucket Hat: Endless Possibilities
One of the greatest joys of DIY projects is the ability to customize. Your reversible bucket hat is a blank canvas for your creativity. Here are some ideas to make it truly your own:
- Fabric Combinations: Experiment with different fabric prints and solids. Think about seasonal themes (florals for spring, plaids for fall) or specific occasions. A vibrant print on one side and a classic solid on the other offer maximum versatility.
- Embellishments: Consider adding small details like embroidered patches, decorative stitching (beyond the concentric circles), or even fabric paint. Just remember that any embellishments should be applied before the final joining of the outer and lining hats.
- Brim Stiffness: For a stiffer, more structured brim, you can insert a layer of fusible interfacing (medium-weight) between the two brim pieces during construction. This adds extra body and helps the brim hold its shape better against wind or wear.
- Adjusting the Fit: Once you’ve made one hat, you’ll have a better idea of sizing. If you want to make hats for others, measure their head circumference and adjust the pattern slightly before cutting. Remember, a small change in seam allowance can significantly alter the fit.
- Add a Chin Strap: For windy days or active wear, you could sew in a simple fabric chin strap or add loops to thread through a cord with a toggle.
- Personalized Labels: Sew in a custom woven label with your name or a small brand name to give your hat a professional, designer touch.
Your journey into sewing a reversible bucket hat is more than just following instructions; it’s about developing skills, unleashing creativity, and enjoying the satisfaction of wearing something you’ve crafted with your own hands. This project is not only practical but also a fantastic way to add a unique flair to your wardrobe. Have fun with your new sewing skills, and don’t hesitate to experiment with different fabrics and designs to create a collection of bucket hats for every occasion. Embrace the endless possibilities and enjoy your beautiful handmade accessory!
*All these images are credited to Hello Sewing via YouTube. Give her channel a visit and subscribe for more inspiring sewing tutorials!