
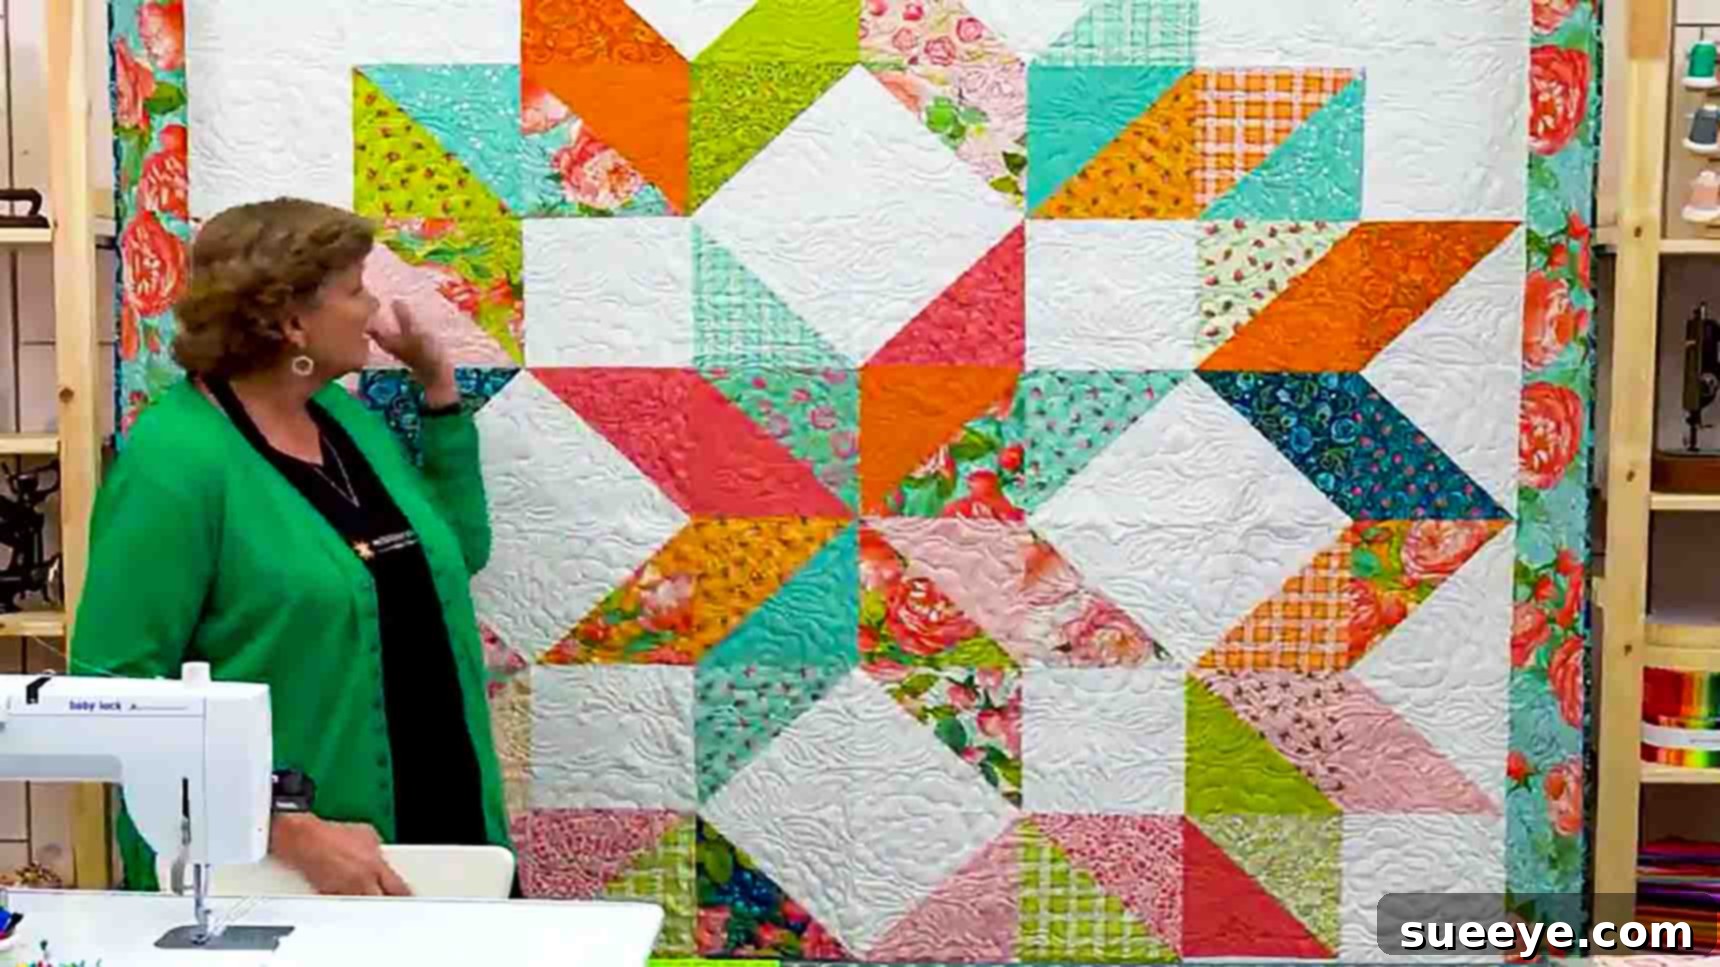
Mastering the Carpenter’s Star Quilt: An Easy Guide for Beginners
Embark on a delightful quilting journey with one of the most beloved and visually striking patterns: the Carpenter’s Star Quilt. Often perceived as intricate, this classic design is surprisingly simple to master, especially with the smart techniques shared by experts like the Missouri Star Quilt Company. This comprehensive tutorial is specifically crafted for beginners, guiding you through each step to create a breathtaking quilt top using convenient 10-inch precut fabric squares. Forget the traditional diamonds; we’ll show you how to construct this magnificent star entirely with versatile half-square triangles (HSTs), making the process quick, enjoyable, and incredibly rewarding.
The Enduring Charm of the Carpenter’s Star Quilt
The Carpenter’s Star quilt pattern holds a special place in the hearts of quilters, celebrated for its bold graphic appeal and the mesmerizing illusion of depth it creates. Its origins trace back to traditional quilting, where it symbolized craftsmanship and community. What makes this star so captivating is its ability to transform simple geometric units into a complex, radiant design that appears to burst from the fabric. Despite its sophisticated look, the Carpenter’s Star is remarkably approachable for new quilters, offering a fantastic opportunity to practice fundamental skills such as accurate cutting, precise piecing, and effective pressing.
Using precut 10-inch squares, often known as “layer cakes,” significantly streamlines the preparation process, allowing you to dive straight into the creative fun. This method reduces cutting time and ensures consistent block sizes, which is crucial for a successful quilt. Whether you choose vibrant contrasting colors or a more subdued, harmonious palette, the Carpenter’s Star will shine as a focal point in any room, a testament to your growing quilting skills.
Understanding Half-Square Triangles (HSTs): Your Quilting Building Blocks
At the heart of this Carpenter’s Star quilt lies the half-square triangle, or HST. These versatile units are formed by sewing two squares together diagonally and then cutting them apart to yield two identical triangular blocks. HSTs are quilting powerhouses, foundational to countless patterns, and mastering them opens up a world of design possibilities. For this particular quilt, HSTs allow us to construct the star points and surrounding elements with remarkable ease and precision, avoiding the trickiness that can sometimes come with diamond-shaped pieces.
The beauty of the HST method is its efficiency. From just two initial squares, you get two finished HSTs. This technique is not only simple but also forgiving, allowing for minor adjustments during the trimming process to ensure perfectly square units ready for assembly. Once you’ve grasped the technique of creating consistent HSTs, you’ll find your confidence soaring, ready to tackle more intricate quilt designs with a solid foundation.
Gather Your Essential Materials
Before you begin, gathering all your materials will ensure a smooth and enjoyable quilting experience. The beauty of this pattern, especially for beginners, is its reliance on readily available precut fabrics. Here’s what you’ll need to create your stunning Carpenter’s Star quilt:
- 1 pack 10″ print squares: Also known as a “layer cake,” these precut squares come in a curated assortment of coordinating fabrics, eliminating the need for extensive fabric selection and cutting.
- 2 & 1/2 yards of background fabric: This fabric will provide the contrast needed for your star to pop. A solid white, cream, or light neutral is traditional, but don’t shy away from subtle prints or colors that complement your chosen print squares.
- 1 & 1/2 yards border fabric: The border frames your quilt top, giving it a polished and finished look. Choose a fabric that harmonizes with your prints and background, perhaps a darker tone to define the edge or a lighter one to expand the visual space.
- 7 & 3/4 yards backing fabric: This will be the underside of your quilt. It’s an opportunity to use a fun print or a super soft fabric for extra coziness. Ensure it’s wide enough for your quilt dimensions.
- 3/4 yard x binding fabric: The binding provides the final edge, protecting the quilt and adding another layer of design. It can match one of your main fabrics, or be a completely contrasting color for a pop.
In addition to fabrics, you’ll want your standard quilting tools: a rotary cutter, cutting mat, quilting ruler, sewing machine, thread, pins or clips, an iron, and an ironing board.
Step-by-Step Carpenter’s Star Quilt Tutorial
Now, let’s dive into the practical steps of constructing your beautiful Carpenter’s Star quilt. Take your time with each step, focusing on accuracy, and you’ll be delighted with the results.
Step 1: Preparing Your Fabrics & Crafting Half-Square Triangles (HSTs)
The foundation of your Carpenter’s Star quilt is the careful creation of half-square triangles (HSTs). We’ll be making two types: those from contrasting print squares and those from print squares paired with background fabric.
First, let’s create the HSTs that will form the points of your star. Take two contrasting 10-inch print squares. Place them right sides together, ensuring all edges are perfectly aligned. With a fabric marker or pencil, draw a diagonal line from one corner to the opposite corner. Now, using your sewing machine, sew a scant 1/4-inch seam on both sides of this drawn line. A “scant” 1/4-inch means sewing just slightly inside the actual 1/4-inch mark, which often accounts for the fabric’s fold when pressed and results in a more accurate finished size. Once both seams are sewn, cut the block diagonally along your drawn line. Press each unit open, making sure to press the seam allowance towards the darker fabric to minimize “shadowing” of the seams through lighter fabrics. You will make eight sets of these contrasting squares, yielding a total of 16 finished HSTs. These units will form the distinct points of your star.
Next, we’ll create the HSTs that define the background around your star points. For these, you’ll pair a 10-inch white background square with a 10-inch printed square from your layer cake. Again, place them right sides together, align the edges, and draw a diagonal line from corner to corner. Sew a scant 1/4-inch seam on both sides of this line, then cut along the drawn line. Press these units open, again pressing the seam towards the darker print fabric. Each pair of squares will give you two HSTs. To create the necessary components for your quilt, you’ll need to repeat this process for 16 sets of white and print squares, resulting in a total of 32 half-square triangles. These will be crucial for building the quadrants of your star.
Finally, for the central elements and cornerstones of your quadrants, you will also need 16 plain white background squares, each cut to 9 & 1/2 inches. These squares will serve as solid blocks within your quilt’s grid, providing visual breathing room and connecting the HST units. Carefully cut these from your background fabric, ensuring precise 9.5-inch measurements for accurate piecing later on. Organization is key at this stage; keep your different types of HSTs and solid squares neatly stacked and separated to simplify the assembly process.
Step 2: Laying Out Your Quilt Quadrants for Perfection
With all your half-square triangles and plain squares prepared, it’s time for the exciting part: arranging your blocks to see the Carpenter’s Star come to life. The beauty of this pattern is often in its modular construction, where you build smaller “quadrants” that then combine to form the larger star. Think of your quilt top as a grand 8×8 grid, composed of four identical 4×4 quadrants.
Begin by laying out just one quadrant on your design wall, floor, or a large table. Each quadrant will consist of a 4×4 arrangement of blocks. Refer to the visual guide from Missouri Star Quilt Company or the layout image provided to ensure your blocks are oriented correctly. The key is to arrange your contrasting HSTs (the ones made from two print fabrics) to form the distinct points of the star, pointing inwards towards the center of your quadrant. The white/print HSTs will frame these star points, creating the negative space and contributing to the overall design. Your 9.5-inch plain white squares will fill in the remaining spaces, typically in the corners and central areas of each quadrant, acting as essential anchors for the design.
Carefully arrange your 16 blocks (4 rows of 4 blocks each) for a single quadrant. Pay close attention to the direction of your HSTs; a single misaligned triangle can disrupt the entire star pattern. Once you are satisfied with the layout of your first quadrant, sew the blocks together row by row. Then, sew the rows together to form the complete 4×4 quadrant. Press your seams thoughtfully; pressing alternate rows in opposite directions (e.g., first row right, second row left) will allow your seams to nest perfectly when you join the rows, creating flatter and more accurate blocks. Repeat this process three more times to create all four identical quadrants.
Step 3: Assembling the Full Carpenter’s Star
With your four meticulously pieced quadrants complete, the moment has arrived to assemble the full Carpenter’s Star. Arrange your four quadrants on your design surface to form the larger 8×8 quilt top. Ensure that the star points from each quadrant align and flow seamlessly into the overall star design. This is where your careful pressing and accurate piecing from Step 2 will truly pay off. Pinning extensively at seam intersections is highly recommended to ensure your points match up precisely.
First, sew the top two quadrants together along their shared vertical edge. Then, sew the bottom two quadrants together. Finally, join these two larger halves along their horizontal seam to complete your quilt top. Take your time, matching up all seams and points as you go. Press the final seams open or to one side, whichever results in the flattest quilt top. Step back and admire your stunning Carpenter’s Star! The visual impact of the complete star is truly rewarding, showcasing your attention to detail and newfound quilting prowess.
Step 4: Adding Borders for a Defined Finish
Adding borders is an optional but highly recommended step that frames your quilt, adds visual weight, and provides stability. For this Carpenter’s Star quilt, you’ll use your border fabric to enhance the overall size and aesthetic.
First, measure the length of your quilt top through the center to get an accurate dimension for your side borders. Cut two border strips to this length from your border fabric. Attach one border strip to each side of your quilt top, pressing the seams towards the border. Next, measure the width of your quilt top, including the newly attached side borders, through the center. Cut two border strips to this new length. Attach these strips to the top and bottom of your quilt. This method of measuring the quilt top directly ensures your borders lay flat and square, preventing wavy edges. Borders are not just decorative; they also help protect the quilt edges from wear and can be a great place to showcase a complementary fabric or a wider print.
Step 5: The Grand Finale: Quilting and Binding
With your quilt top complete, you’re just a few steps away from a finished quilt! The next stage involves creating the “quilt sandwich” and then quilting and binding it. A quilt sandwich consists of three layers: your beautiful quilt top, a layer of batting (the fluffy middle layer that provides warmth and dimension), and your backing fabric.
Carefully layer your backing fabric (right side down), then the batting, and finally your quilt top (right side up). Smooth out any wrinkles and baste the layers together. Basting can be done with safety pins, spray adhesive, or long hand stitches. Once basted, you can proceed to quilt. Quilting is the process of stitching through all three layers to hold them together and add texture. You can choose simple straight lines, a meandering free-motion design, or a more intricate pattern. Finally, prepare your binding strips from your binding fabric. The binding is a strip of fabric sewn around the outer edge of the quilt, encasing the raw edges and giving it a durable, clean finish. This final step transforms your pieced quilt top into a cherished, functional piece of art.
Essential Tips for Quilting Success
As you embark on your Carpenter’s Star journey, keeping a few key tips in mind can make all the difference in achieving professional-looking results:
- Accurate Cutting is Paramount: Precision starts with cutting. Use a sharp rotary cutter, a good quality cutting mat, and a reliable quilting ruler. Double-check your measurements before making any cuts.
- Consistent Seam Allowance: The standard quilting seam allowance is 1/4 inch. Practice maintaining this exact measurement on your sewing machine. A consistent seam allowance ensures your blocks will fit together perfectly.
- Pressing Matters: Pressing is not ironing. When you press, you lift and set the iron down, rather than sliding it. For HSTs, pressing seams to the darker fabric generally prevents shadowing. For joining blocks, pressing seams open or to one side (alternating directions) can help reduce bulk and create flatter intersections.
- Chain Piecing for Efficiency: To save time and thread, sew your units in a continuous chain. For example, when making multiple HSTs, sew the first side of several units one after another without cutting the thread between them. Then, clip them apart and sew the second side.
- Utilize a Design Wall: A design wall (even a flannel sheet pinned to a wall) allows you to visualize your layout before sewing. This is invaluable for ensuring your star points align and your colors are balanced.
- Choose Quality Fabrics: High-quality cotton fabrics will be easier to work with, less prone to fraying, and will stand the test of time, ensuring your quilt remains beautiful for years to come.
Customizing Your Carpenter’s Star: Beyond the Basics
While this tutorial provides a solid foundation for your Carpenter’s Star quilt, don’t hesitate to personalize it and make it uniquely yours. Quilting is an art form, and there are endless ways to customize your creation:
- Color Palettes: Experiment with different color combinations. A monochromatic scheme can create a subtle, elegant look, while vibrant, contrasting colors will make your star truly pop. Consider seasonal themes or specific room decor.
- Fabric Choices: Beyond conventional cottons, explore flannel for a cozy winter quilt, or modern prints for a contemporary feel. The background fabric can also be a subtle tone-on-tone print instead of a solid for added texture.
- Block Sizes: While we used 10-inch squares, you could adapt the pattern for smaller or larger precuts (like 5-inch charm squares or 12-inch blocks) to create different sized quilts, from a baby quilt to a king-size masterpiece.
- Quilting Designs: The quilting stitches themselves can add another layer of design. From simple stitch-in-the-ditch to intricate custom free-motion quilting, choose a design that complements your piecing and enhances the texture of your quilt.
- Borders and Binding: Get creative with your borders. You could add multiple borders, or a pieced border for extra flair. The binding can be a solid, a stripe, or even a scrappy binding made from leftover fabric strips.
Your Journey to a Beautiful Quilt Begins Now
You now have all the knowledge and step-by-step instructions needed to create your very own Carpenter’s Star Quilt. This pattern, while visually impressive, is incredibly rewarding for beginners, offering a fantastic opportunity to build foundational quilting skills. With precut 10-inch squares and the power of half-square triangles, you’re set to create a stunning piece of textile art that will be cherished for years to come. Remember, every stitch tells a story, and every quilt is a labor of love. So, gather your materials, fire up your sewing machine, and let your creative journey begin!
We encourage you to share your progress and finished quilt with others. There’s a vibrant community of quilters ready to celebrate your achievements. Happy quilting!