
Craft Your Own Retro Masterpiece: The Ultimate Crocheted Beer Can Hat Tutorial
The vibrant and charismatic spirit of the 1970s is undeniably back, captivating fashion runways, music charts, and lifestyle trends across the globe. Everywhere you look, elements of that iconic decade are making a powerful resurgence, from the classic country-rock stylings reminiscent of bands like Midland, to the timeless appeal of Ray-Ban’s legendary Aviator glasses. This isn’t just a fleeting trend; it’s a full-blown celebration of an era defined by bold self-expression, innovative design, and a distinctive sense of cool.
Embracing this wave of nostalgia, I recently found myself diving into a fun, retro-inspired project. It all started when I crafted a simple beer box hat for my brother-in-law, a true connoisseur of the pre-game tailgate scene. To my surprise, it was an instant hit! The immediate feedback was overwhelmingly positive, and soon my phone was ringing off the hook with requests from his friends, all eager to get their hands on a custom beer box hat. But my creative spirit yearned for something even more authentic, something that truly captured the essence of 70s DIY culture.
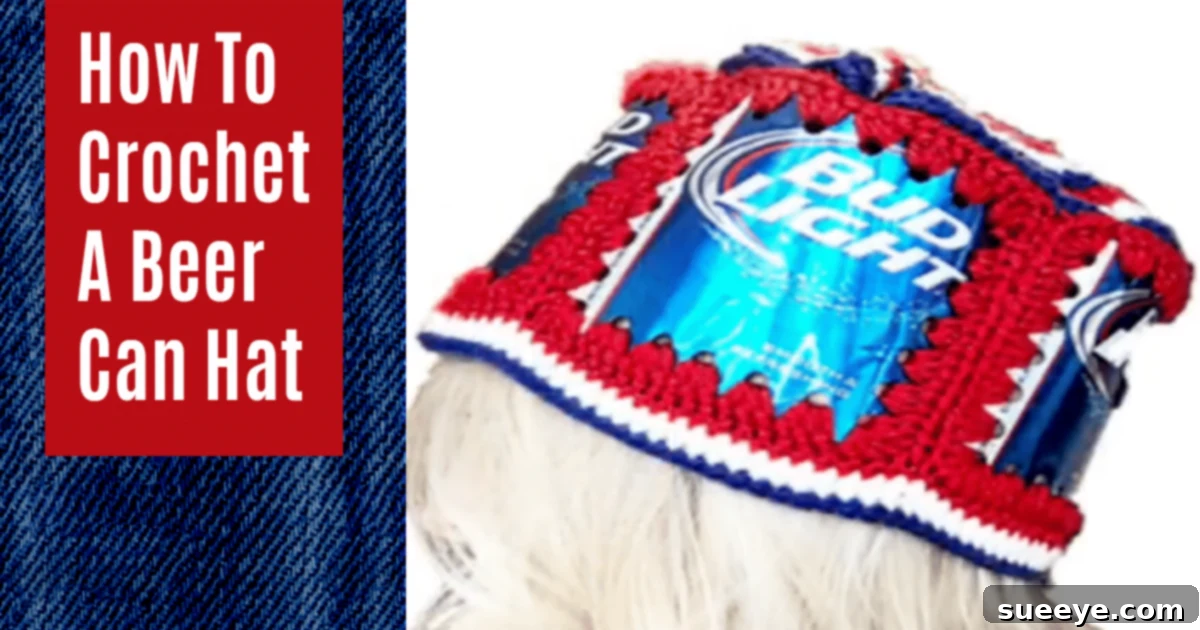
I distinctly remembered the very first beer hat I’d ever laid eyes on back in the 70s – a magnificent, handcrafted piece that stood out with its ingenious use of actual beer cans. The cardboard version, while fun, just didn’t quite hit that mark of genuine retro charm. It was during my search for this ultimate vintage vibe that I stumbled upon a brilliant Crocheted Beer Can Hat tutorial on YouTube. As soon as I watched it, I knew I had struck pure 1970s gold! This wasn’t merely a craft project; it was an homage to an era, a “real McCoy” that promised to elevate any tailgate party from fun to legendary. While I had a growing backlog of beer box hat orders, the allure of this crocheted gem was too strong to resist. I simply had to put everything else on hold for a day to bring this incredible vision to life.
One of the most enjoyable aspects of this project is the preparation – and for beer enthusiasts, it’s arguably the best part! You’ll only need a six-pack of your favorite brew to gather the necessary “materials” (i.e., empty cans). I gladly shared a couple with my neighbor, turning the initial phase of the project into a mini social event. Once those cans are happily emptied and meticulously cleaned, believe me, the rest of the crafting process is an absolute breeze. This project truly embodies what I call a “relaxed state of mind” endeavor – the kind where creativity flows freely, and the end result is as satisfying as the journey itself. If you love unique, handmade items that tell a story, you’re going to absolutely adore crafting this retro masterpiece!
Why the Crocheted Beer Can Hat is the Ultimate Retro Accessory
In a world increasingly saturated with mass-produced goods, the Crocheted Beer Can Hat stands out as a beacon of individuality and nostalgic charm. It’s more than just a hat; it’s a statement piece that instantly transports you back to the golden age of disco, rock and roll, and laid-back summer festivals. This unique accessory combines the kitschy fun of upcycling with the timeless artistry of crochet, creating a wearable piece of art that’s both playful and surprisingly stylish.
For those who love to express their personality through their attire, especially at social gatherings like tailgate parties, music festivals, or casual backyard barbecues, this hat is an absolute game-changer. Imagine the conversations it will spark, the smiles it will elicit, and the countless compliments you’ll receive. It’s an instant ice-breaker, a testament to your creativity, and a fun way to showcase your appreciation for vintage aesthetics. Unlike its cardboard counterpart, the crocheted version boasts durability, a unique texture, and a level of craftsmanship that makes it truly special.
A Journey Back to the 70s: The Resurgence of a Distinctive Style
The 1970s were a fascinating decade of cultural shifts, marked by vibrant fashion, iconic music, and a growing appreciation for handmade goods. From bell bottoms and platform shoes to macrame and tie-dye, the era celebrated individuality and a break from conventional norms. Today, designers and artists alike are drawing inspiration from this period, reinterpreting its elements for a modern audience. The Crocheted Beer Can Hat perfectly encapsulates this trend, blending the eco-conscious practice of upcycling with a quintessential 70s craft technique.
This hat isn’t just about looking good; it’s about feeling good, too. There’s an inherent joy in creating something with your own hands, especially when that creation is as whimsical and distinctive as this. It taps into the DIY spirit that flourished in the 70s, a time when people took pride in crafting unique items that reflected their personal style. By making this hat, you’re not just following a tutorial; you’re participating in a cultural revival, honoring a rich history of handmade artistry, and adding a personal touch to your contemporary wardrobe.
Materials: What You’ll Need to Get Started
Before you embark on this exciting crafting adventure, gather all your tools and materials. Having everything ready will ensure a smooth and enjoyable process. Most of these items are standard for any crochet enthusiast, with a few additions for the unique beer can integration.
- Clover Amour Crochet Hook Set: Known for their ergonomic design and smooth glide, these hooks are a joy to work with, especially for projects that might involve a bit of repetitive motion. Choose a hook size appropriate for your chosen yarn weight (often 4.0mm to 5.5mm, depending on desired stitch tightness).
- High-Quality Crochet Yarn: You’ll need specific colors to achieve that classic retro look.
- Red Yarn: Approximately 200-300 yards, typically a worsted weight (medium 4).
- White Yarn: Approximately 100-150 yards, worsted weight.
- Blue Yarn: Approximately 100-150 yards, worsted weight.
Ensure your yarn is durable and has good stitch definition, as it will be holding the cans in place.
- Set Tapestry Needles: Essential for weaving in ends neatly and seamlessly, giving your hat a professional finish.
- Stitch Markers: Invaluable for keeping track of your rounds and specific stitches, especially in circular projects like hats.
- Small, Sharp Scissors: For clean cuts and trimming yarn tails.
- Hole Puncher: A sturdy, single-hole puncher is crucial for preparing the beer cans. Make sure it can handle the thin aluminum of the cans effectively.
- Six-Pack of Empty Beer Cans: The stars of the show! Ensure they are thoroughly rinsed and dried to prevent any sticky residue or odors.
How to Crochet A Beer Can Hat: A Step-by-Step Guide to Crafting Your Retro Masterpiece
Creating this crocheted beer can hat is a rewarding process that combines practical preparation with creative crochet techniques. Follow these detailed steps to construct your own unique retro accessory.
Phase 1: Preparing Your Beer Cans – The Foundation of Your Hat
The first and most crucial step involves preparing the beer cans. This is where your “relaxed state of mind” project truly begins! Carefully clean and prepare each can to ensure durability and a professional finish.
- Empty and Clean the Cans: This is the most enjoyable part for many! Once you’ve enjoyed your beverages, thoroughly rinse each can with warm water to remove any sticky residue. Allow them to air dry completely, ideally overnight, to prevent mold or odors from developing inside.
- Remove Tabs (Optional but Recommended): While not strictly necessary for the hat’s structure, removing the pull tabs from the cans can prevent snagging yarn or scratching your skin later. You can discard them or save them for another upcycling project.
- Punching the Holes: This step requires precision and care. You will need to punch evenly spaced holes along the top and bottom rims of each can.
- Bottom Rim: Using your hole puncher, create holes approximately 1/4 to 1/2 inch apart around the entire circumference of the can’s base. These holes will be used to crochet into, forming the base and body of the hat.
- Top Rim: Similarly, punch holes around the top rim (just below where the can narrows for the opening). These holes will be used to join cans together or to attach the brim.
- Consistency is Key: Try to keep the spacing and depth of the holes as consistent as possible across all cans. This will ensure your crochet stitches are even and the hat maintains a uniform shape. Be careful not to bend or crush the cans during this process.
Phase 2: Crocheting the Base and Attaching the Cans – Bringing the Structure to Life
With your cans prepared, it’s time to start crocheting! This section outlines the basic approach to creating the hat’s structure and integrating the cans.
- Starting the Crown (Blue Yarn): Begin by crocheting a flat circle in blue yarn to form the crown of the hat. Use a basic crochet stitch like single crochet (SC) or half double crochet (HDC). Work in continuous rounds, increasing stitches evenly to maintain a flat shape until the circle is approximately 6-8 inches in diameter (or slightly larger than the top of one beer can). This will be the very top center of your hat.
- First Row of Cans (Red Yarn): Switch to red yarn. Take your first prepared beer can. Using single crochet stitches, crochet directly into the holes you punched along the top rim of the can. Ensure your stitches are snug but not so tight that they deform the can. Once you’ve crocheted around one can, continue to crochet around a second can, and then a third, connecting them as you go to form a ring. You will essentially be creating a band of red crochet that encases the top of the cans. This ring of cans will then be attached to the blue crown you just made, perhaps by slip stitching or single crocheting into the edge of the blue circle.
- Building the Body with Cans (Red & White Yarn): Continue adding rows of cans, alternating colors (e.g., a row of red, then a row of white, then red again). Each new row of cans will be crocheted into the holes on the bottom rim of the cans in the row above it, and then into its own top rim. The YouTube tutorial will be crucial here for specific joining techniques, but generally, you’ll be using single crochet stitches to create a sturdy fabric that holds the cans securely in place. The number of rows will depend on your desired hat height, typically 3-4 rows of cans for a standard hat.
Phase 3: Crocheting the Brim and Finishing Touches – The Signature Look
The brim gives the hat its classic shape, and the finishing touches ensure durability and a polished appearance.
- Creating the Brim (Blue Yarn): Once you’ve completed the main body of the hat with the desired number of can rows, switch back to blue yarn. Begin crocheting directly into the bottom row of cans, working in rounds to create the brim. You’ll want to increase your stitches significantly in the first few rounds of the brim to make it flare outwards. Use single crochet or half double crochet stitches, adding increases strategically to achieve a wide, sturdy brim.
- Reinforcing the Brim (Optional): For extra stiffness and shape retention in the brim, you might consider inserting a flexible wire or a sturdy piece of plastic (like a cut-up plastic placemat) into the edge of the brim as you crochet the final rounds. This is a common technique for hats that require a defined shape.
- Finishing with White Yarn: For a clean, contrasting edge, complete the final round or two of the brim using white yarn. This will give your hat a crisp, finished look that echoes the classic 70s aesthetic.
- Weaving in Ends: Once all crocheting is complete, use your tapestry needle to carefully weave in all loose yarn ends. This is a critical step for a professional and durable finish, preventing the hat from unraveling over time. Trim any excess yarn close to the fabric.
- Final Inspection: Give your hat a thorough inspection. Ensure all cans are securely fastened, stitches are consistent, and there are no loose ends. Your retro beer can hat is now ready to make its grand debut!
Tips for Success and Customization
- Practice Makes Perfect: If you’re new to crochet, start with a small practice piece to get comfortable with the stitches and tension before working with the cans.
- Consistent Tension: Maintaining even tension throughout your crochet work is key to a professional-looking hat. Too loose, and the cans might shift; too tight, and the fabric could warp.
- Yarn Choice Matters: Opt for a sturdy worsted weight acrylic or cotton yarn. Acrylic is durable and easy to care for, while cotton offers a natural feel. Avoid overly stretchy or thin yarns that might not hold the weight of the cans well.
- Personalize Your Hat: Don’t limit yourself to red, white, and blue! Experiment with different yarn colors to match your favorite team, school, or personal style. You can also use cans from different beer brands to add visual interest. Consider adding small embellishments like fabric patches, pins, or even crocheted motifs for an extra touch of individuality.
- Care Instructions: Since the hat contains aluminum cans, it’s best to spot clean it by hand with mild soap and water. Avoid machine washing or submerging the entire hat.
The Joy of DIY: More Than Just a Hat
Engaging in DIY projects like this crocheted beer can hat offers a wealth of benefits beyond just acquiring a unique item. It’s a journey of skill development, creative expression, and profound personal satisfaction. There’s an undeniable pride that comes from wearing something you’ve crafted with your own hands, especially when it’s as eye-catching and conversation-starting as this retro gem. It’s an opportunity to disconnect from digital distractions, engage in a meditative craft, and truly enjoy the process of bringing an idea to life.
Moreover, embracing upcycling through projects like this speaks to a growing awareness of sustainability and resourcefulness. By transforming discarded beer cans into a functional and fashionable accessory, you’re not only creating something beautiful but also contributing to a more eco-conscious lifestyle. This hat isn’t just a nod to 70s style; it’s a testament to creativity, sustainability, and the enduring appeal of handmade artistry.
Conclusion: Embrace the Retro Revolution!
The Crocheted Beer Can Hat is more than just a novelty; it’s a statement piece, a conversation starter, and a fantastic way to celebrate the enduring charm of 70s retro style. Whether you’re heading to a tailgate party, a music festival, or simply want to add a unique flair to your wardrobe, this DIY project offers endless fun and creative satisfaction. So grab your crochet hook, empty those cans, and get ready to craft a truly original accessory that will turn heads and bring smiles wherever you go. Dive into the retro revolution and create your own iconic piece of wearable art today!