
How to Make Incredibly Soft & Fluffy Dinner Rolls: Your Guide to Homemade Perfection
There’s an undeniable magic in the comforting aroma of freshly baked bread wafting through your home. It’s a scent that evokes warmth, nostalgia, and the promise of a truly delicious meal. For many families, baking together transforms a simple activity into a cherished memory, especially during the summer months. Creating these delightful homemade dinner rolls is an experience that brings joy to all ages, from the moment the dough comes together to the very first bite.
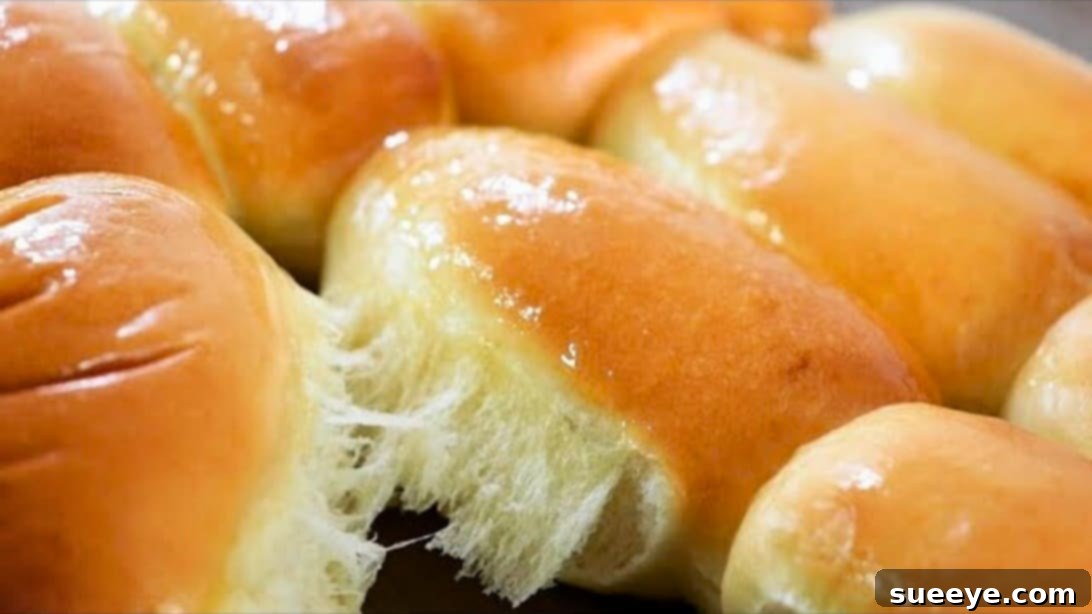
Recently, we embarked on a delightful baking adventure, following a fantastic recipe inspired by the talented 마미오븐 MOMMY OVEN. The outcome was nothing short of spectacular: rolls that were not just soft and fluffy, but utterly delicious and incredibly satisfying. Our house was filled with the tantalizing smell of fresh bread, and every bite was a testament to the simple pleasure of homemade goodness. Our family absolutely adored them, and we are thrilled to share this must-try recipe with you, promising a rewarding baking journey and dinner rolls that will undoubtedly become a new family favorite.
These dinner rolls are meticulously designed to be light, airy, and boast an irresistibly tender crumb, making them the perfect accompaniment to any meal. Whether it’s a casual weeknight dinner, a hearty holiday feast, or a special weekend brunch, these rolls elevate the dining experience. Once you taste the unparalleled difference that freshly baked rolls bring to your table, you’ll find it hard to go back to store-bought alternatives. This comprehensive guide will walk you through each step with detailed explanations, ensuring your success in creating perfect, golden-brown rolls every single time. Get ready to impress your family and friends with your newfound baking prowess and the sheer delight of homemade bread!
Ingredients for the Perfect Soft & Fluffy Dinner Rolls:
Crafting these delectable dinner rolls begins with a selection of common kitchen staples. The quality and, importantly, the temperature of your ingredients play a significant role in the final texture, flavor, and rise of your bread. For optimal yeast activation and dough consistency, ensure your milk and egg are at room temperature before you begin. Using a kitchen scale for precise measurements of flour and butter is highly recommended for consistent results.
- 2/3 cup (approximately 160ml) Whole Milk: Provides essential liquid for the dough, adds richness, and helps to activate the yeast. Using room temperature milk is crucial for yeast activity.
- 2 1/4 teaspoons (approximately 7g) Instant Dry Yeast: This powerful leavening agent is responsible for the incredible rise and fluffy texture of your rolls. No need to activate it separately.
- 1/4 cup (approximately 50g) Granulated Sugar: Acts as food for the yeast, aids in the beautiful browning of the crust, and imparts a subtle, pleasant sweetness to the rolls.
- 1 teaspoon (approximately 6g) Fine Sea Salt: Essential for balancing the flavors, preventing the rolls from tasting bland, and strengthening the gluten structure in the dough.
- 1 Large Egg: Adds richness, contributes to a tender crumb, enhances the color, and helps bind all the ingredients together smoothly. Ensure it’s at room temperature.
- 2 3/4 cups (approximately 330g) Bread Flour: The star of the show! Bread flour has a higher protein content compared to all-purpose flour, which is essential for developing strong gluten networks. This results in the desired chewiness, elasticity, and structure for light and airy rolls.
- 1/8 cup (approximately 28g or 1.4 oz) Unsalted Butter, softened: Incorporating softened butter later in the kneading process creates an incredibly soft, tender, and moist crumb. Using unsalted butter gives you control over the overall saltiness.
- For the Egg Wash: A simple mixture of 1 large egg yolk and 1 teaspoon of water. This creates a gorgeous, glossy, golden-brown crust that makes your rolls look professionally baked.
Step-by-Step Guide to Baking Soft & Fluffy Dinner Rolls:
Follow these detailed instructions carefully to ensure your homemade dinner rolls turn out perfectly soft, exceptionally fluffy, and absolutely delicious. Remember, patience is a virtue when working with yeast dough, so allow ample time for each crucial rising stage.
Step 1: Activate the Yeast & Combine Wet Ingredients
Begin by selecting a large, spacious mixing bowl. Pour in the 2/3 cup of room temperature whole milk. Evenly sprinkle the 2 1/4 teaspoons of instant dry yeast and the 1/4 cup of granulated sugar over the surface of the milk. Using a whisk or a spoon, gently stir these ingredients together until the sugar dissolves completely and the yeast appears to be fully incorporated into the liquid. This initial step is vital as it “wakes up” the yeast, allowing it to begin feeding on the sugar. Let this mixture sit undisturbed for about 5 to 10 minutes; during this time, you should observe a slight foam or froth forming on the surface, which is a clear indication that your yeast is active and ready to work its magic. Following this, crack the large, room temperature egg into the mixture and whisk everything until it’s smoothly combined and boasts a uniform consistency, free of any visible lumps.
Step 2: Form the Dough & Initial Hydration Rest (Autolyse)
Now, carefully add the 2 3/4 cups of bread flour to your prepared wet ingredient mixture. Using a sturdy wooden spoon, a silicone spatula, or a specialized dough whisk, begin to stir the flour into the liquids. Continue mixing until the flour is fully hydrated and a shaggy, cohesive dough starts to form. At this initial stage, the dough will likely appear sticky, rough, and uneven – this is perfectly normal. Turn the dough out onto a lightly floured clean countertop or a large, stable work surface. Gently knead it for just a minute or two with your hands, enough to bring it together into a rough, irregular ball. Avoid overworking it at this point. Place the dough back into the mixing bowl, ensuring it’s covered tightly with plastic wrap to prevent it from drying out. Allow it to rest at room temperature for approximately 15 minutes. This crucial resting period, often referred to as an “autolyse,” allows the flour to fully hydrate and the gluten development to begin naturally, making the subsequent intensive kneading process significantly easier and more effective.
Step 3: Develop Gluten with Butter & Thorough Kneading
After the 15-minute autolyse rest, transfer the dough back onto your lightly floured work surface. Now it’s time to incorporate the softened unsalted butter. Create a small well or indentation in the center of the dough ball and carefully place the 1/8 cup (28g) of softened butter into it. Gently stretch the sides of the dough over the butter to completely enclose it, forming a sealed package. This part can get a bit messy and feel a little slippery at first, but don’t worry – it’s all part of the process! Begin kneading the dough. Initially, the butter will resist incorporation and make the dough feel greasy and broken apart. However, as you continue to knead, the butter will gradually be absorbed into the dough, and you’ll notice a remarkable transformation. Employ the “slap and fold” technique for about 5 to 7 minutes for optimal gluten development. This involves lifting the dough, slapping it down onto the counter with a firm but controlled motion, and then folding it over itself. Repeat this motion rhythmically. You’ll observe the dough becoming progressively smoother, more elastic, and significantly less sticky. It should eventually become supple and be able to pass the “windowpane test” – where you can stretch a small piece of dough thin enough to see light through it without it tearing. Once the dough is smooth, elastic, and well-developed, form it into a taut, round ball. Place this dough ball into a lightly oiled clean bowl, turning it once to ensure it’s coated evenly with oil to prevent sticking. Cover the bowl tightly with plastic wrap to create a humid environment. Find a warm, draft-free place in your kitchen and let the dough rise until it has visibly doubled in size. This crucial first rise (bulk fermentation) typically takes 1 to 1.5 hours, though the exact time can vary depending on the ambient temperature and the activity of your yeast. This stage is essential for developing both the flavor and the characteristic open, airy texture of your rolls.
Step 4: Divide & Pre-Shape the Dough
Once the dough has beautifully doubled in size, gently punch it down to release the accumulated gases. This helps to redistribute the yeast and creates a finer crumb structure. Turn the dough out onto your clean work surface. Using a bench scraper or a sharp knife, carefully divide the dough into 12 equal pieces. For the most uniform rolls and consistent baking, we highly recommend using a kitchen scale to ensure each piece weighs approximately the same (aim for about 60-65 grams per piece). Once divided, take each individual piece of dough and gently flatten it slightly with your palm. Then, bring the edges of the dough underneath itself towards the center, pinching them together at the bottom to create a smooth, taut top surface. Cup your hand over the dough ball and gently roll it against the counter in a circular motion for a few seconds. This action further smoothens its surface and creates essential surface tension, which will help the rolls hold their shape during baking. Arrange the pre-shaped balls on your work surface, ensuring they have a little space between them. Cover them loosely with plastic wrap or a clean kitchen towel and let them rest for another 15 minutes. This brief resting period is important as it allows the gluten in the dough to relax, making the subsequent final shaping much easier and preventing the dough from tearing or springing back excessively.
Step 5: Final Shaping & Second Proofing
Now, it’s time for the final shaping of your dinner rolls. Take one of the rested dough balls. On a very lightly floured surface, gently flatten it into an oval or a rough rectangular shape using your palms or a rolling pin. Aim for a thickness of about 1/4 to 1/2 inch, but avoid making it too thin. Next, starting from one of the longer sides of the oval, tightly roll the dough up, pressing down with your fingers as you go to ensure a snug roll and to seal any air pockets. Once rolled, gently pinch the seam closed at the bottom to secure the shape. This specific rolling technique is crucial as it creates beautiful internal layers and an elongated shape, both of which contribute significantly to the exceptionally soft and fluffy texture of the final baked rolls. Repeat this precise process with all the remaining dough balls.
Prepare your baking tray; a standard 9×13 inch (23×33 cm) pan works exceptionally well for accommodating 12 rolls. Line the tray with parchment paper for easy release and cleanup. Carefully arrange the shaped rolls on the prepared tray, ensuring there’s approximately 1 to 2 inches (2.5-5 cm) of space between each piece. This spacing is vital to allow for ample expansion during the final proofing and baking stages. Loosely cover the entire tray with plastic wrap or a large, clean kitchen towel. Place the tray in a warm, draft-free spot for the second proofing (the final rise) until the rolls have visibly doubled in size and look delightfully puffy. This usually takes between 45 to 60 minutes, but it can vary. To confidently check if they’re perfectly proofed, gently poke a roll with a floured finger; if the indentation springs back slowly and only partially, they are ready for the oven. If it springs back immediately, they need a bit more time. If the indentation remains or the roll collapses, they are likely over-proofed, so proceed with baking immediately.
Step 6: Egg Wash & Bake to Golden Perfection
During the last 15-20 minutes of the second proofing, preheat your oven to 338-356°F (170-180°C). This ensures the oven is at the correct temperature when the rolls are ready, preventing them from sitting too long. Once the rolls are beautifully proofed and puffy, gently prepare the egg wash by whisking together 1 egg yolk with 1 teaspoon of water until well combined. Using a pastry brush, carefully and lightly brush the tops of each roll with the prepared egg wash. Be extremely gentle to avoid deflating the delicate, airy dough you’ve worked so hard to create. The egg wash is a secret weapon that will give your dinner rolls a stunning, uniform golden-brown color and a lovely, professional-looking sheen. Carefully transfer the baking tray into the preheated oven. Bake for approximately 10 to 12 minutes. Remember that exact baking times can vary significantly depending on your specific oven, so it’s crucial to keep a watchful eye on them. The rolls are done when they are gorgeously golden brown on top and, if you carefully lift one, it sounds hollow when gently tapped on the bottom.
Step 7: The Finishing Touch – Buttered Brilliance
As soon as your magnificent dinner rolls emerge from the oven, hot, fragrant, and golden, have your melted butter ready. While they are still piping hot and glistening, immediately brush the tops of each roll generously with melted butter. This simple yet crucial step does several wonderful things: it not only adds an extra layer of rich, buttery flavor that deeply penetrates the warm bread, but it also imparts an exquisite shine to the crust and, most importantly, helps to keep the crust incredibly soft and tender. The warm bread eagerly absorbs the melted butter, making them even more irresistible and moist. After brushing, allow the rolls to cool slightly on a wire rack before serving. While they are undeniably amazing when served warm straight from the oven, they remain incredibly delicious and retain their softness even once fully cooled. Enjoy the fruits of your labor!
Tips for Baking the Best Soft & Fluffy Dinner Rolls:
Achieving bakery-quality dinner rolls at home is entirely possible with a few key techniques and considerations. Here are some essential tips to help you master this recipe and consistently produce perfect results:
- Measure Accurately, Especially Flour: When baking, precision is paramount. Especially with flour, using a kitchen scale (grams) is far more accurate and consistent than volumetric cup measurements. Too much flour can lead to a dry, dense, and tough dough, while too little can make it overly sticky and hard to handle.
- Ensure Room Temperature Ingredients: Always ensure your milk, egg, and butter are at room temperature. This helps the yeast activate more effectively, allows ingredients to combine smoothly, and results in a more uniform and well-hydrated dough. Cold ingredients can shock the yeast and hinder rising.
- Don’t Rush the Rise (Proofing): Yeast activity can be somewhat unpredictable and is heavily influenced by ambient temperature. If your kitchen is cool, the rising times might be longer than suggested. A warm (but not hot), draft-free spot is ideal for proofing. You can create a warm environment by placing the covered bowl in a slightly warm (not hot) oven that has been turned off, or near a sunny window. Patience during rising is rewarded with superior texture and flavor.
- Knead Thoroughly for Gluten Development: Proper gluten development is the backbone of soft, airy rolls. Whether you knead by hand or with a stand mixer, ensure the dough is smooth, elastic, and passes the “windowpane test.” Under-kneaded dough will result in a dense, crumbly texture, while properly kneaded dough will be light and chewy.
- Handle Dough Gently: After the first rise, deflate the dough gently rather than aggressively. During shaping and especially during the second proofing, handle the dough with care to avoid expelling too much gas. Rough handling can lead to a denser crumb and less airy rolls.
- Perfect Proofing is Key: The second rise (final proofing) is absolutely vital for light, fluffy rolls. Over-proofed rolls can collapse in the oven or have a coarse, alcohol-like taste, while under-proofed rolls will be dense and have a tight crumb. The “poke test” is your best friend: gently poke the dough with a floured finger. If the indentation springs back slowly and partially, it’s perfectly proofed. If it springs back immediately, it needs more time. If it stays indented or collapses, it’s over-proofed, and you should bake it immediately.
- Monitor Oven Temperature: Oven temperatures can vary significantly. Invest in an oven thermometer to ensure your oven’s temperature is accurate and consistent. Inconsistent oven temperatures can lead to uneven baking, burnt bottoms, or undercooked centers.
- Cool Properly on a Wire Rack: While it’s tempting to devour the rolls immediately, allowing them to cool slightly on a wire rack after baking is important. This prevents them from becoming soggy on the bottom due to trapped steam and allows the internal structure to set properly.
Delicious Variations to Elevate Your Dinner Rolls:
Once you’ve mastered the basic soft and fluffy dinner roll recipe, feel free to unleash your creativity and experiment with these delicious variations to suit any meal or preference:
- Garlic Herb Rolls: For an aromatic twist, finely mince 2-3 cloves of garlic and chop fresh herbs like rosemary, thyme, or parsley. Mix these into the dough during the last few minutes of the kneading stage. After baking, brush the hot rolls with additional garlic-infused melted butter for an extra burst of flavor.
- Cheese Rolls: Add a savory kick by folding in 1/2 to 3/4 cup of shredded cheese (cheddar, Parmesan, provolone, or a blend) during the last few minutes of kneading. For an extra cheesy crust, sprinkle a little more cheese on top of the rolls before they go into the oven for baking.
- Sweet Cinnamon Sugar Rolls: Transform your dinner rolls into a delightful sweet treat. After flattening the dough in Step 5, spread a thin layer of softened butter evenly over the surface, then sprinkle generously with a mixture of cinnamon and sugar. Roll them up as directed. A light glaze (powdered sugar and milk) can be drizzled over them after they’ve cooled slightly from the oven.
- Whole Wheat Blend Rolls: For a slightly healthier, heartier, and nuttier flavor, you can substitute up to 1/2 cup of the bread flour with whole wheat flour. Keep in mind that whole wheat flour absorbs more liquid, so you might need to add an extra tablespoon or two of milk to achieve the correct dough consistency.
- Honey Oat Rolls: Replace the granulated sugar with an equal amount of honey (or slightly less, as honey is sweeter) for a different kind of sweetness and a touch of moisture. Consider adding 1/4 cup of quick oats to the dough during mixing for added texture and a wholesome flavor profile.
Versatile Serving Suggestions for Your Homemade Dinner Rolls:
These incredibly soft and fluffy dinner rolls are wonderfully versatile and can complement a wide array of dishes, making them a perfect addition to almost any meal. Here are a few creative ideas to inspire you:
- Classic Accompaniment: Serve them warm, straight from the oven, with a pat of butter, a drizzle of honey, or your favorite homemade jam. They are the quintessential side for roasts, stews, hearty soups, pasta dishes, or any family dinner.
- Breakfast Sandwich Bases: Slice the cooled rolls horizontally and fill them with fluffy scrambled eggs, melted cheese, crispy bacon, or savory sausage for a delightful and easy breakfast or brunch sandwich.
- Mini Sliders: Their perfect size makes them ideal for parties and gatherings. Fill them with shredded BBQ pulled pork, juicy shredded chicken, or mini burger patties for delicious and crowd-pleasing sliders.
- Quick Garlic Bread: For a speedy alternative to traditional garlic bread, slice the rolls in half, spread generously with garlic butter (made with melted butter, minced garlic, and parsley), and toast lightly in the oven until golden and fragrant.
- Dessert Treat: If you’ve opted for the sweet cinnamon-sugar variation, enjoy them as a delightful treat alongside your morning coffee or as a light dessert after dinner.
Storage & Freezing Instructions for Maximum Freshness:
To ensure your homemade dinner rolls remain as fresh and delicious as possible for an extended period, follow these simple storage and freezing guidelines:
- Room Temperature Storage: Once your dinner rolls have completely cooled down to room temperature, store them in an airtight container or a resealable plastic bag. This will help to retain their softness and prevent them from drying out. They will remain fresh and delightful for up to 2-3 days on the countertop.
- Reheating Baked Rolls: To enjoy warm, soft rolls again, simply preheat your oven to 300°F (150°C) and warm the rolls for about 5-7 minutes, or until they are heated through and soft to the touch. Alternatively, you can microwave individual rolls for 10-20 seconds for a quick reheat, though this method may sometimes alter the texture slightly.
- Freezing Baked Rolls: If you’ve baked a large batch or want to prepare them in advance, freezing is an excellent option. Once the rolls are entirely cooled, arrange them in a single layer on a baking sheet and freeze until they are solid (this prevents them from sticking together). Then, transfer the frozen rolls to a freezer-safe bag or an airtight container. They can be stored in the freezer for up to 2-3 months without significant loss of quality. When you’re ready to enjoy them, simply thaw the rolls at room temperature and reheat as desired using the instructions above.
- Freezing Unbaked Dough: For ultimate convenience, you can also freeze the shaped dough balls after Step 5 (before the second rise/final proofing). Place the shaped dough balls on a parchment-lined baking tray and freeze until they are completely solid. Once frozen, transfer them to a freezer-safe bag, ensuring as much air is removed as possible. They can be stored for up to 2-3 weeks. When you’re ready to bake, transfer the frozen dough balls to your baking tray, cover them loosely, and thaw them overnight in the refrigerator. The next day, let them come to room temperature and proof until doubled in size (this may take longer than usual) before proceeding with the egg wash and baking as usual.
Frequently Asked Questions About Baking Dinner Rolls:
Here are answers to some common questions and troubleshooting tips that often arise when baking homemade dinner rolls, helping you achieve perfect results every time:
- Q: Why didn’t my dough rise properly?
- A: The most common reasons for a lack of rise are inactive yeast (always check the expiration date on your yeast package!), liquid that’s too hot (which can kill the yeast), or a kitchen environment that’s too cold for yeast activity. Ensure your milk is lukewarm (ideally between 105-115°F or 40-46°C) as yeast thrives in this temperature range, and allow ample time for rising in a warm, draft-free environment.
- Q: My rolls turned out dense and heavy, not fluffy. What could have gone wrong?
- A: Dense rolls can be attributed to several factors: insufficient kneading (poor gluten development leads to a lack of structure), adding too much flour (which makes the dough stiff and heavy), under-proofing (the dough didn’t rise enough before baking), or conversely, over-proofing (the dough rose too much, then collapsed in the oven, resulting in a coarse texture). Accurate measurements, thorough kneading, and precise proofing as outlined in the steps are crucial for achieving that desired fluffy texture.
- Q: Can I use active dry yeast instead of instant dry yeast in this recipe?
- A: Yes, you certainly can, but you’ll need to activate it first. To do so, dissolve the active dry yeast in the warm milk (and a pinch of the sugar from the recipe, if desired) for 5-10 minutes until it becomes visibly foamy and bubbly. Once activated, add this mixture to the rest of the ingredients as directed. Note that active dry yeast might also require a slightly larger quantity than instant yeast; for this recipe, you might use 2.5 to 3 teaspoons of active dry yeast.
- Q: Is it possible to make these dinner rolls ahead of time?
- A: Absolutely! This recipe is excellent for make-ahead convenience. You can prepare the dough up to the end of the first rise (Step 3). After the dough has doubled in size, gently punch it down, cover the bowl tightly with plastic wrap, and refrigerate it overnight (it can stay in the fridge for up to 24 hours). The next day, remove the dough from the refrigerator, let it come to room temperature for about 30-60 minutes (or until it’s pliable), and then proceed with dividing, shaping, and the second rise as usual.
- Q: What type of flour is truly best for making soft and fluffy dinner rolls?
- A: Bread flour is highly recommended for this recipe, and for most yeast-leavened bread. Its higher protein content (typically 12-14%) facilitates the development of strong gluten networks. This gluten is what gives the rolls their desirable structure, elasticity, chewiness, and crucial ability to hold a light, airy, and fluffy texture. While all-purpose flour can be used in a pinch, the rolls might be slightly less chewy, airy, and may not rise quite as high.
The Irresistible Charm of Homemade Dinner Rolls: A Conclusion
Baking these incredibly soft and fluffy dinner rolls is more than just a culinary task; it’s a rewarding journey that culminates in a truly delightful treat for your palate and soul. There’s a unique satisfaction that comes from creating something so delicious from scratch, filling your home with the most wonderful aromas, and sharing the warmth of fresh-baked bread with your cherished loved ones. This recipe, inspired by the wonderful 마미오븐 MOMMY OVEN, provides a detailed and foolproof method to achieve perfect, tender results every single time.
Whether you’re a seasoned baker looking for a reliable recipe or just beginning your exploration into the magical world of yeast breads, these dinner rolls are approachable, forgiving, and guaranteed to impress even the most discerning palates. They are the ultimate comfort food, a versatile accompaniment to any meal, and a delicious testament to the simple joys and profound satisfaction of home baking. So, gather your ingredients, set aside some time for the beautiful alchemy of yeast, and prepare to indulge in the best homemade dinner rolls you’ve ever tasted. Happy baking!