
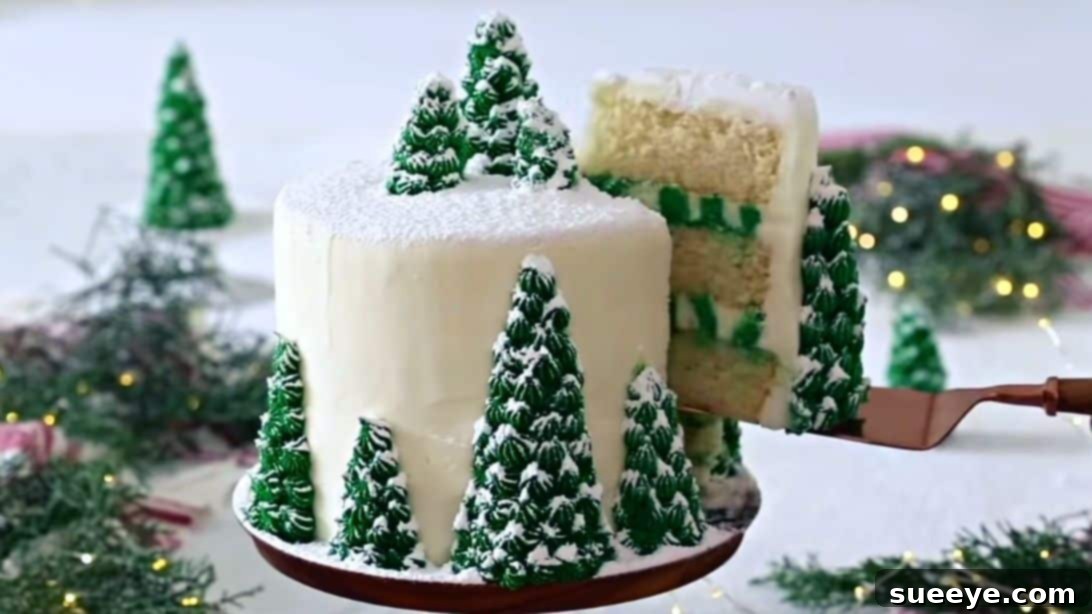
This holiday season, transcend the ordinary and create a show-stopping centerpiece that’s as delightful to look at as it is to eat: a stunning Christmas Tree Cake! Forget the fuss of traditional mini trees; this edible masterpiece offers all the festive charm with a delicious reward. Inspired by the brilliant creators at Preppy Kitchen on YouTube, this Christmas tree cake tutorial brings you a step-by-step guide to crafting the cutest and most clever holiday cake you’ve ever seen. It’s an ideal project for bakers of all skill levels, promising a festive focal point that will undoubtedly captivate your guests, especially the little ones.
Imagine the joyful gasps and smiles as you unveil a beautifully decorated, towering Christmas tree cake. This recipe is designed to be straightforward, ensuring you can enjoy the creative process without stress. We’ll walk you through everything from baking a perfectly moist cake to crafting vibrant green buttercream and ingeniously transforming ice cream cones into miniature edible trees. Get ready to impress at your holiday party this week and make unforgettable memories with this truly Christmassy dessert.
Making a homemade Christmas Tree Cake isn’t just about baking; it’s about embracing the spirit of the holidays, adding a personal touch to your celebrations, and creating something truly magical. This festive cake recipe offers an accessible way to achieve a professional-looking dessert right in your own kitchen. So, gather your ingredients, preheat your oven, and prepare to embark on a sweet adventure that culminates in the ultimate holiday treat. Let’s dive into the ingredients you’ll need to bake this spectacular Christmas Tree Cake.
Ingredients for Your Festive Christmas Tree Cake
Crafting this delightful Christmas Tree Cake requires a few essential components, divided into the cake batter itself and the luscious buttercream frosting. Using high-quality ingredients ensures the best flavor and texture for your holiday masterpiece. Pay close attention to measurements and ensure your butter and eggs are at room temperature for optimal mixing and cake consistency.
For the Moist Cake Batter:
- 1 ⅔ cups All-purpose flour: The foundation of your cake, providing structure. Sifting it ensures a light and airy crumb.
- 1 cup Sugar, granulated: Sweetens the cake and contributes to its tender texture and golden crust.
- ¼ tsp Baking soda: A leavening agent that reacts with acidic ingredients (like sour cream) to help the cake rise.
- 1 tsp Baking powder: Another leavening agent, providing additional lift for a soft, fluffy cake.
- ¼ tsp Salt: Balances the sweetness and enhances the overall flavor profile of the cake.
- ¾ cup Unsalted butter, room temperature: Adds richness and moisture. Room temperature butter creams beautifully, incorporating air for a light cake.
- 3 Egg whites: Contributes to the cake’s structure and helps achieve a lighter, brighter crumb. Using only whites also keeps the cake whiter, which is great for coloring.
- ½ cup Sour cream: A secret ingredient for incredible moisture and a slight tang that complements the sweetness. Ensures a tender and rich crumb.
- 1 tbsp. Vanilla extract: Essential for a classic, comforting flavor that defines a good vanilla cake.
- ½ cup Whole milk: Adds moisture and helps thin the batter to the right consistency.
- ½ tsp Peppermint extract, optional: Infuses a refreshing, festive mint flavor, perfect for a Christmas theme. Use sparingly as it’s potent.
For the Silky Buttercream Frosting:
- 1.5 lb. Confectioners’ sugar (powdered sugar): The primary sweetener and thickener for your buttercream. Sifting is recommended for a smooth texture.
- 1 lb. Unsalted butter, softened: Forms the base of your rich, creamy buttercream. Ensure it’s at perfect room temperature for easy creaming.
- 1-2 tbsp. Heavy whipping cream, if needed for consistency: Helps achieve a smooth, pipeable consistency without thinning the flavor. Add gradually.
- 1 tsp Vanilla extract: Enhances the classic flavor of the buttercream, making it irresistibly delicious.
- 5 drops Green food coloring: Transforms a portion of your buttercream into the iconic Christmas tree green. Adjust drops for desired shade.
- 12 pcs Ice cream cones (for decoration): These humble cones are the ingenious secret to creating your edible Christmas trees on top of and around the cake.
Having all your ingredients measured and ready before you begin will make the baking process much smoother and more enjoyable. Now, let’s move on to the exciting part: bringing this enchanting Christmas Tree Cake to life!
Step-by-Step Guide to Crafting Your Christmas Tree Cake
Creating this festive Christmas Tree Cake is a truly rewarding experience, and with our detailed directions, you’ll find each step simple and enjoyable. Follow these instructions carefully to ensure your cake is not only beautiful but also perfectly delicious.
Step 1: Preparing and Baking Your Moist Cake Layers
Begin by preheating your oven to 350°F (175°C). This ensures the oven is at the correct temperature when your batter is ready, promoting even baking. Take three 8-inch round cake pans and generously spray them with baking spray, or grease and flour them, to prevent sticking. This crucial step guarantees your beautiful cake layers release easily after baking.
In a large mixing bowl, meticulously sift together the all-purpose flour, granulated sugar, baking soda, baking powder, and salt. Sifting is vital as it aerates the dry ingredients, preventing lumps and contributing to a lighter, more tender cake crumb. Once sifted, whisk them together briefly to ensure they are well combined. Set this bowl aside.
In a separate large bowl, combine your wet ingredients: the sour cream, whole milk, melted (and slightly cooled) unsalted butter, egg whites, and vanilla extract. Whisk these ingredients together until they are smooth and thoroughly incorporated. Ensuring your butter is melted but not hot will prevent it from scrambling the egg whites.
Now, gently pour the wet ingredient mixture into the bowl with your dry ingredients. Using a whisk or a rubber spatula, mix until just combined and smooth. Be careful not to overmix the batter, as this can develop the gluten in the flour, resulting in a tough cake. A few small lumps are acceptable. If you choose to add peppermint extract, stir it in now. Divide the batter evenly among your three prepared round cake pans.
Transfer the cake pans to your preheated oven and bake for approximately 28-32 minutes, or until a wooden skewer or toothpick inserted into the center of a cake comes out clean. The top should also be springy to the touch. Once baked, remove the cakes from the oven and let them cool in their pans for about 10-15 minutes before inverting them onto a wire cooling rack to cool completely. Allowing them to cool fully prevents them from breaking when frosted.
Step 2: Crafting the Buttercream and Assembling Your Cake
While your cake layers are cooling, it’s time to prepare the delectable buttercream frosting. In the bowl of a stand mixer fitted with a paddle attachment (or using a hand mixer), beat the softened unsalted butter on medium speed until it’s light and fluffy, about 2-3 minutes. This aerates the butter, creating a lighter buttercream.
Gradually add the confectioners’ sugar, one cup at a time, mixing on low speed to avoid a sugar cloud, until fully incorporated. Once all the sugar is added, increase the speed to medium-high and beat for another 3-5 minutes until the buttercream is light, fluffy, and smooth. Add the vanilla extract and, if desired, the peppermint extract, beating until just combined. If the buttercream appears too thick, add heavy whipping cream one tablespoon at a time until you reach a smooth, spreadable, and pipeable consistency. Avoid making it too thin.
Divide the buttercream into two equal batches. In one batch, add 5 drops of green food coloring (or more, depending on your desired shade of green) and mix until the color is uniform. The other portion will remain white. This dual-colored buttercream is essential for the festive Christmas tree effect.
Once your cake layers are completely cool, it’s time for assembly. Place your first cake layer on your serving plate or cake stand. Spread an even layer of white buttercream over the top. Carefully place the second cake layer on top, pressing gently. Pipe a ring of white buttercream around the edge of this layer and fill the center with green buttercream. Repeat this process with the final cake layer, using white buttercream on top. This creates a beautiful contrast when the cake is sliced.
Now, apply a thin “crumb coat” of white buttercream all over the entire cake – sides and top. This traps any loose crumbs, ensuring a smooth finish. Chill the cake in the refrigerator for 15-20 minutes to set the crumb coat. Once set, apply a final, thicker layer of white buttercream, ensuring the sides and top are completely covered and smoothed for a polished, snowy look. Use an offset spatula or a cake scraper to achieve clean edges and a flat top.
Step 3: Decorating Your Edible Christmas Tree Wonderland
This is where the magic truly happens! Take your ice cream cones and carefully cut them in half lengthwise. You’ll also want to cut some shorter pieces to create smaller versions of the cones for variety in your “forest.” These cones will serve as the structural base for your miniature Christmas trees.
Using a little buttercream, attach the cut cones around the sides of your cake, spacing them out evenly to create a festive border of trees. Fit a piping bag with a star tip (a Wilton 1M or 21 is excellent for this) and fill it with your green buttercream. Starting at the base of each cone, pipe small rosettes or star patterns, working your way up to the tip, to transform them into charming evergreen Christmas trees. The star tip creates a beautiful, textured, branch-like effect.
For the top of the cake, arrange whole, smaller ice cream cones to form a cluster of trees, creating a captivating focal point. Once again, pipe them with green buttercream using the star tip, ensuring they are fully covered and resemble a lush forest. Don’t be afraid to vary the height and placement for a natural look.
To add the perfect finishing touch, reminiscent of freshly fallen snow, liberally dust the entire cake – the white frosted areas and over the green trees – with powdered sugar using a sifter. This not only enhances the visual appeal but also adds another delicate layer of sweetness. You can also add sprinkles, edible glitter, or small candies as ornaments to your trees for extra sparkle and charm.
Tips for a Flawless Christmas Tree Cake
- Room Temperature Ingredients: Always ensure your butter, eggs, and sour cream are at room temperature. This helps them emulsify better, creating a smoother batter and a more uniform, tender cake.
- Don’t Overmix: Mix your cake batter just until the ingredients are combined. Overmixing develops gluten, leading to a tough, dry cake.
- Sift Dry Ingredients: Sifting flour, sugar, and leavening agents prevents lumps and aerates them, resulting in a lighter cake texture.
- Accurate Oven Temperature: Use an oven thermometer to verify your oven’s actual temperature. Inconsistent temperatures can lead to uneven baking.
- Cool Completely: Never attempt to frost a warm cake. It will melt your buttercream and cause a messy disaster. Patience is key!
- Crumb Coat is Your Friend: The thin initial layer of frosting (crumb coat) is essential for trapping loose crumbs, ensuring your final frosting layer is smooth and pristine.
- Practice Piping: If you’re new to piping, practice on a piece of parchment paper first. You can scrape the frosting back into the bag and reuse it.
- Peppermint Extract: A little goes a long way! Start with a small amount and add more to taste, especially with potent extracts.
Creative Variations for Your Holiday Cake
While the classic vanilla cake with peppermint buttercream is delightful, feel free to explore variations to suit your taste:
- Chocolate Christmas Tree Cake: Substitute some of the all-purpose flour with cocoa powder for a rich chocolate cake base.
- Different Flavor Extracts: Instead of peppermint, try almond extract, orange zest, or even a touch of rum extract for a different holiday twist in your cake or buttercream.
- “Snowy” Decorations: Beyond powdered sugar, consider edible glitter, shredded coconut (to mimic snowdrifts), or small white sprinkles.
- Candy Ornaments: Use miniature candies, silver or gold dragees, or even tiny edible stars to decorate your piped Christmas trees.
Storage and Serving Suggestions
Your magnificent Christmas Tree Cake can be stored at room temperature in an airtight cake dome for up to 2-3 days. If your kitchen is particularly warm, or if you’ve added fresh cream elements (beyond the heavy cream in the buttercream), it’s best to refrigerate it. Bring it back to room temperature for about 30 minutes before serving for the best flavor and texture.
This cake is perfect for serving as the grand finale to your Christmas dinner, a showstopper at a holiday party, or a delightful treat for a festive brunch. Pair it with a cup of hot cocoa, a glass of eggnog, or your favorite holiday beverage. The visual appeal alone will spark conversation and bring smiles to everyone’s faces.
Making this Christmas Tree Cake is more than just following a recipe; it’s about creating a memorable experience and a centerpiece that embodies the joy and warmth of the holiday season. The combination of a moist, flavorful cake and a festive, artfully crafted decoration makes it an unforgettable dessert. We hope you have as much fun baking and decorating this cake as your guests will have admiring and devouring it!
*A heartfelt thank you to Preppy Kitchen via YouTube for sharing these amazing visuals and inspiring this wonderful holiday creation. Do visit and follow his channel for more adorable and creative tutorials that elevate home baking!