

Cheesy Bacon Biscuit Bombers: Your New Favorite Easy Appetizer and Savory Snack
Are you searching for an incredibly satisfying, simple, and utterly delicious recipe that will impress without breaking the bank or your back? Look no further than these sensational Cheesy Bacon Biscuit Bombers! Inspired by the brilliant culinary minds at Poor Man’s Gourmet Kitchen on YouTube, this recipe transforms basic, readily available ingredients into a gourmet-tasting delight. It’s a true testament to the idea that fantastic food doesn’t require complex techniques or expensive components.
Imagine golden-brown biscuits, crispy savory bacon, and a molten core of gooey, stretchy mozzarella cheese. These aren’t just snacks; they’re an experience! Perfect for breakfast, brunch, a game-day appetizer, or a comforting treat any time of day, these bombers are ridiculously easy to make, relying on just four core ingredients. The magic happens when these simple elements come together, creating an explosion of classic comfort food flavors that are universally loved.
What makes this recipe a standout? Its incredible simplicity and versatility. Using canned biscuits is a game-changer, dramatically cutting down prep time and making this recipe accessible to even the most novice cooks. We all love biscuits, cheese, and bacon, so combining them into one irresistible bite-sized package is pure genius. When they come out of the fryer, hot and glistening, the promise of that oozing cheese is enough to make anyone’s mouth water. This detailed guide will walk you through everything you need to know to create these culinary masterpieces, along with tips, variations, and serving suggestions to make them truly your own.
Why These Cheesy Bacon Biscuit Bombers Are a Must-Try
Beyond their mouth-watering appeal, these bombers offer a host of benefits that make them a culinary sensation and a must-have in your recipe repertoire:
- Effortlessly Gourmet: Despite their straightforward preparation, the sophisticated combination of crispy bacon, tender biscuit, and melted cheese offers a truly indulgent, gourmet-level experience.
- Budget-Friendly Delight: Utilizing common pantry staples like canned biscuits, store-bought cheese, and bacon means you can whip up a large batch without a hefty grocery bill, making them perfect for feeding a crowd.
- Time-Saving Solution: Canned biscuits are the ultimate kitchen hack, allowing you to bypass tedious dough preparation and focus on the fun parts of cooking. This means less time in the kitchen and more time enjoying your creations.
- Versatile for Any Occasion: Their universal appeal makes them suitable for a wide array of events. Serve them for a hearty breakfast, an indulgent brunch, as a captivating party appetizer, a satisfying snack, or the ultimate game-day finger food.
- Guaranteed Crowd-Pleaser: The combination of bacon, cheese, and biscuits is a classic for a reason. These bombers are guaranteed to disappear quickly at any gathering, earning you rave reviews from friends and family.
- Endlessly Customizable: While the basic recipe is fantastic, it also serves as a perfect canvas for your culinary creativity. Easily adapt the type of cheese, add complementary spices, or experiment with various dipping sauces to suit any palate.
- Irresistibly Delicious: The interplay of the salty, crispy bacon, the soft, fluffy interior of the biscuit, and the gloriously melted, stretchy cheese creates a textural and flavor sensation that is genuinely hard to resist. Each bite is a perfect balance of savory and comforting.
Get ready to elevate your snack and appetizer game with these easy-to-follow instructions. Let’s dive into creating these savory delights!
Essential Ingredients for Your Irresistible Cheesy Bacon Biscuit Bombers
Gathering your ingredients is the foundational step to culinary success. This recipe shines in its remarkable simplicity, requiring just a few readily available items that you likely already have on hand or can easily procure from any local grocery store. Quality ingredients, even simple ones, make all the difference.
- 2 cans (e.g., Pillsbury Grands Flaky Layers) Biscuits: These iconic flaky biscuits form the hearty foundation of our bombers. Their substantial size and ability to puff up and create distinct layers make them absolutely perfect for wrapping around a cheesy filling. You’ll cut each individual biscuit into four equal pieces to create the perfect bite-sized base.
- 1 lb Mozzarella Cheese Squares: For the best results, opt for a block of whole milk mozzarella cheese. Cut it into uniform cubes, approximately 3/4 to 1 inch thick. Mozzarella is chosen for its superior melting properties, yielding that desirable gooey, stretchy texture, and its mild flavor which complements the bacon and biscuit without overpowering them.
- 1 package Bacon Slices: Standard cut bacon works exceptionally well here. Each slice will be cut in half, providing just the right amount of savory crispness and smoky flavor to encase each biscuit-and-cheese parcel. Look for good quality bacon, as its flavor is a key component of this dish.
- Oil for Frying: A neutral-flavored oil with a high smoke point is absolutely essential for deep frying to achieve that beautiful golden-brown exterior and ensure your bombers cook evenly without burning. Excellent choices include vegetable oil, canola oil, or peanut oil. Ensure you have enough to fully submerge the bombers during frying.
Pro Tip: While mozzarella is a classic and highly recommended choice, feel free to unleash your inner chef and experiment with other cheeses! Sharp cheddar for a bolder flavor, spicy pepper jack for a kick, or even a provolone for a different melt can all create unique and delicious variations. Just ensure your chosen cheese is cut into uniform cubes for even melting.
Crafting Your Cheesy Bacon Biscuit Bombers: A Detailed Step-by-Step Guide
Making these irresistible bombers is a surprisingly straightforward process, but paying meticulous attention to a few key details will ensure perfectly golden, wonderfully crispy, and gloriously cheesy results every single time. Follow these steps carefully to achieve appetizer perfection and impress your guests.
Step 1: Preparing the Biscuits and Encasing the Cheese
Begin by carefully opening your cans of Grands flaky biscuits. On a clean, lightly floured work surface, gently separate each biscuit. Then, take each individual biscuit and cut it into four roughly equal pieces. This will give you plenty of smaller portions to work with. Next, using your fingertips or a small rolling pin, gently flatten each biscuit piece. The goal is to make them large enough to comfortably enclose a mozzarella cheese cube, creating a good seal. However, be cautious not to make them too thin, as overly thin dough might tear during the frying process, leading to unwanted cheese leakage. Aim for a thickness that still retains some of the biscuit’s natural body and pliability, typically about 1/8 to 1/4 inch thick.
Now, take one of your precisely pre-cut mozzarella cheese cubes. Place this cheese cube directly in the center of a flattened biscuit piece. Carefully and snugly fold the edges of the biscuit dough over the cheese, working your way around until the entire cube is completely covered. Once folded, pinch and squeeze the edges of the biscuit together firmly and thoroughly to seal it shut. It is absolutely crucial that there are no visible gaps, cracks, or openings in the biscuit dough, as any exposed cheese will inevitably melt out during frying, creating a messy situation in your oil. Take your time with this critical sealing step to create a tight, secure package for each bomber.
Step 2: Wrapping with Bacon and Securing for Frying
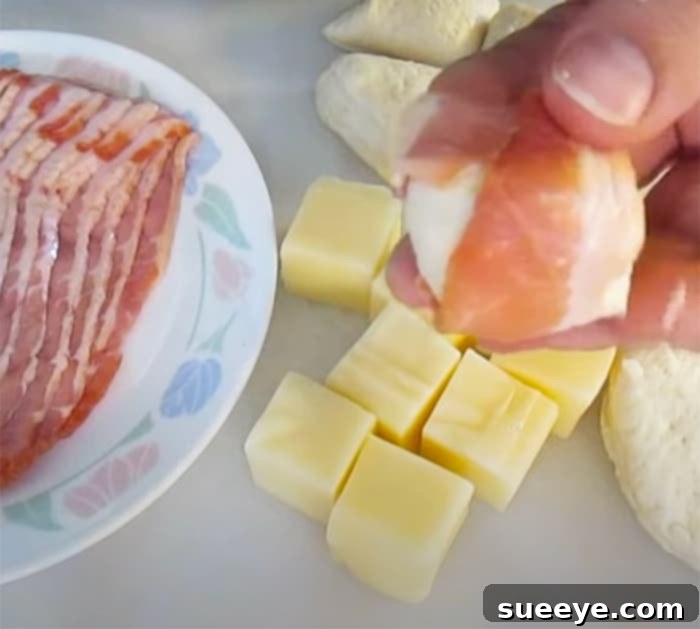
With your cheese-filled biscuit sealed, it’s time to add the bacon! Take a half slice of bacon – ensure it’s not too thick or too thin for optimal crisping – and wrap it snugly around your cheese-filled biscuit cube. The objective here is to encase the biscuit as much as possible with the bacon, adding a layer of irresistible smoky flavor and ensuring a deliciously crispy exterior once fried. Once wrapped, use a sturdy wooden toothpick to secure the bacon firmly in place. Carefully push the toothpick all the way through the biscuit and bacon, making sure it holds everything intact and prevents the bacon from unraveling. This small but important step ensures your bombers maintain their shape throughout the frying process. Repeat this wrapping and securing process for all your biscuit and cheese pieces until you have a tray full of ready-to-fry bombers.
Step 3: Frying to Golden Perfection and Draining
Now, prepare your frying station. In a deep, heavy-bottomed pot or a Dutch oven, pour enough oil to fully submerge your cheesy bombers. The depth of the oil is important for even cooking. Heat the oil to a precise temperature of 350 degrees F (approximately 175 degrees C). An oil thermometer is highly recommended, if not essential, to maintain a consistent temperature throughout the frying process. This consistency is key to achieving evenly cooked, perfectly crispy, and non-greasy results. If the oil is too cool, the bombers will absorb too much oil and become soggy; if it’s too hot, they will burn on the outside before the biscuit is cooked through and the cheese has melted into a molten core.
Carefully place a few bombers into the hot oil using tongs, ensuring you do not overcrowd the pot. Frying in small batches is vital to maintain the oil’s temperature. Fry them until they achieve a beautiful, enticing golden brown color on all sides. This typically takes about 3-5 minutes per batch, but monitor them closely as cooking times can vary depending on your oil temperature and the exact size of your bombers. Use tongs or a slotted spoon to gently turn them for even browning. Once they are perfectly golden and crispy, carefully remove them from the hot oil. Immediately transfer them to a wire rack that has been set over a baking sheet lined with paper towels. This setup allows any excess oil to drain off effectively, preventing them from becoming greasy and keeping them deliciously crispy. Repeat this process with the remaining batches until all your bombers are fried to perfection. Remove toothpicks before serving.

For a comprehensive visual guide and invaluable additional tips, we highly recommend watching the full tutorial by Poor Man’s Gourmet Kitchen on YouTube. Their detailed demonstration provides excellent insights for achieving perfect results every time.
Serving Suggestions and Customization for Your Cheesy Bacon Biscuit Bombers
These cheesy bacon biscuit bombers are incredibly versatile and can be enjoyed in a myriad of ways, making them a fantastic addition to almost any meal or gathering. While they are phenomenal on their own, a little creativity with serving and customization can elevate them even further, turning a great snack into an unforgettable culinary experience.
Perfect for Any Occasion
Their universal appeal means these bombers are truly adaptable:
- Appetizer Extravaganza: They are tailor-made for casual gatherings, festive potlucks, and lively parties. Arrange them beautifully on a platter, perhaps garnished with fresh parsley, and serve with a variety of complementary dipping sauces for an impressive spread.
- Game Day MVP: Forget boring chips and dip! These bombers are an instant hit for football Sundays, basketball watch parties, or any sporting event. They’re easy to eat with one hand and incredibly satisfying.
- Breakfast or Brunch Star: Transform your morning meal into an indulgent feast. Serve them hot alongside fluffy scrambled eggs, fresh fruit, and a steaming cup of coffee or a mimosa for a truly memorable breakfast or brunch.
- Quick Snack Attack: When that irresistible savory craving strikes, these bombers are the perfect answer, offering a substantial and flavorful bite to tide you over.
Dipping Sauce Delights
While the bombers burst with flavor on their own, a complementary dipping sauce can introduce new dimensions and take them to the next level:
- Classic Ranch: The creamy tang of a good ranch dressing pairs wonderfully with the salty bacon and cheesy biscuit, offering a refreshing contrast.
- Warm Marinara: A savory Italian touch, especially if you’re using mozzarella. The warmth and herby flavor of marinara sauce are a fantastic pairing.
- Spicy Sriracha Mayo: For those who love a bit of a kick, a simple mix of Sriracha hot sauce and mayonnaise creates a creamy, spicy, and addictive dip.
- Honey Mustard: A sweet and savory contrast that’s surprisingly delicious and adds a tangy zest.
- Maple Syrup: Don’t knock it ’til you try it! The sweet and savory combination of maple syrup with bacon and biscuit is a classic breakfast pairing that works wonders here.
Creative Variations and Add-Ins
Don’t hesitate to put your own unique spin on this versatile recipe. The possibilities for customization are vast:
- Cheese Exploration: Beyond mozzarella, consider swapping it for sharp cheddar for a more pronounced cheesy flavor, spicy pepper jack for a fiery kick, smoky provolone, or even a melty blend of Italian cheeses.
- Spicy Kick: For those who crave heat, finely chop some pickled jalapeños or add a dash of red pepper flakes directly into the cheese cube before wrapping it for a fiery surprise in every bite.
- Herbaceous Notes: Infuse more flavor by adding a pinch of garlic powder, onion powder, or finely chopped fresh chives or parsley to the flattened biscuit dough before wrapping.
- Different Biscuits: While flaky layers work best due to their texture, experiment with other canned biscuit varieties, such as buttermilk biscuits, for a slightly different density and flavor profile.
- Alternative Cooking Methods:
- Air Fryer: For a less oily option, preheat your air fryer to 350-375°F (175-190°C). Air fry the bombers for 10-15 minutes, flipping them halfway through, until they are beautifully golden brown and crispy. You might want to spray them lightly with cooking oil for extra crispness.
- Oven Baked: If deep frying isn’t an option, bake them! Place the wrapped bombers on a parchment-lined baking sheet and bake at 400°F (200°C) for 15-20 minutes, or until the biscuits are golden and the bacon is crisp. This method might yield a slightly less crispy exterior than frying but is still incredibly delicious.
Tips for Success and Troubleshooting Your Cheesy Bacon Biscuit Bombers
To ensure your Cheesy Bacon Biscuit Bombers turn out perfectly every time, from their crispy exterior to their gooey interior, keep these expert pointers in mind. A little attention to detail goes a long way in achieving culinary excellence.
- Don’t Over-Flatten the Biscuits: While you need to flatten the biscuit pieces to wrap the cheese, avoid making them too thin. A little thickness is crucial for them to hold together, cook properly, and prevent them from becoming soggy or tearing, which could lead to cheese leakage.
- Seal Tightly: This is perhaps the most critical step! Any gaps or unsealed edges in the biscuit wrap will allow the precious melted cheese to escape into your frying oil, creating a mess and resulting in a less satisfying bomber. Take extra care to pinch and seal every edge firmly.
- Secure Bacon with Toothpicks: The toothpick is your best friend in this recipe. Make sure it goes all the way through the biscuit and bacon to firmly hold the bacon in place throughout the frying process. This prevents the bacon from unraveling and ensures a uniform, crispy coating.
- Oil Temperature is Key: Invest in a reliable oil thermometer. Maintaining a consistent temperature of 350°F (175°C) is absolutely crucial for a perfectly cooked, non-greasy bomber. If the oil is too low, the bombers will absorb excess oil and become heavy; if it’s too high, they will burn on the outside before the biscuit is cooked through and the cheese is beautifully melted.
- Avoid Overcrowding the Pot: Fry in small batches to prevent the oil temperature from dropping significantly. Overcrowding can lead to uneven cooking, lower oil temperatures, and greasy bombers. Give each bomber space to fry properly.
- Drain Properly After Frying: Always remove fried items from the oil and place them immediately on a wire rack set over a baking sheet lined with paper towels. This setup allows any excess oil to drain off effectively, which is essential for maintaining their delicious crispiness and preventing them from becoming greasy.
- Serve Warm for Best Experience: These bombers are best enjoyed hot and fresh, right after they’ve drained. This is when the cheese is at its peak meltiness, gooey and stretchy, and the bacon is perfectly crispy. While they are still tasty at room temperature, the warm experience is unmatched.
- Batch Cooking and Freezing: These bombers freeze exceptionally well before frying! Prepare them up to the bacon-wrapping stage (with toothpicks), arrange them in a single layer on a baking sheet, and freeze until solid. Then, transfer them to a freezer-safe bag or container. You can then fry them from frozen, adding a few extra minutes to the cooking time, for a quick and convenient snack whenever the craving strikes.
Conclusion: Get Ready to Bomb Your Taste Buds!
Overall, this Cheesy Bacon Biscuit Bombers recipe is an absolute winner, an undeniable triumph in the realm of easy and delicious comfort food. It masterfully combines the ideal blend of simplicity, profound flavor, and pure indulgent satisfaction. Whether you’re actively searching for an effortless yet impressive appetizer for your next social gathering, a hearty and savory breakfast treat to kickstart your day, or simply a deliciously easy snack to curb those afternoon cravings, these bombers fit the bill perfectly.
Their immense appeal lies in their familiar, humble ingredients transformed into something truly special and memorable with minimal effort. They embody the essence of gourmet taste achieved through approachable methods. So, gather your ingredients, follow these detailed steps, and get ready to experience an explosion of cheesy, bacony, biscuit goodness that will delight your senses and satisfy your soul. Don’t forget to check out the Poor Man’s Gourmet Kitchen tutorial on YouTube for a fantastic visual guide to complement these instructions. Happy cooking, and prepare for an avalanche of rave reviews!