
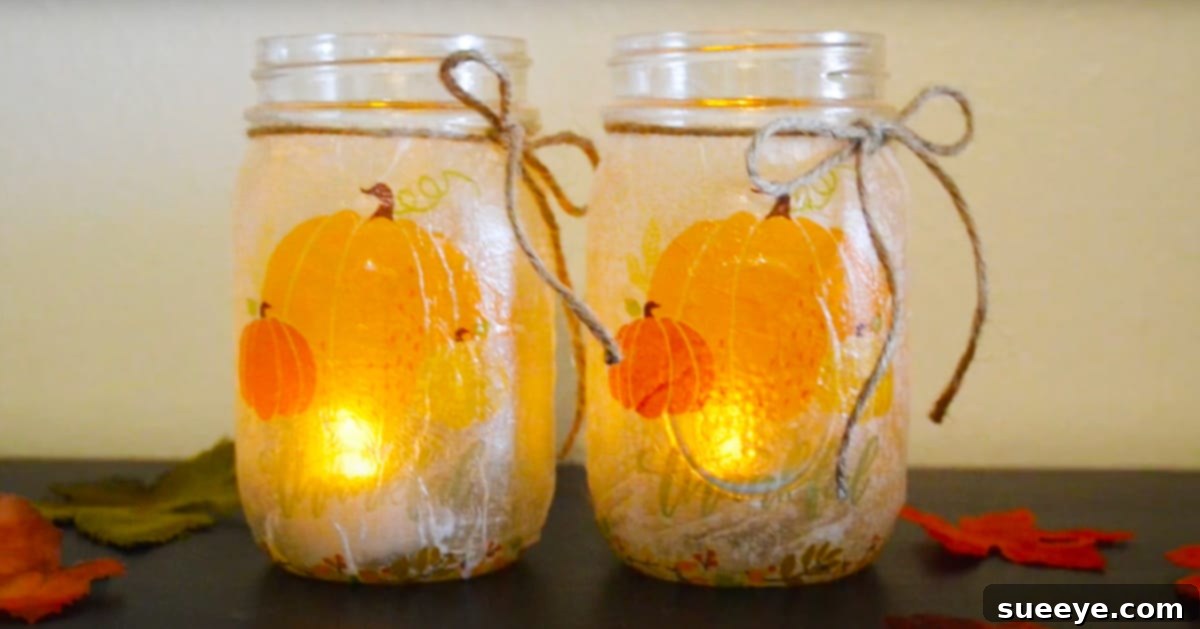
As the leaves begin to turn vibrant shades of red, orange, and gold, there’s an undeniable warmth and coziness that descends upon our homes. What better way to capture the enchanting spirit of autumn than with charming, handmade decorations? These DIY Fall Mason Jar Candle Holders are not just adorable; they are one of the simplest and most rewarding crafts you can undertake, perfect for adding a touch of seasonal magic to any space. Imagine the soft glow of candlelight filtering through beautiful fall-themed patterns, creating an inviting ambiance that celebrates the harvest season.
Crafting your own decor allows for endless personalization and often comes with a much smaller price tag than store-bought alternatives. With just a handful of readily available and inexpensive materials, you can transform ordinary mason jars into stunning focal points. Whether you’re looking to spruce up your mantelpiece, create a centerpiece for your Thanksgiving table, or craft thoughtful homemade gifts, these decorative candle holders are an ideal project. They beautifully blend the rustic charm of mason jars with the delicate artistry of decoupage, resulting in truly unique autumn accents.
Why Mason Jars? The Perfect Canvas for Fall Decor
Mason jars have long been a beloved staple in the world of DIY crafts, and for good reason. Their simple, classic design provides a versatile canvas for countless creative projects. They are incredibly accessible, found in most grocery stores, craft shops, or even repurposed from old food jars like pasta sauce or jam containers, making this an exceptionally eco-friendly and budget-conscious craft. Reusing old jars not only saves you money but also contributes to a more sustainable lifestyle, giving new life to items that might otherwise be discarded.
Beyond their availability, mason jars are durable and safe, making them perfect vessels for candles. Their clear glass allows the beautiful designs you’ll be adding to truly shine when illuminated. The variety of sizes available means you can create a cohesive collection of candle holders, ranging from small votive-sized jars to larger ones that make a statement. Their inherent rustic appeal complements the natural beauty of fall, making them an ideal choice for autumn-themed home decor.
The Magic of Napkin Decoupage: Unleashing Creativity
The secret to the exquisite patterns on these candle holders lies in a simple yet ingenious technique: napkin decoupage. Decoupage is the art of decorating an object by gluing colored paper cutouts onto it in combination with special paint effects, gold leaf, and other decorative elements. For this project, we utilize the delicate nature of decorative napkins. Who would have thought that a simple paper napkin could be transformed into such an elegant design element? This clever trick is what makes the project so unique and visually appealing.
Fall-themed napkins come in an astonishing array of designs, from pumpkins and autumn leaves to rustic landscapes and festive messages. Their thin, multi-layered construction is crucial; when separated, the top printed layer becomes almost translucent, allowing it to seamlessly blend with the glass surface using Mod Podge. This creates a beautifully integrated look, as if the design was printed directly onto the jar. The result is a smooth, professional finish that belies the simplicity of the technique. This creative approach offers endless possibilities for customizing your decor to match your personal style or specific holiday themes.
Gathering Your Simple & Affordable Crafting Essentials
One of the many joys of this DIY project is its minimal material requirements. You’ll likely find most of these items around your home or at your local dollar store, ensuring a truly budget-friendly crafting experience. Here’s everything you’ll need to embark on your creative journey:
- Mason Jar (or recycled glass jar): Choose clean, dry jars of any size. Wide-mouth jars are often easier to work with. Ensure they are free from labels and any sticky residue.
- Mod Podge (Matte or Gloss Finish): This all-in-one glue, sealer, and finish is the star of our project. A matte finish gives a softer, more rustic look, while gloss provides a subtle sheen. Any type of Mod Podge (Original, Dishwasher Safe, or Outdoor) will work effectively for this craft.
- Fall-Themed Napkins: This is where your creativity truly shines! Look for napkins with vibrant autumn colors, leaf patterns, pumpkins, acorns, or any design that evokes the spirit of fall. The thinner the top printed layer, the better the final result will be.
- Small Paintbrush or Foam Brush: Essential for applying the Mod Podge smoothly and evenly. A soft bristle brush will help minimize brush strokes, while a foam brush offers a very smooth application.
- String, Twine, or Ribbon: An optional but highly recommended finishing touch. Burlap twine, jute string, raffia, or a festive satin ribbon can add a charming rustic or elegant accent to your finished candle holders.
- LED or Real Tealight Candles: For safe illumination. LED tealights are perfect for extended use and eliminate fire risk, especially if children or pets are present. Real tealight candles offer a classic, warm glow but require careful supervision.
Most of these items can be purchased for a very low cost, often at dollar stores or craft supply retailers, making this an incredibly economical way to enhance your fall home decor. There’s no need to spend a fortune when you can create stunning, personalized decor for a fraction of the price.
Step-by-Step Guide: Crafting Your Fall Mason Jar Candle Holders
Transforming your mason jars into beautiful fall candle holders is a straightforward and enjoyable process. Follow these detailed steps to achieve a professional-looking finish:
Step 1: Prepare Your Workspace and Napkins
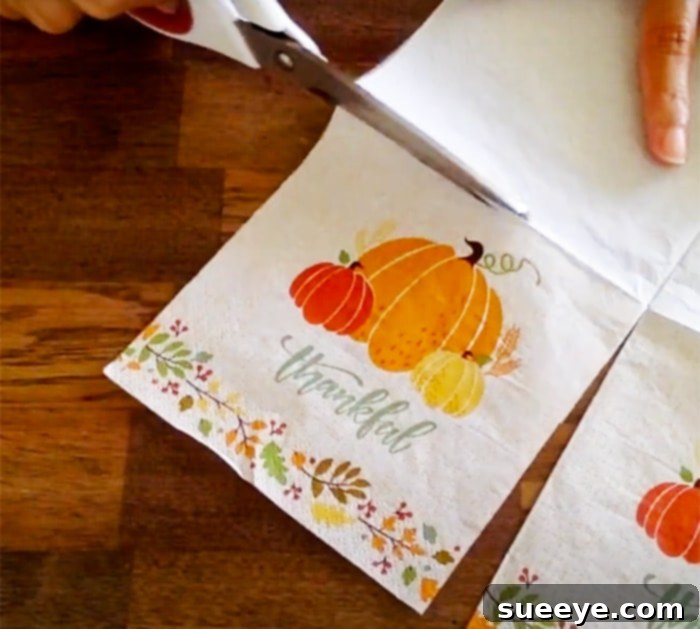
First, set up a clean, flat workspace covered with newspaper or a craft mat to protect it from Mod Podge spills. Ensure your mason jars are sparkling clean and completely dry before you begin. Next, take your fall-themed napkins. Most decorative napkins are multi-layered (usually 2 or 3 plies). Carefully separate these layers, gently peeling them apart until you are left with only the single, very thin top layer that contains the printed design. This step is crucial for achieving a smooth, seamless decoupage effect. If the napkin isn’t thin enough, it won’t adhere properly and will create an obvious edge.
Once separated, open up your chosen fall napkins into their entirety and carefully cut out the square blocks or specific design elements you wish to use. You can cut out individual leaves, pumpkins, or even sections of a pattern. Precision isn’t overly important at this stage, as the Mod Podge will help blend edges, but try to keep your cuts relatively clean. Having your design pieces ready before applying Mod Podge will ensure a smoother application process.
Step 2: Apply Mod Podge and Napkin Layer
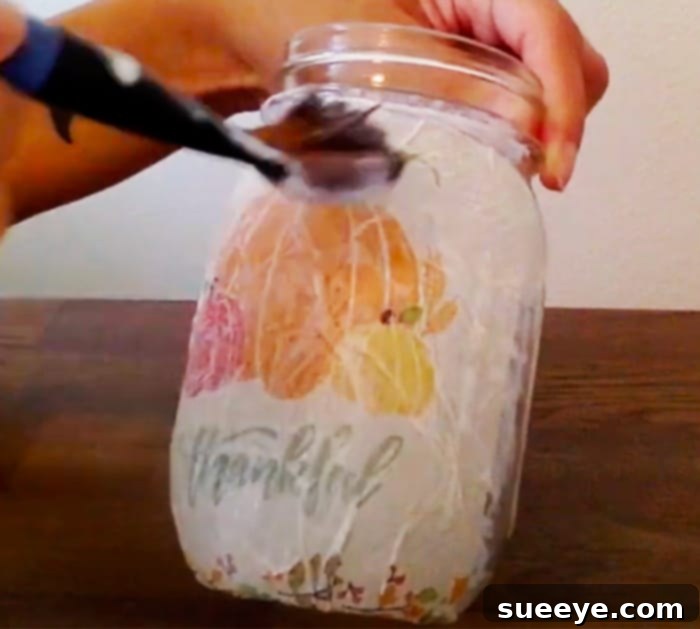
Now it’s time to bring your design to life! Dip your paintbrush into the Mod Podge. Paint a generous, even layer of Mod Podge directly onto a section of the mason jar where you intend to place your first napkin design. Work in sections, focusing on about half of the jar at a time, to prevent the Mod Podge from drying too quickly. The Mod Podge should be wet and tacky.
Carefully pick up one of your separated napkin pieces and gently place it onto the wet Mod Podge on the jar. Use your fingers or a clean, dry brush to gently smooth out any wrinkles or air bubbles, working from the center of the napkin outward. Be very delicate, as the thin napkin layer can tear easily. Continue this process, placing additional napkin pieces onto the jar, overlapping slightly if desired, until you’ve covered your desired area. You can cover the entire jar or leave some clear glass peeking through for a varied effect.
Step 3: Seal with a Top Coat
Once all your napkin pieces are in place on one side of the jar, apply another thin, even coat of Mod Podge directly over the top of the napkin design and the surrounding glass. This layer acts as a sealant, protecting the napkin and creating a smooth, durable finish. This step also helps to further adhere the napkin to the jar, blending its edges and making it appear as if the design is part of the glass itself. Repeat this process for the backside of the jar, ensuring consistent coverage and smoothing out any new wrinkles as you go.
Step 4: Drying and Curing
Allow the Mod Podge to dry completely. This can take several hours, or even overnight, depending on the thickness of the application and humidity levels. For best results, let the jars cure for at least 24-72 hours before handling them extensively or exposing them to moisture. The Mod Podge will dry clear, leaving your beautiful fall designs crisp and vibrant.
Step 5: Add Finishing Touches and Candles
Once fully dry, you can add an extra touch of charm with string, twine, or ribbon. Wrap it around the neck of the mason jar, tying a simple bow or knot, to enhance the rustic or elegant aesthetic. Burlap twine adds a charming farmhouse feel, while a satin ribbon can elevate the look for a more sophisticated display. Finally, carefully place your chosen LED or real tealight candle inside the finished mason jar. If using a real candle, always ensure it’s placed on a stable surface and never left unattended. For a truly unique effect, consider filling the jar with a small amount of water and floating an LED tealight on top for a shimmering, ethereal glow.
Creative Variations & Personalize Your Fall Decor
The beauty of DIY projects lies in their adaptability. While fall napkins provide a fantastic starting point, don’t hesitate to explore other ways to personalize your mason jar candle holders:
- Beyond Napkins: Experiment with thin scrapbook paper, pressed autumn leaves (sealed with Mod Podge), or even printed images relevant to fall.
- Textural Elements: Before or after applying the napkins, you could add a base coat of chalk paint for a distressed look, or gently sand the edges of the jar after decoupage for a vintage feel.
- Sparkle and Shine: Lightly dust some fine glitter onto the wet Mod Podge before the final sealing coat for a touch of festive sparkle that catches the candlelight.
- Themes for Every Occasion: While this guide focuses on fall, you can easily adapt this technique for other holidays – think spooky napkins for Halloween, snowflakes for winter, or florals for spring.
- Multi-Purpose Jars: These decorated jars aren’t just for candles! They make charming rustic vases for small bouquets, elegant holders for pens and pencils, or even beautiful containers for homemade gifts like bath salts or cookies.
A Fun Activity for All Ages and Groups
This project isn’t just an inexpensive way to create beautiful Fall decor; it’s also a fantastic activity to share with friends and family. Gather your loved ones for a fun craft session, turning it into a memorable gathering. It’s a wonderful opportunity to bond, unleash creativity, and make personalized gifts for others. Kids will especially enjoy selecting their favorite napkin designs and applying the Mod Podge (with a little supervision, of course!). This project encourages fine motor skills, artistic expression, and the joy of creating something beautiful with your own hands. Plus, everyone gets to take home their unique piece of fall artistry.
Caring for Your Handmade Candle Holders
Once your beautiful Fall mason jar candle holders are complete and fully cured, they require minimal care to maintain their charm. If you used standard Mod Podge, they are not waterproof and should not be submerged in water. For cleaning, simply wipe them gently with a dry or slightly damp cloth. Avoid harsh scrubbing or abrasive cleaners, which could damage the decoupage finish. When storing them for next year, wrap them carefully in tissue paper or bubble wrap to prevent scratches and keep them in a dry place. With proper care, these delightful decorations can adorn your home for many autumns to come, bringing a touch of handmade warmth year after year.
Embrace the Beauty of Handmade Fall Decor
In conclusion, these DIY Fall Mason Jar Candle Holders offer a perfect blend of simplicity, affordability, and seasonal charm. They prove that you don’t need to be a seasoned crafter or spend a lot of money to infuse your home with beautiful, personalized decor. By harnessing the humble mason jar and the artistic potential of decorative napkins, you can create stunning accents that truly capture the essence of autumn. So, gather your materials, invite some friends, and embark on this delightful crafting adventure. The glowing results will undoubtedly bring warmth and joy to your home throughout the fall season. Happy crafting, and enjoy the cozy ambiance these lovely candle holders will create!