
Crafting Nature’s Beauty: The Unique DIY Epoxy Resin and Wood Slice Stool
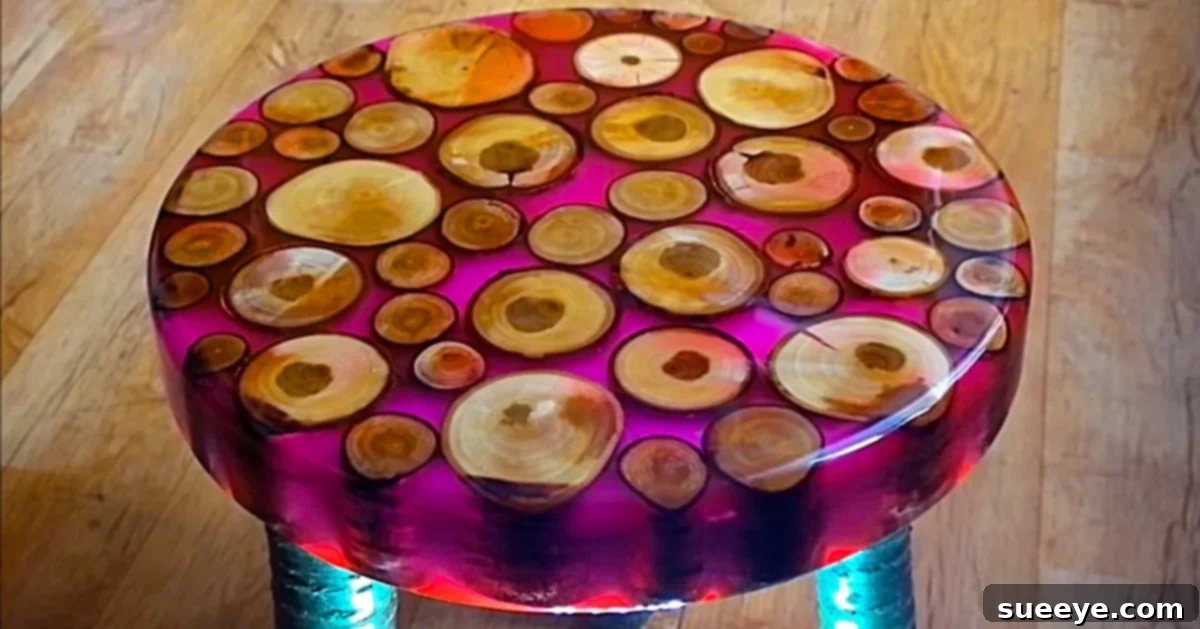
Imagine a piece of furniture that seamlessly blends rustic charm with modern artistry, a functional masterpiece that captures the essence of the natural world. This is precisely what a DIY epoxy resin and wood slice stool offers. Far from being just another seating option, this project transforms humble tree branches into a stunning focal point for any home or garden. Its captivating design, featuring vibrant wood slices suspended within crystal-clear or colored resin, makes it an impressive spectacle even if you’re not planning to embark on a DIY journey just yet. It’s a testament to creativity, showing how simple elements from your backyard can be elevated into a conversation-starting piece of art.
The allure of epoxy resin projects has captivated countless crafters and home decor enthusiasts. From river tables to stunning jewelry, resin provides an incredible medium for encapsulating and preserving various materials, creating durable and visually striking items. However, this particular tree branch stool introduces a captivating twist to the popular resin trend. Unlike the often-seen alcohol ink ‘dirty pour’ epoxy art or simple resin-coated wood, this project intricately places real, meticulously sliced tree branches directly into the resin, creating a mosaic of natural textures and colors that is truly spectacular. It’s a design innovation that stands out, offering a fresh perspective on how natural elements can be integrated into contemporary furniture design.
The Inspiration Behind the Masterpiece: Jedrek29t’s Vision
The mesmerizing concept of this epoxy resin wood slice stool gained significant attention thanks to the ingenious work of YouTuber Jedrek29t. His detailed video tutorial showcases the entire journey from raw materials to a polished, functional stool, leaving viewers captivated by his skill and vision. What makes his approach particularly impressive is the way he integrates the tree branch legs directly into the resin top, ensuring structural integrity and a seamless finish. Watching the transformation unfold, from a pile of garden branches to an elegant piece of furniture, is nothing short of fascinating. It makes you wonder about the spark of creativity that led to such an original and aesthetically pleasing outcome, an item that many would undoubtedly love to feature in their living space.
Jedrek29t’s creation exemplifies how a creative mind can turn ordinary natural resources into extraordinary home decor. His method isn’t just about crafting a stool; it’s about creating a functional sculpture that celebrates the beauty of wood in an entirely new light. The finished product exudes a rustic-modern vibe, appealing to those who appreciate unique, handcrafted items that tell a story. This stool is not just furniture; it’s a testament to the potential of DIY projects and the endless possibilities that arise when nature meets contemporary crafting techniques.
Deconstructing the Creative Process: From Branch to Beautiful Stool
Creating an epoxy resin wood slice stool, while appearing complex, follows a methodical and rewarding process. Jedrek29t’s video provides an excellent blueprint, highlighting key stages that transform simple garden findings into a stunning piece of furniture. Understanding these steps is crucial for anyone considering replicating this impressive project.
1. Gathering and Preparing Natural Elements
The journey begins in the garden or local woods, where suitable branches and sticks are gathered. The selection process is important: look for branches that are relatively straight for the legs and various diameters for the slices that will form the top. Once collected, these natural materials need careful preparation. For the stool’s surface, branches are meticulously sliced into thin, uniform pieces. This step requires precision, often utilizing a saw to ensure clean cuts and consistent thickness, which contributes significantly to the final aesthetic. Allowing the wood to dry thoroughly is also vital to prevent moisture from interfering with the resin curing process.
2. Designing the Layout and Preparing the Mold
With the wood slices ready, the artistic arrangement begins. A circular mold, typically made from a sturdy material like melamine or plastic, serves as the container for the resin and wood. Within this mold, the wood slices are carefully arranged to create a visually appealing pattern. This could involve concentric circles, random clusters, or a deliberate mosaic design. The placement of each slice contributes to the overall character of the stool. Simultaneously, the chosen branches for the legs are prepared. A clever aspect of Jedrek29t’s design is the direct embedding of these legs into the resin, ensuring structural integrity and a seamless finish. This requires careful positioning within the mold before the resin pour, often supported to maintain their upright position.
3. The Mesmerizing Epoxy Resin Pour
This stage is where the magic truly happens. High-quality epoxy resin, typically a two-part system (resin and hardener), is carefully mixed according to the manufacturer’s instructions. Precise measurement is critical for proper curing. The mixed resin is then slowly and evenly poured over the arranged wood slices and around the embedded legs in the mold. Depending on the depth of the stool top, multiple layers may be necessary, allowing each layer to partially cure before adding the next. This helps to manage exothermic reactions (heat generation) and minimize bubbles. A heat gun or torch can be gently used to remove any trapped air bubbles that rise to the surface, ensuring a crystal-clear finish that beautifully encases the wood slices.
4. Curing, Demolding, and Finishing Touches
Once the resin is poured, it needs ample time to cure fully, typically ranging from 24 to 72 hours, depending on the specific resin product and environmental conditions. After complete curing, the stool is carefully demolded. This reveals the raw, albeit solid, form of the stool. The next crucial steps involve sanding and beveling. Sanding starts with coarser grits and progressively moves to finer ones (e.g., 80, 120, 220, 400, 800, 1500, 2000 grit), meticulously smoothing all surfaces and edges. This process removes any imperfections, sharp edges, and ensures a tactilely pleasing finish. Beveling the edges adds a professional and refined look. Finally, a thorough polishing brings out the stunning clarity and shine of the epoxy, making the wood slices appear vibrant and almost three-dimensional beneath the glassy surface. This meticulous finishing process is what elevates the stool from a simple craft project to a piece of elegant furniture.
Why This Epoxy Resin Stool is More Than Just Furniture
This particular epoxy resin wood slice stool transcends its basic function to become a true statement piece. It’s a remarkable example of how sustainable practices and artistic innovation can merge to create something truly exceptional. Here are a few reasons why this design stands out:
- Unique Aesthetic: Unlike mass-produced furniture, each stool made with natural branches will possess its own distinct character. The inherent variations in wood grain, bark, and branch shapes ensure no two stools are exactly alike, offering a truly bespoke item.
- Bringing Nature Indoors: In an increasingly urbanized world, incorporating natural elements into home decor helps to create a sense of calm and connection to nature. This stool does so beautifully, allowing the organic forms of tree branches to be admired up close.
- Durability and Longevity: Epoxy resin is known for its exceptional durability, scratch resistance, and ability to protect encapsulated materials. This means the delicate wood slices are preserved indefinitely, protected from moisture, pests, and wear, ensuring the stool remains beautiful for years to come.
- Conversation Starter: Its unconventional design and stunning visual appeal make it an instant conversation starter. Guests will undoubtedly be curious about its creation and the story behind its unique look.
- Versatility: While perfect as a stool, its compact size and artistic presence also make it an ideal side table for a cup of coffee, a plant stand, or simply a decorative accent piece in various rooms – from the living room to the patio.
Embarking on Your Own DIY Epoxy Resin Project
For those inspired to try their hand at crafting a similar epoxy resin stool, a few considerations are essential. While the project is rewarding, it requires patience, attention to detail, and a willingness to learn new skills. Here’s what you might need and what to keep in mind:
- Materials:
- Epoxy Resin System: Choose a clear, deep-pour epoxy suitable for furniture.
- Tree Branches/Wood Slices: Gather various sizes, ensuring they are dry and free of pests.
- Mold: A circular mold of desired diameter and height. Melamine boards sealed with silicone or HDPE plastic molds work well.
- Release Agent: To easily demold the cured resin.
- Tools:
- Saw: For precisely cutting wood slices and shaping legs.
- Sander & Sandpaper: Orbital sander with a range of grits (from coarse to ultra-fine).
- Polishing Compound & Pads: For achieving a high-gloss finish.
- Mixing Containers & Stirring Sticks: For resin preparation.
- Heat Gun or Torch: For bubble removal.
- Personal Protective Equipment (PPE): Gloves, safety glasses, and a respirator are crucial when working with epoxy resin.
- Key Tips for Success:
- Work in a Well-Ventilated Area: Epoxy fumes can be strong.
- Measure Precisely: The correct resin-to-hardener ratio is vital for proper curing.
- Pour in Layers (for deep pours): This prevents overheating and excessive bubbling.
- Patience is Key: Allow adequate curing time for each layer and the final piece.
- Practice Finishing: Sanding and polishing can be time-consuming but are essential for a professional look.
Customization and Personalization: Making It Uniquely Yours
The beauty of a DIY project like this lies in its potential for personalization. While Jedrek29t’s natural wood aesthetic is stunning, you can infuse your own style:
- Color Pigments: Add transparent or opaque resin pigments to create a colorful base or highlight the wood slices. Imagine an ocean-blue resin with natural branches, or an emerald green evoking a forest floor.
- Different Inclusions: Beyond wood slices, consider encapsulating dried flowers, small pebbles, seashells, or even LED lights for a truly magical effect.
- Leg Design: Instead of embedded branches, you could use metal hairpin legs for a more industrial look, or traditionally attached wooden legs for a classic touch.
- Shape and Size: Experiment with different mold shapes – square, rectangular, or even irregular organic forms – to create various furniture pieces like coffee tables, side tables, or decorative coasters.
Conclusion: An Inviting Glimpse into Creative Craftsmanship
The epoxy resin wood slice stool is more than just a piece of furniture; it’s a testament to the boundless creativity that can transform humble natural materials into extraordinary works of functional art. Jedrek29t’s inspiring demonstration reveals the meticulous yet immensely rewarding process behind such a project. Whether you’re a seasoned DIY enthusiast looking for your next challenge or simply someone who appreciates unique home decor, this stool offers a captivating blend of rustic charm, modern elegance, and artistic ingenuity.
Its ability to bring the serene beauty of the outdoors inside, coupled with its robust durability and bespoke appeal, makes it an enviable addition to any space. So, if you’re feeling inspired, gather your branches, prepare your resin, and embark on a creative journey that promises a truly spectacular result. The satisfaction of crafting such a beautiful and unique piece with your own hands is an experience unlike any other.