
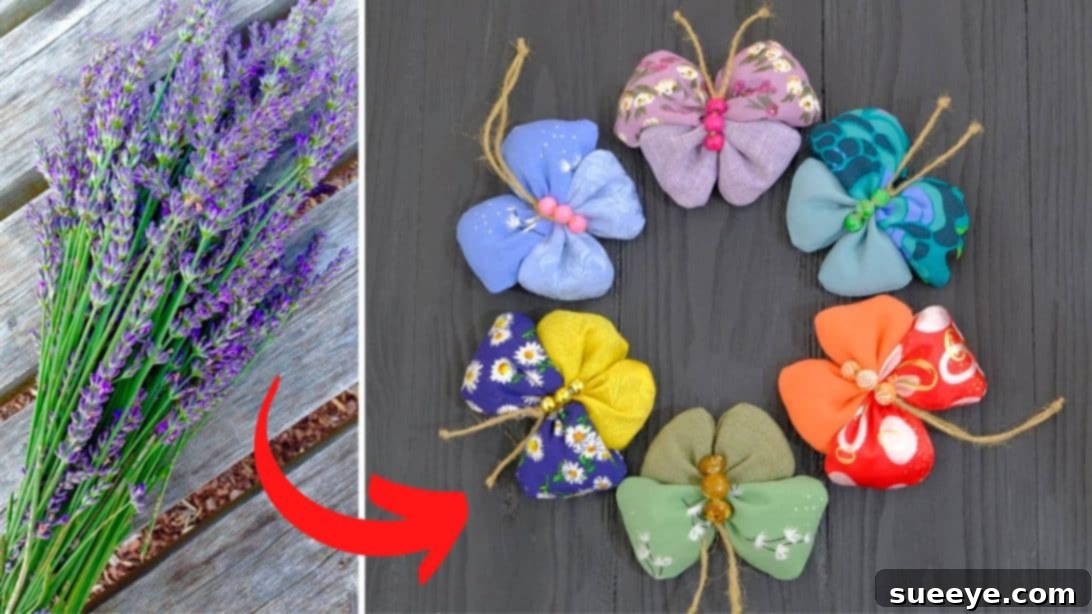
Craft Your Own Fragrant Fabric Butterflies with Lavender: A Delightful DIY Sewing Tutorial
Unleash your creativity and fill your home with a calming aroma by crafting these exquisite fragrant fabric butterflies. Inspired by the beautiful designs from Moth Art on YouTube, these aren’t just any sewing project; they are charming, aromatic creations filled with the soothing essence of dried lavender flowers. Imagine these delightful fabric butterflies adorning your home, tucked into drawers, or presented as thoughtful, handmade gifts. What makes this project even more appealing is its accessibility: you don’t need a sewing machine to bring these beauties to life, making it a perfect craft for beginners and seasoned crafters alike who enjoy the art of hand-stitching.
These lavender-filled butterflies offer a unique blend of visual appeal and aromatherapy. The gentle fragrance of lavender is known for its calming properties, making these fabric creations ideal for stress relief and promoting a peaceful atmosphere. Whether you’re looking for a special present for a loved one, a unique item to sell at craft fairs, or simply a charming addition to your own living space, this tutorial will guide you through every step of making these lovely and functional fabric butterflies. Gather your materials, prepare for a delightful crafting session, and get ready to create something truly magical.
Materials You’ll Need:
To embark on this delightful crafting journey, you’ll need a few essential items. Most of these can be found in your existing craft stash or are readily available at fabric and craft stores. Choosing your fabrics is part of the fun, allowing you to personalize each butterfly to your taste or the recipient’s preference.
- 1 solid color fabric: This will form the base of one of your butterfly wings. Consider soft cotton or linen in a complementary or contrasting shade.
- 1 patterned fabric: This will create the other wing, adding visual interest. Floral prints, polka dots, or subtle geometrics work beautifully.
- Paper, for template: Any sturdy paper or lightweight cardstock is perfect for creating your wing templates.
- Marking pen: A fabric-safe marking pen, tailor’s chalk, or even a regular pencil will work for tracing your shapes.
- Scissors: Sharp fabric scissors are essential for clean, precise cuts.
- Fabric pins: To hold your fabric pieces securely in place while tracing and sewing.
- Dried lavender flowers: The star ingredient! Ensure you use dried, fragrant lavender for the aromatic effect. Culinary grade is usually higher quality, but craft grade works perfectly too.
- Jute twine: This natural fiber adds a rustic charm and forms the body and antennae of your butterfly.
- Beads: Choose three beads that complement your fabric colors. These will form the central body segments of the butterfly.
- Needle and matching thread: A good quality hand-sewing needle and strong polyester or cotton thread that matches your fabric colors will ensure a neat, durable finish.
Step-by-Step Directions: Creating Your Lavender Butterflies
Follow these detailed steps carefully, and you’ll soon have a collection of beautiful, fragrant fabric butterflies ready to delight. Precision in measuring and cutting, along with neat stitching, will contribute to a professional-looking final product.
Step 1: Crafting the Fabric Pouches (Butterfly Wings)
The journey begins with preparing the fabric pouches that will eventually become your butterfly’s wings. Accuracy in this initial stage is key for well-proportioned butterflies.
- Begin by creating your wing templates. Cut two triangle shapes from your paper: one measuring approximately 10cm x 5.5cm (3.9″ x 2.1″) and the other slightly smaller, about 8cm x 5cm (3.1″ x 1.9″). These dimensions are flexible, allowing you to experiment with different butterfly sizes if desired.
- To give your butterfly wings a natural, softer appearance, use a bottle cap or any small circular object to gently curve the sharp corners of each paper triangle. Once you’ve marked the curves, carefully cut them out, resulting in two distinct wing templates.
- Now, prepare your fabric. Take your solid-colored fabric and fold it in half, ensuring the right sides of the fabric are facing each other. This is crucial for a clean finish when you turn the pouch right side out later. Place the smaller curved triangle template onto the folded fabric.
- Using your marking pen or tailor’s chalk, carefully trace around the template onto the fabric. As you trace, remember to mark an opening of about 2 inches (approximately 5cm) along one of the edges – this gap is essential for turning the fabric and filling it with lavender. Secure the fabric layers together with fabric pins to prevent shifting during sewing.
- Repeat this entire process with your patterned fabric, but this time use the larger curved triangle template. Ensure the right sides are facing, trace the shape, mark the 2-inch opening, and pin the layers together. You should now have two sets of pinned fabric, ready for stitching.
- It’s time to sew! Carefully sew along the marked lines of both fabric pieces. You can do this by hand using a sturdy backstitch for durability, or if you have a machine, use a straight stitch. Remember to leave the marked 2-inch gap unstitched. Reinforce the stitches at the beginning and end of your sewing to prevent unraveling.
- Once sewn, trim away the excess fabric around your stitched lines, leaving a consistent seam allowance of approximately ¼ inch (about 0.6cm). For the curved edges, make small snips into the seam allowance (without cutting through your stitches) to help the fabric lie flat when turned.
- Finally, turn both fabric pouches right side out. Gently poke out the corners and curves using a turning tool or a blunt object like a chopstick to achieve a neat, crisp shape. Your butterfly wing pouches are now ready for the fragrant filling!
Step 2: Filling and Assembling Your Fragrant Butterflies
With your fabric pouches prepared, the next step involves infusing them with the delightful scent of lavender and bringing your butterfly to life with beads and twine.
- Before filling, give the openings of your fabric pouches a neat finish. Tuck the raw edges of the opening inward, aligning them with the sewn seam line. A quick press with an iron will help to set these folded edges, creating a crisp, clean opening and making it easier to sew shut later.
- Now comes the fragrant part! Begin carefully filling each pouch with your dried lavender flowers. It’s important not to overfill them. The key is to leave enough room for the pouch to be shaped and pinched later to form the distinct butterfly wing contours. Aim for a soft, pliable filling rather than a rigidly packed one.
- Once filled to your satisfaction, sew the gap in each pouch closed. A ladder stitch (also known as an invisible stitch) is ideal here, as it creates a seamless closure that blends beautifully with the fabric, giving a professional finish. If a ladder stitch is too complex, a neat whipstitch will also work. Set your lavender-filled pouches aside.
- Prepare the jute twine that will form the butterfly’s body and antennae. Cut a generous length of twine – enough to thread three beads, wrap around your pouches several times, and still have enough for antennae. Thread three beads onto the jute twine, positioning them near the center. These beads will serve as the butterfly’s segmented body.
- Lay the beaded twine straight and vertically on your work surface. Now, carefully place your two lavender-filled fabric pouches on top of the twine, arranging them horizontally. Position the smaller pouch at the bottom, and the larger pouch directly above it. Ensure both pouches are nicely centered over the beads and twine, with a slight overlap where they meet. The smaller pouch will represent the lower wings, and the larger one the upper wings.
- To form the butterfly shape, take one of the long tails of the jute twine (the one extending from the top of the beads) and bring it over the top of both pouches. Pull the twine tightly. This action will cinch the pouches in the middle, creating the distinct butterfly wing shape. The tighter you pull, the more pronounced your butterfly’s waist will be.
- Once you’re happy with the shape, secure the jute twine by looping it around the cinched center a few more times and then tying it securely with a strong knot. Double-check that the three beads are still centered along the ‘body’ of the butterfly, adding to its lifelike appearance.
- Finally, create the butterfly’s antennae. Using the remaining jute twine tails at the top of the larger pouch, form two small loops, each about 2 inches (5cm) long. Tie the ends securely to create the antennae, trimming any excess twine. Make sure the antennae are symmetrical and positioned appealingly.
Congratulations! You have successfully crafted your very own fragrant fabric butterfly. Each one you make will be unique, reflecting your choice of fabrics and your personal touch. These charming butterflies are not just beautiful; they carry the soothing scent of lavender, making them perfect for refreshing drawers, decorating nurseries, or simply adding a touch of handmade elegance to any room. They also make truly heartfelt gifts that show thoughtfulness and care.
Tips for Success and Creative Variations:
- Fabric Choices: Experiment with different textures like satin for a luxurious feel or burlap for a rustic look. Always pre-wash fabrics to prevent shrinkage.
- Lavender Scent: If your lavender scent fades over time, you can gently squeeze the butterfly to release more fragrance, or carefully open a seam, add a few drops of lavender essential oil to a cotton ball, and insert it before re-sewing.
- Embellishments: Add small embroidered details, glitter, or even a tiny ribbon bow to the butterfly for extra charm.
- Hanging Loops: Attach a small loop of twine or ribbon to the top of the larger wing before tying off the antennae, allowing you to hang your butterflies.
- Gift Packaging: Present your fragrant butterflies in a small organza bag or a decorative box for an elegant gift.
*All images used in this tutorial are credited to Moth Art via YouTube. We highly recommend visiting her channel and subscribing for more inspiring and creative DIY projects!