
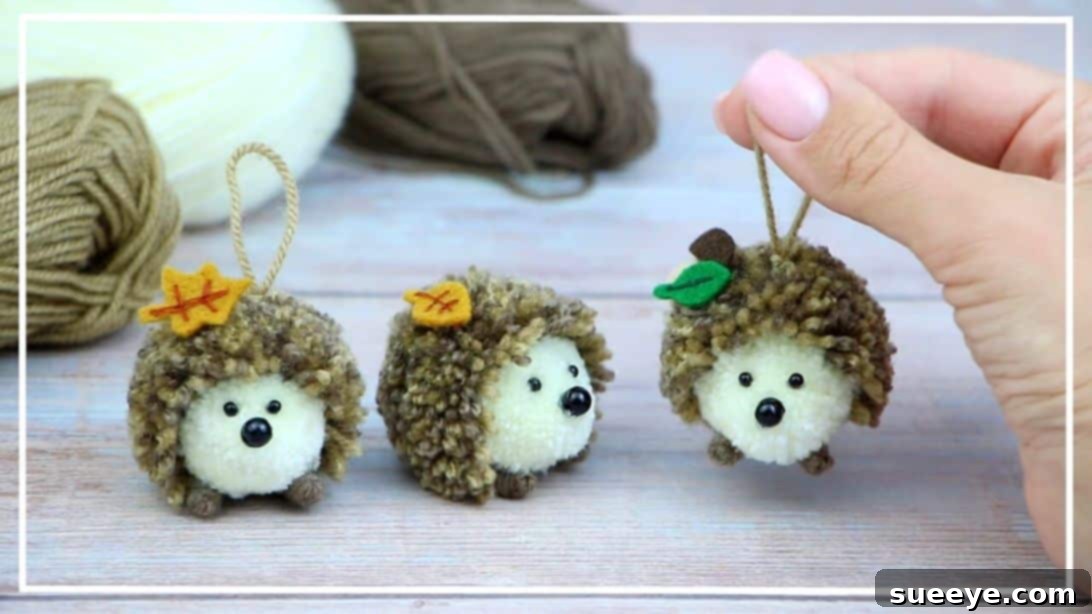
DIY Cute Pompom Hedgehog Toy: Craft Your Own Adorable Companion
Are you searching for a delightful and straightforward crafting project to brighten up your weekend? Look no further! This charming DIY pompom hedgehog toy, inspired by the creative talents of Natalidoma DIY on YouTube, offers a perfect blend of simplicity and cuteness. It’s an ideal activity for crafters of all skill levels, especially those looking for a fun project to share with younger family members. Imagine crafting a whole family of these fuzzy friends to give as heartwarming handmade gifts, use as playful toys, or even transform into unique keychains and whimsical decorations for your home. This comprehensive guide will walk you through each step, ensuring you can create your own lovable hedgehog with ease. For a visual demonstration, be sure to watch Natalidoma DIY’s full video tutorial linked below!
Essential Materials for Your Pompom Hedgehog
Gathering your supplies is the first exciting step in bringing your pompom hedgehog to life. The beauty of this craft lies in its minimal material requirements, making it an accessible and budget-friendly option. Here’s everything you’ll need to get started:
- White Yarn: This will form the distinct pointy snout of your hedgehog. Any standard acrylic or wool blend yarn will work wonderfully, offering softness and an easy-to-handle texture.
- Dark Brown Yarn: Used primarily for the main body, providing a rich, earthy tone. Combining different shades of brown can add depth and realism to your hedgehog’s fur.
- Light Brown Yarn: Perfect for adding a subtle contrast or highlights to the hedgehog’s body, blending beautifully with the dark brown yarn for a more textured look.
- Sharp Scissors: Essential for precise cutting and shaping your pompoms. A good pair of craft scissors will make the trimming process much easier and yield cleaner results.
- Two Small Black Beads: These will serve as the bright, curious eyes of your hedgehog. Look for beads approximately 3-5mm in diameter for a proportionate look.
- One Larger Black Bead: This will become the hedgehog’s adorable little nose. A bead around 6-8mm works well to give it a prominent, cute feature.
- Hot Glue Gun and Glue Sticks: For securely attaching the facial features and feet. Always exercise caution when using a hot glue gun, especially if crafting with children. Craft glue can be an alternative, though it may require longer drying times.
Having all your materials organized before you begin will ensure a smooth and enjoyable crafting experience.
Step-by-Step Instructions: Crafting Your Pompom Hedgehog
Follow these detailed steps carefully, and you’ll have your charming pompom hedgehog ready in no time. Remember, perfection isn’t the goal; enjoying the creative process is!
Step 1: Creating the White Snout Base
To begin, prepare the yarn for the hedgehog’s distinct white snout. Unroll a length of white yarn and set it aside for securing. Then, take the working end of your white yarn and carefully loop it around your index finger approximately 80 times. Maintain a consistent tension to ensure an even pompom. Once you’ve completed the loops, gently slide the entire bundle of yarn off your finger. Take the piece of yarn you set aside earlier, wrap it tightly around the middle of the looped bundle twice, and then secure it with a firm double knot. This forms the base for the hedgehog’s face.
Step 2: Crafting the Textured Brown Body
Next, we’ll create the fluffy body of your hedgehog. Take both the dark brown and light brown yarn ends together. Hold them side-by-side and begin looping them simultaneously around both your index and middle fingers. Continue this process about 80 times, just as you did with the white yarn. The combination of both brown shades will give your hedgehog a wonderfully natural and textured appearance. After looping, carefully remove the yarn bundle from your fingers. Use another piece of brown yarn to tightly loop it around the exact middle of the bundle twice, securing it with a strong double knot. This ensures the pompom holds its shape.
Step 3: Joining the Snout and Body Pompoms
Now it’s time to bring the two main parts of your hedgehog together. Carefully place the white looped yarn bundle (the snout base) directly on top of the brown looped yarn bundle (the body). Position them so that their tied centers align as closely as possible. Using the excess ends from the knots you’ve already made on both bundles, tie them together firmly. This creates a secure connection between the head and body. Trim any overly long excess yarn strands close to the knot, ensuring they don’t interfere with the shaping in the next step.
Step 4: Shaping Your Hedgehog’s Features
This is where your hedgehog truly begins to take shape! First, take your sharp scissors and carefully cut through all the loops of the white yarn bundle in the middle. Once all loops are cut, begin trimming and shaping the white yarn to form a distinct pyramid-like or conical shape. This will be the sharp, pointy snout of your hedgehog. Next, move to the brown yarn bundle. Cut through all the loops in the middle as well. Then, meticulously trim and sculpt the brown yarn to create a rounded, dome-like body for your hedgehog. Aim for a dense, even fluffiness across the body. Don’t be afraid to trim a little at a time to achieve the desired silhouette, making sure it blends smoothly into the white snout.
Step 5: Crafting the Tiny Hedgehog Toes
To add a charming detail, we’ll create tiny feet for your hedgehog. Take a piece of brown yarn and fold it into three equal sections. At one end of this folded yarn, tie a small, tight knot. Now, take the longer end of the yarn and loop it several times around this initial knot, effectively building up a small, compact bundle of yarn. Once you’re satisfied with the size of the “toe,” secure it with another tight knot. Trim any excess yarn close to the knot. Repeat this process to create at least three or four identical toes. These little additions will give your hedgehog a delightful finished look.
Step 6: Final Assembly and Embellishments
With all your components ready, it’s time to bring your hedgehog to life! Using your hot glue gun, carefully attach the small yarn toes to the bottom front of your hedgehog’s body. Place them symmetrically for the best appearance. Next, glue the larger black bead onto the very tip of the white snout to form the nose. Then, glue the two smaller black beads onto the sides of the snout, above the nose, to create the eyes. Be sparing with the hot glue to avoid a messy finish. If you wish to make your hedgehog into a keychain or a hanging decoration, thread a sturdy piece of yarn or a thin ribbon through the center of the brown body using a large needle, then tie the ends to form a loop or handle. Fluff your hedgehog gently to ensure all the yarn strands are evenly distributed, and admire your finished creation!
Tips for a Perfect Pompom Hedgehog
- Consistent Looping: Try to maintain even tension when looping the yarn around your fingers. This ensures a dense and uniform pompom, which is easier to shape.
- Sharp Scissors are Key: Using very sharp scissors will make cutting through the yarn loops and shaping the pompoms much easier and give you cleaner edges. Dull scissors can lead to frayed, uneven results.
- Trim Gradually: When shaping the body and snout, always trim a little at a time. You can always take more off, but you can’t put it back on! Step back and assess your shape frequently.
- Secure Knots: Ensure all your knots are pulled very tight, especially the central knots that hold the pompom together and the one joining the head and body. This prevents your hedgehog from falling apart.
- Safety First with Hot Glue: If crafting with children, always supervise them when using a hot glue gun, or apply the glue yourself. Alternatively, use a strong fabric glue or craft adhesive, allowing ample drying time.
- Fluff It Up: After trimming and assembling, gently fluff the yarn with your fingers to make your hedgehog look as full and soft as possible.
Creative Variations to Try
Once you’ve mastered the basic pompom hedgehog, feel free to experiment with these creative variations:
- Different Colors: Don’t limit yourself to brown! Try grey, black, or even vibrant, whimsical colors for a fantasy hedgehog. Use speckled or variegated yarn for a unique texture.
- Sizes: Adjust the number of loops around your fingers to create larger or smaller hedgehogs. A giant pompom hedgehog could be a cuddly toy, while tiny ones make adorable charms.
- Facial Expressions: Instead of beads, you could embroider small eyes and a nose with black thread for a softer look, or use small pieces of felt.
- Add Accessories: Give your hedgehog a tiny felt hat, a little bow tie, or even a mini backpack for extra personality.
- Keychains and Magnets: Attach a keyring to the yarn handle for a charming keychain, or glue a strong magnet to the back to decorate your fridge or locker.
- Brooches: Affix a brooch pin to the back of a smaller hedgehog to wear as a cute accessory on your bag or jacket.
- Holiday Themes: Create a festive hedgehog for Christmas by using red and green yarn, or add a miniature Santa hat. For Halloween, try orange and black yarn with tiny witch hats!
Creating these cute pompom hedgehogs is a truly rewarding experience, offering both a fun crafting session and an adorable finished product. Whether you’re making them for yourself, as thoughtful gifts, or as charming decorative accents, these little hedgehogs are sure to bring a smile to anyone’s face. We hope this detailed guide, inspired by the wonderful Natalidoma DIY tutorial, empowers you to unleash your creativity. Don’t forget to watch the original video for a visual walkthrough and more inspiration. Happy crafting!