
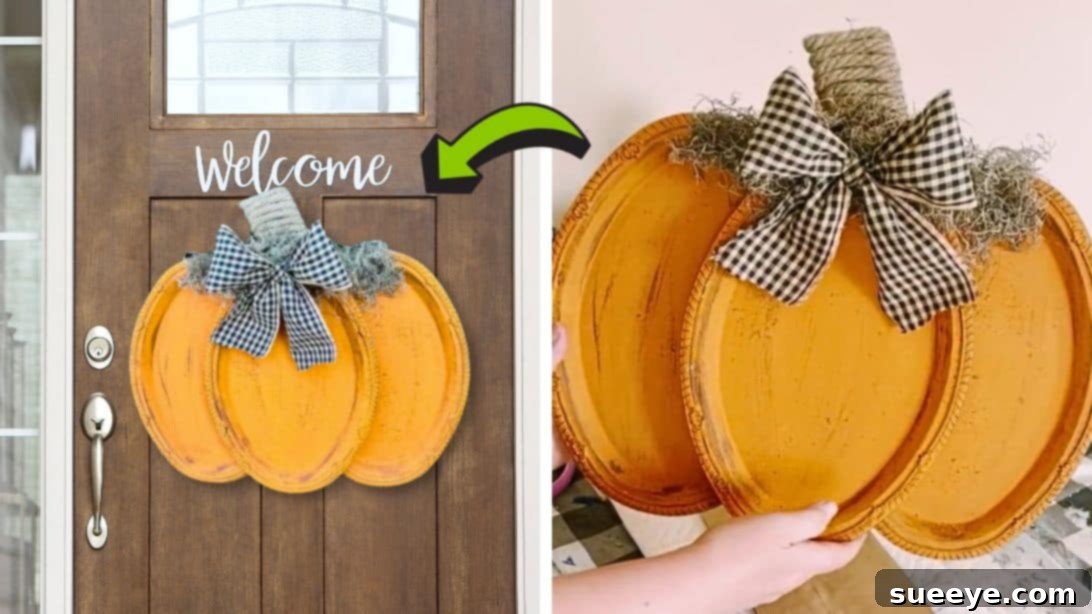
DIY Dollar Tree Pumpkin: Crafting High-End Fall Decor for Less
As the leaves begin their beautiful transformation and a crisp chill fills the air, the season of autumn truly captures our hearts. It’s a time for cozy sweaters, warm beverages, and, of course, transforming our homes into a warm and inviting fall haven. From vibrant autumn foliage to rustic pinecones and flickering candles, decorating for fall is an annual delight. While inspiration often floods social media platforms, one particular DIY project has emerged as a standout, captivating decorators with its clever design and budget-friendly appeal: an elegant pumpkin crafted from simple Dollar Tree platters.
This ingenious DIY pumpkin is more than just a decoration; it’s a testament to the power of creative crafting. It effortlessly elevates inexpensive dollar-store finds into a stunning decorative piece that looks considerably more expensive than it is. Imagine a gorgeous, unique pumpkin gracing your front door, welcoming guests with its charming allure, or serving as a sophisticated centerpiece on your mantelpiece. This project is not only perfect for adding a touch of rustic elegance to your autumnal displays but also offers the immense satisfaction of creating something beautiful with your own hands. It perfectly embodies the spirit of the season, blending affordability with a high-end aesthetic that will surely impress.
The Viral Inspiration Behind Your Next Fall Masterpiece
The original concept for this charming craft soared to popularity thanks to TikTok creator windycitycrafts1, who shared her brilliant step-by-step tutorial on the platform. Her video quickly became a viral sensation, inspiring countless crafters to recreate this beautiful pumpkin. The appeal lies in its straightforward construction combined with a remarkably polished outcome. It demonstrates that you don’t need a lavish budget or advanced crafting skills to achieve sophisticated home decor. This guide will walk you through the process of recreating this beloved Dollar Tree pumpkin, ensuring your home is perfectly adorned for the fall season without straining your wallet.
Essential Materials for Your Budget-Friendly Dollar Tree Pumpkin
The beauty of this project begins with its accessible material list. Most items can be conveniently found at your local Dollar Tree, dollar store, or a craft supply retailer. Here’s a detailed breakdown of what you’ll need, along with tips for selecting the best components:
- Three Metal Platters: Head to Dollar Tree and look for lightweight, round metal platters. These are commonly found in the kitchenware or party supplies sections. Their metal construction provides a durable base, ensuring your finished pumpkin is robust and long-lasting. Opt for platters that are relatively flat to simplify the assembly process.
- Waverly Chalk Paint (in a Pumpkin/Autumn Shade): Chalk paint is highly recommended for this project due to its excellent adhesion to metal without extensive priming, and it provides a beautiful, velvety matte finish. While the original tutorial suggests a specific “pumpkin” orange, feel free to explore other autumnal hues like terracotta, deep rust, muted sage green, or even a soft cream or white for a more farmhouse or neutral aesthetic.
- Waverly Antique Wax: This key component serves two vital purposes. Firstly, it acts as a protective sealant for your painted platters, enhancing their durability. Secondly, and equally important, it imparts a subtle, weathered, and aged patina, instantly giving your DIY pumpkin that coveted antique or vintage look often associated with more expensive decor items.
- Jumbo Craft Sticks: These larger craft sticks are crucial for creating a strong and stable bond between your platters. Their broader surface area provides superior adhesion compared to standard craft sticks.
- Dollar Tree Fix All Adhesive Glue (or strong multi-surface craft adhesive): A robust, all-purpose adhesive is absolutely essential for the structural integrity of your pumpkin. Look for glues designed for strong, multi-surface bonding, capable of securely joining metal and wood. Alternatives like E6000 or Gorilla Glue can also provide excellent results.
- Foam Board: A small piece of rigid foam board will be used to construct the pumpkin’s stem. Its lightweight nature and ease of cutting make it an ideal choice for this element.
- Nautical Rope: This material will be wrapped around the foam board to give the stem a natural, textured, and subtly rustic appearance. Choose a thickness that complements the scale of your platters. As alternatives, consider jute twine, thin sisal rope, or even strips of burlap.
- Spanish Moss: To add an organic, natural touch, Spanish moss is used to seamlessly blend the stem into the pumpkin structure, creating a more realistic and visually appealing finish.
- Black Gingham Fabric: This classic fabric is used to create a charming accent bow, adding a delightful touch of pattern and contrast. However, feel free to customize this! Burlap, plaid fabric, velvet ribbon, or a solid fabric in a complementary autumn color would also work beautifully.
Having all your materials organized and ready before you begin will ensure a smooth, efficient, and enjoyable crafting experience.
Step-by-Step Guide to Crafting Your DIY Dollar Tree Pumpkin
Let’s embark on the creative journey to transform these simple items into a beautiful piece of fall decor. Follow these detailed steps to achieve a stunning, professional-looking pumpkin.
1. Prepare and Paint Your Platters with Autumn Hues
Begin by thoroughly cleaning all three metal platters to remove any dust, grime, or manufacturing residues. This crucial step ensures optimal adhesion for your paint. Once the platters are completely dry, it’s time to infuse them with that vibrant autumn color. Using your chosen shade of Waverly chalk paint, apply a thin, even first coat to all surfaces of the platters. Chalk paint is known for its quick drying time, but it’s vital to allow this initial coat to dry completely before proceeding. This prevents streaking and provides a smooth base. Once dry, apply a second coat. This second application will intensify the color saturation, providing full, opaque coverage and giving your pumpkin a rich, professional finish that truly stands out.
2. Seal and Weather for an Antique Finish
After your painted platters have thoroughly dried – typically after several hours or ideally overnight, depending on your local humidity – it’s time to apply the antique wax. Using a clean, lint-free cloth or a dedicated wax brush, apply a thin, even layer of Waverly antique wax over the surface of each platter. Work in small sections, gently buffing the wax into the paint. The wax performs a dual function: it acts as a protective sealant, making your pumpkin more durable against wear and tear, and it simultaneously imparts a beautifully subtle, weathered, and aged patina. This careful distressing adds significant depth and character, giving your DIY pumpkin that sought-after vintage or farmhouse appeal that characterizes many higher-end decorative pieces.
3. Assemble the Pumpkin Structure with Care
Now, watch as your pumpkin truly begins to take form. Lay two of your painted and waxed platters face down on a clean, flat work surface. Position them side-by-side, leaving a small, uniform gap between them that mimics the natural segmentation of a pumpkin. Take your jumbo craft sticks and apply a generous amount of your strong adhesive glue along one side of a stick. Carefully place one end of the craft stick onto the back of the first platter and the other end onto the back of the second platter, effectively bridging the gap between them. Use several craft sticks, spaced evenly, to create a robust and secure bond. Allow this assembly to dry thoroughly according to your glue’s instructions – patience here ensures durability. Once the initial two platters are firmly joined, take your third platter. This platter will be glued to the front, precisely centered over the seam where the first two platters meet. This not only significantly reinforces the overall structure but also adds a crucial dimension, giving the pumpkin a more realistic, rounded, and segmented appearance from the front. Double-check its centering before applying firm pressure to set the glue in place.
4. Craft and Secure the Realistic Pumpkin Stem
The stem is a vital component that elevates the pumpkin’s realism and charm. Begin by cutting a piece of foam board into a rectangle or a slightly tapered shape that will serve as your pumpkin’s stem. Ensure its size is proportionate to your platters – typically a few inches tall and an inch or two wide. Once cut, take your nautical rope and begin to wrap it tightly and neatly around the foam board stem piece. Use small dabs of hot glue or your strong adhesive to secure the ends of the rope, ensuring the foam board is completely covered and the finish is clean and continuous. Once the rope-wrapped stem is complete, apply a generous amount of strong adhesive to one end and securely glue it to the top center of the back of the center platter. Position it so it extends upwards, mimicking the natural growth of a pumpkin stem. Hold it firmly in place until the adhesive sets and the stem is stable.
5. Add Naturalistic Details with Spanish Moss
To further enhance the organic appeal and seamlessly integrate the stem, Spanish moss is the perfect addition. Take small, manageable clumps of Spanish moss and carefully use dabs of glue to attach them around the base of the stem, where it meets the top edge of the platters. This clever detail helps to soften any hard lines, creating a more natural and cohesive transition. The moss also introduces a lovely rustic texture, mimicking the natural elements often found at the top of real pumpkins and adding to the overall authenticity of your DIY decor piece.
6. Final Touches: The Charming Accent Bow
The final decorative touch brings the entire project together, adding a pop of personality. Take your black gingham fabric (or whichever accent fabric you’ve chosen) and either rip or cut it into strips. Create a charming bow from these strips. The raw, ripped edges can add to a rustic, handmade aesthetic, but neatly cut and hemmed edges would also work beautifully for a more refined look. Once your bow is fashioned to your liking, apply a small amount of glue to its back and carefully attach it to the base of the stem, positioned attractively. This small detail provides a lovely contrast in color and texture, making your pumpkin truly unique and visually engaging. Consider other embellishments like small faux fall leaves, tiny berries, a rustic bell, or even a personalized initial charm for an extra special touch.
Expert Tips for a Perfect Budget-Friendly Fall Pumpkin
To ensure your Dollar Tree pumpkin turns out absolutely perfect and stands the test of time, consider these helpful tips:
- Creative Color Palette: Don’t feel confined to traditional orange. Experiment with white, cream, soft grey, metallic gold, or even a distressed blue chalk paint for a modern or coastal-inspired fall aesthetic.
- Enhanced Distressing: For an even more weathered or antique appearance, once your paint and wax layers are fully dry, lightly sand the edges and raised areas of the platters with fine-grit sandpaper. This will subtly expose some of the metal underneath, adding to the distressed charm.
- Alternate Embellishments: Beyond the gingham bow, explore other creative accents. Consider a bow made from burlap ribbon, a cluster of small faux fall leaves and berries, tiny acorns, cinnamon sticks, or even a personalized initial tag for a truly unique touch.
- Prioritize Adhesion: The strength of your glue is paramount for a durable pumpkin. Invest in a high-quality, strong adhesive and allow ample drying time between each gluing step, especially for the structural components. This ensures your pumpkin holds together beautifully for many seasons to come.
- Safety Measures: Always exercise caution when using sharp tools, like scissors or utility knives for cutting foam board. If you’re opting for a hot glue gun, be mindful of the hot surfaces and glue to prevent burns.
- Versatile Display Ideas: This pumpkin is incredibly versatile! Display it prominently on your covered porch or entryway, lean it artfully against your fireplace mantel, use it as a welcoming piece on an entryway table, or even as a unique centerpiece on your dining table.
Why This Dollar Tree DIY Is an Absolute Must-Try for Fall
Beyond its undeniable aesthetic appeal, this Dollar Tree pumpkin DIY offers a multitude of compelling advantages that make it a perfect project for the autumn season:
- Unbeatable Value: The core materials for this project cost mere dollars, making it an incredibly budget-friendly way to achieve high-impact decor without overspending on expensive store-bought items.
- High-End Aesthetic: The clever combination of chalk paint, antique wax, and thoughtful assembly results in a finished piece that genuinely looks like a luxury item purchased from a boutique, defying its humble origins.
- Fully Customizable: With endless possibilities for paint colors, fabric choices for the bow, and additional embellishments, you can easily personalize this pumpkin to perfectly match your existing home decor style and fall theme.
- Beginner-Friendly: The step-by-step instructions are straightforward and easy to follow, making this an accessible and rewarding project for crafters of all skill levels, even those completely new to DIY.
- Adds a Personal Touch: There’s immense satisfaction and pride in creating beautiful decor with your own hands. This personalized element makes your home feel even more unique, inviting, and truly reflective of your individual style.
This autumn, embrace your creative spirit and transform ordinary Dollar Tree platters into an extraordinary, elegant piece of fall home decor. This DIY pumpkin project is more than just a way to save money; it’s an opportunity to craft joy, add warmth and personality to your living space, and showcase your unique style. Get ready to impress your guests and elevate your home’s autumn ambiance with this stunning, budget-friendly pumpkin that beautifully captures the essence of the season!