
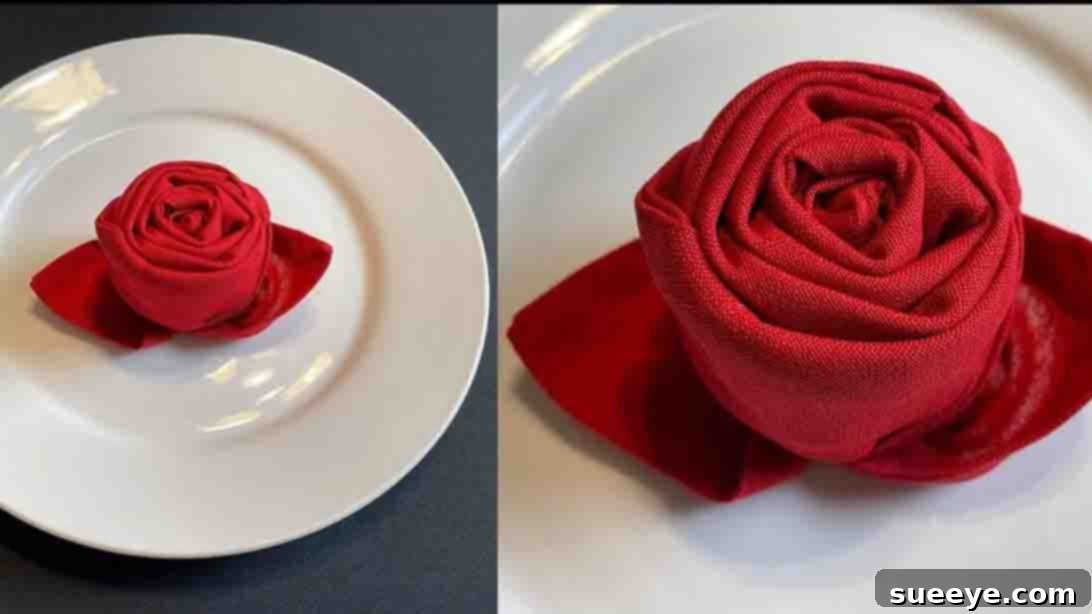
Master the Art of Napkin Folding: Create Exquisite Rose Napkins for Any Occasion
In the realm of memorable dining experiences, every detail matters. From the shimmering glassware to the gleaming cutlery, and from the inviting aroma of the food to the carefully chosen centerpiece, each element contributes to the overall ambiance. Yet, one often-overlooked detail holds the power to transform an ordinary table into an extraordinary tableau: the art of napkin folding. A beautifully folded napkin is more than just a functional item; it’s a silent prelude to the meal, a touch of elegance that signals thoughtfulness and attention to detail. Among the myriad of folding techniques, the rose napkin stands out as a true showstopper, evoking beauty, romance, and sophistication.
Imagine the delight of your guests as they discover a perfectly sculpted rose adorning each plate, crafted from a simple cloth napkin. This exquisite detail can elevate any meal, whether it’s a casual brunch, a formal dinner party, or an intimate romantic evening. If you’ve ever admired such a display and wondered how to achieve it yourself, you’re in luck! We’ve discovered a fantastic, easy-to-follow tutorial from MadeByFate on YouTube that demystifies the process, allowing anyone to master this impressive skill.
Why Embrace the Elegance of Napkin Folding?
Napkin folding is an understated art form that offers numerous benefits beyond mere aesthetics:
- Elevates the Dining Ambiance: A thoughtfully folded napkin instantly adds a touch of class and sophistication, making any meal feel more special and intentional.
- Impresses Your Guests: It demonstrates an extra level of care and hospitality, leaving a lasting impression on anyone seated at your table. It’s a subtle “wow” factor that guests often remember.
- Cost-Effective Table Decor: Instead of investing in elaborate centerpieces, a creative napkin fold can serve as a beautiful and affordable focal point, adding color and texture to your table setting.
- Versatility for Any Occasion: While the rose fold is inherently romantic, its beauty makes it suitable for a wide range of events—from holiday dinners and birthday celebrations to garden parties and everyday family meals where you want to add a special touch.
- Personal Expression: Napkin folding allows you to infuse your personal style and creativity into your entertaining, making each event uniquely yours.
The rose napkin fold, in particular, carries a timeless charm. Symbolizing love, beauty, and grace, a napkin rose brings a poetic touch to your table, setting a delightful mood even before the first dish is served. Thanks to MadeByFate, transforming a simple square of fabric into a delicate bloom is surprisingly straightforward. Their comprehensive guide breaks down the process into easy steps, ensuring that even beginners can achieve a perfect result.
RELATED: If you love creative table accessories, check out this Easy DIY Watermelon Clothespin Napkin Holder Tutorial for more inspiration!
Getting Started: What You’ll Need
One of the beauties of this DIY project is its simplicity in terms of materials. You don’t need a special kit or expensive tools; just a few basic items will suffice to create your stunning napkin roses. For the best results, consider the following:
- A Cloth Napkin: While paper napkins can be folded, a cloth napkin offers superior structure, drape, and reusability, making your rose look much more elegant and refined.
- Size: A standard square napkin, typically 18×18 inches (45×45 cm) or 20×20 inches (50×50 cm), works best. Larger napkins provide more material for a fuller rose, while smaller ones might result in a more delicate bloom.
- Material: Fabrics like cotton, linen, or a polyester blend are ideal. They hold creases well and have enough body to stand upright. Avoid overly flimsy or slippery fabrics like silk, as they might not maintain their shape effectively.
- Color: A red napkin is classic for a rose, but don’t be afraid to experiment! Pink, white, cream, or even multi-toned napkins can create beautiful and unique floral effects to match your specific theme or decor.
- A Flat, Clean Work Surface: Essential for precise folding and crisp creases.
- Optional: An Iron: For truly professional-looking results, lightly iron your napkin beforehand to remove any wrinkles and ensure sharp, clean folds. This step can significantly enhance the final appearance of your rose.
With your materials ready, let’s dive into the simple yet rewarding process of transforming a plain napkin into a captivating table centerpiece.
Step-by-Step Guide: How to Fold a Cloth Napkin Into a Rose
Follow these detailed instructions to craft your very own beautiful napkin rose. Remember, practice makes perfect, but this fold is designed to be accessible for everyone.
Step 1: Forming the Core and First Roll
Begin by laying your chosen cloth napkin completely flat on your clean work surface. Smooth out any wrinkles to ensure a crisp starting point.
- Diagonal Fold: Take one corner of the square napkin and fold it diagonally to meet the opposite corner, creating a perfect triangle. Ensure the edges align perfectly and press the crease firmly.
- Initial Roll (Loose): Starting from the longest edge (the base of your triangle), begin to roll the napkin upwards. Roll it relatively loosely for the first part, leaving approximately one-fourth of the napkin unrolled at the very top. This unrolled section will eventually form the petals of your rose, so ensure it remains flat and uncreased. The goal here is to create the central “stem” and a base for the petals.
- Flip and Tighten: Carefully flip the entire rolled napkin over to the other side. Now, from this new position, continue rolling the napkin from the same starting edge, but this time, roll it much more tightly. The tighter you roll it in this second pass, the more compact and stable the base of your rose will be. Roll all the way to the other end.
- Secure the End: Once you’ve rolled the entire napkin tightly, you’ll be left with a small flap at the end. Tuck this end securely inside the adjacent folds or into a small pocket formed by the rolling process. This action secures the base of your rose, preventing it from unraveling and providing stability.
Step 2: Shaping the Petals and Final Presentation
Now that the core and base of your rose are formed, it’s time to bring your bloom to life by shaping the petals.
- Open the Flaps: Locate the unrolled section you left at the top in Step 1. You should see two distinct flaps or layers. Gently open these up, pulling them outwards on each side. These will become the outer petals of your rose.
- Slightly Stretch and Form: As you open the flaps, gently stretch them outwards and slightly downwards. This action helps to create the soft, natural curve of rose petals. Don’t be afraid to subtly manipulate the fabric to achieve a realistic, organic shape. The goal is to give the impression of a blossoming flower.
- Flip Up and Stand: Carefully flip the entire napkin structure upright. Position the base firmly on your plate or table. Then, delicately adjust and fix the two main “petal” flaps, ensuring they stand independently and contribute to the overall rose shape. You might need to gently push the center upwards or pull the outer edges downwards to refine the shape and give it volume.
- Final Placement: Once you are satisfied with the shape of your rose, carefully place it on your guest’s plate, nestled within a glass, or as a charming accent next to your cutlery. Admire your handiwork!
Tips for a Perfect Napkin Rose Every Time
- Practice Makes Perfect: Don’t get discouraged if your first attempt isn’t flawless. A few tries will help you get a feel for the fabric and the folding technique.
- Crisp Napkins: As mentioned, ironing your napkins before folding can make a huge difference, resulting in sharper creases and a more defined rose.
- Even Tension: When rolling, try to maintain consistent tension. This helps create a symmetrical and stable base for your rose.
- Experiment with Petal Shaping: The final “stretch and fix” step is where you add your personal touch. Play around with how much you open and curve the flaps to create different looks, from a tightly budded rose to one in full bloom.
- Consider a “Leaf”: For an extra touch of realism, you can fold a small green napkin (or a corner of a larger green napkin) into a simple leaf shape and tuck it next to your rose.
Beyond the Fold: Creative Display Ideas
Once you’ve mastered the rose fold, consider how you can integrate it into your wider table design:
- On the Dinner Plate: This is the classic placement, immediately captivating guests as they sit down.
- In a Water Glass: For a more upright display, gently place the rose into an empty water glass, allowing the stem to support it.
- As a Centerpiece Accent: Arrange several napkin roses in a small bowl or alongside real flowers for a mixed floral display.
- With Napkin Rings: While the rose is a statement on its own, a simple, elegant napkin ring at its base can add a sophisticated touch and help secure its form.
Conclusion: Elevate Your Every Meal
Mastering the art of napkin folding, especially the beautiful rose design, is a delightful skill that promises to enhance your entertaining repertoire. It’s a testament to the idea that small details can have a profound impact, transforming a simple meal into an unforgettable dining experience. Whether you’re hosting a grand celebration or simply want to add a touch of everyday elegance, the napkin rose is a versatile and impressive choice.
So, gather your napkins, head over to MadeByFate’s tutorial, and start creating these charming blooms. Your guests will undoubtedly be impressed, and you’ll find immense satisfaction in bringing such beauty to your table. A huge thank you to MadeByFate for sharing this fantastic and accessible tutorial!