
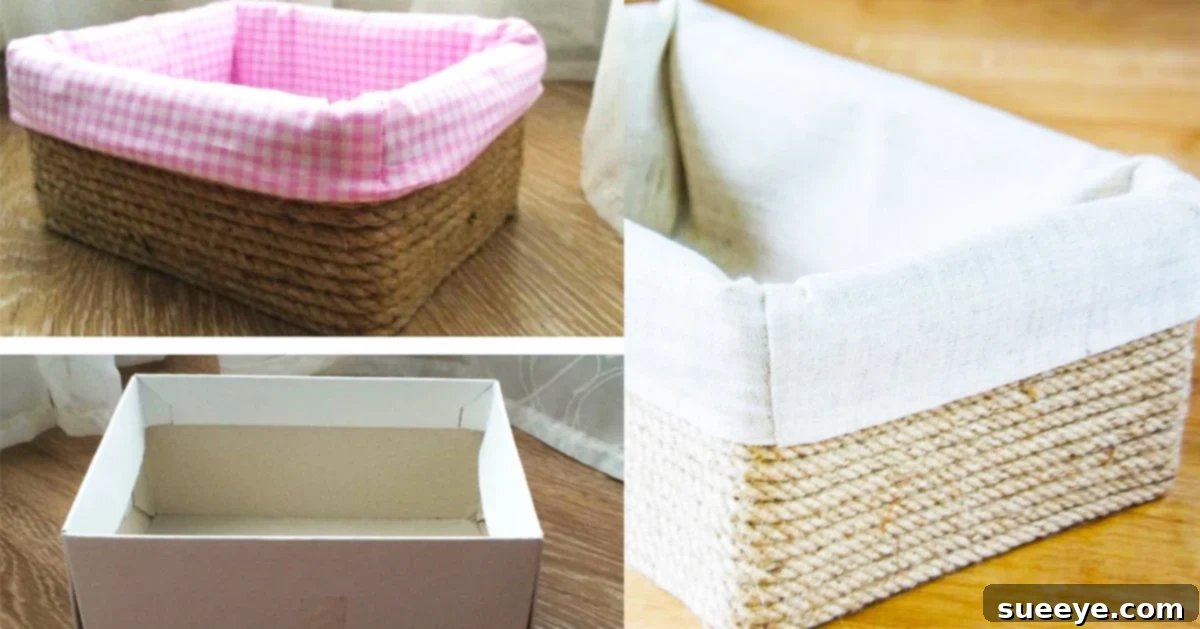
DIY Elegant Cardboard Storage Box: Crafting Beauty from Repurposed Materials
In a world increasingly focused on sustainability and personalized home decor, the art of upcycling has emerged as a beloved trend. There’s an undeniable charm in transforming discarded items into functional, beautiful pieces that enhance our living spaces. Today, we’re diving into a project that perfectly embodies this spirit: creating a chic, high-end storage box from humble cardboard, adorned with rope and fabric. This ingenious DIY project, brilliantly showcased by Alitoysa’s captivating YouTube tutorial, turns what many consider waste into a practical and aesthetically pleasing organizer.
Imagine a storage solution that not only helps declutter your home but also adds a touch of rustic elegance. This cardboard organizer box is incredibly versatile, fitting seamlessly into a closet for tidying away accessories, serving as a stylish holder for toilet paper in the bathroom, or even organizing craft supplies in your creative corner. While similar decorative boxes can fetch a hefty price in retail stores, the satisfaction and cost savings of crafting your own are truly unparalleled. Alitoysa’s tutorial stands out for its clarity and meticulous detail, ensuring that every step is visible and easy to follow, a crucial aspect for any successful DIY endeavor. The finished product defies expectations; it possesses such a sophisticated look that one would never guess its origins lie in a simple cardboard box. This project, with its minimalist rope style, has certainly captured our hearts, and we’re eager to share how you can bring this exquisite piece of functional art into your home.
Why Choose DIY Cardboard Storage? The Benefits Unveiled
Beyond the sheer joy of creation, opting to DIY your storage solutions, especially with repurposed materials like cardboard, offers a multitude of advantages:
- Cost-Effectiveness: Cardboard boxes are often free or very inexpensive. Coupled with affordable rope and fabric, this project is significantly cheaper than purchasing comparable designer storage bins.
- Environmental Friendliness: By upcycling cardboard, you’re diverting waste from landfills and contributing to a more sustainable lifestyle. It’s a wonderful way to give materials a second life.
- Customization: Unlike store-bought options, you have complete control over the design. Choose your preferred rope texture, fabric pattern, and box dimensions to perfectly match your home decor and storage needs.
- Sense of Accomplishment: There’s immense satisfaction in seeing a project through from start to finish, especially when the result is a beautiful and functional item crafted by your own hands.
- Unique Decor: Handmade items inherently carry a unique charm and character that mass-produced products often lack, adding a personal touch to your home.
Materials: Gathering Your Creative Toolkit
To embark on this delightful crafting journey, you’ll need a few readily available materials. Each component plays a vital role in transforming an ordinary cardboard box into a stylish organizer. Here’s a detailed list:
- Cardboard or Any Sturdy Box: The foundation of your project. Look for sturdy delivery boxes, moving boxes, or even appliance boxes. Ensure it’s clean and free from strong odors. The size will dictate the final dimensions of your storage box, so choose one that fits your intended use.
- Sisal Rope (6 mm / ¼’’ recommended) or Manila Rope: These natural fiber ropes are key to achieving the rustic, high-end aesthetic. Sisal offers a slightly rougher texture, while manila rope is known for its strength and golden hue. Both provide excellent grip for gluing and a beautiful finish. You’ll need a considerable length, so purchase enough to cover your entire box.
- Linen Fabric: This will be used to line the interior of your box, providing a clean, elegant finish and protecting the contents. Linen is chosen for its natural look and durability, but you can also use cotton canvas, burlap, or any other fabric that complements your style. Consider a neutral tone for versatility or a patterned fabric for a pop of color.
- Cotton Thread: Essential for any fabric work, it will be used to secure the fabric lining neatly, especially if you opt to sew certain edges for a more polished look.
- Hot Melt Glue Gun: Your primary adhesive tool. A good quality glue gun with a comfortable trigger will make the application process much smoother and more efficient.
- Hot Melt Glue Sticks: Stock up on these! You’ll need plenty to securely attach the rope to the cardboard and the fabric lining. Ensure you have sticks compatible with your glue gun.
- Pins: Useful for holding fabric in place while measuring, cutting, or temporarily securing before gluing or sewing.
- Scissors: Sharp scissors are essential for precise cutting of both fabric and rope. A utility knife or box cutter might also be useful for cutting the cardboard if modifications are needed.
- Optional Materials:
- Ruler or Measuring Tape: For accurate measurements of cardboard and fabric.
- Pencil or Marker: For marking cutting lines on cardboard and fabric.
- Utility Knife or Box Cutter: For clean cuts on thicker cardboard.
- Self-Healing Cutting Mat: Protects your work surface when using a utility knife.
- Fabric Glue: An alternative or supplement to hot glue for fabric application, especially for fine details.
- Clips or Clothes Pins: Can help hold rope ends while glue dries.
Directions: Crafting Your Organizer Step-by-Step
The beauty of Alitoysa’s tutorial lies in its simplicity and clarity. While we highly recommend watching her video on YouTube for a complete visual guide, here’s a breakdown of the process to help you conceptualize the steps:
Step 1: Preparing Your Cardboard Base
First, select your cardboard box. It’s crucial to ensure the box is structurally sound and the desired size. If you need to alter its height or shape, carefully use a utility knife and ruler to make clean, straight cuts. For added durability, especially if your cardboard is thin, you might consider reinforcing the corners or edges with extra cardboard pieces and strong tape or glue. A well-prepared base is the secret to a long-lasting organizer. Ensure all flaps are either neatly trimmed or securely glued down to form a smooth surface for rope application.
Step 2: The Art of Rope Application
This is where the magic truly begins! With your hot glue gun ready and heated, you’ll start adhering the sisal or manila rope around the exterior of your cardboard box. Begin at a discreet corner of the box, applying a line of hot glue directly onto the cardboard. Press the rope firmly into the glue, working in small sections. The key is to wrap the rope tightly and evenly, row by row, ensuring there are no gaps between the coils. Take your time to maintain consistent tension and alignment as you work your way up the sides of the box. For a truly professional finish, try to make the seam where the rope begins and ends as inconspicuous as possible. This meticulous wrapping process transforms the mundane cardboard into a textured, visually appealing surface.
Step 3: Crafting the Fabric Interior
Once the rope application is complete and the glue has fully dried, you’ll move on to lining the interior with fabric. Measure the inside dimensions of your box carefully, including the bottom and all four sides. Cut your linen fabric according to these measurements, allowing for a slight overlap or hem at the top edge for a clean finish. You can either cut individual pieces for each side and the bottom, or create a cross-shaped pattern that fits the entire interior. Use pins to temporarily hold the fabric in place, ensuring it fits snugly without wrinkles. Then, apply hot glue (or fabric glue for a smoother finish) to the cardboard interior walls and bottom, pressing the fabric firmly into place. Neatly fold or hem any raw edges for a polished look, especially along the top rim of the box. This fabric lining adds both functionality, protecting contents from the rope texture, and a touch of refined elegance.
Step 4: Finishing Touches and Customization
With the rope exterior and fabric interior complete, your cardboard organizer box is almost ready! Inspect your work for any loose ends, glue strings, or uneven areas, and make any necessary adjustments. You might consider adding small rope handles to the sides for easier portability, or even a decorative label holder for categorization. The beauty of DIY is that you can personalize it further. Paint the cardboard before applying rope for a different base color, or use patterned fabric for the lining. The possibilities are endless!
Tips for a Flawless Finish
- Work in Sections: When applying hot glue and rope, work in small sections to prevent the glue from drying before you can position the rope.
- Consistent Tension: Maintain consistent tension on the rope as you wrap it around the box for an even and neat appearance.
- Clean Glue Lines: Use a fine-tipped glue gun nozzle if possible, and wipe away any excess glue immediately before it dries.
- Sharp Tools: Use sharp scissors and a fresh blade for your utility knife to ensure clean cuts, especially for fabric and cardboard.
- Patience is Key: Don’t rush the process. Taking your time will result in a much higher quality and more professional-looking finished product.
- Safety First: Hot glue guns can cause burns. Always exercise caution and keep children away from the hot glue.
Creative Variations and Uses for Your New Organizer
Once you’ve mastered the basic technique, you can unleash your creativity and adapt this project for various needs and aesthetics:
- Different Sizes and Shapes: Create small boxes for desk organization, medium ones for bathroom toiletries, or larger bins for blankets or toys.
- Color Palettes: Experiment with dyed ropes or paint the cardboard base before wrapping. Use fabrics that complement your existing home decor, from vibrant patterns to sophisticated neutrals.
- Adding Handles: Integrate braided rope handles, leather straps, or metal pulls for added functionality and style.
- Compartments: For larger boxes, you can add cardboard dividers inside before lining with fabric to create separate compartments for better organization.
- Specific Uses:
- Closet Organization: Store scarves, belts, socks, or small clothing items.
- Bathroom Storage: Perfect for extra toilet paper rolls, towels, or beauty products.
- Office/Craft Room: Organize papers, pens, yarn, or fabric scraps.
- Kids’ Rooms: A stylish way to store small toys, books, or art supplies.
- Living Room: Use it as a decorative magazine holder or remote control caddy.
Embrace the Joy of Upcycling
Ultimately, this DIY cardboard organizer box is more than just a craft project; it’s a statement. It demonstrates how easily overlooked materials can be transformed into something truly special and functional. My friends and I are absolutely thrilled to make this a weekend project, knowing we’ll have beautiful, bespoke storage solutions that are both eco-friendly and budget-conscious. The satisfaction of looking at a seemingly high-end organizer, knowing it was crafted by your own hands from recycled materials, is incredibly rewarding. So, gather your materials, watch Alitoysa’s inspiring tutorial, and prepare to add a touch of handmade elegance to your home!