
Mastering Gold Leaf Tulips: A Beginner-Friendly Oil Painting Guide
Gold leaf offers a unique opportunity to infuse dimensionally-textured richness into a diverse range of DIY projects and artistic creations. Its radiant shimmer can transform ordinary pieces into extraordinary works of art, adding a touch of elegance and sophistication that is truly captivating. From accentuating the intricate details of chalk-painted furniture to lending an ethereal glow to modern abstract pieces, the versatility of gold leaf is boundless.
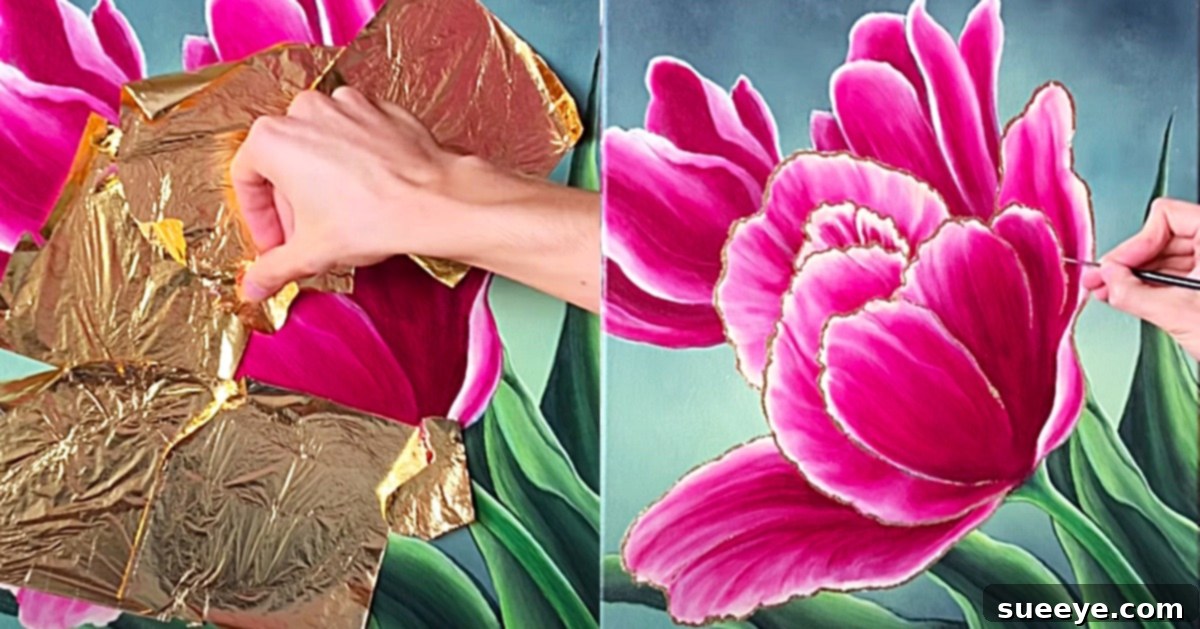
While gold leaf has long been a staple in various artistic disciplines, its application in contemporary art, particularly alongside mediums like alcohol ink, has opened up exciting new avenues for creative expression. Recently, I stumbled upon a remarkable tulip painting with gold leaf video tutorial by Color By Feliks on YouTube. What immediately caught my eye was the revolutionary ease with which Feliks applied the gold leaf. Unlike traditional gilding methods that often require specialized adhesives and meticulous handling, Feliks demonstrates a strikingly simple technique: literally sticking the delicate gold leaf directly onto wet paint. This straightforward approach eliminates much of the intimidation factor, making this sophisticated art form accessible to creators of all skill levels. After the paint dries, a light brush-off with a foam-head craft brush reveals an embedded metallic splendor that is nothing short of phenomenal.
This tutorial promises not only to teach you how to paint beautiful tulips but also to introduce you to a game-changing method for incorporating gold leaf into your artwork. Get ready to transform a simple canvas into a luminous masterpiece with this engaging and rewarding project.
Why Gold Leaf? The Enduring Appeal of Metallic Accents in Art
Gold leaf has been revered across cultures and centuries for its intrinsic beauty and symbolic significance. Used in ancient Egyptian tombs, medieval manuscripts, and Renaissance altarpieces, its luminous quality has always commanded attention. In modern DIY and fine art, gold leaf continues to be a powerful tool for artists looking to add a luxurious finish, highlight specific elements, or create striking contrasts. Its ability to catch and reflect light gives a dynamic quality to any piece, making it appear to shift and glow with varying perspectives.
Beyond its aesthetic appeal, working with gold leaf can be a deeply satisfying experience. The delicate nature of the material, combined with the transformative effect it has on a finished piece, adds an element of magic to the creative process. When applied correctly, gold leaf can elevate an artwork from beautiful to breathtaking, making it a coveted technique for both professional artists and enthusiastic hobbyists.
Materials You’ll Need to Create Your Golden Tulip Masterpiece
Before diving into the painting process, gathering the right materials is crucial for a smooth and enjoyable creative journey. Here’s a detailed list of what you’ll need to follow along with Feliks’ inspiring gold leaf tulip tutorial:
- Oil Paints (or Acrylics): While the tutorial primarily features oil paints, which offer rich colors and longer blending times, high-quality acrylics can also be used if you prefer a faster drying time and easier cleanup. Choose a palette that includes vibrant colors for your tulips (like the fuchsia in the example), greens for stems and leaves, and suitable background shades.
- Gold Leaf Sheets: These are the star of the show! Ensure you purchase genuine or imitation gold leaf sheets, readily available at most art and craft stores. These thin, delicate sheets will provide the shimmering metallic accents.
- Liquitex Canvas Primer (or Gesso): This crucial preparatory layer ensures that your canvas is properly sealed and provides an optimal surface for paint adhesion. It helps prevent the paint from soaking into the canvas fibers, allowing for smoother application and truer colors.
- A Canvas: Select a canvas of your desired size. Stretched canvases are generally preferred for paintings of this type, providing a stable and sturdy surface.
- Paintbrushes: A variety of brushes will be beneficial. You’ll need larger brushes for laying down background colors, medium-sized brushes for shaping the tulips, and smaller, finer brushes for detailing. A flat brush, round brush, and perhaps a small liner brush would be a good starting set.
- A Palette Knife: Useful for mixing paints on your palette and can also be employed to add texture directly to your painting if desired.
- A Paint Mixing Palette: A traditional wooden palette, a disposable paper palette, or even a ceramic tile can serve as an excellent surface for mixing your oil or acrylic paints.
- Foam Head Craft Paintbrush: This specific brush, with its soft, absorbent foam head, is essential for gently brushing off the excess gold leaf once the paint has dried, revealing the embedded design without damaging the artwork.
- Paper Towels or Rags: For wiping brushes and cleaning up spills.
- Turpentine or Odorless Mineral Spirits (for oil paints): For thinning oil paints and cleaning oil paint brushes.
- Water (for acrylic paints): For thinning acrylics and cleaning acrylic paint brushes.
Step-by-Step Directions to Paint Golden Tulips with Ease
This captivating tulip painting with gold leaf video tutorial by Color By Feliks on YouTube provides an exceptionally clear path to creating a stunning piece of art. Here, we’ll expand on the steps to ensure you have all the details needed for success.
Step 1: Preparing Your Canvas for a Flawless Start
The foundation of any great painting begins with proper canvas preparation. Apply an even coat of Liquitex canvas primer or gesso across your entire canvas. This creates a smooth, uniform surface for your paints, enhances paint adhesion, and ensures that your colors will appear vibrant and true. Allow the primer to dry completely, following the manufacturer’s instructions, which typically takes a few hours. A well-primed canvas is less absorbent, giving you more control over your brushstrokes and paint consistency.
Step 2: Laying the Foundation – Painting the Background
Once your primer is dry, it’s time to bring your canvas to life by painting the background for your beautiful tulips. This initial layer sets the mood and atmosphere for your entire piece. Consider using soft, muted tones that will make your vibrant tulips stand out. You might opt for gentle blues, subtle grays, or earthy greens to create depth and interest. Use a larger brush to apply your background colors, focusing on smooth transitions and a consistent texture. Don’t be afraid to experiment with blending different shades to achieve a dynamic yet complementary backdrop for your floral subjects. This is where you establish the overall light and shadow of your scene.
Step 3: Sketching Your Tulips (Optional but Recommended)
For those less confident in freehand painting, a light sketch of your tulip composition can be very helpful. Using a thin, contrasting color of paint (or even a pencil that won’t show through your oils), lightly outline the placement and general shapes of your tulips and their stems. This gives you a roadmap to follow in the subsequent painting steps, ensuring good composition and balanced placement without being too rigid.
Step 4: Bringing Tulips to Life – Layering Colors and Form
This is where your tulips begin to take shape! Starting with a base color for your petals (such as the bright fuchsia shown in the example), begin to build up the form of each tulip. Use your brushes to create the distinctive cup-like shape of the tulip, paying attention to the way the petals overlap and curve. Gradually add darker shades for shadows within the petals to create depth and lighter shades or highlights on the edges where light would strike. Don’t forget to paint the vibrant green stems and leaves, giving them a sense of movement and natural grace. Remember, oil paints allow for longer blending times, so take advantage of this to create smooth transitions between colors and soft edges. Acrylics will require quicker blending. Focus on building up layers, allowing each layer to define the form and texture of your flowers.
Step 5: The Magic Unfolds – Applying the Gold Leaf
Here comes the truly exciting part: the gold leaf application! This is where Feliks’ unique technique shines. With your tulip painting still wet, or at least tacky enough for the gold leaf to adhere, carefully take a sheet of gold leaf. Gently press it onto the areas of the painting where you want the metallic accents to appear. The key is to apply it directly to the *wet* paint. The moisture and tackiness of the paint will act as the adhesive, pulling the gold leaf onto the canvas. Don’t worry about perfect placement at this stage; the beauty of this method lies in its organic and somewhat spontaneous nature. You can apply larger pieces or tear off smaller fragments to create more intricate details. Allow the painting to dry completely with the gold leaf attached. This is crucial for the gold leaf to bond properly with the paint. Depending on the thickness of your oil paint layers, this can take several days to a week or more.
Step 6: Revealing the Radiance – Brushing Off Excess Gold Leaf
Once your painting is thoroughly dry and cured – patience is key here, especially with oil paints – it’s time for the grand reveal. Take your foam head craft brush and gently, very gently, begin to brush off the excess gold leaf from the canvas. The gold leaf that adhered to the wet paint will remain, creating stunning metallic accents that are seamlessly integrated into your artwork. The loose gold leaf will simply flake away, leaving behind a perfectly gilded finish. The result is consistently amazing: shimmering, dimensional highlights that give your tulip painting an air of luxury and sophistication.
Step 7: Final Touches and Protection (Optional)
After all the excess gold leaf has been brushed away, take a moment to admire your finished piece. If you used oil paints, consider applying a varnish once the painting is fully cured (which can take several months) to protect it from dust, UV light, and environmental damage. A varnish will also enhance the vibrancy of your colors and the luster of your gold leaf. For acrylic paintings, a clear acrylic sealant or varnish can be applied after the paint is dry to the touch.
Tips for Success and Creative Variations
- Patience with Drying: Especially for oil paints, proper drying time is paramount. Rushing the gold leaf removal can ruin your work.
- Experiment with Gold Leaf Placement: Try applying gold leaf not just on the petals, but also subtly on leaves, or even as shimmering streaks in the background for an abstract effect.
- Color Choices: While fuchsia tulips are vibrant, experiment with different tulip colors – classic reds, sunny yellows, or elegant whites – to see how the gold leaf interacts with various palettes.
- Other Subjects: Once you master this technique, apply it to other subjects! Imagine golden leaves on a landscape, shimmering details on a portrait, or metallic geometric patterns in abstract art.
- Lighting: When working with gold leaf, observe how natural and artificial light affects its appearance. This can inspire strategic placement to maximize its reflective qualities.
Embrace the Sophistication of Gold Leaf Art
This painting project is truly an amazing journey into sophisticated art that is surprisingly accessible. The method pioneered by Color By Feliks democratizes the use of gold leaf, making it possible for anyone to add that extraordinary touch of metallic glamour to their creations. The combination of vibrant tulip colors with the shimmering elegance of gold leaf creates a visually stunning piece that will undoubtedly become a focal point in any room. I encourage you to set aside some time, gather your materials, and immerse yourself in the meditative and rewarding process of bringing these golden tulips to life. The satisfaction of creating such a beautiful and unique piece with your own hands is an unparalleled joy.
So, why wait? Unlock your artistic potential and discover the magic of gold leaf. You’ll be amazed at the professional-looking results you can achieve right in your own home studio!