
Welcome to the delightful world of DIY home decor, where creativity blossoms and personal touches transform your living space! Few decorative items capture the essence of charm and versatility quite like a beautifully crafted wreath. Flower-themed wreaths, in particular, hold a special place in the hearts of crafters and home decorators alike. They possess a timeless appeal, effortlessly adapting to any season, celebration, or interior style. What makes them even more appealing is their accessibility; you don’t need to be a seasoned artisan to create a stunning floral display for your front door or an accent wall. The beauty of wreath assembly lies in its inherent flexibility – there’s truly no right or wrong way to arrange your blossoms and embellishments. Whether you prefer a perfectly symmetrical design or a more organic, free-flowing style, the end result is almost always incredibly beautiful and uniquely yours. Embrace the joy of crafting and let your imagination guide you as you bring a touch of nature’s elegance into your home.
RELATED DIY PROJECT: If you’re a fan of charming sunflower crafts, you might also enjoy learning How to Make a DIY Sunflower Bandana Wreath. It’s another fantastic way to add a bright and cheerful touch to your seasonal decor!
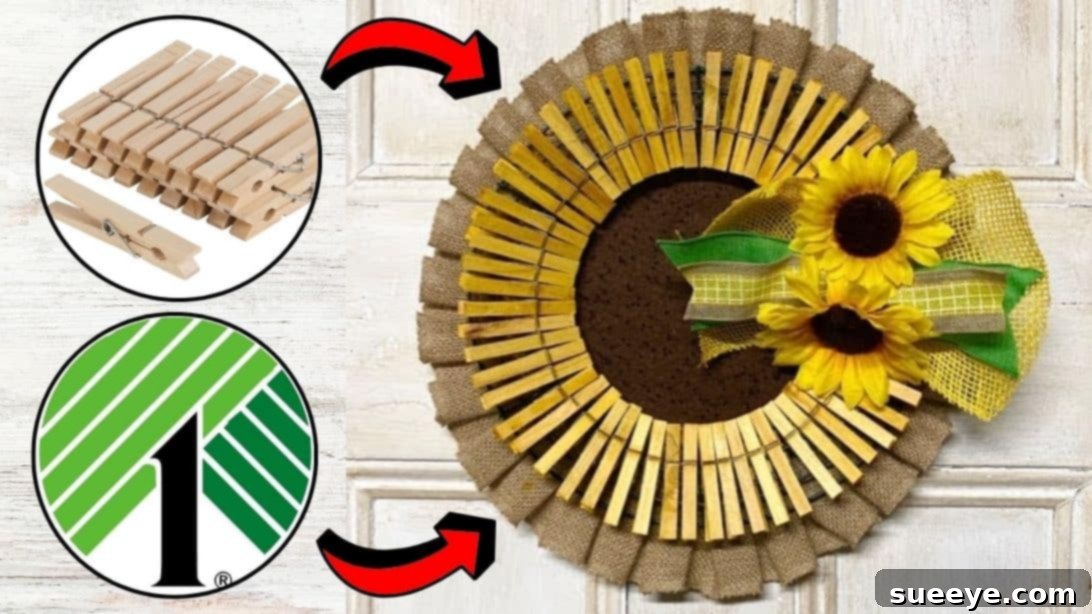
For those seeking an exceptionally cheerful and budget-friendly decor piece, this DIY Clothespin Sunflower Wreath is an absolute must-try. Inspired by the brilliant creators at Chalk It Up Fancy on YouTube, this project is the quintessential embellishment for ushering in the vibrant energy of Spring or celebrating the sunny warmth of Summer. One of its most appealing aspects is that it’s primarily crafted from materials readily available at your local dollar store, making it a fantastic “Dollar Tree craft” opportunity. Furthermore, if you happen to have a collection of old wooden clothespins lying around – perhaps tucked away in a laundry room drawer – this is the perfect chance to upcycle them into something truly spectacular. Get ready to transform simple items into a captivating piece of seasonal art!
Gather Your Supplies: Essential Materials for Your DIY Clothespin Sunflower Wreath
Embarking on any DIY project begins with gathering the right tools and materials. For this charming clothespin sunflower wreath, you’ll find that most items are easily accessible and budget-friendly, often found at craft stores, discount retailers like Dollar Tree, or even around your home. Here’s a detailed list of what you’ll need, along with some tips for selection:
- 12-inch Wire Wreath Frame: This will serve as the sturdy foundation for your wreath. A 12-inch frame is ideal for a standard door or wall hanging, providing enough space for your clothespin petals without being overly large. Ensure it’s a multi-ring frame, as you’ll be clipping the clothespins to one of the inner wires.
- Brown Felt Fabric: You’ll need a piece large enough to cut a circular center for your sunflower. Brown felt is chosen to mimic the dark, seed-filled center of a real sunflower, providing a beautiful contrast to the yellow clothespin “petals.” Craft felt sheets are inexpensive and easy to cut.
- Pleated Burlap Placemat: This unique item forms the background and adds texture to your wreath’s core. The pleated texture offers an interesting dimension that flat fabric wouldn’t. Look for one that’s roughly the same size as your wreath frame or slightly larger, so you can trim it to fit. If a pleated placemat isn’t available, a plain burlap placemat or even a round piece of burlap fabric could work, though it may lack the specific texture.
- Permanent Marker (Black or Dark Brown): Used for adding small, decorative “seed” details to the felt center, enhancing the realistic sunflower appearance. A fine-tipped marker will give you more precision.
- Floral Wire: Essential for securely attaching various elements, particularly the central felt and burlap layers to the wire wreath frame, and for holding ribbons together. Opt for a medium-gauge wire that is strong enough to hold but flexible enough to manipulate. Green floral wire blends in well with natural elements.
- Sharp Scissors: You’ll need these for cutting felt, burlap, ribbons, and any other fabric components. A good pair of fabric scissors will make clean cuts and prevent fraying.
- Hot Glue Gun and Glue Sticks: The backbone of many craft projects, a hot glue gun will be indispensable for adhering the felt, burlap, flowers, and ribbons firmly in place. Ensure you have plenty of glue sticks on hand, as you’ll be doing a fair amount of gluing.
- Wooden Clothespins (approximately 50-70, depending on spacing): These are the star of the show, forming the distinctive “petals” of your sunflower. Standard wooden spring-style clothespins work best. If you have old ones, give them a good clean. The quantity needed will depend on the size of your wreath and how densely you space them.
- Yellow Fabric Dye (or craft paint): To transform your plain wooden clothespins into vibrant yellow petals. Fabric dye provides a beautiful, even, and long-lasting color. Alternatively, acrylic craft paint can also be used, but ensure good coverage and allow ample drying time.
- Yellow and Green Ribbons: These will be used to create a decorative bow or loops, adding a finishing touch and a pop of complementary color. Choose ribbons of varying widths and textures for visual interest. Burlap ribbon, satin, or grosgrain would all work beautifully.
- Artificial Sunflowers (or other suitable floral embellishments): To adorn your wreath. You can use one large central sunflower or several smaller ones. High-quality artificial flowers will give your wreath a professional and lasting finish. Consider adding some green leaves or smaller filler flowers for added depth.
Crafting Your Masterpiece: A Step-by-Step Guide to Your DIY Clothespin Sunflower Wreath
Now that you have all your materials assembled, let’s dive into the creative process of bringing your stunning clothespin sunflower wreath to life. Follow these detailed steps for a smooth and enjoyable crafting experience.
Step 1: Prepare Your Sunflower Petals and Center Base
The first crucial step involves preparing the core elements of your sunflower design: the dark felt center and the vibrant yellow clothespin petals. Begin by laying your brown felt fabric flat on a clean work surface. Carefully place your wire wreath frame on top of the felt. Using a marker, trace a circle on the felt that is slightly larger than the innermost ring of your wire wreath frame, but significantly smaller than the full diameter of the frame. This circle will become the dark center of your sunflower. Once traced, use your sharp scissors to meticulously cut out this felt circle. Aim for a neat, even edge. Set the felt circle aside for now.
Next, it’s time to infuse your clothespins with that characteristic sunflower yellow. Prepare your yellow fabric dye according to the manufacturer’s instructions in a container suitable for soaking. If you’re using craft paint, dilute it slightly with water if needed to achieve a smooth consistency, or paint them directly. Submerge your wooden clothespins into the dye bath, ensuring they are fully immersed. The duration of soaking will depend on the desired intensity of the yellow shade – a longer soak will result in a deeper, richer color. Periodically check the color until you achieve your preferred hue. Once the desired shade is reached, carefully remove the clothespins from the dye. Gently blot them with paper towels to remove excess dye and prevent dripping. Arrange them on a protected surface (like wax paper or old newspaper) and allow them to air dry completely. This might take several hours, or even overnight, depending on the humidity and dye type. Ensure they are bone dry before moving to the next step to prevent color transfer.
Step 2: Construct the Wreath Base and Attach the Clothespin Petals
With your felt circle cut and clothespins vibrantly yellow and dry, it’s time to assemble the main structure of your wreath. Begin by laying the pleated burlap placemat flat on your work surface. This will serve as a decorative backing and add an appealing rustic texture. Carefully center the brown felt circle you cut in Step 1 onto the middle of the burlap placemat. Using your hot glue gun, apply a generous amount of hot glue to the back of the felt circle and firmly adhere it to the center of the burlap. Press down gently but firmly to ensure a strong bond.
Now, position your 12-inch wire wreath frame directly on top of the newly glued felt and burlap layers. Take care to center the wire frame perfectly, ensuring that the felt circle sits neatly within the innermost ring of the wire frame. To secure these layers together, thread pieces of floral wire through the burlap and felt, wrapping them firmly around the wire wreath frame. Use several anchor points around the circle (e.g., at 12, 3, 6, and 9 o’clock positions) to ensure everything is held securely and centrally. Trim any excess floral wire, tucking the ends away neatly.
The exciting part begins now: attaching your yellow clothespin “petals”! Take your dried, dyed clothespins and begin clipping them onto the innermost wire ring of the wreath frame. Position each clothespin with the open end facing outwards, creating the illusion of petals radiating from the center. Work your way around the entire inner circle, clipping one clothespin after another. Pay attention to spacing – you’ll want them to be close enough to create a full, lush appearance, but not so crowded that they overlap awkwardly. Uniform spacing will create a more polished look. Continue until the entire inner ring is covered with your vibrant yellow clothespin petals, forming a beautiful halo around your burlap and felt center.
Step 3: Add Details, Ribbons, and Final Floral Embellishments
Your sunflower wreath is really taking shape! Now it’s time to add those finishing touches that truly make it shine. Take your permanent marker and, on the brown felt center, add a few random dots. These simple dots mimic the texture and appearance of sunflower seeds, adding an extra layer of realism and charm to your design. You can create a spiral pattern or just scatter them randomly for an organic look.
Next, let’s prepare the decorative ribbons. Take your yellow and green ribbons and create a multi-layered bow or several loops. You can layer a wider green ribbon with a narrower yellow ribbon on top for visual contrast. Once you have arranged your ribbons into a pleasing shape, secure them tightly in the middle with a small piece of floral wire. This will hold your bow or loops together firmly. Carefully consider where you want to place this ribbon embellishment on your wreath – typically, it looks best positioned at the bottom or slightly to one side, adding a lovely asymmetry. Use your hot glue gun to firmly adhere the stacked ribbon creation to the desired spot on the wire wreath frame or burlap base. Hold it in place for a few moments to ensure a strong bond.
Finally, it’s time to add the focal point: the artificial sunflowers. Whether you’re using one large sunflower or a cluster of smaller ones, decide on their optimal placement. Typically, one prominent sunflower placed slightly off-center on the felt core, or several smaller ones arranged gracefully, creates an impactful statement. Apply a generous amount of hot glue to the back of your artificial flowers and press them firmly onto the felt and burlap center of your wreath. Hold each flower in place until the glue sets. If your artificial flowers come with leaves, incorporate those for an even more natural and lush appearance. Once all your elements are securely in place and the glue has dried completely, your beautiful DIY Clothespin Sunflower Wreath is ready to be displayed! Find the perfect spot on your door, wall, or mantel, and enjoy the radiant charm it brings to your home.
Embrace Your Creativity with This Easy DIY Clothespin Sunflower Wreath
Creating this stunning DIY Clothespin Sunflower Wreath is not only a rewarding craft project but also an incredibly effective way to infuse your home with cheerful, seasonal charm. It perfectly captures the bright and hopeful spirit of spring and summer, making it an ideal decorative accent for your front door, entryway, or any room needing a burst of sunshine. The beauty of this project lies in its simplicity, affordability, and the unique texture offered by the repurposed wooden clothespins.
This tutorial, inspired by the creative vision of Chalk It Up Fancy via YouTube, demonstrates just how easy it is to transform everyday items, like dollar store finds and old clothespins, into a truly eye-catching piece of home decor. Whether you’re an experienced crafter or just starting your DIY journey, the clear, step-by-step instructions ensure a successful and enjoyable experience.
Don’t be afraid to personalize your wreath even further! Consider using different shades of yellow or even a touch of orange dye for a sunset effect on your clothespins. Experiment with various ribbon styles, or add small faux bees or ladybugs for extra whimsical details. The possibilities are endless when it comes to customizing your handmade wreath to perfectly match your personal aesthetic and home decor. So grab your supplies, unleash your inner artist, and get ready to enjoy the compliments on your vibrant, handcrafted sunflower masterpiece!
*All image credit belongs to Chalk It Up Fancy via YouTube. We highly recommend visiting her channel for more inspiring DIY tutorials and creative ideas. Follow and subscribe to her channel for more fantastic crafting adventures!