
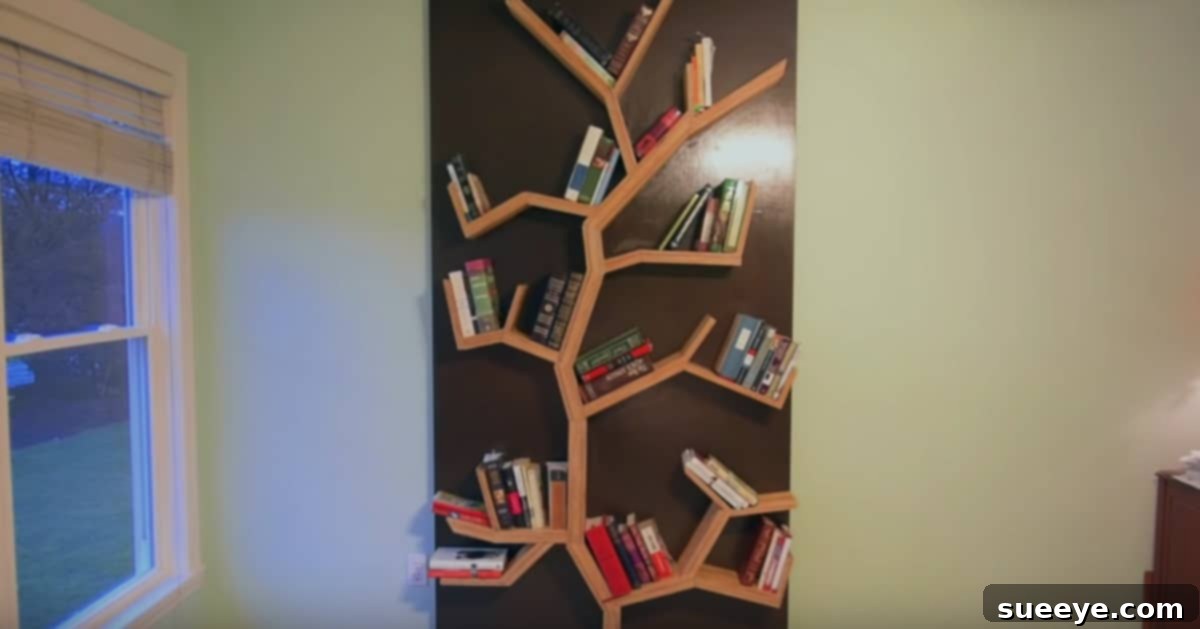
How To Make A Tree Bookshelf: Your Ultimate DIY Guide to Creative Wooden Shelving
Are you searching for a captivating way to display your cherished book collection and unique decor items? Tired of generic, mass-produced furniture that lacks personality? The world of home design, particularly vibrant platforms like Pinterest and Instagram, constantly sparks inspiration for innovative and aesthetically pleasing storage solutions. Lately, one particular concept has truly captured the imagination of DIY enthusiasts and interior design lovers alike: the enchanting DIY Tree Bookshelf.
Inspired by the organic beauty of nature and driven by a desire for a serene, natural ambiance in my own home, I embarked on a quest for the perfect shelving idea. My criteria were simple yet ambitious: it had to be visually stunning, highly functional, and most importantly, achievable for a confident DIYer. After exploring numerous options, I stumbled upon an incredible tutorial for a DIY Tree Bookshelf. It was an instant match, promising not just a storage unit but a piece of art that would truly transform my space. This project resonated deeply, offering a chance to infuse my home with a touch of woodland charm and create a unique focal point.
This guide will walk you through the entire process, from gathering your materials and tools to the final installation of your magnificent tree-inspired shelving unit. Whether you’re a seasoned woodworker or an adventurous beginner, this project offers immense satisfaction and a truly one-of-a-kind addition to your home. Let’s create a beautiful, functional, and conversation-starting bookshelf that brings the tranquility of nature indoors!
Why Choose a DIY Tree Bookshelf? Unveiling Its Unique Charm
Beyond its primary function of holding books, a DIY Tree Bookshelf offers a multitude of benefits that elevate it far above conventional shelving units. It’s more than just furniture; it’s a statement piece, an artistic installation, and a personal expression. Here’s why this creative wooden shelving unit stands out:
- Aesthetic Appeal & Natural Ambiance: The most striking advantage is its inherent beauty. Mimicking the organic lines of a tree, it introduces a natural, calming element into any room. It softens harsh architectural lines and can transform a sterile space into a cozy, inviting sanctuary. The brown tones of wood further enhance this natural connection, creating a soothing atmosphere reminiscent of a quiet forest.
- Unique Focal Point: Unlike standard rectangular shelves, a tree bookshelf immediately draws the eye. It acts as a stunning focal point, sparking curiosity and conversation among guests. It’s a design element that expresses creativity and a love for unique home decor.
- Optimized Vertical Storage: While artistic, these shelves are also incredibly practical. They utilize vertical wall space efficiently, making them ideal for smaller rooms or areas where floor space is limited. The varying “branch” lengths can accommodate books of different sizes, as well as decorative items, plants, and art.
- Personalization & Customization: Building your own tree bookshelf allows for unparalleled customization. You can adjust the size, number of branches, angles, and finish to perfectly match your home’s aesthetic and your specific needs. From rustic to modern, the design possibilities are endless. Choose your paint color, add decorative elements, or even integrate subtle lighting.
- Cost-Effective & Rewarding: While requiring an initial investment in materials and tools, a DIY tree bookshelf can often be more cost-effective than purchasing a custom-designed, high-end shelving unit of similar visual impact. Moreover, the satisfaction of creating something beautiful and functional with your own hands is an invaluable reward. It’s a project that builds skills and confidence alongside a stunning piece of furniture.
- Versatile Placement: A tree bookshelf is incredibly versatile and can enhance almost any room. It’s perfect for a living room, adding warmth and character. In a child’s bedroom or nursery, it becomes a whimsical, imaginative feature. It can also serve as a sophisticated display in a home office or study, or a charming accent in a entryway.
Embracing the DIY Tree Bookshelf project means choosing a functional piece of furniture that doubles as an artistic expression, bringing warmth, character, and a touch of the natural world into your daily living space.
Planning Your Masterpiece: From Inspiration to Execution
Before diving into cutting wood, thorough planning is paramount for a successful and enjoyable DIY Tree Bookshelf project. A well-thought-out plan ensures efficiency, minimizes errors, and results in a polished final product. Here’s what you need to consider:
Finding the Right Tutorial & Inspiration
My journey began with a YouTube tutorial, and I highly recommend seeking out visual guides. Videos often provide invaluable tips, demonstrate techniques, and clarify steps that might be ambiguous in text. While my initial video provided a solid foundation, I quickly realized the benefit of supplementing it with additional research, gathering design ideas from various sources like Pinterest and Instagram to truly refine my vision for this unique wooden shelving unit.
Assessing Your Skills and Dedication
Be honest about your woodworking experience. This project, while rewarding, does involve power tools and precision. If you’re a “confident (or crazy adventurous)” DIYer like me, you’ll likely embrace the challenge. If you’re newer to woodworking, consider starting with simpler projects or seeking assistance from an experienced friend. However, with patience and attention to detail, even beginners can achieve fantastic results. Safety should always be your top priority.
Workspace Preparation: Safety First!
A safe and organized workspace is non-negotiable. Ensure you have ample room to work, especially when handling large sheets of plywood and operating power tools. Good ventilation is crucial when painting, gluing, and varnishing. Always wear appropriate personal protective equipment (PPE) including safety glasses, hearing protection, and a dust mask. Keep your work area tidy to prevent tripping hazards and ensure clear access to all your tools.
Design Considerations: Scale, Style, and Finish
- Dimensions and Scale: How big should your tree bookshelf be? Measure your intended wall space carefully. Consider the height of your ceilings and the overall proportion relative to existing furniture. Sketch out different designs to visualize how it will look.
- Wood Choice: Plywood is an excellent and cost-effective choice for this project due to its stability and availability. Opt for a good quality plywood, such as birch or cabinet-grade plywood, for a smoother finish and fewer voids. The 3/4 inch thickness specified in the materials list ensures robustness for your creative wooden shelving.
- Tree Design: This is where your creativity shines! Will your tree have a central trunk with branches extending symmetrically, or will it be more abstract and asymmetrical? Plan the general shape and number of shelves (branches) you want. You can draw directly on the plywood or create paper templates first.
- Finish: Will you paint it for a bold, modern look or stain it to highlight the natural wood grain? The original project opted for brown paint, enhancing the natural tree aesthetic. Consider the overall color scheme of your room when making this decision. Polyurethane is essential for durability, regardless of your finish choice.
By investing time in meticulous planning, you lay a solid foundation for a successful and aesthetically pleasing DIY Tree Bookshelf, ready to become a cherished part of your home decor.
Gathering Your Resources: Essential Materials and Tools for Your Tree Bookshelf
A successful woodworking project starts with having the right materials and tools readily available. This comprehensive list ensures you’re prepared for every step of crafting your unique wooden shelving unit. Don’t skimp on quality, as it directly impacts the durability and finish of your DIY tree bookshelf.
Materials List: Building the Foundation
- 3 Sheets of 3/4 inch thick 4 foot by 8-foot Plywood: This is the backbone of your project. The 3/4 inch thickness provides ample strength and stability for your shelves and backing. Opt for good quality plywood, such as Baltic birch or cabinet-grade, for cleaner cuts and a smoother finish. Cheaper plywood can have voids and irregularities that make finishing difficult.
- 1 Box of 2″ Deckmate Screws: These screws are designed for outdoor use, meaning they are strong, resistant to corrosion, and hold well in wood. Their 2-inch length is ideal for securing the 3/4-inch plywood strips together, ensuring a robust connection that won’t easily pull apart.
- 1 Bottle of Wood Glue (e.g., Titebond): Wood glue is crucial for creating strong, lasting bonds between plywood layers. Titebond is a widely respected brand known for its excellent adhesion and quick drying time. When combined with screws, glue creates a bond stronger than wood itself, vital for the structural integrity of your unique bookshelf.
- 1 Can of Paint Primer: Plywood, especially lower grades, can be quite porous. Primer creates an even, sealed surface, allowing your paint to adhere better, providing superior coverage, and giving your final coat a professional, smooth finish. It also helps block any tannins from bleeding through the paint.
- 1 Can of Brown Paint: The choice of brown paint enhances the natural tree aesthetic, but you can customize this to any color that suits your home decor. A good quality interior latex or acrylic paint will offer durability and a pleasing finish. Consider whether you want a matte, satin, or semi-gloss sheen.
- 1 Pint of Polyurethane: This clear protective topcoat is indispensable. Polyurethane shields your bookshelf from moisture, scratches, and everyday wear and tear, significantly extending its lifespan. It comes in various finishes (matte, satin, gloss) to match your desired aesthetic and offers a durable, easy-to-clean surface for your creative storage solution.
- Optional: Wood Filler and Sandpaper (various grits): Wood filler is excellent for patching any small voids in the plywood or covering countersunk screw heads for a perfectly smooth finish. Sandpaper (80-grit, 120-grit, 220-grit) is essential for smoothing rough edges and preparing surfaces for paint and varnish.
Tools List: Precision and Power for Your Project
- Table Saw: Absolutely essential for ripping your large plywood sheets into precise, long strips. A table saw ensures consistent widths and straight cuts, which are critical for the structural integrity of your tree trunk and branches. Safety precautions must be strictly followed when operating.
- Miter Saw: Ideal for cross-cutting your plywood strips to length and making accurate angled cuts for your branches and shelves. The miter saw allows for quick and repeatable cuts, ensuring all your “branches” are consistent where needed.
- Drill: A versatile tool for both pre-drilling holes and driving screws. A cordless drill offers greater mobility, while a corded drill provides consistent power for continuous work. Ensure you have a good set of drill bits.
- Sander (Orbital or Belt Sander): Critical for smoothing all cut edges and surfaces before painting or varnishing. An orbital sander is excellent for general smoothing, while a belt sander can tackle more aggressive material removal. Smooth surfaces are key to a professional-looking finish and proper paint adhesion.
- Clamps (Bar Clamps, Spring Clamps): Indispensable for holding glued pieces together while the adhesive cures. Clamps apply consistent pressure, ensuring strong, even bonds between plywood layers. You’ll need several, especially long bar clamps for the 96-inch strips.
- Paint Brush or Roller: For applying primer and paint. A good quality brush will give you smooth, streak-free results, especially for edges and intricate areas. A small roller can be efficient for larger flat surfaces.
- Disposable Brushes: Handy for applying wood glue cleanly and for smaller touch-up paint jobs or applying polyurethane in tight spots.
- Pre-drill Bit: Using a drill bit slightly smaller than your screw’s core diameter before driving screws prevents the wood from splitting, especially near edges. This is a crucial step for a clean, professional finish and strong joints.
- Countersink Bit: This bit creates a conical hole that allows the head of your screw to sit flush with or slightly below the surface of the wood. This provides a clean, finished look and makes it easier to patch over screw heads for a seamless appearance.
- Measuring Tape, Carpenter’s Square, Pencil, Level: Essential for accurate measurements, marking cut lines, ensuring square angles, and mounting your finished bookshelf perfectly straight on the wall.
With these materials and tools meticulously gathered, you’re well-equipped to tackle the construction of your DIY Tree Bookshelf with confidence and precision.
Step-by-Step Construction Guide: Building Your DIY Tree Bookshelf
Now that your materials and tools are ready, it’s time to bring your vision to life. This detailed, step-by-step guide will walk you through the entire construction process, ensuring you build a sturdy, beautiful, and SEO-friendly tree bookshelf that will be the envy of your friends and family.
1. Prepare Your Plywood: Precision Cuts for the Structure
This initial stage requires accuracy with your table saw. Always prioritize safety, wearing eye and ear protection.
- Cut the Main Strips: Begin by carefully cutting two full sheets of your 3/4-inch plywood into precise 7-inch wide strips. You will need these strips to be 96 inches long. A table saw is indispensable here for achieving perfectly straight and consistent cuts. Take your time to measure accurately before each cut. These strips will form the core vertical elements of your tree’s trunk and the primary support for your shelves.
- Assemble the Thick Strips (Trunk Components):
- For the Main Spine: Take three of your 7″ X 96″ strips and glue them together. Apply a generous, even layer of wood glue to the faces of two strips, then carefully stack them, followed by applying glue to the third strip and stacking it on top. Ensure edges are perfectly aligned. This will form a robust strip measuring approximately 2.25″ X 7″ X 96″ (assuming 0.75″ plywood thickness). This thicker piece will serve as the strong central spine or main trunk of your tree. Clamp these three strips together firmly along their entire length and allow the glue to dry completely according to the manufacturer’s instructions (typically 2-4 hours, but ideally overnight).
- For Supporting Branches/Thicker Shelves: Next, take two additional 7″ X 96″ strips and glue them together to form a piece approximately 1.5″ X 7″ X 96″. Repeat this process once more, so you end up with two such 1.5″ X 7″ X 96″ strips. These pieces will be used for the thicker, more substantial branches or shelves that extend from your main trunk, providing critical support and visual weight to your unique bookshelf design. Again, clamp tightly and allow adequate drying time.
2. Design and Cut Your Branches: Shaping the Tree
This is where your tree truly takes shape! This step involves thoughtful design and precise angled cuts.
- Layout Your Design: Once your glued strips are dry, lay out your design. Use your thick 2.25″ X 7″ X 96″ strip as the central “trunk.” Sketch out the approximate positions, lengths, and angles of your branches (shelves) directly onto the plywood. Consider the visual balance and the practical space needed for books. You might want to create paper templates first to experiment with different tree shapes.
- Cut the Branches and Shelves: Using your miter saw, carefully cut the various “branch” pieces and shelves from the remaining 7-inch wide plywood strips (both the single thickness and the 1.5-inch thick ones you created). Ensure that the ends that will attach to the main trunk are cut at the correct angles to create a natural, branching effect. Precision is key here for a seamless assembly. Remember to account for the thickness of the backing board if you’re attaching directly to it.
3. Sanding and Priming: Preparing for a Flawless Finish
A smooth surface is critical for a professional-looking paint job.
- Thorough Sanding: Use your sander (orbital or belt) to smooth all cut edges and surfaces of every plywood piece. Start with a coarser grit (e.g., 80 or 120) to remove any rough spots or imperfections, then progress to a finer grit (e.g., 220) for a silky smooth finish. Pay special attention to the edges that will be visible. Wipe away all dust with a tack cloth or damp rag.
- Applying Primer: Once everything is smooth and clean, apply a uniform coat of paint primer to all surfaces. Primer helps seal the porous plywood, ensures better paint adhesion, and results in a more vibrant, even color. Allow the primer to dry completely according to the product instructions. Lightly sand with a very fine grit (e.g., 320) between coats if multiple primer coats are recommended for an exceptionally smooth base.
4. Painting the Backing and Branches: Infusing Color
This step brings the first layer of aesthetic appeal to your home decor project.
- Paint the Backing Plywood: If your design includes a separate backing board (which is highly recommended for stability and ease of mounting), paint this piece brown (or your chosen color) first. This ensures an even coat on the background of your tree.
- Paint Individual Branch Pieces: It’s significantly easier to paint all the individual “branch” and “trunk” components before assembly. Apply thin, even coats of your chosen brown paint. Allow each coat to dry thoroughly before applying the next. You’ll likely need two to three coats for full coverage and a rich, deep color. Lightly sand with very fine sandpaper between coats for an exceptionally smooth finish if desired.
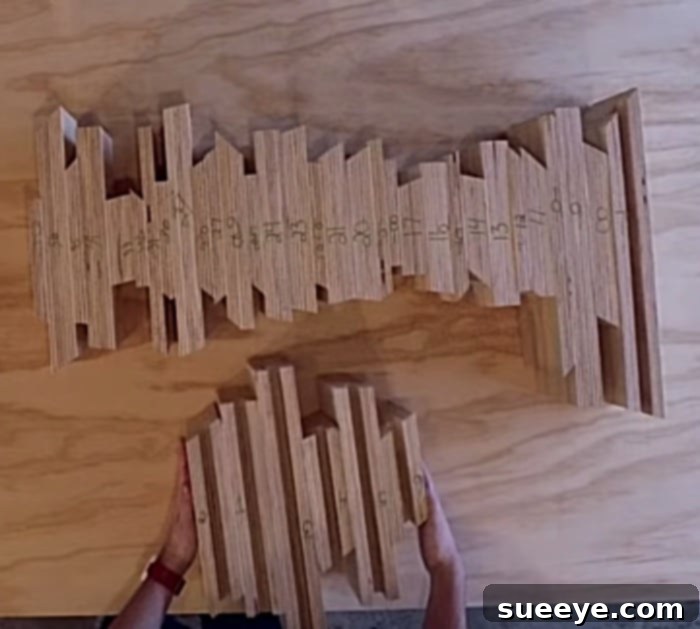
After painting the backing plywood brown, the individual components are ready for assembly.
5. Assembly: Bringing Your Tree to Life
This is where all your carefully cut and painted pieces come together to form the structure of your tree bookshelf.
- Secure the Main Trunk: If you have a separate backing board, carefully align your main 2.25″ thick trunk piece onto it. Use both wood glue and 2-inch deckmate screws to secure it firmly. Pre-drill all holes to prevent splitting, and use a countersink bit so the screw heads sit flush with the surface.
- Attach the Branches (Shelves): Starting from the bottom and working your way up, begin attaching your “branch” pieces to the main trunk and, if applicable, to the backing board. For each joint, apply a generous amount of wood glue, position the branch accurately, and then secure it with deckmate screws. Ensure all shelves are level using a spirit level before fully tightening screws. Clamps will be invaluable here for holding pieces in place while the glue sets and you drive screws.
- Gradual Formation: As you progressively attach each branch, you’ll witness the Book Shelf Tree gradually taking shape. Take your time, double-check alignments, and ensure every connection is solid and secure.

With the main trunk secured, the branches begin to extend, forming the recognizable silhouette of the tree.

As more shelves are added, the functionality and unique aesthetic of the tree bookshelf become apparent.
6. Finishing Touches: Varnishing and Mounting for Durability and Display
The final steps involve protecting your hard work and securely installing it in its new home.
- Apply Polyurethane Varnish: Once all the glue has dried completely and the structure is fully assembled, it’s time to apply the protective polyurethane. Ensure your workspace is well-ventilated. Apply thin, even coats using a good quality brush or foam applicator. Avoid applying too thickly, which can lead to drips and uneven drying. Allow each coat to dry thoroughly according to product instructions (often 4-6 hours) and lightly sand with very fine grit sandpaper (e.g., 320-400) between coats to ensure maximum adhesion and a super smooth finish. Two to three coats are usually sufficient for excellent durability.
- Mounting Your Gorgeous Shelving Unit: This is arguably the most critical step for safety. Your tree bookshelf, especially when loaded with books, will be heavy.
- Locate Wall Studs: Use a stud finder to locate at least two, preferably three, vertical wall studs behind where you plan to mount the bookshelf. Marking these studs accurately is crucial.
- Use Heavy-Duty Fasteners: Secure the bookshelf directly into the wall studs using long, heavy-duty construction screws (e.g., 3-4 inch lag screws or structural wood screws). The specific type and number of fasteners will depend on the size and weight of your bookshelf and the local building codes.
- Ensure Level and Secure: Have a helper assist you in holding the bookshelf against the wall while you mark the drill points and ensure it is perfectly level. Drill pilot holes into the studs through the bookshelf’s backing board. Drive the screws firmly but do not overtighten, which can strip the wood.
- Safety Check: Once mounted, give the bookshelf a gentle but firm tug to ensure it is absolutely stable and secure on the wall. Your creative storage solution is now ready to be enjoyed!
With these steps completed, you’ve not only built a functional piece of furniture but also crafted a captivating piece of home decor that embodies both natural charm and your personal touch. Now, it’s time to admire your craftsmanship and fill your tree with your favorite treasures!
Customization and Decoration: Personalizing Your Tree Bookshelf
The true beauty of a DIY project lies in the ability to personalize it. Your tree bookshelf is a canvas waiting for your unique touch, allowing you to tailor it perfectly to your home’s aesthetic and your personal style. Here are some ideas for customization and decoration:
- Color Schemes Beyond Brown: While brown offers a classic, natural look, don’t be afraid to experiment!
- White or Gray: For a more modern, minimalist, or Scandinavian feel, white or light gray paint can create a stunning, airy tree silhouette.
- Bold Colors: If you’re looking for a vibrant statement piece, consider painting your tree bookshelf a bold accent color that complements your room’s palette, like a deep forest green, a calming navy, or even a soft pastel for a whimsical touch in a child’s room.
- Stain and Seal: Instead of paint, you could use a wood stain to highlight the natural grain of the plywood, followed by a clear polyurethane topcoat for a more rustic or sophisticated wood finish.
- Adding Integrated Lighting: Elevate the ambiance with subtle lighting.
- LED Strip Lights: Conceal LED strip lights along the underside of the shelves or behind the main trunk to create a warm glow that highlights your books and decor, especially in the evening.
- Small Spotlights: Install small, directional spotlights above key display areas to draw attention to specific items.
- Decorating the Shelves: This is where your tree truly comes alive.
- Books as Art: Arrange books by color, size, or genre to create visual interest. Utilize both horizontal and vertical stacking.
- Natural Elements: Lean into the tree theme by incorporating small potted plants (succulents, air plants), natural stones, branches, or dried flowers.
- Curated Collections: Display cherished photographs, small sculptures, travel souvenirs, or unique figurines that reflect your personality.
- Functional Baskets: Use decorative baskets or bins on some shelves for hidden storage of smaller items, maintaining a tidy appearance.
- Making it Child-Friendly: If your tree bookshelf is destined for a nursery or child’s room, ensure all corners are rounded and smoothed. Consider playful elements like small wooden birds or leaves attached to the “branches.” Paint it in whimsical colors to ignite imagination.
Remember, your DIY Tree Bookshelf is a reflection of you. Don’t be afraid to experiment with different styles and elements until you achieve a look that you absolutely adore, making it a truly integral part of your home decor.
Maintenance and Care for Your Wooden Shelving Unit
To ensure your beautiful DIY Tree Bookshelf remains a cherished and functional part of your home for years to come, proper maintenance and care are essential. With a little attention, its natural charm and structural integrity will endure.
- Regular Cleaning: Dust your bookshelf regularly with a soft, dry cloth or a duster. For deeper cleaning, a slightly damp cloth can be used, but always follow up immediately with a dry cloth to prevent moisture damage. Avoid abrasive cleaners or harsh chemicals, as these can damage the paint or polyurethane finish.
- Protect from Direct Sunlight and Moisture: Position your bookshelf away from direct, prolonged sunlight, which can cause wood and finishes to fade or warp over time. Similarly, avoid placing it in areas with high humidity or where it might be exposed to water or excessive moisture. Use coasters under any potted plants to prevent water rings.
- Periodic Stability Checks: Every few months, gently check the bookshelf for any wobbles or loose connections. Tighten any screws that may have loosened over time, particularly those securing the unit to the wall. This is crucial for safety, especially with a unit that will hold considerable weight.
- Touching Up Finishes: Over time, minor scratches or scuffs may occur. Keep a small amount of your original paint and polyurethane on hand for quick touch-ups. Lightly sand the damaged area, clean it, apply paint, and then seal with polyurethane for a seamless repair.
- Even Weight Distribution: Avoid overloading any single shelf. Distribute the weight of your books and decor items evenly across the shelves to prevent undue stress on the structure and maintain its stability.
By following these simple care instructions, your DIY Tree Bookshelf will continue to serve as a stunning and functional centerpiece in your home, preserving its unique aesthetic and structural integrity for a long time.
Conclusion: Embrace the Beauty of Your Handmade Tree Bookshelf
Embarking on the journey to create your own DIY Tree Bookshelf is more than just a woodworking project; it’s an incredibly rewarding experience that culminates in a unique, functional, and deeply personal piece of home decor. From the initial spark of inspiration found on social media to the final stroke of polyurethane, each step allows you to infuse your home with creativity and a touch of natural elegance.
You’ve now learned how to transform simple plywood sheets into a captivating wooden shelving unit that evokes the serene beauty of a tree. This guide has provided you with the detailed instructions, material insights, and tool knowledge necessary to build a sturdy and beautiful tree bookshelf, designed not just for storage but to become a true focal point in any room. The satisfaction of stepping back and admiring something you’ve crafted with your own hands is truly unparalleled.
Your new tree bookshelf will not only provide ample storage for your beloved books and cherished keepsakes but will also serve as a constant reminder of your dedication and craftsmanship. It’s a conversation starter, a piece of art, and a testament to the fact that with a little effort and a lot of passion, you can transform your living space into a haven of style and personality. So, go forth, gather your supplies, and embrace the joy of creating a truly one-of-a-kind DIY tree bookshelf that adds a calm and natural ambiance to your home. We’d love to see your creations!