
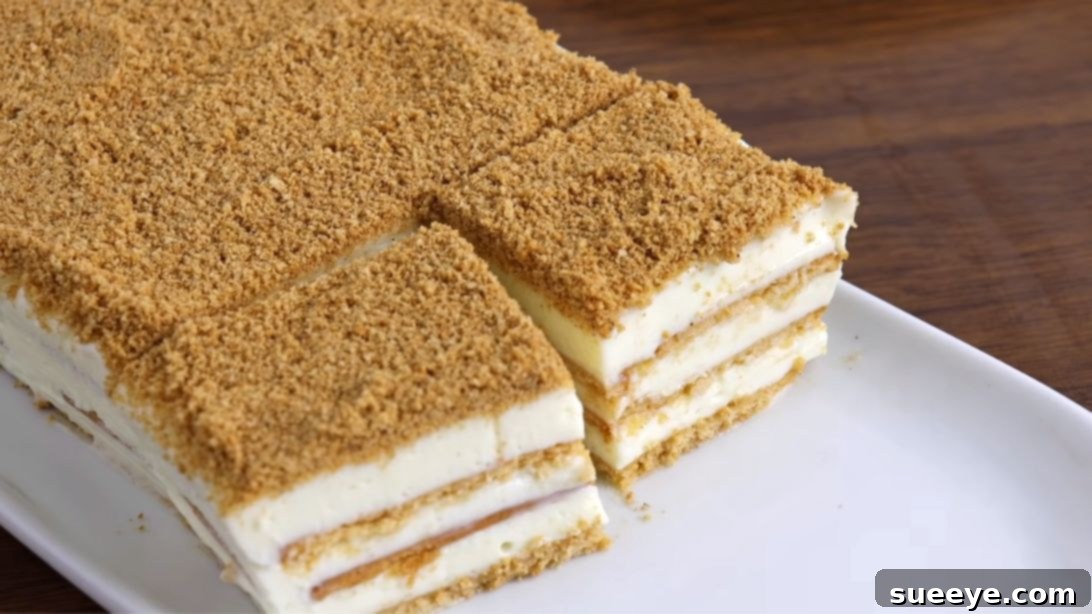
Indulge in Simplicity: The Easiest 3-Ingredient No-Bake Milk Cake Recipe
Craving a delightful dessert that requires minimal effort and no oven? Look no further! This incredible 3-ingredient no-bake milk cake recipe, inspired by Quick Simple & Delicious, is a game-changer for anyone seeking a quick, elegant, and utterly delicious treat. Perfect for unexpected guests, a last-minute potluck, or simply satisfying your sweet tooth, this luscious lemon-infused milk cake paired with crunchy cinnamon cookies comes together in under an hour of active prep time, followed by a few hours of chilling. It’s the ideal companion for your afternoon tea or coffee, offering a refreshing and creamy texture that melts in your mouth. Prepare to impress with this effortless yet sophisticated dessert!
Why You’ll Adore This No-Bake Milk Cake
There are countless reasons why this easy no-bake milk cake will become a staple in your dessert repertoire:
- Effortless Preparation: With just three primary ingredients and no baking required, this recipe is perfect for beginner bakers and seasoned dessert enthusiasts alike. Forget about complicated techniques or elaborate equipment; simplicity is key here.
- Speedy Assembly: You can whip up the core components of this dessert in less than an hour, freeing up your time for other activities while it chills to perfection in the refrigerator.
- Irresistible Flavor Profile: The magic happens when tangy lemon juice meets rich, sweet condensed milk, creating a thick, creamy, and wonderfully zesty “lemon cream.” Layered with aromatic cinnamon cookies, each bite offers a delightful contrast of textures and flavors – a balance of creamy, crunchy, sweet, and bright.
- Versatility for Any Occasion: Whether you need a quick dessert for a weeknight, a show-stopping treat for a dinner party, or a thoughtful gift, this milk cake fits the bill. It’s light enough for warmer weather yet comforting enough year-round.
- Customization Potential: While the core recipe is fantastic as is, it’s also a blank canvas for your creativity. Experiment with different cookie types, extracts, or toppings to make it uniquely yours.
Essential Ingredients for Your Simple Milk Cake
The beauty of this recipe lies in its minimalist ingredient list. High-quality components ensure the best flavor and texture for your condensed milk cake.
- 2 and 1/2 cups of Sweetened Condensed Milk: This is the star of our cake. Sweetened condensed milk is a thick, syrupy milk product that has been sweetened with sugar and reduced to remove most of its water content. It provides the essential sweetness and creamy body for our no-bake lemon cream, eliminating the need for any additional sugar. Ensure you use *sweetened* condensed milk, not evaporated milk, as they are not interchangeable in this recipe.
- 3/4 cup of Fresh Lemon Juice: The fresh acidity of lemon juice is crucial. When combined with sweetened condensed milk, the citric acid reacts with the milk proteins, causing it to thicken and create a luxurious, tangy cream. Freshly squeezed lemon juice is highly recommended for the best flavor; bottled lemon juice might work but often lacks the vibrant, natural zest. You’ll need about 3-4 medium-sized lemons to yield 3/4 cup of juice.
- 8.82 oz (approx. 250g) of Cinnamon Cookies: These cookies provide the delightful crunchy layers and a warm, spiced contrast to the bright lemon cream. Common choices include speculoos biscuits, cinnamon graham crackers, or other similar spiced shortbreads. You’ll need enough for the layers and a bit extra for crumbling on top as a garnish. If you can’t find cinnamon cookies, plain digestive biscuits or graham crackers can be used, and you can enhance them with an extra sprinkle of cinnamon powder in the topping.
- 1 to 2 teaspoons of Cinnamon (optional): This is reserved for the topping, to be blended with the crushed cookies. It intensifies the cinnamon flavor and adds an extra layer of warmth to the finished cake. Adjust the amount to your preference or omit if your cookies are already very strong in cinnamon flavor.
Equipment You’ll Need
Gathering your tools before you start will make the process even smoother:
- Large mixing bowl
- Hand mixer or stand mixer (essential for thickening the cream)
- Citrus juicer or reamer
- Fine-mesh strainer (to remove lemon pulp and seeds)
- Plastic wrap or cling film
- 11.8″ by 5.9″ (approx. 30cm x 15cm) loaf pan or mold
- Piping bag (optional, but makes layering much easier and neater)
- Glass (to hold the piping bag)
- Spoon or offset spatula (for spreading cream)
- Food processor or rolling pin (for crushing cookies)
- Serving plate
Step-by-Step Instructions for Your No-Bake Dessert
Follow these detailed steps to create your perfect no-bake lemon and cookie dessert:
Step 1: Prepare the Condensed Milk Base
Begin by pouring the entire 2 and 1/2 cups of sweetened condensed milk into a large, clean mixing bowl. Make sure your bowl is large enough to accommodate the whisking process without spills. Set the bowl aside briefly while you prepare the lemon juice.
Step 2: Juice and Strain Your Lemons
Carefully slice your fresh lemons in half. Using a citrus juicer or reamer, squeeze the halves firmly until you have precisely 3/4 cup of fresh lemon juice. This measurement is critical for the chemical reaction that thickens the milk cream. Once juiced, pour the lemon juice through a fine-mesh strainer directly into the bowl with the condensed milk. This step is important to ensure a smooth, pulp-free, and seed-free lemon cream, enhancing the cake’s delicate texture.
Step 3: Whisk to Create the Lemon Cream
Now for the magic! Using a hand mixer or a stand mixer fitted with a whisk attachment, begin whisking the condensed milk and lemon juice mixture. Start on a low speed to incorporate the ingredients, then gradually increase to medium-high. Whisk continuously for about 1 minute. You will notice a remarkable transformation: the mixture will thicken significantly, turning into a luscious, pipeable lemon cream. Once it reaches a thick consistency, stop whisking. Use a spatula to scrape down any mixture clinging to the sides of the bowl and gently fold it into the center a few times to ensure everything is evenly incorporated. Cover the bowl tightly with plastic wrap and place it in the refrigerator to chill for approximately 5 minutes. This brief chill helps the cream set slightly further before layering.
Step 4: Prepare Your Mold and First Cream Layer
While the lemon cream chills, prepare your mold. Line an 11.8″ by 5.9″ loaf pan or similar rectangular mold completely with cling wrap, ensuring there’s enough overhang on all sides to easily lift the cake out later. Retrieve the chilled lemon cream mixture from the refrigerator. For easier and neater layering, place a piping bag into a tall glass, folding the top edges over the rim. Scoop the lemon cream mixture into the piping bag. Snip off a generous corner of the piping bag, then squeeze an even layer of the lemon cream mixture into the bottom of the prepared mold, covering the base completely.
Step 5: Layer Cookies and Cream
Carefully arrange your cinnamon cookies over the initial layer of lemon cream. Place them closely together to cover as much of the surface as possible. For any small gaps or irregular spaces, you can gently cut some cookies in half or into smaller pieces to fill them in. Once the first cookie layer is complete, pipe or spoon another layer of the lemon cream mixture over the cookies. Use the back of a spoon or an offset spatula to gently spread the cream evenly, ensuring it covers the cookies thoroughly. Continue this layering process, alternating between cookies and lemon cream, until you’ve used all of the mixture and cookies. Aim for at least two layers of cookies and three layers of cream, finishing with a cream layer on top. Once all layers are in place, cover the mold tightly with the overhanging cling wrap. Place the covered mold back into the refrigerator and let it chill undisturbed for a minimum of 3 to 4 hours. For best results and optimal setting, an overnight chill is highly recommended.
Step 6: Garnish, Slice, and Serve
After the chilling period (at least 3 hours, preferably longer), gently remove the milk cake from the refrigerator. Uncover the plastic wrap, then use the overhang to carefully lift the cake out of the mold and transfer it onto a serving plate. At this point, prepare your delicious topping. Place the remaining cinnamon cookies (or fresh ones reserved for topping) into a food processor. If desired, add 1 to 2 teaspoons of extra cinnamon powder to enhance the flavor. Pulse until the cookies are finely ground into a crumbly powder. Generously sprinkle this aromatic cookie and cinnamon mixture over the entire top surface of your milk cake. Now, your beautiful and delicious 3-ingredient no-bake milk cake is ready to be sliced and served! Each slice reveals perfectly layered cream and cookie, promising a delightful treat. Enjoy!
Tips for Success with Your No-Bake Cake
To ensure your easy no-bake dessert turns out perfectly every time, keep these tips in mind:
- Use Fresh Lemon Juice: This cannot be stressed enough. Freshly squeezed lemon juice not only provides superior flavor but also ensures the correct acidity for the condensed milk to thicken properly.
- Whisk Thoroughly: Don’t under-whisk the lemon cream mixture. The 1 minute of whisking is crucial for the chemical reaction to occur and for the mixture to reach the desired thick, pipeable consistency.
- Patience with Chilling: The chilling time is non-negotiable for a no-bake cake. A minimum of 3-4 hours is needed for the cake to set firmly and for the flavors to meld beautifully. Overnight chilling yields the best results, allowing the cookies to soften slightly into a cake-like texture while the cream becomes perfectly firm.
- Line Your Mold Well: Using ample plastic wrap ensures a smooth release from the mold. If you don’t have a loaf pan, any similar rectangular container can work.
- Even Layers: Take a moment to spread your cream layers evenly and arrange your cookies neatly. This will result in a visually appealing cake with consistent texture in every slice.
Variations and Customizations for Your Milk Cake
This no-bake milk cake is incredibly adaptable. Feel free to get creative with these ideas:
- Different Cookie Flavors:
- Chocolate: Use chocolate digestive biscuits, Oreo cookies (remove cream), or chocolate wafer cookies for a chocolate-lemon twist.
- Vanilla: Vanilla wafers, shortbread biscuits, or even graham crackers work well, offering a more neutral base.
- Coconut: Coconut biscuits would add an exotic, tropical flair.
- Flavor Extracts: Add a teaspoon of vanilla extract, almond extract, or even a touch of orange blossom water to the condensed milk mixture before whisking for an extra layer of flavor.
- Citrus Zest: For an intensified lemon flavor, finely grate the zest of one lemon into the condensed milk mixture. Orange zest can also be a delightful alternative.
- Fruit Additions: Between layers, you could gently press in thinly sliced fresh berries (strawberries, raspberries) or mango pieces for a fruity variation. Ensure the fruit is patted dry to avoid excess moisture.
- Boozy Twist: A tablespoon of limoncello or a compatible liqueur could be added to the lemon cream mixture for an adult version.
- Chocolate Drizzle: Instead of or in addition to cookie crumbs, drizzle melted dark or white chocolate over the finished cake.
Serving and Storage Suggestions
Once your milk cake is beautifully garnished, it’s ready to be the star of your dessert table. For the best presentation, use a sharp knife for clean slices. This cake is delightful on its own, but it also pairs wonderfully with a fresh cup of tea or coffee, a scoop of vanilla ice cream, or a small side of fresh berries to enhance its freshness. Store any leftover cake in an airtight container in the refrigerator for up to 3-4 days. The flavors tend to deepen overnight, making it even more delicious the next day. While this cake can be frozen, the texture of the cookies might change slightly upon thawing, becoming softer. If freezing, wrap individual slices tightly in plastic wrap and then foil, and thaw in the refrigerator before serving.
Frequently Asked Questions (FAQ)
Q1: Can I make this milk cake ahead of time?
Absolutely! This no-bake milk cake is an excellent make-ahead dessert. In fact, chilling it overnight often improves both its texture and flavor, allowing the cookies to soften beautifully and the lemon cream to fully set. Just add the crumb topping right before serving to maintain its crispness.
Q2: What if my lemon cream doesn’t thicken?
The most common reasons for the cream not thickening are not using *sweetened* condensed milk (evaporated milk won’t work), or not whisking long enough. Ensure you’re using the correct ingredient and whisk for the full minute on medium-high speed. Fresh lemon juice is also key, as its acidity initiates the thickening process. If it’s still too thin after whisking, you can try chilling it for a bit longer, as cold temperatures can help firm it up.
Q3: Can I use different sized molds?
Yes, you can use different sized molds, but keep in mind that the layers might be thicker or thinner, and the overall chilling time could vary. For a larger, shallower pan, the chilling time might be slightly less. For a smaller, deeper pan, it might need more time. Adjust the cookie amounts as needed to fit your chosen mold, ensuring you have enough for layers and topping.
Q4: Are there any substitutions for sweetened condensed milk?
In this specific recipe, sweetened condensed milk is fundamental and cannot be directly substituted with ingredients like heavy cream, milk, or evaporated milk, as its unique properties (high sugar content, thick consistency, and the way its proteins react with acid) are crucial for the no-bake setting process.
Q5: How do I get clean slices?
For perfectly neat slices, ensure the cake is thoroughly chilled. Use a long, sharp knife, and wipe the blade clean with a damp cloth between each cut. This prevents sticking and ensures smooth, elegant portions.
Your New Favorite No-Bake Dessert Awaits!
There you have it – a wonderfully simple, utterly delicious, and surprisingly elegant 3-ingredient no-bake milk cake that promises to delight with every bite. It’s the perfect testament to how minimal ingredients can create maximum flavor and joy. Whether you’re a busy parent, a student, or simply someone who appreciates good food without the fuss, this recipe is designed for you. So go ahead, gather your three ingredients, and treat yourself (and your loved ones) to this incredible dessert. We’re confident it will become a cherished recipe in your kitchen!