
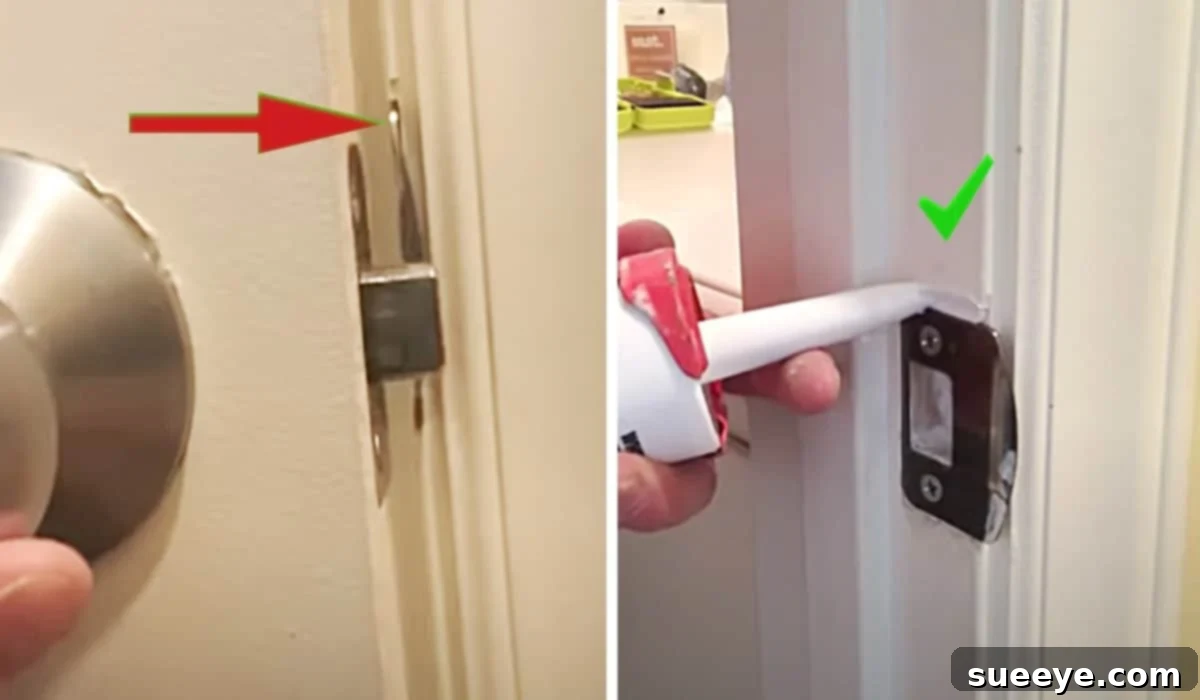
Ultimate Guide: How to Fix a Door That Won’t Latch Properly
There are few things as unsettling in a home as a door that refuses to latch properly. Whether it’s a bedroom door failing to provide privacy, a bathroom door leaving you exposed, or a front door compromising your home’s security, a misbehaving latch can quickly become a source of daily frustration and anxiety. The constant worry about a door being closed but not truly secured can chip away at your peace of mind. For many, the immediate reaction is to call a professional, but what if you could easily fix this common household problem yourself?
Discovering practical DIY solutions for everyday annoyances can be incredibly empowering. Gone are the days of having to explain your innermost household fears or depend on someone else’s schedule and expertise. Taking matters into your own hands not only saves time and money but also builds confidence in your home maintenance skills. This comprehensive guide, inspired by excellent tutorials like The Honest Carpenter’s video on YouTube, will walk you through the simple steps to diagnose and repair a door that won’t latch, offering several proven methods to ensure your doors are always secure.
The core of most door latch issues lies in the alignment between the latch bolt (the movable part that extends from the door edge) and the strike plate (the metal plate installed on the door frame). When these two components don’t meet precisely, the door won’t catch and hold securely. Fortunately, this is often a straightforward fix that anyone can achieve with basic tools and a little patience. Let’s delve into the methods that will empower you to restore functionality and security to your doors.
Why Your Door Isn’t Latching: Common Causes
Before diving into fixes, understanding the root cause can help you choose the most effective solution. Here are the most common reasons a door might not be latching:
- Misaligned Strike Plate: This is by far the most frequent culprit. Over time, houses settle, wood frames shift, or even the strike plate itself might have been installed slightly off from the start. This prevents the latch bolt from entering the strike plate’s opening.
- Worn or Damaged Latch Mechanism: The internal components of the door knob or handle can wear out, preventing the latch bolt from fully extending or retracting smoothly.
- Door Sagging or Settling: The door itself can sag due to loose hinges, heavy use, or changes in humidity, causing it to drop slightly and misalign with the strike plate.
- Loose Hinges: If the screws holding the door’s hinges to the frame or door slab become loose, the door can shift, leading to misalignment.
- Wood Expansion/Contraction: Seasonal changes in humidity can cause wooden doors and frames to expand and contract, altering their fit.
- Improper Installation: Sometimes, the door or frame components were not installed correctly from the beginning, leading to persistent latching problems.
Essential Tools and Materials for Door Latch Repair
Most of these fixes require only a few common household tools. Before you begin, gather the following:
- Screwdrivers: A set including both Phillips and flathead screwdrivers will be essential for tightening or removing screws.
- File: A metal file (half-round or flat) is crucial for enlarging the strike plate opening.
- Drill: For pre-drilling new pilot holes if repositioning the strike plate.
- Hammer: Useful for gently tapping wood shims or chisels.
- Super Glue or Wood Glue: To secure wood shims (like toothpicks or matchsticks) into stripped screw holes.
- Screws: Longer or thicker screws can be useful for stripped hinge or strike plate holes.
- Pencil or Marker: For marking new positions or areas to file.
- Utility Knife or Wood Chisel: If you need to enlarge the mortise (the recessed area where the strike plate sits).
- Wood Filler or Dowels: For filling larger, old screw holes cleanly.
- Measuring Tape: For precise measurements if major adjustments are needed.
- Safety Glasses: Always recommended when working with tools.
Diagnosing the Problem: A Simple Test
To accurately determine why your door isn’t latching, try this simple diagnostic trick:
- Close the door slowly, observing where the latch bolt meets the strike plate.
- If the latch bolt hits the metal edge of the strike plate, it’s a misalignment issue.
- For a more precise visual, apply a small amount of lipstick, marker ink, or even chalk to the tip of the latch bolt. Close the door slowly until the latch bolt touches the strike plate, then open it. The mark left on the strike plate will show exactly where the latch bolt is making contact, indicating if it’s too high, too low, or too far inward/outward.
Method 1: Minor Adjustment to the Strike Plate (Easiest Fix)
This method is ideal for situations where the latch bolt is only slightly off and barely catching the strike plate, or if the door has shifted just a hair.
- Loosen Screws: Use your screwdriver to slightly loosen the screws holding the strike plate to the door frame. Do not remove them completely, just enough so the plate can move.
- Adjust Plate: Gently try to nudge the strike plate in the direction needed. For instance, if the latch bolt hits the bottom of the opening, slide the plate slightly downwards. If it hits the top, slide it up.
- Test: With the screws still loose, close the door gently and see if the latch bolt now slides smoothly into the opening.
- Tighten Screws: Once you find the sweet spot, hold the strike plate firmly in place and tighten the screws. Test again to ensure it holds.
Sometimes, simply tightening the existing screws on a loose strike plate is enough to bring it back into proper alignment.
Method 2: Enlarging the Strike Plate Opening (Filing)
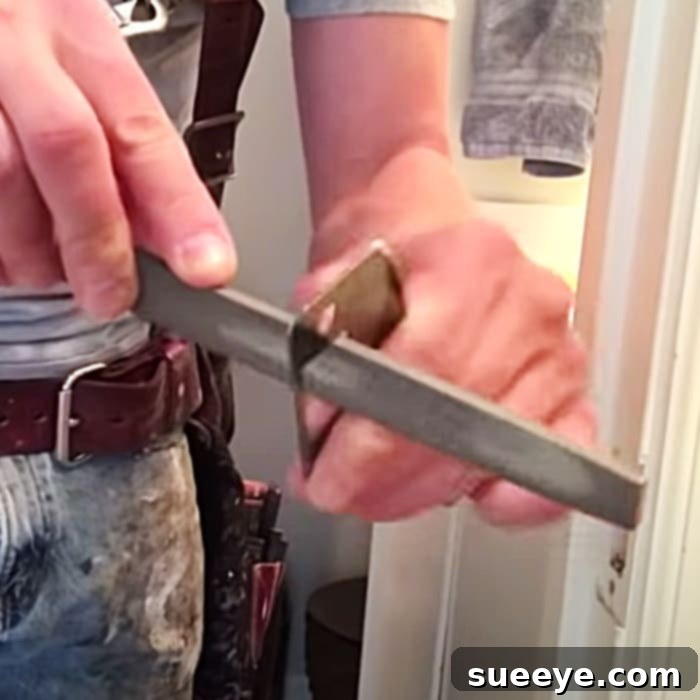
If the latch bolt consistently hits the edge of the strike plate opening, preventing the door from fully closing and latching, filing is an effective solution. This is a common and highly successful method featured in many tutorials, including The Honest Carpenter’s guide.
- Remove Strike Plate: Unscrew and remove the strike plate from the door frame.
- Identify Filing Area: Based on your diagnostic test (the lipstick/marker mark), you’ll know exactly which edge of the opening needs to be enlarged. Most commonly, it’s either the top or bottom edge, or the side closest to the door stop.
- File Carefully: Using your metal file, slowly and carefully file away a small amount of metal from the inside edge of the opening. It’s always better to remove too little and test, rather than remove too much. File in the direction you need the opening to expand. For example, if the latch bolt is hitting the bottom, file the bottom edge downwards.
- Test Frequently: Periodically re-install the strike plate (don’t worry about tightening all the way) and test the door. This iterative process ensures you don’t over-file.
- Reinstall and Secure: Once the latch bolt glides smoothly into the enlarged opening, tighten the strike plate screws securely.
Pro Tip: If the metal finish is scratched during filing, you can touch it up with a matching paint or a permanent marker for a clean look.
Method 3: Repositioning the Strike Plate (For Significant Misalignment)
When filing isn’t enough, or the misalignment is significant, you may need to move the entire strike plate to a new position. This method involves creating new screw holes and potentially modifying the mortise.
- Remove Strike Plate: Fully unscrew and remove the strike plate.
- Mark New Position: Use your diagnostic test (lipstick/marker on the latch bolt) to mark the precise new location where the latch bolt makes perfect contact with the door frame. This mark will guide your new strike plate placement.
- Prepare Old Screw Holes: The existing screw holes will be in the wrong spot and might be stripped. To give new screws a good grip, you need to fill them.
- For small holes: Insert toothpicks or wooden matchsticks coated with wood glue or super glue into the holes. Break them off flush with the frame surface. Let the glue dry completely.
- For larger or severely stripped holes: You might need to use wood filler or a small dowel rod.
- Chisel New Mortise (if necessary): If the new position requires the strike plate to move significantly, you might need to slightly enlarge or shift the recessed area (mortise) where the plate sits. Use a utility knife or wood chisel to carefully score and remove small amounts of wood, ensuring the strike plate will sit flush with the frame. This step requires precision; remove wood incrementally.
- Drill Pilot Holes: Position the strike plate over your new marks. Using a drill bit slightly smaller than your new screws, carefully drill new pilot holes through the strike plate’s screw holes and into the prepared frame. Pilot holes prevent wood splitting.
- Install and Test: Secure the strike plate with new screws. Close the door slowly and test the latch. It should now slide in perfectly.
Method 4: Addressing Loose Hinges (When the Door Itself is Sagging)
If your diagnostic test reveals that the entire door has shifted (e.g., the latch bolt is consistently too low or too high relative to the frame), the problem might originate from loose hinges, rather than just the strike plate.
- Check Hinge Tightness: Open the door and visually inspect both hinges. Wiggle the door gently. Are any hinge screws loose or stripped? Tighten any loose screws with a screwdriver.
- Fix Stripped Hinge Screws: If a screw spins freely and doesn’t tighten, the hole is stripped. Remove the screw. Insert several wood toothpicks or a small dowel (coated with wood glue or super glue) into the stripped hole until it’s packed tightly. Break off any excess flush with the frame. Let it dry. Then, pre-drill a new pilot hole (if using a dowel) and reinsert the original screw, or use a slightly longer/thicker screw for better grip.
- Shim Hinges (Advanced): For persistent sagging, you can add thin shims (made from cardboard or thin wood veneer) behind the hinge leaf attached to the door frame. This subtly pushes the door in or out, or up or down, depending on which hinge you shim. This is a more nuanced adjustment and often requires a bit of trial and error.
Preventative Maintenance for Your Doors
Once your door is latching perfectly, a little ongoing care can keep it that way:
- Regularly Tighten Screws: Periodically check and tighten all screws on your door hinges and strike plates. This is especially important for frequently used doors.
- Lubricate Latch Mechanism: A dry lubricant like graphite powder or a silicone spray can keep the internal latch mechanism operating smoothly, preventing wear and sticking. Avoid oil-based lubricants as they can attract dust and grime.
- Address Humidity Changes: In areas with extreme humidity fluctuations, consider using a dehumidifier or humidifier to minimize wood expansion and contraction that can affect door fit.
Enjoy Your Secure and Functional Door!
Tackling a door that won’t latch might seem daunting at first, but as you’ve seen, it’s often a straightforward process with simple tools. Whether you need to slightly adjust, file, or reposition your strike plate, or even address underlying hinge issues, the satisfaction of a job well done and a securely latching door is immense. Embracing these DIY solutions not only saves you money but also empowers you to maintain a safe, functional, and comfortable home.
With these practical methods at your disposal, you no longer have to live with the annoyance of a stubborn door. Take charge, apply these tips, and enjoy the peace of mind that comes with knowing your doors are properly secured and functioning exactly as they should.