
The Ultimate Guide to Cleaning Your Glass Cooktop Like a Pro (Streak-Free & Damage-Free)
A pristine glass cooktop is a cornerstone of a modern kitchen, offering a sleek look and efficient cooking. However, the beauty of these surfaces can quickly be overshadowed by a build-up of grease, stubborn food spills, and unsightly burnt-on grime. If your glass cooktop has lost its sparkle and accumulated layers of dirt, don’t despair! Many owners believe a deep clean requires harsh chemicals or intense scrubbing, but we’re here to share a revolutionary, easy-to-follow method that will restore your cooktop to its showroom shine without risking scratches or damage.
This comprehensive guide draws inspiration from expert cleaning techniques, demonstrating how common household products can work wonders. We’ll show you how to tackle even the toughest burnt-on residues, ensuring a spotless, streak-free finish every time. Say goodbye to endless scrubbing and hello to a brilliantly clean glass cooktop with minimal effort. This approach is so effective, it might just become your new favorite cleaning routine, making other methods seem obsolete.
We’ll walk you through each step, providing detailed instructions and crucial tips to ensure success. For those who prefer a visual demonstration, we highly recommend checking out the video tutorial by Clean That Up on YouTube. Their expertise perfectly complements the written steps below, offering additional insights into professional-grade cleaning. Get ready to transform your cooktop and rediscover the joy of a truly clean kitchen!
Why Glass Cooktops Get Dirty (and Why Cleaning Them is Tricky)
Glass cooktops are beloved for their smooth surfaces, even heat distribution, and contemporary aesthetics. They integrate seamlessly into kitchen designs, making cleanup seem easy. However, their very nature – a perfectly flat, often black or dark surface – means they unforgivingly highlight every splash, spill, and speck of dust. Over time, these minor incidents accumulate:
- Grease Splatters: Cooking oils and fats are notoriously difficult to remove once they cool and solidify, creating a sticky film.
- Food Boilovers: Sugary sauces, dairy products, or starchy liquids can bake onto the surface at high temperatures, forming hard, crusty, and often dark residues.
- Heat Stains: Sometimes, even without a direct spill, high heat can cause discoloration or a hazy appearance on the glass.
The challenge lies in removing these diverse types of grime without scratching the delicate glass surface. Abrasive scrubbers, harsh chemical cleaners, or improper techniques can lead to irreversible damage, marring your cooktop’s appearance and potentially affecting its performance. Our method focuses on combining gentle yet powerful cleaning agents with the right tools to safely lift away dirt.
Essential Materials for Your Glass Cooktop Cleaning Hack:
Gathering the right tools before you start is key to an efficient and effective cleaning process. You’ll likely find most of these items already in your home or easily available at any grocery or hardware store.
- Dawn Powerwash Dish Spray (or Quality Dish Soap): This degreasing powerhouse is crucial for breaking down oily residues. If Powerwash isn’t available, a concentrated, high-quality dish soap like original Dawn will work effectively.
- Scrub Daddy (or Non-Abrasive Scrubber): The key here is “non-abrasive.” A Scour Daddy or similar scrubber designed for non-stick surfaces or delicate cleaning is ideal. Avoid anything metallic or overly scratchy.
- Bar Keeper’s Friend Cleanser (Powder or Liquid): This versatile cleaner is renowned for its ability to tackle tough stains, rust, and burnt-on food without harsh scratching, thanks to its oxalic acid content. It’s a game-changer for glass cooktops.
- Razor Blade Scraper: This tool is specifically for extremely stubborn, hardened, and burnt-on debris. It must be used with extreme caution and at a very shallow angle to avoid damaging the glass. Ensure you have a fresh, sharp blade.
- Microfiber Cloths (at least two): Essential for both applying and buffing. Their fine fibers effectively pick up dirt and polish surfaces without leaving lint or streaks.
- Warm Water: For rinsing and dampening cloths.
- Spray Bottle (Optional but Recommended): For even distribution of water or diluted cleaner during rinsing.
How to Clean Glass Cooktop Like a Pro: Step-by-Step Guide
Follow these steps carefully to achieve a sparkling clean cooktop. Remember, patience and proper technique are your best allies.
Step 1: Initial Degreasing and Loosening Surface Grime
Before you begin, ensure your glass cooktop is completely cool to the touch. Cleaning a hot surface can be dangerous and cause cleaners to bake on, making them harder to remove.
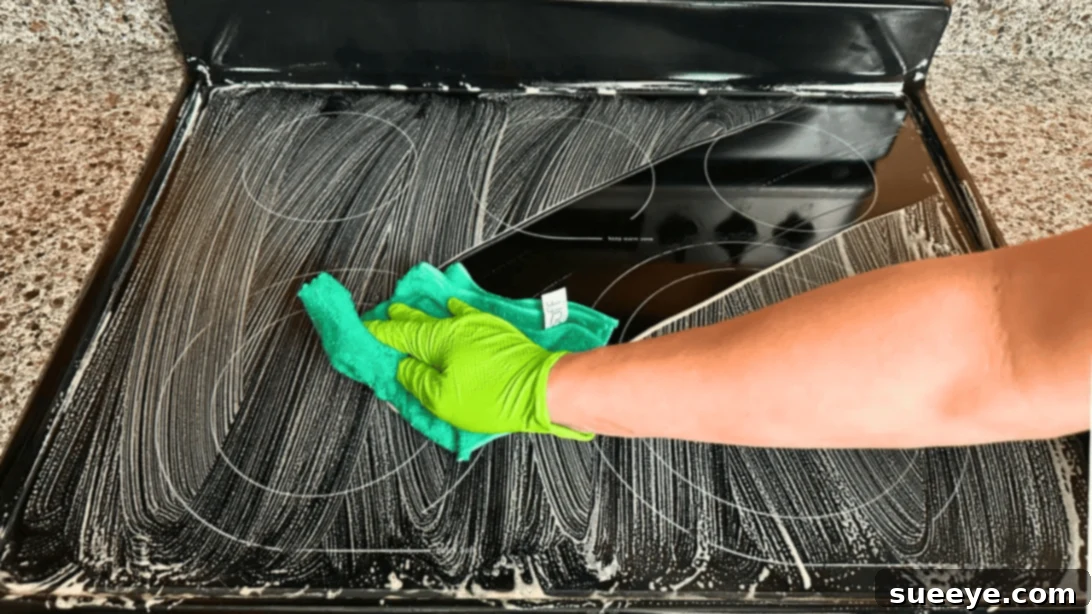
- Apply Degreaser: Generously spray the entire surface of your glass cooktop with Dawn Powerwash or apply a good amount of concentrated dish soap. Focus particularly on areas with visible grease and food splatters. The goal is to fully saturate the grime, allowing the powerful surfactants to start breaking down oils and loosening dried-on food particles.
- Let it Dwell: Allow the soap to sit on the surface for 5-10 minutes. This dwell time is crucial, especially for tougher grease, as it gives the soap time to penetrate and emulsify the dirt. For extremely heavy build-up, you might extend this to 15 minutes.
- Gentle Scrubbing: Using your chosen non-abrasive scrubber (like a Scour Daddy), gently but firmly scrub the entire cooktop surface. Use circular motions to work the soap into the grime. You should start to see the grease and loose debris lifting away. Remember, the scrubber should be strong enough to cut through grease and grime but never so abrasive that it could scratch the delicate glass surface. The Scour Daddy, with its unique texture, is perfect for this balance.
- Initial Rinse: Using a clean, damp microfiber cloth, wipe away the soapy residue and loosened dirt. You can also use a spray bottle filled with warm water to lightly mist the surface and then wipe clean. This initial rinse helps you assess which areas still need attention.
Step 2: Tackling Stubborn Burnt-On Stains with Bar Keeper’s Friend and Razor Scraper
After the initial degreasing, you’ll likely be left with stubborn, burnt-on spots that refuse to budge. This is where Bar Keeper’s Friend and the razor blade scraper truly shine.
- Apply Bar Keeper’s Friend: Lightly dampen the cooktop surface or mix a small amount of Bar Keeper’s Friend powder with water to form a paste. Apply this paste directly onto the remaining stubborn spots. If using the liquid version, apply directly. Ensure even coverage over the affected areas.
- Allow to Work: Let the Bar Keeper’s Friend sit on the stains for 3-5 minutes. The oxalic acid in Bar Keeper’s Friend works chemically to dissolve rust, mineral deposits, and burnt food particles, making them easier to remove.
- Focused Scrubbing or Scraping:
- For Less Stubborn Stains: Use your non-abrasive scrubber (Scour Daddy) with the Bar Keeper’s Friend paste, scrubbing in small, circular motions. You’ll feel the resistance as the grime gives way.
- For Extremely Stubborn or Hardened Burnt Spots: This is where the razor blade scraper comes in. Hold the razor blade scraper at a very shallow angle (approximately 15-20 degrees) to the cooktop surface. Carefully and gently push the blade under the hardened debris. Do not jab or scrape perpendicularly, as this can scratch the glass. The goal is to lift the burnt material off the surface, not to carve into it. Work slowly and methodically until the stubborn spots are removed. Always use a fresh, sharp blade for best results and safety.
- Thorough Rinse and Wipe: Once all the tough spots are gone, use a clean, damp microfiber cloth to thoroughly wipe off all traces of Bar Keeper’s Friend and dislodged grime. You might need to rinse and wring your cloth multiple times to ensure no residue is left. A second wipe with a fresh damp cloth is often beneficial to ensure a completely clean surface.
Step 3: The Final Buff for a Streak-Free Shine
The last step is crucial for achieving that coveted, professional-grade, streak-free shine that makes your cooktop look brand new.
- Buff Dry: Take a clean, dry microfiber cloth. Using broad, circular motions, buff the entire cooktop surface until it is completely dry and gleaming. The microfiber cloth’s unique structure effectively picks up any remaining moisture or minuscule residue, leaving behind a perfectly polished, streak-free finish.
- Inspect and Admire: Step back and admire your handiwork! Your glass cooktop should now be sparkling clean, free of grease, grime, and burnt-on food.
Pro Tips for Maintaining Your Glass Cooktop’s Sparkle
Cleaning is only half the battle. Regular maintenance and preventative measures can significantly reduce the frequency and intensity of deep cleaning sessions.
- Clean After Every Use (When Cool): The golden rule for glass cooktops is to wipe them down after every cooking session, but only once the surface has completely cooled. Addressing fresh spills immediately prevents them from baking on and becoming stubborn stains.
- Address Spills Promptly: If something boils over or splatters, try to gently wipe it away with a damp cloth as soon as it’s safe to do so (i.e., the cooktop isn’t scalding hot, but still warm enough that the spill hasn’t completely dried).
- Use the Right Cookware: Opt for cookware with flat bottoms that make full contact with the heating elements. Avoid pans with rough or uneven bottoms, which can scratch the glass. Cast iron, while excellent for cooking, can be very heavy and abrasive; lift, don’t slide, cast iron pots.
- Avoid Sugar Spills: Melted sugar is particularly damaging to glass cooktops. If sugary food spills, turn off the burner and carefully scrape it off with a razor blade scraper while it’s still warm but not hot enough to burn you. Sugar can pit the glass if left to cool and harden.
- Never Use Abrasive Cleaners or Tools: Steer clear of steel wool, abrasive scouring pads (unless specifically designed for glass cooktops and non-scratch), oven cleaners, or any powdered cleaners not explicitly safe for glass cooktops (like Bar Keeper’s Friend). These can cause permanent scratches or chemical damage.
- Protect Your Cooktop: Consider using cooktop protectors or mats when the stove is not in use. These can shield the surface from accidental scratches or spills.
Common Mistakes to Avoid When Cleaning Your Glass Cooktop
Knowing what not to do is as important as knowing what to do to ensure the longevity and pristine condition of your appliance.
- Cleaning a Hot Cooktop: Attempting to clean a hot surface is not only dangerous (risk of burns) but can also cause cleaning products to evaporate too quickly or even bake onto the glass, creating more problems. Always wait for the cooktop to cool down completely.
- Using the Wrong Scrubber: A common mistake is reaching for a regular abrasive sponge or steel wool. These can leave behind irreversible scratches and dull the glass’s shine. Always use microfiber cloths or designated non-scratch scrubbers.
- Applying Too Much Pressure with a Razor Scraper: While effective, a razor scraper must be used with a very light touch and at a shallow angle. Digging in or applying excessive pressure can chip or scratch the glass.
- Leaving Cleaner Residue: Failing to thoroughly rinse off cleaning solutions can leave behind hazy streaks or a sticky film that attracts more dirt. Always finish with a thorough wipe-down using a damp cloth, followed by a dry buff.
- Using Harsh Chemicals: Ammonia-based cleaners, oven cleaners, or industrial degreasers can damage the cooktop’s finish, leading to discoloration or etching. Stick to cleaners specifically formulated for glass cooktops or the tried-and-true methods described here.
Frequently Asked Questions About Glass Cooktop Cleaning
Q: Can I use baking soda and vinegar to clean my glass cooktop?
A: While baking soda and vinegar are popular natural cleaning agents, they are generally not recommended as the primary solution for deeply stained glass cooktops. Baking soda is a mild abrasive and can be used sparingly as a paste for very light stains, but consistent use might leave micro-scratches over time. Vinegar is excellent for cutting grease and polishing, but it may not be strong enough for burnt-on food. For optimal results and safety, the Bar Keeper’s Friend method is superior for tough grime.
Q: How often should I deep clean my glass cooktop?
A: The frequency of deep cleaning depends on your cooking habits. For daily users, a light wipe-down after each use is essential. A deep clean using the method described above might be necessary once a week or bi-weekly, especially if you cook heavily or experience frequent spills. If you maintain it well, you might only need a full deep clean once a month.
Q: What if my glass cooktop already has scratches? Can I remove them?
A: Unfortunately, deep scratches on a glass cooktop are very difficult, if not impossible, to remove entirely. There are some specialty scratch removal kits available, but their effectiveness varies, and they often only minimize the appearance of very fine surface scratches. Prevention is key: always use non-abrasive tools and proper cleaning techniques to avoid scratches in the first place.
Conclusion: Embrace a Sparkling Clean Kitchen
Cleaning a glass cooktop doesn’t have to be a dreaded chore. With the right tools and a systematic approach, you can effortlessly banish grease, grime, and burnt-on food, restoring your appliance to its original glory. This professional-grade method, leveraging the power of readily available household items like Dawn Powerwash, Bar Keeper’s Friend, and a razor blade scraper, ensures a deep, scratch-free clean and a dazzling, streak-free finish.
By incorporating these simple steps into your routine and adopting preventative measures, you’ll not only enjoy a cleaner kitchen but also extend the life and beauty of your glass cooktop. Don’t let stubborn stains diminish the elegance of your kitchen any longer. Give this method a try, and prepare to be amazed by the results!
*All images are credited to Clean That Up via YouTube. We encourage you to visit their channel and subscribe for more fantastic cleaning tips and tutorials!