
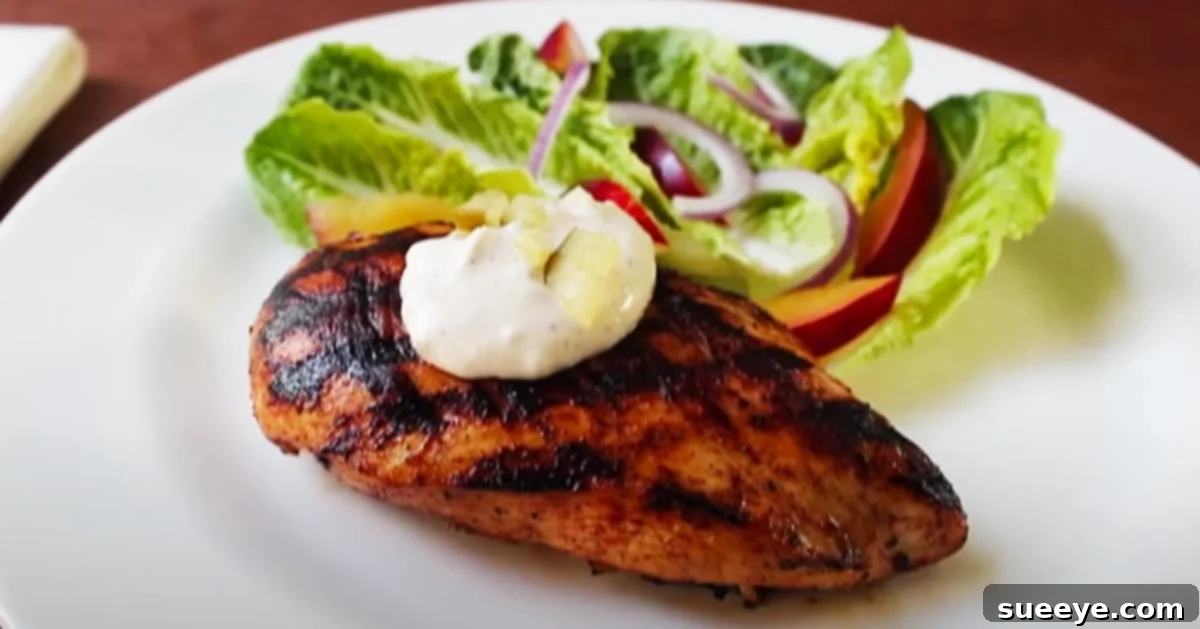
Prepare to revolutionize your perception of chicken breasts! This incredible recipe, inspired by the culinary masters at Food Wishes, unveils the secret to astonishingly tender and juicy chicken: pickle brine. Far from being just a quirky flavor note, pickle brine acts as a powerful marinade, infusing chicken with moisture and a delightful tangy zest that transforms an ordinary meal into an extraordinary dining experience. If you’re a pickle enthusiast, you already possess a culinary goldmine in that jar of leftover pickle juice. Instead of discarding it once the last pickle is gone, harness its potential to create something truly magical in your kitchen. This method not only prevents food waste but also elevates your chicken dishes to a new level of flavor and succulence.
The principle behind brining chicken is simple yet profoundly effective: it significantly enhances the moisture content and tenderness of the meat. While a standard salt brine achieves great results, the addition of dill pickle juice introduces a unique complexity. The natural acidity and aromatic spices present in the pickle brine work wonders, breaking down muscle fibers and allowing the chicken to absorb more liquid, ensuring it stays incredibly moist even after cooking. Beyond the textural benefits, the pickle brine imparts a distinctive tanginess and a subtle, yet unmistakable, pickle flavor that complements a wide array of side dishes and culinary preparations. Get ready to discover your new favorite way to cook chicken!
The Magic of Pickle Brine: Why It Works
Brining is a time-honored technique used by chefs worldwide to achieve perfectly cooked meats, especially poultry. At its core, brining involves soaking meat in a saltwater solution, which initiates a process called osmosis. The salt dissolved in the brine helps to denature the proteins in the chicken, causing them to loosen and allowing the muscle fibers to absorb more moisture. This absorbed liquid remains trapped within the chicken during cooking, preventing it from drying out and resulting in a significantly juicier final product.
What makes pickle brine particularly special is the additional layer of flavor and tenderizing power it brings. Dill pickle juice isn’t just salt water; it contains vinegar (acetic acid), dill, garlic, and other spices. The acidity in the pickle juice further aids in tenderization by breaking down tough connective tissues in the chicken, leading to an even more tender bite. Moreover, these aromatic compounds permeate the chicken, imparting that beloved tangy, savory, and herbaceous pickle flavor throughout the meat. This dual action—moisture retention from salt and tenderization/flavor infusion from the acidic, spiced pickle juice—makes pickle brine an unparalleled choice for transforming chicken breasts.
The Ultimate Pickle Brine Chicken Breast Recipe: Juicy & Tender Every Time
Ingredients You’ll Need
- 2 large boneless, skinless chicken breasts (about 1.5 – 2 pounds total)
- 1-2 tablespoons olive oil, for coating chicken before cooking
- Freshly ground black pepper, to taste
- Kosher salt, to taste (use sparingly if seasoning after brining)
For the Irresistible Brine:
- 1 tablespoon packed light brown sugar
- 2 teaspoons kosher salt (or fine sea salt)
- 1 teaspoon freshly ground black pepper
- A generous pinch of cayenne pepper (optional, for a subtle kick)
- 1 1/2 to 2 cups high-quality dill pickle juice (ensure it’s not too sweet or overly acidic)
Step-by-Step Directions for Perfection
Preparing the Pickle Brine Marinade
Begin by creating your potent pickle brine. In a large mixing bowl, combine the brown sugar, kosher salt, freshly ground black pepper, and cayenne pepper (if using). These dry ingredients will blend harmoniously with the pickle juice, adding depth and balance to its natural tang. Next, pour in the dill pickle juice. Using a whisk or spoon, stir the mixture vigorously until both the brown sugar and salt have completely dissolved. It’s crucial that these crystalline ingredients are fully integrated into the liquid to ensure even distribution of flavor and effective brining. Taste a tiny bit of the brine; it should be robustly salty, tangy, and slightly sweet. Adjust seasonings if necessary, though the provided ratios are generally well-balanced.
Brining the Chicken to Maximize Tenderness
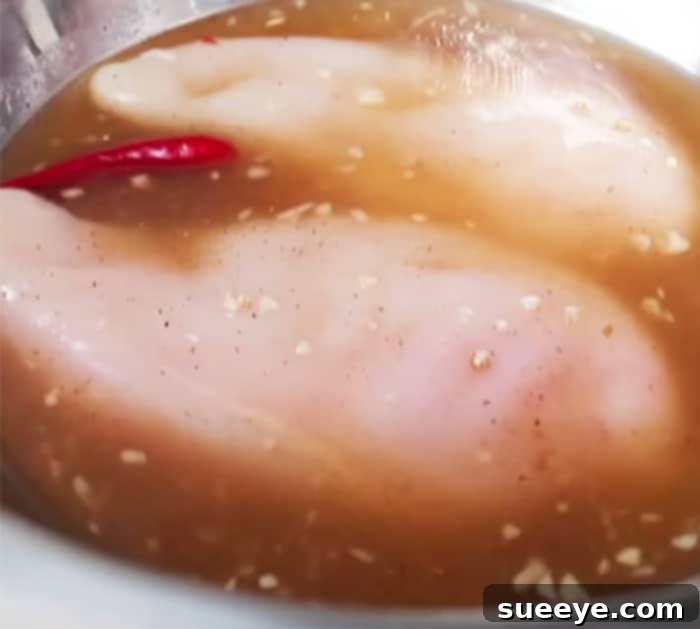
Once your brine is perfectly prepared, it’s time to introduce the star of the show: the chicken breasts. Carefully submerge the large boneless, skinless chicken breasts into the pickle brine, ensuring they are fully covered. If necessary, you can use a plate or a small resealable bag filled with water placed on top to keep the chicken completely immersed. Cover the bowl tightly with plastic wrap or transfer the chicken and brine to a large, sealable plastic bag. Place it in the refrigerator and let the magic happen. For optimal tenderness and flavor, allow the chicken to marinate for a minimum of 2 hours, but no more than 6-8 hours. Brining for too long, especially with an acidic brine, can result in a mushy texture. For full visual instructions and additional expert tips, consider watching the original Food Wishes tutorial on YouTube.
Cooking Your Brined Chicken Breasts
After the brining period, remove the chicken breasts from the pickle brine. Pat them thoroughly dry with paper towels. This step is crucial for achieving a beautiful sear and crispy exterior, as excess moisture will steam the chicken rather than brown it. Lightly coat both sides of the chicken breasts with olive oil, then season sparingly with fresh black pepper. Remember, the chicken has already absorbed a good amount of salt from the brine, so be cautious when adding more salt. You can always add more at the table if needed. Preheat your grill, grill pan, or heavy-bottomed skillet over medium-high heat. Once hot, place the chicken breasts on the cooking surface.
Grill the chicken for about 5-7 minutes per side, or until internal temperature reaches 165°F (74°C) with an instant-read thermometer. The exact cooking time will vary depending on the thickness of your chicken breasts and the heat of your cooking surface. Look for a golden-brown crust and opaque white meat throughout. Avoid overcooking, as even brined chicken can become dry if cooked past its ideal temperature. If you prefer baking, preheat your oven to 400°F (200°C) and bake for 20-25 minutes, or until cooked through.

Resting and Serving Your Flavorful Chicken
Once the chicken breasts are cooked to perfection, transfer them to a clean plate or cutting board. Immediately cover them loosely with aluminum foil. This resting period is critical; it allows the juices within the chicken to redistribute evenly throughout the meat, resulting in a significantly juicier and more tender bite. Let the chicken rest for about 5 to 10 minutes before slicing or serving. Skipping this step can lead to juices running out onto your plate, leaving you with drier chicken. Serve your magnificent pickle brine chicken breasts whole or sliced, perhaps topped with a complementary sauce like a creamy dill sauce, a tangy BBQ sauce, or simply a drizzle of fresh olive oil and a sprinkle of herbs. For an extra pop of flavor and texture, consider adding finely chopped pickles on the side to reinforce that delightful pickle essence.
Why Choose Pickle Brine? Beyond Just Tenderness
While the primary benefits of brining are enhanced tenderness and juiciness, pickle brine offers several unique advantages that set it apart from traditional brines:
- Distinctive Flavor Profile: The complex blend of acidity, salt, dill, and garlic from the pickle juice permeates the chicken, creating a savory, tangy, and slightly herbaceous flavor that is both unique and incredibly delicious. It’s a taste adventure that keeps you coming back for more.
- Natural Tenderizer: The acetic acid in pickle juice acts as a natural tenderizer, breaking down tougher muscle fibers more effectively than salt alone. This results in an exceptionally soft and yielding texture, making even leaner cuts like chicken breast wonderfully palatable.
- Reduces Cooking Stress: Brined chicken is far more forgiving to cook. Its increased moisture content provides a buffer against accidental overcooking, helping it remain juicy even if it stays on the heat a little longer than intended.
- Economical and Sustainable: Repurposing leftover pickle juice is a smart way to reduce food waste and get more value from your grocery purchases. It transforms a discarded liquid into a flavorful marinade, saving you money on specialty marinades.
Tips for the Juiciest Pickle Brine Chicken Breasts
- Choose Your Pickle Juice Wisely: The quality and flavor of your pickle juice directly impact the final taste of your chicken. Opt for a good quality dill pickle juice that you enjoy drinking. Avoid sweet or overly spiced varieties unless that’s the specific flavor profile you’re aiming for.
- Don’t Over-Brine: While brining is great, too much of a good thing can be detrimental. For chicken breasts, 2-6 hours is generally ideal. Brining for too long, especially in an acidic solution, can break down the proteins too much, leading to a mushy texture.
- Pat Dry for Searing: Always pat your chicken breasts thoroughly dry with paper towels after brining and before cooking. This removes surface moisture, which is essential for achieving a beautiful, crispy, golden-brown sear.
- Use a Meat Thermometer: The only way to guarantee perfectly cooked chicken and avoid dryness is to use an instant-read meat thermometer. Chicken breasts are done when they reach an internal temperature of 165°F (74°C) at their thickest part.
- Let It Rest: This tip is paramount! Resting the chicken for 5-10 minutes after cooking allows the juices to redistribute, ensuring every bite is moist and flavorful. Cutting into it too soon will cause those precious juices to escape.
- Consider Pounding: For very thick chicken breasts, you might consider gently pounding them to an even thickness (about 3/4 inch). This ensures even brining and more consistent cooking.
Customize Your Pickle Brine Chicken Experience
The beauty of this pickle brine chicken recipe lies in its versatility. While the core pickle flavor is delightful on its own, you can easily customize it to suit your palate and culinary creativity:
- Spice It Up: Increase the cayenne pepper for a spicier kick, or introduce other chili powders like chipotle for a smoky heat. A dash of red pepper flakes in the brine can also add an exciting warmth.
- Herbaceous Twist: Fresh herbs can elevate the brine. Consider adding a few sprigs of fresh dill, rosemary, or thyme to the brine mixture. These will infuse subtly into the chicken during the marination process.
- Garlic Lover’s Dream: If you adore garlic, mince a couple of extra cloves and add them to the brine. The pungent flavor will permeate the chicken beautifully.
- Different Sugars: While brown sugar adds a nice molasses note, you could experiment with honey or maple syrup for a different kind of sweetness to balance the tang.
- Cooking Method Variations: While grilling is fantastic, this brined chicken is equally delicious when pan-seared, baked, air-fried, or even shredded for tacos or sandwiches. Adjust cooking times accordingly.
Perfect Pairings: What to Serve with Pickle Brine Chicken
The tangy, savory profile of pickle brine chicken makes it an excellent candidate for a variety of side dishes. The key is to choose accompaniments that either complement the pickle flavor or offer a refreshing contrast. Here are some ideas:
- Creamy Mashed Potatoes: A classic pairing, the creamy, buttery potatoes provide a comforting contrast to the chicken’s tang.
- Fresh Green Salad: A simple tossed salad with a light vinaigrette is a perfect, healthy complement, offering freshness and crunch.
- Roasted Vegetables: Asparagus, broccoli, carrots, or Brussels sprouts roasted with a touch of olive oil, salt, and pepper make for a delicious and easy side.
- Coleslaw or Potato Salad: These picnic staples often contain a tangy dressing that harmonizes beautifully with the pickle notes in the chicken.
- Corn on the Cob: Sweet corn, grilled or boiled, offers a natural sweetness that balances the savory and tangy chicken.
- Rice Pilaf or Quinoa: A light grain provides a neutral base to soak up any chicken juices and complements the overall meal without overpowering it.
- Crispy French Fries: For a more casual and indulgent meal, a side of perfectly crisp fries can’t be beat.
Because pickle brine chicken breasts are inherently flavorful and moist, opting for lighter, simpler sides often allows the star of the dish to truly shine. Avoid overly rich or complex sides that might compete with the chicken’s unique taste.
Frequently Asked Questions About Pickle Brine Chicken
Can I use other types of pickle juice besides dill?
While dill pickle juice is highly recommended for its classic flavor profile, you can absolutely experiment with other types. Bread and butter pickle juice would add a sweeter, tangier note, while spicy pickle juice could introduce a fiery kick. Just be mindful of the sugar and spice levels in the alternative brine and adjust your added sugar and cayenne accordingly to maintain balance.
How long can I brine chicken breasts?
For boneless, skinless chicken breasts, a brining time of 2 to 6 hours is generally sufficient to achieve maximum tenderness and flavor infusion without compromising texture. Brining for longer than 8 hours, especially in an acidic brine, can cause the chicken to become too soft or even mushy due due to excessive protein breakdown. Always keep the chicken refrigerated during the brining process.
What if I don’t have dill pickle juice?
If you don’t have leftover dill pickle juice, you can often buy jars of pickle juice separately at specialty stores or online. Alternatively, you can create a similar effect by combining white vinegar or apple cider vinegar with water, salt, sugar, and pickling spices (like dill, mustard seeds, and garlic powder) to mimic the flavor. While it won’t be identical, it will still offer a fantastic tenderizing and flavoring marinade.
Can I freeze brined chicken?
It’s generally not recommended to freeze chicken while it’s still in the brine, as the prolonged exposure to salt and acid during thawing could negatively impact the texture. Instead, remove the chicken from the brine, pat it dry, and then freeze it in an airtight container or freezer bag. Thaw it in the refrigerator before cooking. You can also cook the chicken after brining, and then freeze the cooked chicken for future meals.
Is this recipe suitable for other cuts of chicken?
Absolutely! This pickle brine works wonderfully with other chicken cuts, such as thighs, drumsticks, or even a whole spatchcocked chicken. The brining times might need slight adjustment: thicker cuts like thighs can benefit from slightly longer brining (up to 8-12 hours), while a whole chicken might need 12-24 hours. Always ensure the chicken is fully submerged and refrigerated during brining.
Unlock Unforgettable Flavor with Pickle Brine Chicken
Gone are the days of dry, bland chicken breasts! With this pickle brine recipe, you’re not just cooking a meal; you’re unlocking a world of flavor and tenderness that will impress even the most discerning palates. The humble pickle jar holds the key to transforming everyday chicken into a culinary masterpiece, proving that sometimes, the most unexpected ingredients yield the most extraordinary results. This method is simple, effective, and deeply satisfying, making it a perfect addition to your regular cooking repertoire.
So, the next time you finish a jar of dill pickles, resist the urge to pour that precious brine down the drain. Instead, harness its power to create the most succulent, flavorful chicken breasts you’ve ever tasted. Your taste buds, and your guests, will thank you. Experiment with the tips and variations provided, and make this pickle brine chicken truly your own. Happy cooking!