
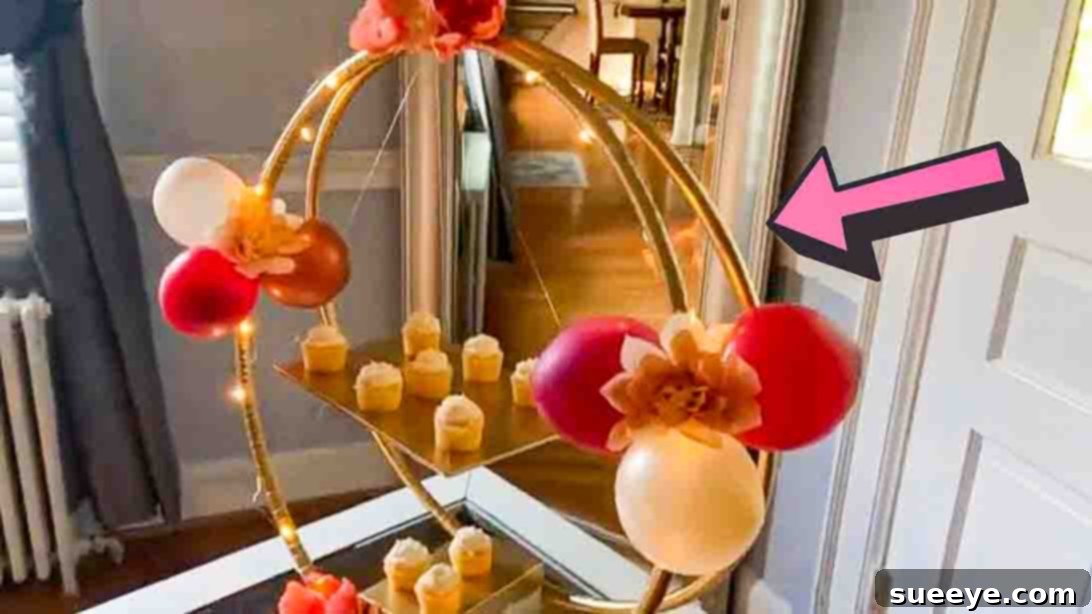
Transform your next celebration with a show-stopping dessert display that’s both elegant and incredibly simple to create! Forget expensive rental equipment or generic store-bought stands; you can craft a stunning, personalized cupcake display right at home. We’re thrilled to share an ingenious DIY project inspired by the creative minds at SPECIAL CREATIONS BY NELLY on Youtube. Prepare to be amazed as you learn to construct a beautiful cupcake stand using just two ordinary hula hoops – yes, you read that right! This project is not only unbelievably easy but also makes for a fantastic weekend activity to share with friends or family, adding a touch of handmade charm to any event. From elegant weddings to lively birthday parties, this customizable stand will elevate your dessert table and leave a lasting impression on your guests. Dive into our detailed guide below and discover how you can bring this magical display to life, step by step.
Why Opt for a DIY Cupcake Stand?
In a world full of mass-produced items, there’s something truly special about a handcrafted touch. Choosing to DIY your cupcake stand offers numerous advantages, making it a popular choice for event planners and home entertainers alike. Firstly, it’s incredibly budget-friendly. Hula hoops are inexpensive, and most other materials can be found at dollar stores or craft shops, significantly cutting down on event costs compared to renting or purchasing high-end stands. Secondly, customization is key. A DIY stand allows you to perfectly match your event’s theme and color scheme, ensuring a cohesive and visually appealing presentation that reflects your unique style. You’re not limited to standard designs; your imagination is the only boundary. Thirdly, there’s a genuine sense of accomplishment and pride that comes with creating something beautiful with your own hands. This project is simple enough for beginners but yields professional-looking results. Finally, repurposing items like hula hoops adds an eco-friendly element, giving new life to everyday objects and contributing to more sustainable party planning. Embrace the joy of creation and let your personality shine through every detail of your event!
Gathering Your Materials: What You’ll Need
Before embarking on this exciting DIY journey, it’s essential to gather all your materials. Having everything ready will make the process smooth and enjoyable. Here’s a comprehensive list of what you’ll need, along with a few tips for sourcing them:
- 2 Hula Hoops: The stars of our show! Standard adult-sized hula hoops work best. You can often find these at toy stores, dollar stores, or even discount retailers. Choose ones that are sturdy but not too heavy.
- Picture Frame (8×10 or similar): This will form the base of your stand. A lightweight frame is ideal. You can often find suitable frames at thrift stores, dollar stores, or craft supply shops. The size can vary depending on how large you want your top tier to be.
- Gold Spray Paint (or your color of choice): This allows for complete personalization. While gold offers a luxurious finish, feel free to pick a color that matches your event’s aesthetic – silver, rose gold, white, or even a vibrant hue would look fantastic. Ensure it’s suitable for plastic and wood/MDF.
- Small Carton Box (approximately 6×6 inches): This will serve as the central support and helps stabilize the structure. A sturdy cardboard box from packaging works perfectly. You can also use a small wooden craft box.
- Scissor: For cutting twine, fish line, and toothpicks. A sharp pair will make your work much easier.
- Twine: Strong, natural twine is excellent for securing the hula hoops. You’ll need a good length, so a small spool is recommended.
- Hot Glue Gun & Glue Sticks: Indispensable for quick and strong adhesion, especially for the decorative elements and securing the frame. Always exercise caution when using a hot glue gun.
- Fish Line: Transparent and strong, fish line is perfect for hanging the frame and creating an illusion of floating. A thin yet durable line is best.
- Toothpicks: These tiny helpers are crucial for creating secure anchor points for the fish line on your frame.
- String Lights (Battery-Operated LED): Adds a magical, enchanting glow to your display. Battery-operated ones are best for portability and safety. Choose warm white or a color that complements your theme.
- Faux Flowers: For decorative embellishment. Select flowers that match your event’s color palette and overall style. You can also use greenery, ribbons, or other decorative elements.
Step-by-Step Guide: Crafting Your Hula Hoop Cupcake Stand
Let’s get creative! Follow these detailed instructions to assemble your stunning DIY hula hoop cupcake stand. Take your time with each step for the best results.
Step 1: Preparation and Initial Assembly
Begin by setting up your workspace in a well-ventilated area, preferably outdoors or in a garage, especially when spray painting. Lay down a drop cloth or old newspapers to protect your surfaces.
- Spray Painting Components: Take your two hula hoops, the small carton box, and the picture frame. Apply an even coat of your chosen spray paint (e.g., gold) to all sides of these items. For the hula hoops, make sure to rotate them to cover all angles. For the box and frame, ensure a smooth, consistent finish. Allow everything to dry completely according to the paint manufacturer’s instructions, which may require several hours or even overnight. Patience here ensures a durable and professional look.
- Preparing the Box for Attachment: Once your box is fully dry, grab your scissors. Carefully make four small, evenly spaced holes on each side of the box. These holes should be positioned near the top edge and directly across from each other. These will serve as anchor points for the twine to secure the hula hoops.
- Attaching the First Hula Hoop: Take one of your dried hula hoops. Cut a generous piece of twine, about 18-24 inches long. Thread one end of the twine through one of the holes on the box, pull it through, and knot it securely from the inside or bottom to prevent it from slipping out. Now, align the hula hoop evenly on top of the box. Bring the twine up and over the hula hoop, then back down through the corresponding hole on the opposite side of the box. Pull it taut and tie it securely. Repeat this process for all four sides of the box, ensuring the hula hoop is centered and firmly attached.
- Attaching the Second Hula Hoop: Now, take your second hula hoop. Position it directly underneath the first hula hoop, again ensuring it’s centered with the box. Use additional pieces of twine to secure this hula hoop to the bottom edges of the box, mirroring the process you used for the top hoop. Make sure both hoops are parallel and well-secured to the central box.
- Preparing the Picture Frame for Suspension: Pick up your painted picture frame. Locate the small hanging holes, typically found on the back corners. Cut four equal lengths of fish line, each about 12-18 inches long, depending on how low you want the top tier to hang. Thread one piece of fish line through each hole.
- Creating Secure Anchors: For each piece of fish line, cut a toothpick in half. Tie one half of a toothpick to the very end of each fish line that is threaded through the frame. This toothpick acts as a stopper. Apply a small dab of hot glue directly onto the toothpick and the knot, then carefully press it against the corner of the frame, ensuring it’s firmly attached and won’t slip through the hole. Repeat this for all four corners.
- Assembling the Top Tier Hanger: Now, turn the frame around so the front is facing down. Gather all four pieces of fish line that are now attached to the frame. Carefully adjust them, ensuring all the strings are of the same length when held taut, so the frame hangs evenly. Once you’re satisfied with the lengths, tie all four fish lines together at the very top with a strong, secure knot. This central knot will be used to suspend the frame from the hula hoop structure.
Step 2: Final Assembly and Decoration
With the main structure ready, it’s time to add the finishing touches that will make your cupcake stand truly sparkle!
- Attaching the Top Tier: Take the knotted end of the fish line assembly from your picture frame. Carefully thread this knot through the middle of the top hula hoop, allowing the frame to hang beneath. Adjust the height of the frame to your liking. Once positioned, wrap the fish line (from the knot) a few times around the top hula hoop, ensuring it’s firmly in place. Secure it with another tight knot, then trim any excess string. The picture frame will now serve as your top tier, ready to hold a small cake or additional cupcakes.
- Adding Magical String Lights: Now for the enchanting glow! Place the battery pack of your string lights inside the small carton box, tucking it neatly out of sight. Begin to wrap the string lights carefully around both hula hoops, starting from the central box. Distribute the lights evenly, creating a beautiful, warm illumination that will highlight your delicious treats. Make sure to hide the wire as much as possible for a clean look.
- Decorating with Faux Flowers: The final flourish! Using your hot glue gun, carefully attach your faux flowers (or other chosen embellishments) to both the top and bottom hula hoops. You can create clusters of flowers, run a floral garland along the hoops, or strategically place individual blooms. Consider adding some greenery for contrast and fullness. Be mindful of where your cupcakes will sit to ensure the decorations don’t interfere.
Your beautiful and unique DIY hula hoop cupcake stand is now finished and ready to impress! Stand back and admire your handiwork.
Tips for a Perfect DIY Cupcake Stand
To ensure your project goes smoothly and your finished cupcake stand is nothing short of spectacular, here are a few expert tips:
- Test Stability: Before loading your stand with delicious treats, gently test its stability. Give it a slight shake to ensure all connections (twine, hot glue) are secure. A stable stand is a safe stand!
- Allow Ample Drying Time: Rushing the drying process for spray paint can lead to a sticky finish or smudges. Always follow the manufacturer’s recommendations. Applying multiple thin coats is better than one thick coat.
- Measure Twice, Cut Once: This age-old adage applies particularly when cutting twine or fish line. Precise measurements ensure the frame hangs evenly and the hoops are balanced.
- Safety First: When using hot glue guns, always be mindful of hot surfaces and liquid glue. Keep fingers clear and work in a steady, controlled manner. If children are helping, adult supervision is crucial.
- Consider Your Cupcake Count: The size of your hula hoops and the frame will dictate how many cupcakes your stand can hold. Plan accordingly for your event. You might use larger hula hoops for more capacity.
- Embrace Creativity: While gold paint and faux flowers offer a classic look, don’t be afraid to experiment! Use different paint colors, add glitter, wrap the hoops in ribbons or fabric, or incorporate battery-operated fairy lights for an extra touch of magic. Think about your event’s specific theme.
Customization Ideas for Every Occasion
One of the greatest joys of DIY is the ability to personalize your creation to perfectly suit any event. Here are some ideas to make your hula hoop cupcake stand truly unique:
- Wedding Wonderland: Use white or silver spray paint, drape with delicate lace or satin ribbons, and adorn with white roses, hydrangeas, or baby’s breath. Consider small pearl accents for an elegant touch.
- Birthday Bash: Let the birthday person’s favorite colors guide your paint and decor choices. Bright, vibrant flowers, confetti-themed ribbons, or even small toy figures attached with hot glue can make it playful.
- Baby Shower Bliss: Opt for pastel colors like soft blues, pinks, or yellows. Decorate with baby-themed embellishments like tiny pacifiers, rattles, or plush animals. Ribbons tied in bows can add to the charm.
- Holiday Celebrations: For Christmas, use red and green paint, pine cones, berries, and artificial snow. For Halloween, try black and orange, spider webs, or miniature spooky figures. The possibilities are endless!
- Seasonal Themes: Embrace the seasons! Spring stands can feature cherry blossoms or daffodils. Summer might call for sunflowers or seashells. Autumn can be adorned with fall leaves, small pumpkins, and rustic twine.
- Themed Parties: If you have a specific theme like “Under the Sea,” “Boho Chic,” or “Enchanted Forest,” tailor your decorations accordingly. Use relevant colors, textures, and small thematic elements to bring your vision to life.
Final Thoughts on Your DIY Hula Hoop Cupcake Stand
Creating your own hula hoop cupcake stand is more than just a craft project; it’s an opportunity to inject personal charm and creativity into your celebrations. This simple yet effective DIY idea, brilliantly showcased by SPECIAL CREATIONS BY NELLY, empowers you to craft a memorable focal point for your dessert table without breaking the bank. The satisfaction of seeing your handmade creation beautifully display an array of delicious cupcakes is truly rewarding. Whether you’re hosting an intimate gathering or a grand affair, this stand promises to be a conversation starter and a testament to your imaginative spirit. So gather your materials, follow our comprehensive guide, and prepare to delight your guests with a unique, elegant, and perfectly customized cupcake display. Happy crafting, and may your events be filled with joy and deliciousness!