
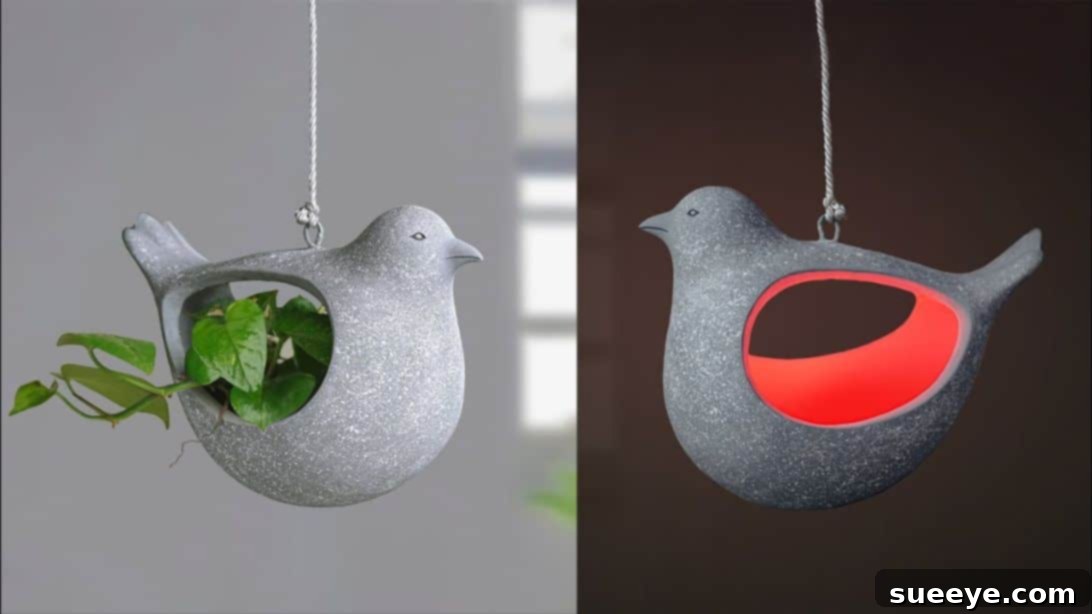
There’s an undeniable allure in bringing the tranquility and beauty of nature indoors, or enhancing our outdoor spaces with unique, handcrafted elements. As an ardent admirer of birds and all things creative, I was utterly captivated when I first encountered this ingenious DIY project by the talented Kuti Bari. This isn’t just another craft; it’s an opportunity to create a truly enchanting DIY hanging bird planter, a piece of art that promises to infuse whimsical charm and personalized elegance into any corner of your home or garden.
Imagine this adorable bird-shaped planter gracefully swaying on your porch, serving as a charming focal point suspended from your living room ceiling, or nestled thoughtfully among the lush foliage of your garden trees. The versatility of this project is one of its greatest appeals. Not only does it offer a delightful way to display your favorite small plants, succulents, or air plants, but it can also be used to house delicate LED fairy lights, creating a magical, ambient glow that transforms your space after dusk.
Crafting your own DIY hanging bird planter is an incredibly rewarding experience. It allows for unparalleled customization, ensuring that your finished piece perfectly aligns with your personal style and existing decor. Beyond the sheer joy of creation, this project champions a sustainable approach to home embellishment, repurposing simple, everyday materials into something both beautiful and functional. It’s a wonderful chance to express your artistic flair, de-stress through a mindful activity, and add a bespoke touch that store-bought items simply cannot replicate.
Whether you’re a seasoned crafter looking for your next exciting endeavor or a beginner eager to dive into the world of DIY, this comprehensive guide will walk you through each step with clear, easy-to-follow instructions. We’ll demystify the process, from preparing your basic structure to applying the finishing touches, making the entire journey enjoyable and straightforward. So, gather your supplies, prepare your workspace, and let’s embark on this creative adventure together to transform ordinary materials into an extraordinary, captivating piece of decorative art!
Essential Materials for Crafting Your DIY Hanging Bird Planter
To ensure a seamless and enjoyable crafting experience, it’s always best to gather all your necessary materials before you begin. Most of these items are easily found at local craft stores, hardware shops, or might even be tucked away in your home. Here’s a detailed list of everything you’ll need to bring your beautiful bird planter to life:
- Balloon: A standard, round balloon will serve as the foundational mold for your bird’s body. Select one that inflates to a size proportionate to your desired finished planter.
- Scissors: A reliable pair of sharp scissors is indispensable for precise cutting of paper, cardboard, and other components, ensuring clean edges and shapes.
- Paper: Standard printer paper or any lightweight, flexible paper will be used for preliminary shaping and support structures.
- Cardboard: Sturdy pieces of cardboard are crucial for constructing the bird’s beak and tail, providing a robust base. Recycled cereal boxes, tissue boxes, or thin shipping cardboard are excellent choices.
- Painter’s Tape: This versatile, low-tack adhesive tape is perfect for temporarily securing cardboard elements to the balloon. It holds components firmly without damaging the balloon’s surface and is easy to remove.
- Glue with Water Mixture: The cornerstone for your papier-mâché layers. A common and effective ratio is one part PVA (white school glue) to one part water, thoroughly stirred until you achieve a smooth, slightly runny consistency. This mixture acts as the binder for your newspaper strips.
- Newspaper (cut into small pieces): The primary material for building the bird’s body structure. Tear or cut the newspaper into small, irregular strips or squares. These smaller pieces are easier to work with, conform better to curves, and help create a smoother overall finish for the papier-mâché.
- Marker: A permanent marker is essential for drawing outlines, marking cutting guides, and indicating specific areas on your bird’s structure.
- Wire: A length of sturdy yet pliable wire, such as galvanized steel wire or a strong floral wire, is required to fashion the robust hanging hook for your planter. Ensure its gauge is sufficient to support the anticipated weight of the completed planter, including plants and soil.
- Pliers: A pair of needle-nose or standard pliers will be necessary for safely and accurately bending, shaping, and cutting the wire to form the hanging loop.
- White Cement with Glue and Water Mixture: This unique blend provides the final, durable, and weather-resistant outer shell. The ideal consistency is a thick, creamy paste—similar to pancake batter or yogurt—achieved by meticulously mixing white cement powder with water and a small amount of PVA glue. The addition of glue enhances adhesion and flexibility, preventing cracks. Always test a small batch to perfect the consistency before applying it to your bird.
- Cord: A strong, decorative cord will be used for hanging your finished bird planter. Options include jute twine, macrame cord, nylon rope, or even thin chain, chosen to complement your desired aesthetic and paint scheme.
- Sandpaper: A selection of sandpaper grits (ranging from medium-grit for initial shaping to fine-grit for ultimate smoothness) will be used to refine and smooth any rough edges or imperfections after the cement has dried, ensuring a polished, professional surface.
- Paint: High-quality acrylic paints, spray paints, or outdoor-grade paints are suitable. Choose colors that harmoniously blend with your decor, or dare to be bold with vibrant hues and intricate patterns to bring your bird to life.
- Brush: A variety of paint brushes, including wider brushes for applying base coats and finer brushes for detailed work, accents, and artistic touches.
With all your materials meticulously gathered and organized, you are now perfectly poised to embark on the exciting transformation process. Let’s proceed to the detailed, step-by-step instructions and begin crafting your magnificent DIY Hanging Bird Planter!
Step-by-Step Guide to Crafting Your Unique Bird Planter
Step 1: Constructing the Beak and Establishing the Initial Body Shape
Begin by carefully inflating your chosen balloon to the desired size, which will define the main body of your bird. Once inflated, tie it securely to maintain its shape. Next, take a small, rectangular piece of cardboard – typically around 3-4 inches in length and 1.5-2 inches in width, though this can vary based on your balloon’s size. Cut a small slit, about halfway through, along the middle of one of its longer edges. Gently bend the cardboard, allowing the cut edges to overlap slightly, which will form a pointed, conical structure – this will be the bird’s distinctive beak. Apply a small amount of glue to secure this shape. Once the glue has dried, trim any excess cardboard from the sides to refine its form. Using painter’s tape, firmly attach this newly formed beak to the top-front section of the inflated balloon. Ensure it is securely taped and stable, as this initial shaping is critical for establishing the overall elegant silhouette of your bird.
Step 2: Shaping the Tail for Avian Grace
Now, let’s give our bird its characteristic tail. Cut two identical rectangular pieces of cardboard, making sure their size is proportionate to the balloon’s body and the beak you’ve just created. Position these two cardboard pieces on the bottom-rear section of the balloon. Using painter’s tape, securely attach approximately half of each rectangle to the balloon’s surface, allowing the other half to extend outward. This arrangement creates a foundational ‘V’ shape for the tail. Once firmly taped, meticulously cut the extending ends of these cardboard pieces into your desired bird tail shape. You have complete creative freedom here – opt for a simple rounded tail, an elegant split swallow-like tail, or even a more elaborate fanned design. The painter’s tape will hold these components firmly in place, preparing the structure for the subsequent layering process.
Step 3: Applying Papier-Mâché for Strength and Form Definition
With the fundamental bird shape now established, it’s time to impart strength, rigidity, and a smooth base surface using the time-honored technique of papier-mâché. Begin by thoroughly dipping your pre-cut newspaper strips into the glue-water mixture. Ensure each piece is fully saturated but carefully remove any excessive dripping. Systematically apply these wet newspaper strips all around the inflated balloon, meticulously covering the cardboard beak and tail structures. As you apply, gently smooth out any wrinkles or trapped air bubbles to ensure a uniform and taut surface. It is crucial to cover every part thoroughly, building up a consistent and even layer. For optimal durability and structural integrity, apply at least 2-3 distinct layers of newspaper, allowing each layer to dry partially before applying the next. This multi-layered approach will result in a remarkably robust and stable bird planter. Once fully covered, place your bird aside in a well-ventilated area and allow it to dry completely. This crucial drying period can range from 12 to 24 hours, depending on ambient humidity and the number of layers applied.
Step 4: Defining the Planter Opening
Once your papier-mâché bird structure is completely dry and has achieved a rigid form, it’s time to define the opening that will house your plants or lights. Using your marker, carefully draw a circular or oval shape on the back of your bird, strategically placing it where you envision your plants or LED lights sitting. This will be the main access opening for the planter. Ensure the size of this opening is sufficient to comfortably accommodate your chosen plant pot or light source without compromising the structural integrity of the bird. Once you are entirely satisfied with the shape and precise placement, use sharp scissors or a craft knife to meticulously cut out this marked circle. If you desire a symmetrical design or multiple openings, you can use the cut-out piece as a template to trace an identical shape on the opposite side, then cut that out as well. However, if a single opening suffices, simply proceed with one. Take your time during this step to make clean, precise cuts, as this opening will be a prominent and visible feature of your finished planter.
Step 5: Integrating the Robust Hanging Hook
Now, let’s prepare the essential mechanism that will allow your beautiful bird planter to hang securely. Take your sturdy wire and, using a pair of pliers, carefully bend it into a strong, circular loop. It is paramount to ensure this loop is robust and well-formed, capable of reliably bearing the entire weight of the finished planter, including its plants and soil. This loop will serve as the primary attachment point for hanging. Position this wire loop securely on the very top of your bird’s back, ensuring it is perfectly aligned along the central axis for balance. For temporary stability, you might find it helpful to use an additional piece of painter’s tape to hold it firmly in place. This step is absolutely critical for the functionality and safety of your hanging planter, so double-check that the wire is impeccably positioned and firmly stable before proceeding to the next stage of cement application.
Step 6: Applying the Cement Mixture and Sculpting Fine Details
This pivotal step will dramatically enhance the durability, weather resistance, and aesthetic texture of your bird planter. Before starting, don a pair of protective gloves, as the cement mixture can be abrasive and irritating to bare skin. Carefully begin applying the white cement, glue, and water mixture uniformly over the entire papier-mâché bird structure. Ensure that every inch is meticulously covered, including the embedded wire hook – however, the actual loop portion of the wire must remain exposed for future hanging. Apply the mixture evenly, aiming for a consistent thickness across the entire surface. While the cement is still wet and pliable, use your gloved hands to gently and patiently smooth out the surface, meticulously eliminating any lumps, rough patches, or uneven areas. This is your prime opportunity to refine the bird’s overall form and achieve a professional, polished finish. Before the cement begins to set completely, take the initiative to sculpt or define the bird’s tail feathers using a small sculpting tool, a craft stick, or even your fingers to add texture and realism. Subsequently, take a generous portion of the cement mixture and carefully sculpt the bird’s head and beak, adding more definition, character, and realism to these prominent features. Once you are satisfied with your sculpting, lightly brush the entire surface with a thin, smooth layer of the water-and-glue mixture (from Step 3). This final sealing layer helps to consolidate the surface and ensures an even smoother texture. Now, allow your sculpted bird to dry undisturbed for a minimum of 12 hours, or ideally a full 24 hours, to ensure the cement cures properly, achieving maximum hardness and strength. Patience during this drying phase is paramount for the longevity and integrity of your planter.
Step 7: Final Finishing and Smoothing for a Polished Look
After the cement has completely cured and hardened to its maximum strength, it’s time for the critical final touches before you unleash your artistic vision with paint. First, thoroughly rinse the entire bird planter with water. This essential step helps to meticulously clean off any loose cement particles, dust, or residue that may have accumulated, creating a pristine surface for subsequent steps. Once rinsed, carefully reach into the cut openings and gently remove the deflated balloon and any remaining papier-mâché paper from the interior of the bird. This will leave a perfectly hollow and clean interior, ready to house your chosen plants or lights. Next, take your sandpaper. Begin with a medium-grit sandpaper to effectively tackle any significant rough spots, prominent seams, or uneven areas on the outside surface of the bird. Focus on creating a consistent and smooth base. Once the major imperfections have been addressed and smoothed, switch to a finer-grit sandpaper. Use this finer grit to achieve a wonderfully smooth, tactile, and polished finish across the entire surface. This diligent sanding process is absolutely vital for ensuring that your paint adheres beautifully and evenly, ultimately giving your bird planter a professional, refined, and exquisite appearance. After sanding, meticulously wipe off any lingering dust or debris to ensure a clean canvas for painting.
Step 8: Unleashing Your Artistic Flair with Paint
Now, we arrive at arguably the most exciting and transformative part of the entire project – bringing your bird planter to vibrant life with color! Carefully select your desired paint colors. You have boundless creative freedom here: you can opt for realistic bird hues and natural tones to mimic a specific species, or you can unleash your wildest imagination with bold, fantastical colors, intricate patterns, and abstract designs. If your planter is destined for outdoor display, it is highly recommended to choose an outdoor-grade paint that offers superior durability and weather resistance against the elements. Begin by applying your chosen base coat evenly across the entire bird, ensuring full coverage. Allow this initial coat to dry completely, following the manufacturer’s recommendations. Once the base is dry, you can proceed to add exquisite details such as realistic eyes, stylized wings, intricate feather patterns, or charming decorative motifs using finer brushes. Do not shy away from experimentation with different shades, textures, or even painting techniques. Perhaps you envision a distressed, antique look, or a sleek, glossy finish? This step is where your unique personality and artistic vision truly shine through, ensuring your bird planter is uniquely yours. For enhanced longevity and protection, especially for outdoor use, consider applying a clear protective sealant or varnish after all paint layers have thoroughly dried.
Step 9: Final Assembly and Proud Display
Your beautifully crafted and meticulously decorated bird planter is now almost ready for its grand debut! Take your chosen decorative cord and tie it securely onto the robust wire hook that you thoughtfully embedded in Step 5. Ensure that the knot is strong, reliable, and capable of safely bearing the full weight of the planter, its contents, and any additional decorative elements. Carefully adjust the length of the cord to suit the specific location where you intend to hang your magnificent bird. Finally, it’s time for the delightful moment of placing your chosen contents inside. You can opt for small, charming potted plants such as resilient succulents, elegant air plants, or vibrant small flowering annuals. Alternatively, for a truly magical and captivating evening display, gently place an LED light, solar-powered garden light, or delicate fairy lights inside the opening to cast a warm, inviting, and enchanting glow. Carefully hang your finished DIY bird planter in its chosen spot and take a moment to proudly admire your handiwork. Whether it’s brightening your porch, accenting a cozy living room corner, or adding an unparalleled charm to your garden sanctuary, this unique and handmade creation is absolutely certain to delight both you and your guests!
Bringing Your Garden and Home to Life: The Enduring Charm of the DIY Hanging Bird Planter
Congratulations once again on the successful completion of your very own DIY Hanging Bird Planter! This project transcends the realm of a simple craft; it represents a wonderful opportunity to infuse your living spaces with character, warmth, and a profound connection to the natural world. Every single step in its creation, from the initial inflation of the balloon to the final, deliberate brushstroke of paint, provides ample room for creative expression and personal touches, culminating in a truly unique and meaningful piece that perfectly reflects your individual style and dedication.
Valuable Tips for Success and Endless Customization:
- Thoughtful Plant Selection: When choosing plants, opt for varieties that are well-suited for confined spaces and do not demand excessive watering, particularly if your planter does not incorporate traditional drainage holes. Resilient succulents, graceful air plants (which require no soil), small ferns, or even fragrant herbs like thyme and oregano are all excellent and popular choices.
- Addressing Drainage: If you plan to house live plants directly within the planter, consider adding a thin layer of gravel, small pebbles, or even activated charcoal at the very bottom before introducing soil. While this specific planter design does not feature explicit drainage holes, careful and measured watering is paramount to prevent root rot. Alternatively, a highly practical solution is to keep your plants in their original nursery pots and simply place these pots inside the bird planter, removing them periodically for thorough watering outside the bird to allow for proper drainage.
- Unleashing Creative Painting: Do not feel constrained by realistic bird colors. This is your chance to experiment! Explore the allure of metallic paints for a shimmering effect, incorporate sparkling glitter, design intricate mosaic patterns, or embrace abstract designs. Consider adding whimsical googly eyes, small decorative beads, or even fabric scraps for an extra touch of delightful charm and personality.
- Creating a Captivating Flock: Why stop at just one? Consider crafting several bird planters of varying sizes, colors, and even slightly different shapes. When hung together at staggered heights, they can create a stunning, dynamic, and visually compelling display that mimics a whimsical bird flock.
- A Unique Gift Idea: A meticulously handmade bird planter, filled with a small plant or a set of fairy lights, makes an incredibly thoughtful, personalized, and unique gift for bird enthusiasts, avid gardeners, or anyone who deeply appreciates the beauty and effort of handcrafted decor. It’s a gift that carries genuine sentiment and stands out.
This remarkable project stands as a testament to the fact that genuinely beautiful, custom-designed decor does not necessitate a hefty price tag or professional expertise. With just a modest investment of time, a spark of creativity, and a collection of simple, accessible materials, you possess the power to forge something truly extraordinary and impactful. Your finished DIY hanging bird planter will not only significantly enhance the aesthetic appeal of your home or garden but will also serve as a constant source of proud remembrance of your admirable crafting capabilities and artistic vision. So, take a well-deserved step back, thoroughly admire your unique and personal creation, and perhaps even inspire friends, family, and visitors to try their hand at this delightfully engaging and rewarding craft. Happy crafting, and may your bird planter bring you immense joy!