
Irresistible Homemade Caramel Bars: Your Ultimate Recipe for Decadent Slices
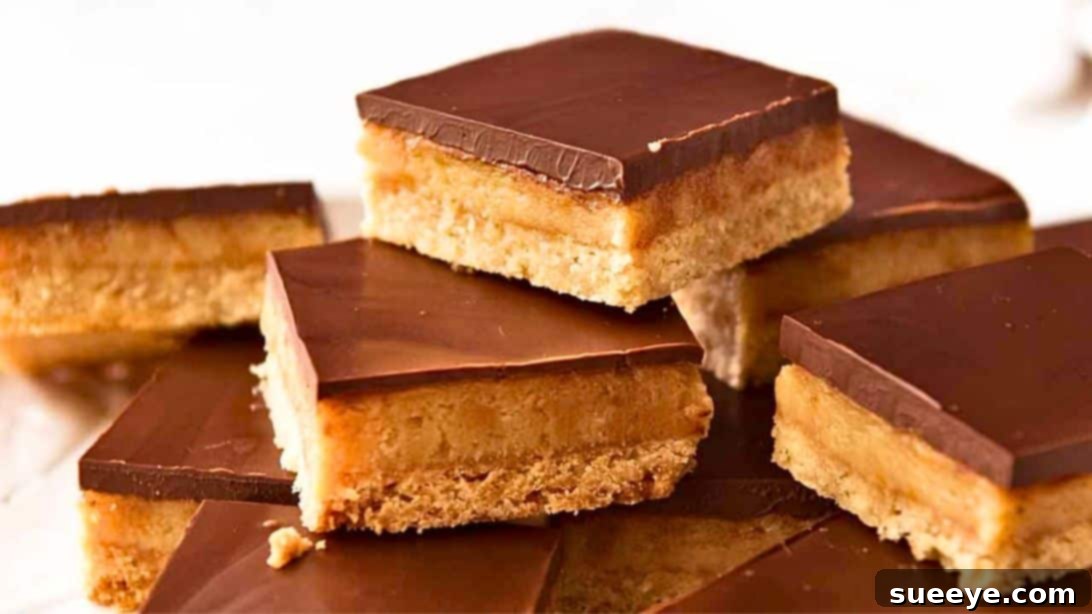
Prepare to delight your taste buds with these incredibly easy and undeniably delicious homemade caramel bars, inspired by the culinary genius of RecipeTin Eats. If you’ve been searching for that perfect sweet treat that combines a buttery shortbread base, a rich, chewy caramel filling, and a smooth chocolate topping, look no further. These aren’t just any dessert; they are a masterpiece of textures and flavors, designed to make every bite a moment of pure bliss. Perfect for sharing with family and friends, gifting, or simply indulging yourself, these chocolate caramel slices can be prepared ahead of time, making them an ideal choice for any occasion.
Whether you’re an experienced baker or just starting your journey in the kitchen, this recipe for easy caramel bars is straightforward and yields impressive results every time. We’ll guide you through each step, from crafting the golden shortbread base to perfecting the luscious caramel and adding the final touch of rich chocolate. Get ready to create a dessert that will have everyone asking for more!
Why You’ll Love These Easy Caramel Bars
There are countless reasons why these caramel bars will become a staple in your baking repertoire. First and foremost, they are incredibly simple to make, yet taste like they came from a high-end bakery. The combination of a crunchy, slightly salty base with the sweet, gooey caramel and crisp chocolate creates an explosion of flavors and textures that is truly addictive. They are also incredibly versatile; customize them with different chocolate types or add a sprinkle of sea salt for an elevated gourmet touch. Furthermore, their make-ahead convenience means less stress when entertaining, allowing you to enjoy your guests while a delicious dessert waits patiently in the fridge. These homemade caramel bars are a guaranteed crowd-pleaser, perfect for potlucks, parties, holiday gifts, or simply a comforting treat on a quiet evening.
Essential Ingredients for Your Decadent Caramel Slices
Crafting the perfect caramel bar requires simple, high-quality ingredients that work together to create layers of flavor. Here’s what you’ll need:
Base
- 1 cup plain or all-purpose flour
- ½ cup brown sugar, loosely packed
- ½ cup desiccated coconut
- ½ cup unsalted butter, melted
Caramel Filling
- ½ cup unsalted butter, roughly chopped
- ½ cup brown sugar, loosely packed
- 1 tsp vanilla extract
- 1¼ cup sweetened condensed milk
Chocolate Topping
- 1¼ cup dark, milk, or semi-sweet chocolate chips
- 1 tbsp vegetable oil
Recommended Equipment
Having the right tools can make all the difference in ensuring a smooth and enjoyable baking process. For these delightful caramel bars, you’ll need a few common kitchen items:
- 7×11 inch Rectangle Pan: Essential for shaping your bars.
- Baking or Parchment Paper: Crucial for easy removal and cleanup.
- Large Mixing Bowl: For preparing the base ingredients.
- Saucepan: A non-stick one is recommended for the caramel filling.
- Whisk: To ensure smooth, lump-free caramel.
- Microwave-Safe Bowl: For melting the chocolate.
- Spatula or Offset Spatula: For spreading layers evenly.
- Measuring Cups and Spoons: For accurate ingredient proportions.
Step-by-Step Directions: Crafting Your Perfect Caramel Bars
Follow these detailed instructions to create luscious caramel bars that are sure to impress.
Step 1: The Golden Shortbread Base
Begin by preheating your oven to 180°C (350°F). While the oven heats, prepare your 7×11 inch rectangle pan by greasing it thoroughly, then lining it with baking or parchment paper. Make sure to leave a generous overhang on the sides – this acts as a sling, making it incredibly easy to lift the entire slab of caramel bars out of the pan once chilled and set. In a spacious mixing bowl, combine the all-purpose flour, brown sugar, desiccated coconut, and the melted unsalted butter. Mix these ingredients together until they are thoroughly combined and resemble wet sand. This ensures a uniform texture for your base. Transfer this mixture into your prepared pan, then press it down firmly and evenly across the bottom. A flat-bottomed glass or the back of a spoon can help achieve a perfectly smooth and compact layer. Bake this base in the preheated oven for approximately 15 minutes, or until its surface turns a beautiful golden brown. The aroma filling your kitchen will be a delightful preview of what’s to come! Once baked, remove the pan from the oven and let it cool down slightly at room temperature before transferring it to the refrigerator. Chilling the base is a critical step, as it prevents the warm caramel from seeping into it and helps create distinct, perfectly layered bars.
Step 2: The Luscious Caramel Filling
While your base chills, prepare the star of the show: the rich, gooey caramel filling. Lower your oven temperature to 160°C (320°F). Place a medium saucepan on your stove over medium-low heat. Add the roughly chopped unsalted butter, brown sugar, and vanilla extract. Allow the butter to melt completely, then whisk all ingredients together continuously until the sugar has fully dissolved. This gentle whisking prevents the sugar from crystallizing and ensures a smooth caramel. Let this mixture come to a gentle simmer, where small bubbles start to appear. Once simmering, add the sweetened condensed milk, and continue whisking consistently for about 5 minutes. During this time, the caramel will thicken and begin to form large, slow-moving bubbles as it cooks. It’s crucial to keep whisking to prevent the bottom from scorching and ensure even cooking. After about 5 minutes, once the bubbles are noticeably larger and slower, continue whisking for just one more minute to achieve the perfect consistency – thick enough to set, but still wonderfully chewy. Immediately pour this warm, golden caramel over the chilled shortbread base in the pan. Gently tilt the pan from side to side to spread the caramel evenly across the surface. Place the pan back into the oven and bake for approximately 12 minutes. This second bake helps the caramel set beautifully. After baking, remove the pan and let it cool completely on a wire rack at room temperature for at least 20 minutes. This slow cooling prevents cracking. Then, transfer the pan back to the refrigerator and chill for a minimum of 30 minutes, or until the caramel layer is firm enough to support the chocolate topping.
Step 3: The Decadent Chocolate Topping & Assembly
The final layer brings a touch of classic chocolatey goodness to your caramel bars. In a microwave-safe bowl, combine your choice of dark, milk, or semi-sweet chocolate chips with the vegetable oil. The oil helps create a smoother, more spreadable chocolate that sets with a beautiful sheen. Heat the chocolate in the microwave in 30-second intervals, stirring thoroughly after each interval. This gradual melting prevents the chocolate from burning or seizing. Continue until the chocolate is completely melted and smooth. Once the chocolate is perfectly melted and glossy, pour it evenly over the chilled caramel layer. Use an offset spatula or the back of a spoon to spread the chocolate from edge to edge, ensuring full coverage. For an extra smooth finish, gently shake the pan from side to side to help the chocolate self-level. Return the pan to the refrigerator for at least 1 hour, or until the chocolate topping is completely set and firm. Once fully set, remove the pan from the fridge. Allow it to sit on your counter for about 5 minutes; this slight warming makes it easier to cut clean, crisp bars without cracking the chocolate. Using a sharp knife that has been warmed under hot water (and dried), cut the slab into desired bar sizes. Wipe the knife clean between each cut for the neatest edges. Serve these delightful caramel bars and watch them disappear!
Tips for Perfect Caramel Bars Every Time
Achieving bakery-quality caramel bars is easier than you think with a few helpful tips:
- Use Quality Ingredients: Good butter and sweetened condensed milk make a significant difference in the flavor and texture of your caramel.
- Don’t Rush the Caramel: Cooking the caramel slowly over medium-low heat and stirring constantly prevents it from burning and ensures a smooth, even consistency. The whisking time for the condensed milk is crucial for setting.
- Chill Thoroughly: Adequate chilling between layers is key to getting clean, distinct layers and preventing your bars from becoming a gooey mess. Patience here pays off!
- Even Spreading: Take your time to spread each layer (base, caramel, chocolate) as evenly as possible. This ensures uniform bars and a professional finish.
- Clean Cuts: For neat slices, let the bars come to room temperature for 5-10 minutes before cutting. Use a large, sharp knife, and run it under hot water, wiping it dry before each cut. This helps glide through the chocolate without cracking.
- Avoid Overheating Chocolate: Melting chocolate slowly in short intervals in the microwave or using a double boiler prevents it from seizing or burning, ensuring a smooth, glossy topping.
Variations & Customizations
While the classic caramel bar recipe is perfect as is, feel free to experiment and make it your own!
- Chocolate Choices: Experiment with different types of chocolate for the topping. White chocolate, a mix of dark and milk, or even a sprinkle of chocolate shavings can add a unique touch.
- Salty-Sweet Twist: Sprinkle a pinch of flaky sea salt over the melted chocolate topping before it sets for a delicious salted caramel effect.
- Nutty Base: Add finely chopped nuts (like pecans or walnuts) to the shortbread base for extra crunch and flavor.
- Coconut Lover’s Dream: Increase the amount of desiccated coconut in the base or toast some coconut flakes to sprinkle on top of the chocolate.
- Espresso Boost: A small amount (½ tsp) of instant espresso powder dissolved in the caramel mixture can deepen its flavor beautifully.
Storage Instructions
These caramel bars are excellent for making ahead, and they store wonderfully, allowing you to enjoy them for days.
- Room Temperature: If stored in an airtight container in a cool, dry place, these bars will stay fresh for up to 3-4 days.
- Refrigerator: For longer storage and a firmer texture, keep the caramel bars in an airtight container in the refrigerator for up to a week. They are delicious chilled, or you can let them come to room temperature for a softer bite.
- Freezing: For extended storage, cut the bars and place them in a single layer in an airtight freezer-safe container, separated by parchment paper. They can be frozen for up to 2-3 months. Thaw them in the refrigerator or at room temperature before serving.
Frequently Asked Questions (FAQ)
Here are answers to some common questions you might have about making these delightful caramel bars:
- Q: Can I use different types of chocolate for the topping?
A: Absolutely! Feel free to use milk chocolate, dark chocolate, semi-sweet, or even white chocolate chips based on your preference. The vegetable oil helps keep the chocolate smooth regardless of the type. - Q: My caramel didn’t set properly, what went wrong?
A: The most common reason for runny caramel is not cooking it long enough. The caramel needs to reach a certain thickness and bubble consistency (large, slow bubbles) to set. Ensure you cook it for the full recommended time and keep whisking. - Q: How long do these caramel bars last?
A: When stored in an airtight container, they can last for 3-4 days at room temperature or up to a week in the refrigerator. They also freeze well for longer storage. - Q: Can I make this recipe gluten-free?
A: Yes, you can substitute the all-purpose flour in the base with a 1:1 gluten-free baking flour blend. Ensure your other ingredients are also certified gluten-free. - Q: What if I don’t have desiccated coconut?
A: While the coconut adds a lovely texture and subtle flavor, you can omit it if you prefer or don’t have it on hand. The base will still be delicious!
Indulge in Homemade Perfection
There’s something incredibly satisfying about creating a delicious treat from scratch, and these homemade caramel bars deliver on every front. From the satisfying crunch of the shortbread base to the creamy chew of the caramel and the smooth finish of the chocolate, each layer contributes to an unforgettable dessert experience. Whether you’re a seasoned baker or just dipping your toes into the world of sweets, this recipe, inspired by RecipeTin Eats, is designed for success. So, gather your ingredients, follow these simple steps, and prepare to impress yourself and everyone lucky enough to try a bite of these truly irresistible chocolate caramel slices. Enjoy the sweet rewards of your baking!
*All image credit belongs to RecipeTin Eats via YouTube. Follow and subscribe to her channel for more incredible recipes!