
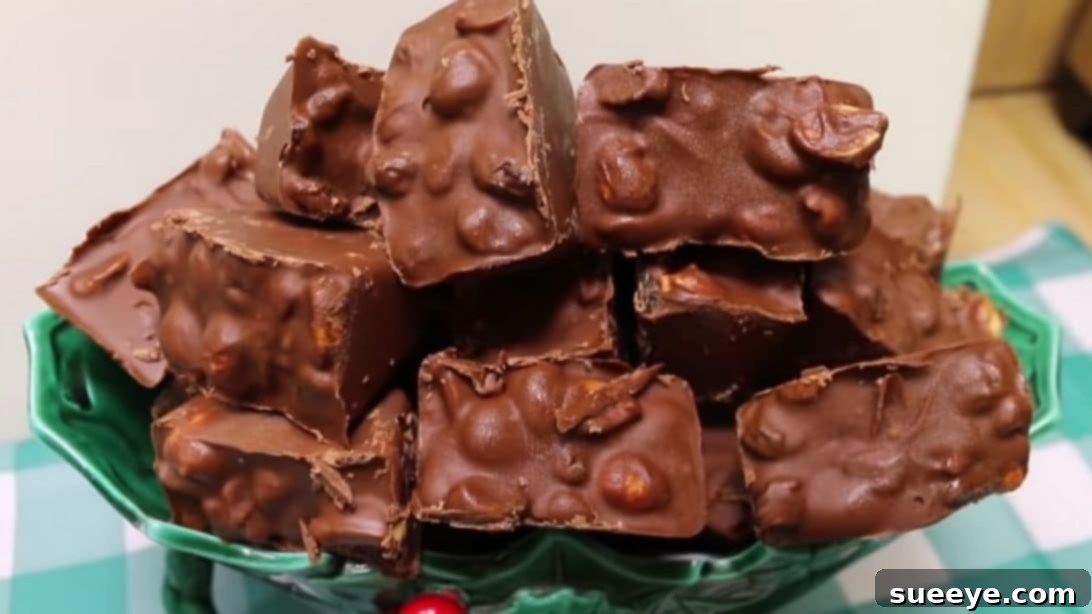
There’s a special magic in revisiting the flavors of childhood, a nostalgic journey that often brings warmth and happiness. For many, one such memory revolves around the delightful taste of homemade chunky bars. These simple yet incredibly satisfying sweet treats are more than just candy; they’re edible heirlooms, passed down through generations, evoking the carefree joy of simpler times. Whether you’re craving a taste of the past, seeking a standout dessert for a holiday gathering, or looking for a thoughtful, handmade gift, these chunky bars fit the bill perfectly. They combine affordability with an incredibly easy, no-fuss preparation, making them an accessible delight for any home cook. Prepare to rediscover the rich, decadent, and utterly mouth-watering experience of these beloved confectionery classics.
Indulge in Nostalgia: Crafting Classic Homemade Chunky Bars
Few desserts capture the essence of wholesome, homemade goodness quite like the chunky bar. This timeless confection, often reminiscent of old-fashioned candy shop treats, holds a special place in the hearts of those who grew up with its delightful combination of chocolate, nuts, and dried fruit. Our recipe for these classic chunky bars is designed to bring that cherished taste right into your kitchen, providing a sweet escape to happier days.
The beauty of making chunky bars at home lies in their simplicity and the immense satisfaction of creating something so delicious with minimal effort. This particular tutorial, inspired by the brilliant content of Noreen’s Kitchen on YouTube, simplifies the process without compromising on flavor or texture. Noreen’s ability to transform complex recipes into approachable steps is truly admirable, and her take on chunky bars is no exception. Get ready to impress your family and friends with a treat that’s both deeply comforting and irresistibly delicious.
The Allure of Retro Chunky Bars: A Taste of Sweet History
Chunky bars are a wonderful testament to how classic flavor combinations can stand the test of time. While commercial versions have been around for decades, the homemade variety offers a unique appeal. It’s the perfect blend of creamy, melting chocolate, the satisfying crunch of nuts, and the chewy sweetness of raisins that creates an unforgettable texture and taste sensation. This delightful medley doesn’t just satisfy a sweet tooth; it triggers cherished memories of holiday baking, family gatherings, and childhood treats.
What makes these bars truly “chunky” is their generous inclusion of ingredients, ensuring every bite is packed with texture and flavor. Unlike thin, uniform candy bars, chunky bars embrace their rustic, homemade charm, celebrating the joy of substantial, satisfying bites. They are the epitome of comfort food in candy form, a delightful reminder that sometimes, the simplest recipes yield the most profound culinary experiences.
Why Craft Your Own Homemade Chunky Bars?
In a world full of mass-produced sweets, making your own chunky bars offers several compelling advantages:
- Unmatched Freshness and Quality Control: When you make candy at home, you have complete control over the quality of your ingredients. You can select premium milk chocolate, ensure your peanuts are freshly roasted, and choose plump, juicy raisins, leading to a superior final product.
- Customization to Your Heart’s Content: While this recipe provides a classic foundation, homemade chunky bars are incredibly versatile. You can easily adapt them to suit personal preferences or dietary needs by swapping out nuts, dried fruits, or even the type of chocolate.
- Cost-Effective Indulgence: Store-bought gourmet chocolates can be expensive. Crafting your own chunky bars at home is a much more economical way to enjoy a luxurious, satisfying treat, especially when preparing larger batches for parties or gifts.
- The Joy of Creation: There’s a unique satisfaction that comes from creating something delicious with your own hands. It’s a rewarding activity that can be shared with family, creating new memories while reviving old ones.
- A Thoughtful Gift: Homemade chunky bars, elegantly packaged, make for incredibly personal and heartfelt gifts during the holidays, for birthdays, or as a simple token of appreciation. They convey warmth and effort that store-bought items simply cannot match.
The Simple Magic of Ingredients
The beauty of classic chunky bars lies in their straightforward ingredient list. Each component plays a crucial role in creating the signature flavor and texture:
- 4 cups milk chocolate chips: The cornerstone of this treat, milk chocolate provides a creamy, sweet base that melts beautifully and sets into a firm yet yielding bar. Using good quality chocolate chips will elevate the flavor significantly.
- 1 cup dry roasted, salted peanuts: These peanuts offer a delightful crunch and a crucial salty contrast to the sweet chocolate and raisins. The “dry roasted” aspect ensures maximum crispness, while the salt enhances all the other flavors.
- 1 cup raisins: Adding a chewy texture and a burst of natural sweetness, raisins complement the richness of the chocolate and the savoriness of the peanuts, creating a perfectly balanced bite.
This trio of ingredients is a match made in heaven, demonstrating that often, the most delicious results come from the most humble beginnings.
Ingredients:
- 4 cups milk chocolate chips
- 1 cup dry roasted, salted peanuts
- 1 cup raisins
Directions:
Step 1: Perfectly Melting the Chocolate and Incorporating Mix-ins
Achieving the perfect chocolate base is key to outstanding chunky bars. Begin by placing your milk chocolate chips in a microwave-safe bowl. Microwave them for 1 minute on high. After this initial burst, remove the bowl and stir the chocolate thoroughly. Even if the chocolate doesn’t appear fully melted, the residual heat will continue the melting process. Return the bowl to the microwave for additional 15-second intervals, stirring well after each, until the chocolate is completely smooth and lump-free. You’ll know it’s perfectly melted when drizzled, it forms a beautiful, glossy ribboning effect. This gentle, incremental melting prevents the chocolate from seizing or burning, ensuring a silky smooth texture.
Once your chocolate is flawlessly melted, gently fold in the dry roasted, salted peanuts and the plump raisins. Stir with a spatula until all the peanuts and raisins are thoroughly coated and evenly distributed throughout the rich chocolate mixture. This ensures every bite of your chunky bar delivers the delightful combination of flavors and textures.
Step 2: Shaping Your Chunky Bars and Allowing Them to Set
Now comes the fun part: shaping your chunky bars! You have several excellent options for molding them. The simplest method is to spoon the chocolate mixture onto a cookie sheet generously lined with parchment paper. Use two spoons to create individual mounds of your desired size. For a more uniform and polished look, silicone molds (like those for candy bars or even muffins) work wonderfully. Alternatively, if you’re looking for perfectly portioned, bite-sized treats, clean ice cube trays are an ingenious substitute. Lightly grease these trays or molds if they aren’t naturally non-stick to ensure easy removal.
Once you’ve spooned out your chocolate mixture, it’s time to let them set. For a quicker set, place the cookie sheet or molds in the refrigerator for about an hour, or in the freezer for approximately half an hour. If you’re not in a hurry, you can also leave them on the counter at cool room temperature; they will set naturally, though this will take several hours depending on the ambient temperature and humidity. The bars are ready when they are firm to the touch and easily pop out of their molds or peel off the parchment paper. Once set, they are ready to be enjoyed!
Tips for Crafting the Perfect Chunky Bar
- Quality Ingredients Matter: While the recipe is simple, the quality of your chocolate, peanuts, and raisins will significantly impact the final taste. Invest in good quality milk chocolate chips for the best results.
- Gentle Chocolate Melting: Avoid overheating the chocolate, as this can cause it to seize (become thick and crumbly) or burn, resulting in a bitter taste. Low and slow is the key, whether using a microwave or a double boiler.
- Even Distribution: Ensure the peanuts and raisins are thoroughly mixed into the melted chocolate. This guarantees that every bite of your chunky bar is consistently flavorful and textured.
- Parchment Paper is Your Friend: Always line your baking sheets with parchment paper for easy removal of the set bars and hassle-free cleanup. Silicone baking mats also work wonderfully.
- Patient Setting: While rushing the setting process in the freezer is tempting, allowing the bars to set slowly in the refrigerator or at a cool room temperature can result in a smoother, more stable chocolate texture.
- Storage for Longevity: Once set, store your chunky bars in an airtight container at room temperature for up to two weeks, or in the refrigerator for extended freshness, especially in warmer climates.
Creative Variations & Customization
While the classic chunky bar is delightful, don’t hesitate to experiment with variations to suit your taste or occasion:
- Chocolate Choices: Substitute milk chocolate with dark chocolate for a richer, less sweet bar, or use white chocolate for a creamy, distinct flavor. A blend of different chocolates can also be incredibly delicious.
- Nutty Alternatives: Swap peanuts for other roasted nuts like almonds, cashews, walnuts, or pecans. For an extra dimension of flavor, lightly toast them before adding to the chocolate.
- Dried Fruit Fun: Instead of or in addition to raisins, try dried cranberries, cherries, apricots (finely diced), or even shredded coconut for different textures and sweet-tart notes.
- Unexpected Add-ins: For an adventurous twist, consider adding mini marshmallows, pretzel pieces for extra saltiness and crunch, toffee bits, or even a sprinkle of sea salt on top before the bars set.
- Spice It Up: A pinch of cinnamon, nutmeg, or even a tiny dash of chili powder can add an intriguing warmth and complexity to your chocolate bars.
Serving and Gifting Ideas
Homemade chunky bars are incredibly versatile:
- Holiday Platters: They are a perfect addition to any festive dessert spread, offering a beloved classic that appeals to all ages.
- Thoughtful Gifts: Arrange a selection of chunky bars in a decorative box or cellophane bag, tied with a ribbon, for a charming and personal gift during the holidays, as a hostess gift, or for a birthday.
- Everyday Treat: Keep a batch on hand for an easy after-dinner indulgence, a quick snack, or a delightful accompaniment to a cup of coffee or tea.
- Kids’ Parties: Cut into smaller, bite-sized pieces, they make a fantastic, kid-friendly treat that’s easy to eat.
Storage Solutions for Freshness
To keep your homemade chunky bars tasting their best, proper storage is essential. Once fully set, store them in an airtight container. They will maintain their quality at cool room temperature for up to two weeks. If you live in a warmer climate or wish to extend their shelf life, storing them in the refrigerator is an excellent option; they will remain fresh for up to a month. Just be sure to let them come to room temperature for a few minutes before serving to appreciate their full flavor and texture.
Making these old-fashioned homemade chunky bars is truly a rewarding experience. It’s a simple recipe that yields incredibly decadent results, bringing together creamy chocolate, crunchy peanuts, and chewy raisins into a harmonious bite. Whether you’re sharing them with loved ones or savoring them yourself, these bars are sure to create new joyful memories while celebrating the timeless appeal of classic confections. A huge thank you again to Noreen’s Kitchen on YouTube for inspiring this wonderful recipe. If you enjoyed this tutorial, we highly recommend visiting and following her channel for more brilliant content – you won’t be disappointed!
*All images used here are credited to Noreen’s Kitchen via YouTube.