
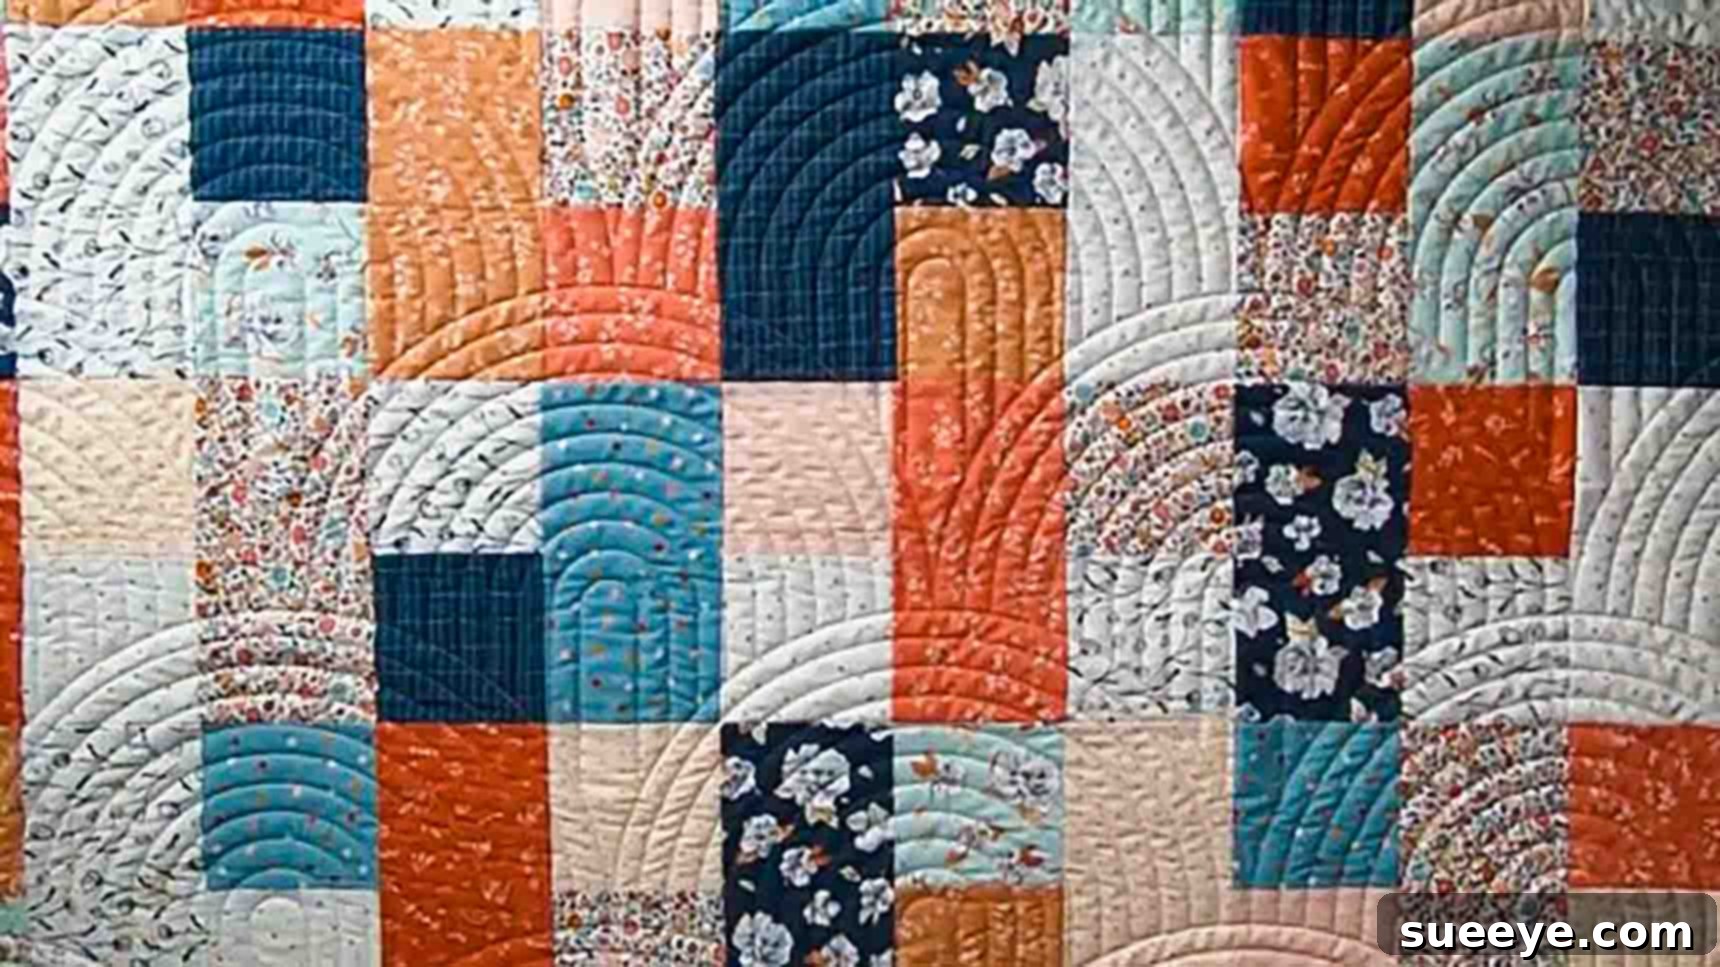
Master the Lazy Day’s Layer Cake Quilt Pattern: Your Guide to a Beautiful, Speedy Quilt
Are you looking for a quick yet stunning quilting project that delivers impressive results without the usual time commitment? Look no further than the remarkable Lazy Day’s Layer Cake Quilt Pattern! Perfect for last-minute gifts, this pattern promises a beautiful finish that looks intricate but is surprisingly simple to achieve. I recently stumbled upon this fantastic design from Moonkin Stitchery’s YouTube tutorial when I needed a thoughtful Mother’s Day gift in a flash. Its straightforward approach allowed me to complete a gorgeous quilt in less than a day, making it my new go-to for any occasion requiring a speedy, handmade touch. Whether you’re a seasoned quilter or just starting your creative journey, this guide will walk you through every step to craft your own Lazy Day’s Layer Cake Quilt.
Why Choose the Lazy Day’s Layer Cake Quilt Pattern?
This particular quilt pattern has gained immense popularity for several compelling reasons, making it an excellent choice for a wide range of quilters:
- Incredible Speed: As its name suggests, this pattern is designed for efficiency. By utilizing pre-cut layer cake squares, you save significant time on fabric cutting, which is often the most time-consuming part of quilting.
- Beginner-Friendly: The construction involves simple straight seams and repetitive blocks, making it ideal for those new to quilting. The clear instructions ensure a smooth and enjoyable learning experience.
- Stunning Visual Appeal: Despite its simplicity, the clever arrangement of fabric pieces creates a dynamic and sophisticated look, resembling a more complex design.
- Perfect for Gifting: Need a thoughtful, handmade gift for a birthday, anniversary, or special holiday like Mother’s Day? This pattern allows you to create a personalized and cherished present without weeks of effort.
- Maximizes Fabric Collections: Layer cakes are bundles of pre-coordinated 10-inch fabric squares, typically from a single fabric line. This pattern is perfect for showcasing these beautiful collections, ensuring a cohesive and harmonious quilt top.
- Versatile Sizing: While this guide focuses on a throw size, the block-based nature of the pattern means it can be easily scaled up or down to create anything from a baby quilt to a king-size bedspread with minor adjustments to block count.
Materials for Your Lazy Day’s Layer Cake Quilt
Before diving into the sewing, gather all your essential materials. Having everything ready ensures a seamless and enjoyable quilting experience. Here’s what you’ll need for a cozy throw-sized quilt (approximately 54″ x 63″):
- 42 Print Layer Cake Squares (10″ x 10″): These pre-cut fabric bundles are the heart of this project. They offer a delightful variety of coordinated prints that will bring your quilt to life. Opt for high-quality quilting cotton for durability and ease of sewing.
- 1/2 Yard Binding Fabric: The binding provides a neat and durable edge to your quilt, framing your beautiful work. Choose a fabric that complements your layer cake prints, either by blending in or offering a striking contrast.
- 3 3/4 Yards Backing Fabric: The backing fabric forms the underside of your quilt. Consider a soft, comfortable print or a solid color that harmonizes with your quilt top. Wide-back fabrics can minimize seams, but standard quilting cotton works perfectly.
- 62″ x 71″ Batting: Batting is the crucial middle layer that gives your quilt its warmth, loft, and texture. Common types include cotton, polyester, or blends, each offering different characteristics. The specified size provides a few inches of overhang around your quilt top, essential for the quilting process.
- Essential Quilting Tools:
- Rotary Cutter with a fresh blade
- Self-healing Cutting Mat
- Quilting Rulers (especially a large square ruler for squaring up blocks)
- Sewing Machine with a 1/4-inch presser foot
- Good Quality Thread (cotton is recommended)
- Fabric Scissors
- Pins or Fabric Clips
- Iron and Ironing Board
- Free Pattern Link: For a printable version and additional guidance, you can access the free pattern directly from Moonkin Stitchery: (click here for the free pattern)
Directions: Crafting Your Lazy Day’s Quilt
Follow these detailed steps carefully to ensure a beautiful and precisely constructed Lazy Day’s Layer Cake Quilt. Accuracy in cutting and sewing is key to a professional-looking finish.
Step 1: Precision Cutting and Block Assembly
This initial step transforms your large layer cake squares into the foundational units of your quilt. Careful measurement and cutting are crucial for blocks that fit together perfectly.
- Prepare Your Layer Cakes: Take all 42 of your 10″ x 10″ layer cake squares. Using your rotary cutter and a reliable quilting ruler, cut each square into two distinct 5″ x 10″ rectangles. To do this, align your ruler at the 5-inch mark across the 10-inch width and make a clean cut. You will now have 84 rectangles.
- Sub-Cut for Squares: From *one* of those 5″ x 10″ rectangles you just cut, sub-cut it into two perfect 5″ squares. This means you will cut it in half along its 10-inch length. For each original 10-inch layer cake, you will end up with one 5″ x 10″ rectangle and two 5″ squares. Repeat this process for all 42 of your layer cake units. At the end of this step, you will have 42 (5″ x 10″) rectangles and 84 (5″ x 5″) squares.
- Mix and Match: Once all your pieces are cut, it’s time to mix them up! Spread them out and randomly combine pieces from different fabrics. This creates a visually dynamic quilt and avoids repeating patterns in adjacent blocks.
- Assemble the Block Units:
- First, take two of your 5″ squares and place them right sides together. Sew them along one 5-inch edge using a precise 1/4-inch seam allowance. A consistent seam allowance is vital for blocks that will match up perfectly. Press this seam open or to one side, whichever you prefer, to reduce bulk. You now have a joined unit measuring 5″ x 9.5″ (including seam allowances).
- Next, take one of your 5″ x 10″ rectangles. Align it right sides together with the joined 5″ square unit you just created. Sew these two pieces together along the 10-inch side of the rectangle (which will align with the 9.5-inch side of your square unit, with a small overhang that will be trimmed). Again, use a 1/4-inch seam allowance. Press this final seam.
- Square Up Your Blocks: After assembly, each block should be trimmed down to a perfect 9 1/2″ square. Use a large square quilting ruler for this. Place the 9 1/2″ mark of your ruler at the center or a distinct point of your block and trim away any excess fabric from all four sides. Squaring up ensures all your blocks are uniform in size, which is essential for a flat and even quilt top.
- Repeat: Continue assembling and squaring up blocks until you have created all the necessary units for your quilt size. For a throw quilt, you will need 42 of these completed blocks.
Step 2: Laying Out and Assembling the Quilt Top
With all your blocks prepared, it’s time to bring your quilt top to life. This stage is exciting as you see your design emerge!
- Design Your Layout: For a throw quilt, you will typically arrange your blocks in 6 rows of 7 blocks each. Find a large, flat surface—your design wall, the floor, or a large table—to lay out all your finished blocks. This allows you to visualize the final look and make any desired adjustments to fabric placement.
- Implement the Pattern Arrangement: The signature “Lazy Day’s” look comes from an alternating block orientation:
- For the odd-numbered rows (Row 1, Row 3, Row 5, etc.), ensure the unit with the two 5″ squares is positioned on the left side of each block within that row.
- For the even-numbered rows (Row 2, Row 4, Row 6, etc.), orient the blocks so the two 5″ squares are on the right side of each block.
This alternating pattern creates a beautiful, flowing design across your quilt top. Step back and examine your layout to ensure you’re happy with the overall balance of colors and prints.
- Sew Blocks into Rows: Once your layout is perfect, begin sewing the blocks together to create individual rows. Working one row at a time, place two blocks right sides together, aligning the edges precisely, and sew them with a 1/4-inch seam allowance. Continue until all blocks in a row are joined. When pressing seams for rows, it’s often helpful to press seams in opposite directions for adjacent rows. For example, press all seams in Row 1 to the left, and all seams in Row 2 to the right. This allows the seams to “nest” when you join the rows, creating perfectly aligned intersections.
- Join the Rows to Complete the Quilt Top: After all your rows are pieced and pressed, it’s time to join them. Take two adjacent rows, place them right sides together, carefully aligning all the seam intersections. Use pins generously at these intersections to ensure they match up accurately. Sew with a 1/4-inch seam allowance along the length of the row. Repeat this process until all rows are sewn together, completing your quilt top. Give your finished quilt top a final press to ensure it lies flat and smooth.
Finishing Your Lazy Day’s Quilt: Quilting and Binding
Once your quilt top is complete, the final steps involve layering, quilting, and binding to turn it into a functional and beautiful blanket.
- Basting: Create a quilt sandwich by layering your backing fabric (face down), then the batting, and finally your quilt top (face up). Smooth out all layers to eliminate wrinkles. Secure these layers together using your preferred basting method: spray basting, safety pins, or long hand stitches.
- Quilting: This is where you stitch through all three layers to hold them together and add texture. For a quick quilt, simple straight-line quilting is effective and easy. You can quilt straight lines diagonally across the blocks, horizontally, or vertically. Alternatively, experiment with a simple meandering free-motion quilting design if you’re comfortable with it.
- Trimming: After quilting, trim the excess batting and backing fabric, squaring up your quilt to its final dimensions.
- Binding: Prepare your binding strips from your 1/2 yard of fabric. Attach the binding to the front of your quilt, miter the corners for a professional finish, and then hand-stitch or machine-stitch the binding to the back of the quilt. This step truly frames your work and provides durability.
Tips for Beginner Quilters
If you’re new to quilting, these pointers will help ensure a smoother and more enjoyable experience:
- Master the 1/4-Inch Seam: This is the golden rule of quilting. Practice on scraps until your 1/4-inch seam is consistently accurate. Consider investing in a 1/4-inch presser foot for your machine.
- Press, Don’t Iron: When joining pieces, gently press your seams flat, rather than ironing back and forth. Pressing avoids stretching and distorting your fabric.
- Use Quality Tools: A sharp rotary blade, a good self-healing mat, and reliable rulers make a world of difference in accuracy and efficiency.
- Don’t Fear the Seam Ripper: Mistakes happen! A seam ripper is your friend. It’s better to unpick a section and re-sew it correctly than to leave an error that might affect the entire quilt.
- Listen to Your Machine: Ensure your machine is clean, oiled, and threaded correctly. Use good quality cotton thread for quilting.
- Enjoy the Process: Quilting is a creative journey. Don’t strive for perfection on your first attempt; focus on learning and enjoying the craft.
Customizing Your Lazy Day’s Quilt
While the Lazy Day’s Layer Cake pattern is fantastic as is, feel free to personalize it to make it uniquely yours:
- Fabric Choices: Experiment with different color palettes and themes. Use holiday fabrics for a festive quilt, baby-themed prints for a nursery, or solids for a modern minimalist look.
- Adding Borders: If you want a larger quilt or a different aesthetic, consider adding one or more borders around your finished quilt top before basting.
- Varying Quilting: While straight lines are quick, if you have more time or skill, explore more intricate quilting designs that complement your fabric choices.
- Embellishments: For a personal touch, consider adding embroidered details, fabric labels, or decorative stitches to your finished quilt.
Caring for Your Handmade Quilt
To ensure your beautiful Lazy Day’s quilt lasts for years to come, proper care is essential. Generally, machine wash your quilt on a gentle cycle with cold water and a mild detergent. Tumble dry on low heat or, preferably, air dry flat to prevent shrinkage and preserve the integrity of the stitches and fabric. Avoid harsh chemicals or excessive heat.
Embark on Your Quilting Adventure!
The Lazy Day’s Layer Cake Quilt pattern truly lives up to its name, offering a wonderfully accessible and rewarding quilting experience. It’s an ideal project for creating a thoughtful, handmade gift that will be cherished, or simply for treating yourself to a beautiful new addition to your home. With this detailed guide and the inspiring Moonkin Stitchery video tutorial, you have all the resources you need to succeed. So, gather your vibrant layer cakes, set up your sewing machine, and prepare to be amazed at how quickly you can create a stunning, personalized quilt. Happy quilting!