
Mastering the Waffle Stitch: A Comprehensive Guide to Crocheting Your Own Beautiful Waffle Blanket
There’s an undeniable charm and comfort that comes with a handmade item, especially a hand-crocheted blanket. These aren’t just mere coverings; they are tangible expressions of warmth, care, and dedication, often becoming treasured heirlooms. If you’ve ever received one, you know the feeling of cherished comfort it brings. However, embarking on a crochet project, particularly one as substantial as a blanket, can sometimes feel daunting. Many tutorials jump straight into complex patterns, leaving beginners feeling lost from the very first stitch.
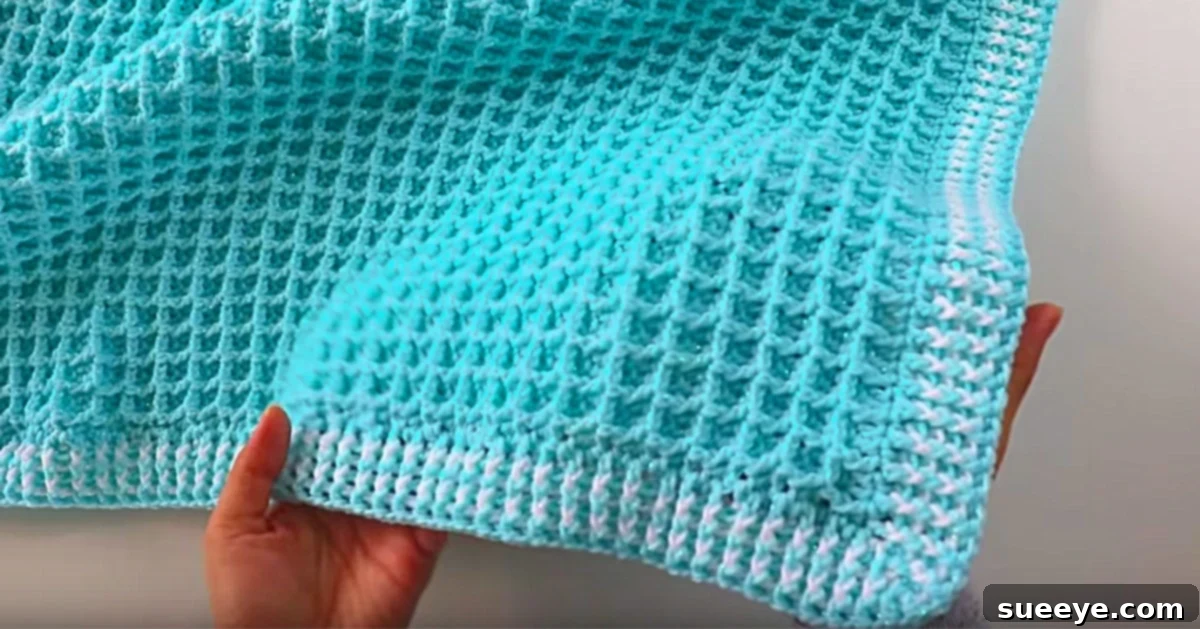
That’s precisely why discovering the waffle blanket tutorial was such a delight. This guide stands out by breaking down the entire process into easy-to-follow, no-nonsense steps. From mastering your initial chain stitch to adding that perfect decorative border, you’ll be guided meticulously through each phase of creating a stunning waffle blanket. The beauty of the waffle pattern lies in its distinctive texture and relative simplicity once you understand the core stitches. It’s a consistently applied pattern throughout the project, meaning you won’t be grappling with overly complicated stitch changes. The resulting blanket boasts a lovely thickness and delightful squishiness, making it incredibly versatile. Imagine it draped over a baby’s stroller for an extra layer of warmth, or perhaps as your go-to companion for cozy evenings curled up on the couch watching your favorite show. Its rich texture isn’t just visually appealing; it also traps air, providing excellent insulation and comfort.
Beyond the core pattern, this tutorial also includes clear instructions for crafting an attractive border. While the example uses a solid color, remember that this is *your* creative project. Feel free to experiment with any color you desire—imagine vibrant stripes, subtle ombrés, or a contrasting hue that makes the border pop. In the world of DIY crafting, there are no strict rules; these creations are limited only by your imagination. The yarn used in the original tutorial is a lighter weight, but don’t shy away from chunky yarn if you prefer. Using chunky yarn can significantly speed up your project, making it a fantastic choice for those eager to see their blanket take shape quickly. It’s truly my favorite for that very reason!
Why Choose the Waffle Stitch for Your Next Blanket?
The waffle stitch is a favorite among crocheters for a multitude of reasons, making it an excellent choice for blankets. Its unique, deeply textured surface resembles the familiar grids of a waffle, creating a plush, squishy fabric that is incredibly soft to the touch. This texture isn’t just for aesthetics; it also makes for a wonderfully warm blanket. The raised “squares” and recessed “grooves” create pockets that trap air, providing superior insulation without making the blanket overly heavy. This dense yet flexible fabric offers a comforting weight and drape that feels luxurious.
Beyond its comfort and warmth, the waffle stitch is surprisingly approachable for those who have mastered basic crochet stitches like the double crochet (dc) and front post double crochet (fpdc). Once you understand the two-row repeat, the pattern becomes rhythmic and meditative, allowing you to enjoy the process without constant reference to complex charts. This makes it a satisfying project for both focused crafting sessions and relaxed, TV-watching endeavors. Its reversible nature (though one side is typically more pronounced) also means you don’t have to worry about a “wrong” side, adding to its appeal. Whether you’re making a gift for a loved one or a cozy addition to your own home, a waffle blanket is sure to be admired and frequently used.
Getting Started: Essential Supplies for Your Waffle Blanket
Before you dive into crocheting, gathering the right materials is crucial for a smooth and enjoyable experience. Here’s what you’ll need, along with some tips for choosing the best options:
- Yarn: The original tutorial suggests two skeins, but the actual quantity will depend significantly on your desired blanket size and the yarn weight you choose. For a standard throw blanket (approx. 50×60 inches) using a medium worsted weight yarn, you might need anywhere from 2000-3000 yards. If opting for chunky yarn, you’ll need fewer skeins, but they will be larger.
- Fiber Type: Acrylic is an excellent choice for beginners and blankets because it’s affordable, durable, machine washable, and comes in a vast array of colors. Wool offers superior warmth but requires more delicate care. Cotton is breathable and great for warmer climates but can be heavier. Blends often combine the best qualities of different fibers.
- Weight: Medium (worsted/aran) weight yarn is a common and versatile choice, offering a good balance of warmth and reasonable project time. Chunky or bulky weight yarn (as mentioned, a personal favorite for speed) will result in a thicker, heavier blanket that works up very quickly. Finer yarns will create a more delicate blanket but will take considerably longer.
- Color: Solid colors beautifully showcase the waffle texture, while variegated or self-striping yarns can add visual interest with less effort. Don’t be afraid to experiment with multiple colors for stripes or color blocks.
- Crochet Hook: The size of your crochet hook is dictated by the weight of your yarn. Always check the yarn label for a recommended hook size. For worsted weight yarn, a 5.0mm (H) or 5.5mm (I) hook is common. For chunky yarn, you’ll need a much larger hook, possibly 8.0mm (L) to 12.0mm (P/Q). Choosing the correct hook size is vital for achieving the proper gauge and drape for your blanket. You might also consider ergonomic hooks if you plan on crocheting for extended periods, as they can reduce hand strain.
- Scissors: A good pair of sharp scissors is essential for cutting yarn ends neatly.
- Tapestry Needle (or Yarn Needle): While not listed, a tapestry needle is indispensable for weaving in all those loose yarn ends, ensuring a professional and polished finish. Don’t skip this step!
- Stitch Markers: Especially useful for beginners, stitch markers can help you keep track of your first and last stitches in a row, preventing uneven edges and lost stitches.
- Measuring Tape: Handy for checking your gauge (the number of stitches and rows per inch) and ensuring your blanket is growing to your desired dimensions.
Crafting Your Waffle Blanket: Step-by-Step Directions
Now that you have all your supplies, let’s begin the exciting journey of bringing your waffle blanket to life. This guide will walk you through each step, from the very first chain to the final decorative flourish.
Step 1: The Foundation Chain – Starting Your Project
Every crochet project begins with a foundation chain. For a waffle blanket, you’ll need to create a chain of a specific multiple to ensure the pattern works out evenly. The waffle stitch typically requires a multiple of 3 + 2 stitches (for example, if you want 30 waffle “squares” across, you’d chain 3*3 + 2 = 11 stitches, then add more depending on the size you want). A good rule of thumb for a baby blanket might be to chain around 80-100 stitches, or for a throw, 120-150 stitches. Always make sure your chain is long enough for your desired width before proceeding. To start, make a slip knot on your hook, then yarn over and pull through the loop to create your first chain stitch. Repeat this process until you reach your desired length, ensuring your chain isn’t too tight.
Step 2: Establishing the Waffle Pattern – Rows 1 to 3
The waffle pattern is built upon a two-row repeat, but you’ll first need a setup row. Let’s break it down:
- Row 1 (Setup Row): Once your foundation chain is complete, you’ll work double crochet (dc) stitches across the row. Skip the first 2 chains from your hook (these count as your first dc) and make 1 dc into the 3rd chain. Continue making 1 dc into each chain across the entire row. This creates a solid base upon which the waffle texture will emerge. Turn your work.
- Row 2 (Waffle Pattern Row 1): This is where the magic begins! Chain 2 (counts as your first dc). Now, you’ll alternate between front post double crochet (fpdc) and regular double crochet (dc). Make 1 fpdc around the post of the next dc stitch (from the previous row). Then, make 1 dc into the top of the next 2 dc stitches. Repeat this sequence: *1 fpdc around the next post, 1 dc into the next 2 stitches* until you reach the last 2 stitches. You should end with 1 fpdc around the second to last post, and then 1 dc into the top of the turning chain from the previous row. Turn your work.
- Row 3 (Waffle Pattern Row 2): Chain 2 (counts as your first dc). Now, you’ll alternate differently. Make 1 dc into the top of the next dc stitch. Then, make 1 fpdc around the post of the next 2 fpdc stitches (from the previous row). Repeat this sequence: *1 dc into the top of the next stitch, 1 fpdc around the next 2 posts* until you reach the last 2 stitches. You should end with 1 dc into the top of the second to last stitch, and then 1 dc into the top of the turning chain from the previous row. Turn your work.
Step 3: Building Length – Repeating the Pattern
To continue your waffle blanket, you simply repeat Row 2 and Row 3 alternately until your blanket reaches the desired length. The “waffle squares” will become more defined with each repeat, creating that beautiful, textured fabric. Always remember to count your stitches at the end of each row to ensure your edges remain straight and you haven’t accidentally increased or decreased stitches.
Step 4: Adding the Perfect Border
Once your blanket body is complete, adding a border provides a polished, finished look and helps to square up your edges. For a simple and solid border as suggested, you can do several rounds of single crochet (sc) or half double crochet (hdc). To start, make a slip stitch into the corner of your blanket. Chain 1 (does not count as a stitch) and then make single crochet stitches evenly around the entire perimeter of your blanket. Aim for roughly 1 sc per stitch along the top and bottom edges, and 1 sc per row along the side edges, ensuring you place 3 sc stitches into each corner to create a neat turn. Slip stitch to join at the end of the round. You can repeat this for 2-3 rounds for a sturdy and attractive border. For a more decorative touch, consider adding a final round in a contrasting color or using a simple shell stitch.
I can’t wait to make one; I just love this pattern!
Personalizing Your Waffle Blanket
One of the most rewarding aspects of crochet is the ability to customize your creations. Here’s how you can make your waffle blanket truly unique:
- Size Variations: This pattern is incredibly adaptable. For a baby blanket, a finished size of approximately 30×40 inches is common. For a lapghan or throw, aim for 40×50 inches or 50×60 inches. A larger twin or queen size will simply require a longer starting chain and more rows. Remember that heavier yarns will result in a larger blanket with the same number of stitches, so always check your gauge!
- Color Play: Don’t limit yourself to solid colors! Experiment with stripes by changing colors every few rows, create color blocks, or use a self-striping yarn for an effortless gradient effect. A contrasting border can also add a beautiful pop of color.
- Yarn Choices: While acrylic is great for durability and washability, consider merino wool for exceptional softness and warmth, or a cotton blend for a breathable, lighter blanket perfect for spring and summer. The yarn fiber directly impacts the drape, feel, and weight of your finished blanket.
- Embellishments: Once your blanket is finished, consider adding playful tassels to the corners, decorative pompoms, or even appliqués for a personalized touch, especially for children’s blankets.
Care and Maintenance of Your Handmade Waffle Blanket
To ensure your beautiful waffle blanket lasts for years to come, proper care is essential. Always refer to your yarn label for specific washing instructions. Generally:
- Acrylic Yarn: Most acrylic blankets can be machine washed on a gentle cycle with cold water and tumble dried on low heat.
- Wool Yarn: Wool often requires hand washing in cold water with a gentle wool-specific detergent. Gently squeeze out excess water (do not wring!) and lay flat to dry, reshaping as needed.
- Cotton Yarn: Cotton can usually be machine washed on a delicate cycle. Some cotton blends can be tumble dried on low, but air drying flat is always the safest bet to prevent stretching or shrinking.
- Blocking: For a truly professional finish, especially with natural fibers, consider blocking your blanket. This involves wetting the finished piece and pinning it to its desired dimensions to dry, which helps even out stitches and shapes the blanket beautifully.
Troubleshooting Common Crocheting Issues
Even experienced crocheters face challenges. Here are a few common issues and quick tips to overcome them:
- Uneven Edges: This often happens when you miss the last stitch or add an extra one. Use stitch markers to mark the first and last stitch of each row. Make sure your turning chain counts as a stitch and that you work into it correctly.
- Too Tight/Loose Stitches: Your tension might be inconsistent. Practice helps, but also ensure your hook size is appropriate for your yarn. If stitches are too tight, try a larger hook; if too loose, try a smaller one.
- Losing Stitches: This is usually due to missing the last stitch of a row. Always count your stitches at the end of each row to maintain the correct count.
- Weaving in Ends: This isn’t a problem, but it can be tedious! Use a tapestry needle to weave ends discreetly into the fabric, going in multiple directions for security.
Begin Your Waffle Blanket Journey Today!
The joy of creating something with your own hands is truly unparalleled. A hand-crocheted waffle blanket is more than just a functional item; it’s a testament to your patience, creativity, and the warmth you can impart through your craft. Whether you’re making it for a precious new arrival, a thoughtful gift, or a luxurious treat for yourself, the waffle stitch offers a satisfying project with a beautiful, tactile result.
With this comprehensive guide, you have all the knowledge and encouragement needed to embark on your waffle blanket journey. Take your time, enjoy the rhythmic motion of the hook and yarn, and savor the process of watching this gorgeous texture come to life beneath your fingers. We encourage you to share your finished waffle blanket creations with us and inspire fellow crafters. Happy crocheting!