
Craft Your Own Stunning Twisted Wire Tree: A Comprehensive DIY Guide
There’s a unique magic to handcrafted decor that store-bought items simply can’t replicate. Among the most enchanting and elegant pieces are twisted wire trees – intricate sculptures that blend nature’s organic beauty with the artistry of metalwork. For years, I admired these captivating creations, often spotting them in high-end boutiques and art galleries, only to be deterred by their often prohibitive price tags. The desire to own one, or even several, was strong, but the cost always felt like a significant hurdle, placing these beautiful wire sculptures out of reach for many.
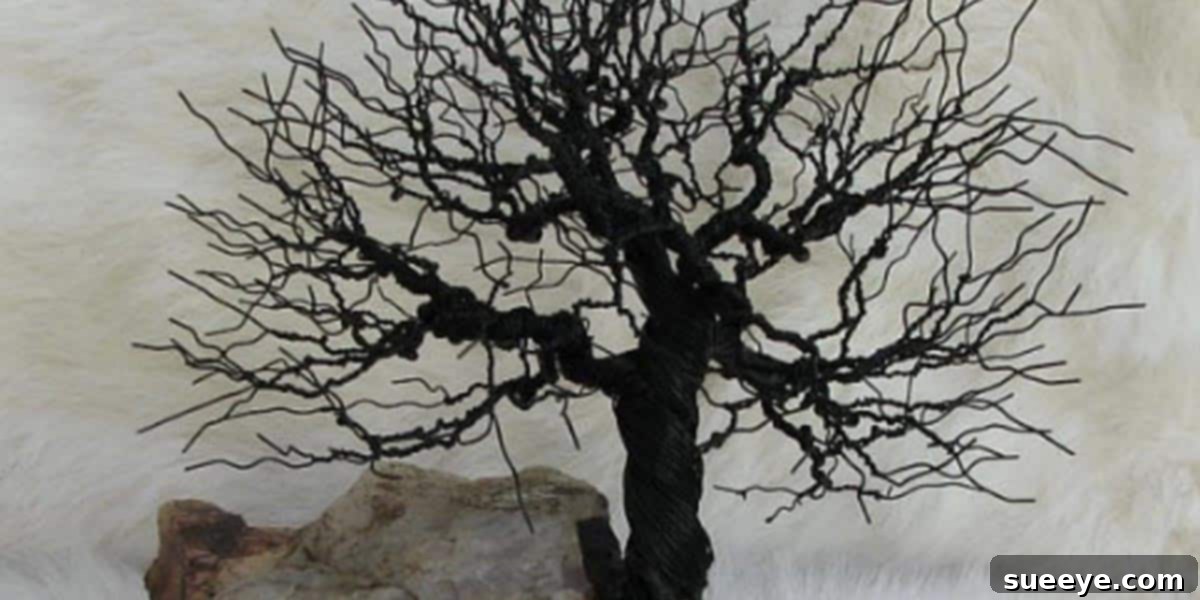
Then came a revelation: the discovery of a comprehensive tutorial on how to craft these very DIY wire trees at home! The excitement was immense, opening up a world of creative possibilities. Armed with a dark-colored wire and a newfound determination, I embarked on my first project. The result? Absolutely stunning! I meticulously attached my finished tree to a beautiful, substantial rock, which gave it an incredibly cool and grounded presence. It instantly became a focal point, a true statement piece in my living space, drawing compliments from everyone who saw it. And I’m here to tell you, your handmade twisted wire tree will do the same for your home. You are truly going to love the end result and the personal touch it adds to your decor.
Embrace the Art of DIY Decorating: Personalize Your Space on a Budget
Do-it-yourself decorating isn’t just a trend; it’s a powerful approach to personalizing your environment. Whether you’re enhancing a spacious home, a cozy apartment, a modern condo, or just a single room, DIY accents offer an incredible way to infuse personality and style without the financial strain or disruption of a full-scale remodel. It’s about taking control of your aesthetic, expressing your unique taste, and creating a space that genuinely feels like ‘you’.
The twisted wire tree project exemplifies this perfectly. It’s a craft that allows for immense customization, from the type and color of wire to the design of the branches and the choice of base. Each tree you create will be a reflection of your artistic vision, ensuring that no two pieces are ever exactly alike. This level of individuality is simply unattainable with mass-produced decor, offering a truly unique home accent that tells a story.
Why a Twisted Wire Tree? More Than Just a Decoration
Beyond their undeniable visual appeal, twisted wire trees carry a deeper significance that elevates them beyond mere ornamentation. They are not just objects; they are expressions of creativity and nature.
-
Sculptural Elegance:
These trees are true three-dimensional art pieces. Their intricate twists and turns create a dynamic interplay of light and shadow, adding texture and depth to any room. They command attention without being overpowering, serving as a sophisticated focal point that captivates the eye and sparks conversation.
-
Symbolism and Serenity:
Trees often symbolize growth, strength, life, and connection to nature. A wire tree sculpture brings a touch of this natural serenity indoors, fostering a calm and meditative atmosphere. It’s a beautiful reminder of resilience, beauty, and the enduring cycles of life, making it a profound addition to any space.
-
Versatile Aesthetics:
Amazingly versatile, a handmade twisted wire tree can complement almost any interior design style. A minimalist design with a sleek base fits perfectly in modern or industrial spaces. A more organic, rustic shape on a natural wood base blends seamlessly with bohemian or farmhouse aesthetics. The choice of wire color—from gleaming copper to antique bronze or stark black—further dictates its stylistic impact, allowing it to seamlessly integrate into your existing decor.
-
A Unique Conversation Starter:
Prepare for compliments! A handmade wire tree invariably sparks curiosity and admiration. Its unique form and the story behind its creation make it an excellent conversation piece, allowing you to share your passion for DIY and craftsmanship with friends and family. It’s a statement of your personal style and creative spirit.
The Immense Benefits of Crafting Your Own Wire Tree Sculpture
Deciding to make your own twisted wire tree offers a multitude of advantages that go far beyond just having a pretty object. It’s an investment in your creativity, your home, and your personal satisfaction.
-
Significant Cost Savings:
As I discovered, buying a high-quality twisted wire tree can be quite expensive, often ranging from tens to hundreds of dollars depending on size and intricacy. By crafting your own, you dramatically reduce the cost, paying only for the raw materials, which are surprisingly affordable. This allows you to invest in better quality wire, experiment with different designs, or even make multiple trees for the price of one store-bought item, making luxury decor accessible on a budget.
-
Unparalleled Customization:
This is where DIY truly shines. You have complete control over every aspect: the height, width, trunk thickness, branch intricacy, and canopy density. Want a sprawling bonsai look? Or a tall, slender silhouette? You can tailor your creation to fit a specific space, theme, or personal preference. Experiment with different wire gauges for varied effects, or incorporate beads and small stones for unique “foliage” or “fruit.” The possibilities for personalization are endless.
-
Profound Sense of Accomplishment:
There’s an incomparable satisfaction that comes from transforming simple materials into a work of art with your own hands. The process is meditative, focusing your mind and providing a creative outlet. The final reveal of your own creation is incredibly rewarding, offering a tangible testament to your patience, skill, and creativity. This feeling of pride is something mass-produced items can never provide.
-
Develop New Skills:
Crafting a wire tree is an excellent way to hone fine motor skills, develop an eye for proportion and balance, and learn fundamental wire-working techniques. These skills are not only enjoyable to acquire but are also transferable to other craft projects, opening up even more creative avenues and hobbies.
-
Personalized Gifting:
A handmade twisted wire tree makes an exceptionally thoughtful and unique gift for birthdays, holidays, housewarmings, or any special occasion. It’s a personalized present that truly comes from the heart, showing the recipient the time, effort, and care you invested. A gift like this speaks volumes, creating lasting memories and a cherished keepsake.
Essential Materials and Tools for Your Wire Tree Project
Before you dive into the twisting and turning, let’s gather what you’ll need. The beauty of this craft is its relatively simple material list, making it accessible even for beginners.
Key Materials:
-
Craft Wire: This is your primary material and the heart of your sculpture.
- Type: Copper wire is highly popular for its beautiful natural sheen and excellent malleability, making it easy to work with. Aluminum is lighter, more flexible, and often comes in vibrant colors. Galvanized steel offers superior strength and a more industrial, silver-toned look. Additionally, enamel-coated craft wires are available in a vast array of colors, from classic black and silver to vibrant blues, greens, and reds, allowing for immense creative freedom.
- Gauge (Thickness): You’ll typically want a combination of gauges for varied effects. Thicker wires (e.g., 16-20 gauge) are excellent for the main trunk and primary branches, providing crucial structural integrity. Thinner wires (e.g., 22-28 gauge) are perfect for delicate secondary branches, intricate foliage effects, and fine detailing. A good starting point for the bulk of the tree is often around 20-22 gauge.
- Quantity: This depends entirely on the size and fullness of your desired tree. For a medium-sized tree (approximately 6-10 inches tall), you might need several hundred feet of wire. It’s always better to have more than you think you’ll need, as running out mid-project can be frustrating.
-
Base Material: This provides stability and greatly enhances the aesthetic of your finished wire tree sculpture.
- Rocks: My personal favorite! Look for interesting shapes, smooth river stones, or textured natural finishes. Ensure the rock is stable and heavy enough to support your tree without tipping.
- Wood Slices/Blocks: Natural and rustic, these are great for earthy or forest-themed designs. Live edge wood can add a particularly charming touch.
- Polished Stones/Gemstones: For a more refined, luxurious, or even mystical feel. Agate slices, geodes, or polished crystals can make stunning bases.
- Small Pots/Planters: You can fill these with plaster, resin, or decorative pebbles to securely anchor the tree’s roots.
- Concrete Blocks: For an industrial or modern minimalist look, offering a stark contrast to the organic form of the tree.
Essential Tools:
- Wire Cutters: Absolutely essential for cleanly cutting your wire. A good quality pair designed for craft wire will make the process much smoother and prevent frustration.
-
Pliers: A critical toolset for shaping and twisting.
- Round-Nose Pliers: Indispensable for creating smooth loops, elegant curves, and intricate branch formations, giving your tree an organic appearance.
- Flat-Nose Pliers: Useful for gripping, bending sharper angles, and securing connections tightly. They help create crisp bends and hold wires firmly.
- Chain-Nose Pliers (optional): A versatile combination of flat and round nose, offering broad utility.
- Protective Eyewear (Highly Recommended): Small pieces of wire can occasionally fly when cut with force. Safety first to protect your eyes!
- Gloves (Optional but Recommended): To protect your hands from sharp wire ends, especially if working with stiffer wire gauges or for extended periods. They can also improve grip.
- Ruler or Measuring Tape: Useful for consistent wire lengths, especially if you want a uniform tree height or branch structure.
- Strong Adhesive (e.g., Epoxy, Super Glue, Construction Adhesive): Crucial for permanently attaching the finished tree to its base. If using natural rocks, a powerful, weather-resistant adhesive is often necessary. Alternatively, you might consider drilling a small hole into the base and securing the wire mechanically, then filling with glue for extra strength.
The Art of Creation: A General Process Overview for Your Wire Tree
While each tutorial may have its specific nuances, the general process of crafting a twisted wire tree follows a similar, satisfying path. This overview will give you a clear idea of what to expect, empowering you to approach any detailed guide with confidence.
Step-by-Step Approach:
- Prepare Your Wire Bundles: Begin by cutting numerous strands of wire to your desired length. A common technique involves cutting strands significantly longer than your intended tree height, as twisting them will shorten the overall length. For example, for a 10-inch finished tree, you might start with 20-inch strands. The more strands you use, the fuller and more substantial your tree will appear. Neatly bundle them together, aligning one end.
- Form the Roots (Base): Take your bundle of wires and begin twisting them tightly together at one end. This twisted section will form the “roots” that will anchor your tree to its chosen base. You can splay out individual wires or smaller bundles at the very end to mimic the natural sprawling appearance of a root system, creating stability and aesthetic appeal.
- Build the Trunk: Continue twisting the main bundle of wires upwards, creating a strong, thick “trunk” for your tree. The tighter and more uniform your twists, the more robust and realistic your trunk will appear. You can vary the thickness of the trunk by occasionally splitting off a few wires and twisting them back into the main bundle, creating a more organic, textured look.
- Branching Out: At various points along the trunk, typically starting from about one-third to halfway up, you will begin to separate smaller bundles of wires from the main trunk. These will become your primary branches. Twist each of these smaller bundles to form distinct, strong branches. Think about natural tree branching patterns for inspiration, staggering branches and varying their angles.
- Developing Secondary Branches and Twigs: As you move further up each primary branch, continue to split off even smaller bundles of wires. Twist these into secondary branches and then individual delicate “twigs.” This is where the tree really starts to take shape, gaining its intricate details and realistic density. Use your pliers to achieve clean, tight twists.
- Shaping the Canopy: Once you have all your branches and twigs formed, it’s time to shape the overall form of the tree. Gently bend and arrange the branches to create a natural-looking canopy. You can loop individual wires, create subtle spirals, or leave them relatively straight, depending on the desired effect (e.g., a weeping willow vs. a sturdy oak). Aim for a balanced and aesthetically pleasing silhouette, ensuring the tree looks good from all angles.
-
Attaching to the Base: This is a critical step for ensuring the stability and longevity of your sculpture.
- For Rocks/Wood: Apply a generous amount of strong adhesive (like a two-part epoxy or construction adhesive) to the twisted “roots” of your tree and firmly press it onto your chosen base. Hold it in place until the adhesive begins to set. For extra security, some crafters drill a small, shallow hole into the base and insert the main root bundle, then fill with glue for a stronger bond.
- For Pots: Place the tree’s roots into the pot and fill it with plaster of Paris, quick-drying cement, or resin. Once the filling is set and fully cured, you can cover the top with decorative pebbles, sand, or artificial moss to conceal the adhesive and enhance the natural look.
- Finishing Touches: Once the tree is securely attached and the adhesive has fully cured, take some time to fine-tune the branches and overall shape. Ensure all wire ends are neatly tucked away, and the tree stands proudly. You might add small beads as “leaves” or tiny decorative elements if you wish, bringing further personalization to your unique wire art.
Design Inspirations and Placement Ideas for Your Wire Art
Your finished wire tree isn’t just a craft project; it’s a piece of art ready to enhance your home and reflect your personal style. Here are some ideas for design and placement to inspire you:
- Desk Accent: A smaller tree (4-6 inches) on a polished stone makes a sophisticated addition to an office desk, bookshelf, or bedside table, adding an organic, calming touch to your workspace or reading nook.
- Living Room Centerpiece: A larger, more elaborate tree (10-15 inches) can serve as a stunning centerpiece on a coffee table, console table, or mantelpiece. Position it where natural light can highlight its metallic sheen and intricate details, creating dynamic shadows that add to its allure.
- Bedroom Serenity: A subtly lit wire tree on a bedside table or dresser can create a calming, dreamlike ambiance. Consider carefully weaving in micro-LED string lights (battery-operated) for a magical, ethereal glow, especially enchanting in the evenings.
- Entryway Statement: Welcome guests with a distinctive handmade piece on an entryway table. It immediately sets a tone of unique style and artistic flair, offering a glimpse into your creative personality.
- Groupings: Create a miniature forest or a captivating landscape by crafting several trees of varying sizes, wire colors, and styles. Arrange them together on a long shelf, windowsill, or display cabinet for an impactful and cohesive display.
- Seasonal Decor: Decorate your wire tree seasonally! Tiny ornaments for winter holidays, delicate pastel beads for spring blossoms, or autumnal leaves for fall can easily transform its look throughout the year, making it a versatile decorative piece.
- Gift of Art: As mentioned, these make incredible personalized gifts. Tailor the tree’s style, wire color, and base material to the recipient’s taste or home decor, making it a truly thoughtful and cherished present that conveys your care and effort.
Caring for Your Wire Tree Sculpture
Your handmade wire tree is a durable piece of art, but a little care can keep it looking its best and preserve its intricate beauty for years to come.
- Dusting: Due to their intricate nature, wire trees can collect dust. Use a soft, dry brush (like a makeup brush), a can of compressed air, or a feather duster to gently remove dust from the intricate branches. Avoid harsh cloths or excessive force that might snag or bend delicate wires.
- Preventing Tarnish: If you use bare copper, brass, or silver-plated wire, it might naturally tarnish over time, developing a beautiful, aged patina. If you prefer a shiny, polished look, you can periodically clean it with a gentle metal polish suitable for the specific wire type. Alternatively, apply a clear sealant (like a clear lacquer or jewelry sealant) after creation to prevent oxidation and maintain its original luster. Enamel-coated wires are generally more resistant to tarnishing and maintain their color.
- Handling: While your wire tree is designed to be sturdy, avoid excessive bending or manipulating of the branches once the tree is fully formed and set. Repeated stress can weaken the wire over time. Handle it gently and carefully when moving, dusting, or cleaning to ensure its structural integrity.
Unlock Your Inner Artisan: Your Next Steps to Crafting a Masterpiece
The journey from admiring costly, mass-produced decor to crafting your own exquisite pieces is incredibly empowering. Making a twisted wire tree is more than just a craft project; it’s an opportunity to create something truly personal, stunning, and meaningful for your home or as a heartfelt, custom-made gift. This unique wire art not only enhances your space but also serves as a testament to your creativity and patience.
Now that you’re equipped with a comprehensive understanding of the materials, tools, and general process, it’s time to take the plunge. Seek out a detailed video tutorial or step-by-step guide (like the one I initially discovered!) to get started on your first project. Don’t be afraid to experiment with different wire types, bases, and branching patterns. The beauty of this craft lies in its flexibility and the unique artistic expression each creator brings to it. Remember, every twist and turn adds to the unique character of your sculpture.
Prepare to be amazed by what you can achieve with your own hands. Your home is about to gain a magnificent, handmade accent that tells a story – your story. Start twisting, shaping, and creating your very own stunning twisted wire tree today, and transform your space with unparalleled, personalized beauty!