
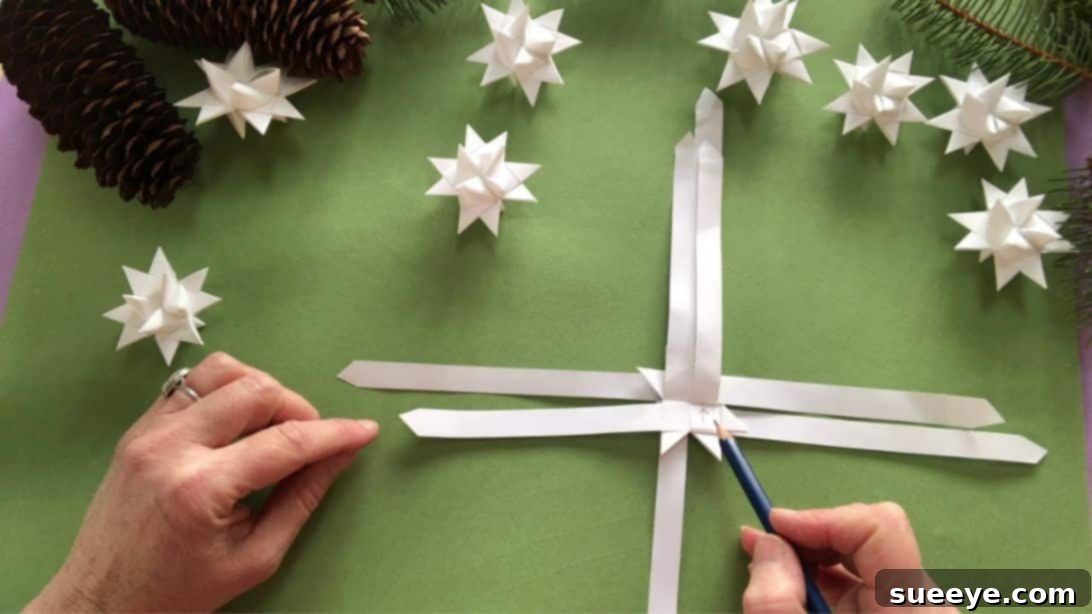
Mastering the Art of Froebel Stars: A Comprehensive Guide to Woven Paper Stars
Step into the enchanting world of paper crafting with the beautiful and intricate Froebel star. Far more than just a simple paper decoration, these woven wonders are a testament to patience, precision, and the joy of creating something truly special with your own hands. If you’ve ever admired the detailed craftsmanship of holiday ornaments or sought a meditative craft project, the Froebel star, also known as the German star, Advent star, or Danish star, offers a profoundly rewarding experience.
As a child, I vividly recall the simple pleasure of folding classic paper stars. There was a unique satisfaction in watching a flat strip of paper transform into a puffy, five-pointed gem. My collection grew, filling vases and boxes, each star a tiny beacon of happiness. But the Froebel star elevates this experience to an entirely new level, offering a distinct and captivating challenge that yields a stunning 16-point creation.
This tutorial will guide you through the detailed process of crafting the magnificent Froebel star. Though its intricate design might seem daunting at first glance, don’t be discouraged! Many crafters find that after a couple of tries, the process becomes intuitive and even therapeutic. Once you master the technique, you’ll be creating these stunning stars with ease, ready to adorn your home or share as cherished handmade gifts.
Ready to discover the magic of paper weaving? Join us as we unlock the secrets to crafting these timeless paper treasures. You might also enjoy exploring other intricate paper crafts, such as learning How to Make Realistic Paper Flowers or tackling the DIY Woven Lampshade for another satisfying project.
The Enduring Appeal of Froebel Stars: History and Cultural Significance
The Froebel star holds a rich history deeply rooted in educational philosophy and European tradition. It is named after Friedrich Fröbel, the pioneering German educator who founded the concept of “kindergarten” in the mid-19th century. Fröbel believed fervently in learning through play and creative activities, advocating for the use of what he termed “gifts” and “occupations” to help children develop fine motor skills, spatial reasoning, and an intuitive understanding of geometric forms. The woven paper star was one such “occupation,” meticulously designed to foster concentration, patience, and dexterity in young minds.
Beyond its significant educational origins, the Froebel star has gracefully transitioned into a beloved cultural symbol, particularly prominent during the holiday season in Germany and other parts of Northern Europe. Its intricate points are often said to represent the star of Bethlehem, making it a popular and meaningful decoration for Christmas trees, festive wreaths, and various holiday displays. Crafting these stars is frequently a cherished family tradition, a skill and story passed down through generations, connecting individuals to a beautiful and enduring cultural heritage.
Today, the appeal of Froebel stars extends globally. Crafters and enthusiasts appreciate them not just for their historical context but for their stunning aesthetic and the deeply meditative process involved in their creation. They offer a perfect blend of artistic expression and mathematical precision, culminating in a durable, visually striking, and deeply personal decorative piece.
Why Craft Froebel Stars? Benefits and Joys of Paper Weaving
Engaging in hands-on crafts like making Froebel stars offers a myriad of benefits that extend far beyond simply creating a beautiful object. In our increasingly digital and fast-paced world, hands-on activities provide a welcome respite and a wonderful opportunity to unwind and reconnect with your creative self:
- Mindfulness and Stress Reduction: The repetitive, focused nature of paper weaving can be incredibly calming and therapeutic, helping to quiet the mind and significantly reduce stress. It serves as a potent form of active meditation, allowing you to immerse yourself fully in the present moment.
- Enhanced Fine Motor Skills: The precise manipulation of paper strips, the careful execution of exact folds, and the intricate weaving process significantly improve hand-eye coordination and fine motor dexterity. This benefit is valuable for individuals of all ages.
- Boosted Problem-Solving Abilities: Following the intricate step-by-step instructions and troubleshooting occasional challenges help develop critical spatial reasoning and problem-solving skills. Each star you meticulously create refines your understanding of the process and strengthens your cognitive abilities.
- Creative Expression: While the basic structure of the Froebel star is well-defined, you have endless opportunities to infuse your personal style. Experiment with a vast array of paper colors, patterns, and finishes. Create elegant monochrome stars for a sophisticated look or vibrant, multi-colored ones for a playful, festive touch.
- Personalized Decorations & Gifts: Handmade items inherently carry a special sentiment and are deeply appreciated. Froebel stars make exquisite, personalized gifts for friends and family, and they instantly add a unique, artisanal touch to your holiday or everyday home decor. Imagine the charm of a garland of these stars or delicate ornaments gracing your Christmas tree!
- Connecting with Tradition: By creating Froebel stars, you are actively participating in a craft that has delighted people for over a century, forging a tangible connection with a rich history and a beautiful cultural practice.
Essential Materials for Your Woven Paper Stars
One of the most appealing aspects of crafting Froebel stars is the delightful simplicity of the materials required. You won’t need an extensive or expensive toolkit to get started, making it an accessible and enjoyable project for almost anyone.
- Four Pieces of Paper Strips (1 1/2″ x 18″): These specific dimensions are critically important for achieving the classic, perfectly symmetrical Froebel star shape.
- Paper Choice: Opt for a medium-weight paper, typically around 80-120 gsm (or 20-32 lb bond). Heavier paper or cardstock can be challenging to fold precisely and make the weaving process difficult, while lighter paper might tear too easily during manipulation.
- Color and Pattern: This is where your creativity can truly shine! Use solid colors for a traditional and elegant look, or experiment with patterned paper for a unique and eye-catching flair. Using two different colors (e.g., two strips of one color and two of another) can create stunning visual effects as the colors intricately weave together, adding depth and contrast.
- Cutting Your Strips: If you’re unable to find pre-cut strips of the exact dimensions, you can easily cut your own. For the most precise and consistent results, we highly recommend using a metal ruler, a sharp pencil, and a craft knife or paper cutter on a self-healing mat. Consistency in the width of your strips is paramount for a beautifully symmetrical finished star.
- Sharp Scissors: A pair of sharp, fine-tipped craft scissors is essential for cleanly pointing the ends of your strips and for making any minor, precise adjustments as needed.
- Optional Tools for Enhanced Precision:
- Ruler and Pencil: Indispensable for accurate measurements and marking, especially if you’re cutting your own strips.
- Bone Folder: While not strictly necessary, a bone folder is a fantastic tool for creating super crisp, professional-looking folds. This results in a more refined and structurally sound star.
- Tweezers: Small, fine-tipped tweezers can be incredibly helpful for grasping and tucking in the final ends of the paper strips, particularly on smaller stars or if your fingers are less nimble.
With these simple yet essential supplies, you are now perfectly equipped and ready to embark on your delightful Froebel star weaving journey!
Step-by-Step Guide to Crafting Your Froebel Star
This intricate star is meticulously formed from four identical paper strips woven together in a specific, sequential pattern. While the initial steps might feel like a complex puzzle, with practice and patience, the underlying pattern will gradually click into place, becoming intuitive. For the clearest visual guidance, we highly recommend watching Cynthia Cratsley’s excellent video tutorial alongside these written instructions.
Watch Cynthia Cratsley’s Froebel Star Video Tutorial Here
Step 1: Preparing Your Paper Strips for Weaving
Begin by taking all four of your carefully cut paper strips. For each individual strip, fold it precisely in half lengthwise, creating a strong, sharp central crease. This foundational fold prepares the strips perfectly for the subsequent weaving process. Once all four are folded, stack them neatly together. Now, using your sharp scissors, make a small, precise diagonal cut at each open end of all the folded strips. This action creates a clean, pointed tip on each end. This step is crucial, as these elegantly pointed tips will ultimately form the beautiful, sharp points of your finished Froebel star.
Step 2: Forming the Central Weave (The Foundation of Your Star)
This pivotal step establishes the foundational interlocking square from which your star will emerge. Precision and careful alignment here are absolutely key to a symmetrical outcome.
- Take one of your folded strips and place it horizontally in front of you on a flat surface. Ensure that its open, uncreased edges are consistently facing towards your right side.
- Pick up a second folded strip. Gently insert it through the loop of the first strip, positioning it vertically so that its open ends are now facing downwards.
- Now, take a third folded strip. Weave it through the second strip, carefully placing it horizontally above the first strip. Its open ends should now distinctly point to your left.
- Finally, take the last folded strip. This step requires careful attention: you need to insert it between the third strip (the one you just placed horizontally) and the first strip (your initial horizontal strip). It should be oriented vertically, with its open ends facing upwards, effectively completing a closed square at the center.
Carefully and gently pull all four strips together, tightening them until they form a snug, interlocked square at the very center. This central weave should closely resemble a miniature basket weave. Refer to the image provided below for a clear visual representation of this foundational interlock to ensure you’ve done it correctly.
Step 3: Beginning the First Set of Points (Securing the Central Square)
With the central weave established, we now begin the process of forming the star’s characteristic points. You will be working with the free ends of the strips that extend outwards from the central square.
Take the very top strip extending from the central weave. Fold it downwards and to the left, aligning its edge neatly with the central square. This creates a triangular flap. Repeat this precise folding action for each of the remaining three strips, moving either clockwise or counter-clockwise (e.g., top, then left, then bottom, then right). Each fold should form a distinct triangular flap. Once all four are folded in this manner, the final (right) folded flap needs to be carefully tucked into the pocket or loop formed by the very first (top) folded flap. This action securely locks the central square and begins to define the initial structure of your star, making it stable.
Step 4: Crafting the First Eight Points (The Side Spikes of the Star)
This is arguably the most intricate and visually defining part of the Froebel star’s creation, as you will be forming the main body of its iconic spikes. You will meticulously repeat a specific sequence of folds eight times in total, ensuring uniformity.
Focus on one of the four strips that are currently extending from the square (for example, the one positioned at the bottom-right). First, flip this strip backward so that it now points distinctly downwards. Next, take this very same strip and fold it over to the left, creating a clean, arrow-like or triangular shape with a crisp, defined crease. Following this, fold this newly formed arrow shape upwards onto itself, essentially folding it in half along its length. Finally, fold it to the right, and carefully tuck the pointed end of the strip into the small loop or pocket that was created by your previous folds. Pull gently but firmly to secure the point and give it definition.
Once you have successfully completed one point, rotate your entire star 90 degrees. You will now find another strip in the exact same bottom-right position. Repeat the precise same sequence of folds as described above. Continue rotating the star and repeating these detailed steps until you have created all eight distinct points around the perimeter of your star. Take your time, ensure all your folds are sharp and deliberate, and do not hesitate to gently adjust the paper to maintain symmetry.
Step 5: Forming the Top Four Points (Adding Dimensionality)
With the initial eight side points beautifully complete, you will now create the four points that give the Froebel star its unique three-dimensional depth and striking visual appeal. This step is repeated four times on one side of the star.
Orient your star so that one of the remaining flat strips (still extending outwards from the center) is positioned at the bottom-right. Fold this bottom-right strip upward, carefully aligning it along the diagonal axis of the star. This action creates a new triangular flap that points towards the center of your star. Now, take the strip located directly to its left (the bottom-left strip) and gently tuck its pointed end into the pocket or loop formed by the strip you just folded upward. Pull it all the way through, applying gentle but firm tension, until it creates a taut, sharp, and projecting point.
Rotate your star 90 degrees. Repeat this exact process for the next set of strips. Continue rotating and repeating these steps until you have successfully created all four projecting points on one side of your star. These points will dramatically project outwards, significantly enhancing your star’s three-dimensional quality. Refer closely to the image below to ensure your points are forming correctly and symmetrically.
Step 6: Completing the Star (The Final Four Points)
You are now just one step away from completing your magnificent Froebel star! To finalize your creation, simply flip the entire piece over to its reverse side. You will now clearly see the remaining four flat strips, still extending outwards from the center, ready to be transformed into the final set of points.
Repeat the exact same sequence of folds as meticulously described in Step 5. Work your way around the star, systematically folding each bottom-right strip upwards and then tucking the adjacent strip into the pocket, rotating the star 90 degrees after each point is formed. Once you have successfully completed these final four points, your stunning 16-point Froebel star is officially finished and ready to be admired!
Tips for Success and Troubleshooting Common Issues
Crafting Froebel stars is an artistic journey, and like any intricate craft, there are invaluable tips and tricks that can significantly enhance the process, making it smoother and far more enjoyable, especially for beginners:
- Start with Wider Strips: If you are new to this specific paper weaving technique, it’s highly advisable to begin with slightly wider paper strips (for instance, 3/4 inch or 2 cm) before attempting narrower ones. Wider strips are considerably easier to handle and fold, allowing you to grasp the fundamental technique without unnecessary frustration.
- Practice Makes Perfect: Do not expect your very first star to be absolutely flawless. Embrace the learning process! Use scrap paper for your initial attempts. You’ll find that your muscle memory and intuitive understanding of the intricate folds will develop surprisingly quickly with each practice star.
- Crisp Folds are Paramount: Every single fold you make should be sharp, deliberate, and well-defined. Utilize your fingernail or, ideally, a bone folder to press down firmly on all creases. Crisp folds contribute immensely to the star’s clean lines, structural integrity, and overall professional appearance.
- Maintain Consistent Tension: When meticulously pulling strips through loops, it’s crucial to apply consistent, gentle tension. If the tension is too loose, your finished star might appear floppy and lack definition; if it’s too tight, you risk tearing the delicate paper, which can be frustrating.
- Re-watch the Video: If you find yourself stuck or confused on a particular step, do not hesitate to pause and re-watch Cynthia Cratsley’s video tutorial specifically for that segment. Visual guidance can often clarify complex movements much more effectively than written instructions alone.
- Patience is a Virtue: This is an intricate and rewarding craft. Avoid rushing through the steps. Savor the process, and remember not to get discouraged by any initial mistakes. Most folds can be gently unfurled and re-attempted with renewed focus.
- Choosing the Right Paper: As mentioned, medium-weight paper is the ideal choice. Avoid glossy papers, as they can be slippery, making them harder to hold folds securely. Matte or slightly textured paper generally offers better grip and maintains creases more effectively.
With a little patience, consistent practice, and the application of these helpful tips, you’ll soon be weaving stunning Froebel stars with the confidence and precision of a seasoned pro!
Creative Ways to Display Your Woven Paper Stars
Once you’ve mastered the delightful art of making Froebel stars, you’ll discover a myriad of imaginative ways to incorporate these beautiful creations into your home decor and gift-giving. Their incredible versatility makes them perfect for various occasions, aesthetic styles, and settings:
- Christmas Tree Ornaments: This is arguably their most classic and beloved use. Hang them individually on branches, allowing their intricate design to catch the light, or create a truly magical themed tree adorned entirely with Froebel stars in an array of sizes and colors.
- Garlands and Banners: String multiple stars together using fine fishing line, delicate thread, or thin ribbon to create breathtaking garlands perfect for mantels, doorways, windows, or even across a festive wall.
- Unique Gift Toppers: Elevate your gift wrapping by using a handmade Froebel star instead of a traditional bow. This thoughtful touch adds a unique, deeply personal, and artisanal flair to any wrapped present.
- Charming Bowl Fillers: Artfully arrange a collection of Froebel stars in a decorative bowl, a clear glass vase, or on a elegant platter for a charming centerpiece or a sophisticated accent piece on a coffee table, console, or shelf.
- Enchanting Window Decorations: Hang them individually or in clusters in your windows. The natural light filtering through their intricate folds will highlight their beautiful geometric forms, creating a captivating display.
- Dreamy Mobile Components: Combine your woven stars with other decorative elements like beads, feathers, or delicate trinkets to create an eye-catching and soothing mobile, perfect for a child’s room, a nursery, or a creative studio space.
- Versatile Home Decor Accents: Discreetly place them on bookshelves, integrate them seamlessly into a beautifully arranged tablescape, or even incorporate them into a seasonal wreath for an unexpected touch of handcrafted elegance.
- Thoughtful Personalized Gifts: The act of hand-making a Froebel star for someone is a deeply thoughtful gesture that conveys genuine care and significant effort. Consider crafting them in colors that perfectly match the recipient’s home decor or their favorite hues for an extra personal touch.
- Mix and Match Styles: Don’t be afraid to combine different paper types, varying colors, and contrasting patterns. A harmonious mix of solid-colored stars and patterned ones can create a dynamic, visually rich, and incredibly interesting display.
The intricate and captivating beauty of Froebel stars ensures they will be admired and cherished wherever they are displayed, adding a unique touch of handmade elegance and thoughtful artistry to any setting.