
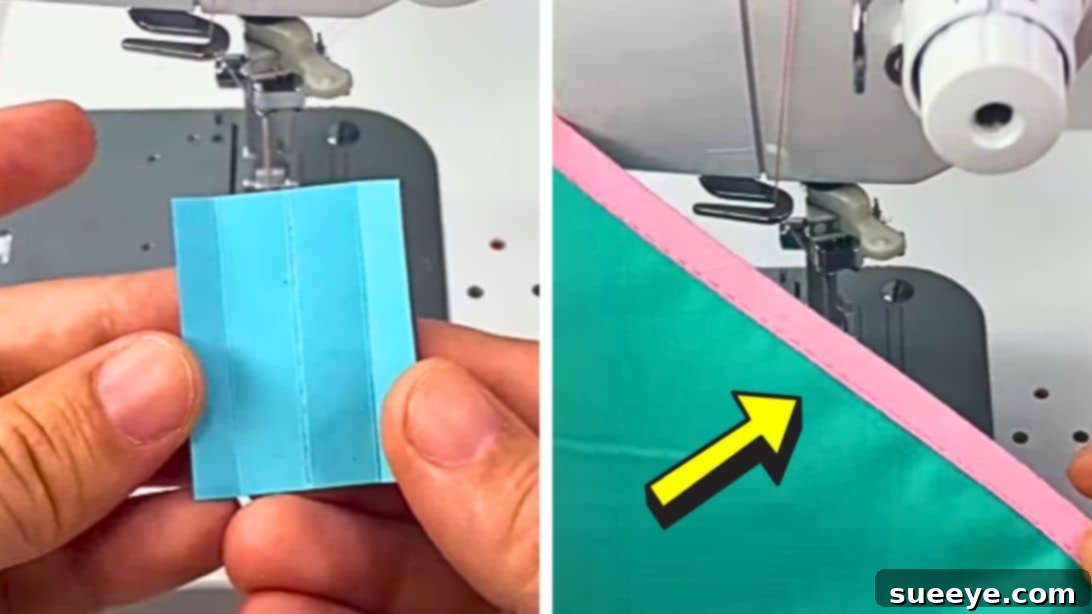
Achieving a professional, polished finish on your sewing projects often comes down to the details, and binding raw edges is paramount among them. Properly bound edges prevent fabric from fraying, extend the garment’s lifespan, and elevate its aesthetic appeal. To accomplish this, a bias strip of fabric, commonly known as bias tape, is indispensable. While there are various methods for applying bias binding—such as the half-fold, single-fold, or double-fold techniques—many sewers, especially beginners, can find the process challenging, particularly when striving for perfectly straight and consistent results. If you’ve ever struggled with keeping your bias binding neat and even, you’re not alone. Fortunately, the creative world of DIY sewing is constantly evolving, bringing forth ingenious solutions. We’re excited to share an incredible sewing hack by AlejandraMezaDIY that promises to simplify bias binding significantly. This clever trick, utilizing nothing more than a simple piece of paper, is a true game-changer that many experienced sewers wish they had discovered sooner.
Mastering Bias Binding: The Ultimate Sewing Guide for Flawless Edges
Bias binding is more than just a finishing technique; it’s a testament to quality craftsmanship in sewing. It involves encasing the raw edges of fabric within a folded strip of fabric cut on the bias – meaning diagonally across the grain. This diagonal cut gives the fabric strip exceptional flexibility and stretch, allowing it to curve smoothly around edges, making it ideal for necklines, armholes, hems, and decorative finishes. The primary purpose of binding is to encapsulate those unruly raw edges, which are prone to fraying and unraveling over time, thereby creating a durable and visually appealing finish that enhances the overall look and longevity of your project.
What is Bias Tape and Why is it Essential?
Bias tape is a narrow strip of fabric that has been cut on a 45-degree angle to the selvage. This unique cutting direction is key to its functionality. Unlike strips cut along the straight grain, bias-cut fabric possesses a natural elasticity. This stretch allows the tape to conform beautifully to curved edges without puckering or adding bulk, which is a common issue with straight-grain bindings. Its flexibility also makes it incredibly versatile, suitable for a wide range of applications from garment finishing to home decor projects like placemats and blankets.
The importance of bias tape extends beyond mere aesthetics. It’s a crucial element in preventing fabric degradation. Raw edges, when left exposed, are susceptible to wear and tear. Every wash, every movement, contributes to threads pulling loose, leading to a tattered appearance and ultimately shortening the lifespan of your handmade items. By encasing these edges, bias tape acts as a protective barrier, reinforcing the fabric and ensuring your creations remain beautiful and intact for years to come. Furthermore, it adds a touch of professional flair, transforming mundane seams into design elements.
Understanding Bias Tape: Types and Uses
While the core function of bias tape remains consistent, it comes in different forms, each suited for particular applications:
Half-Fold Bias Tape
Sometimes referred to as a single-fold bias tape in some contexts, the half-fold bias tape is typically a strip of fabric with both long edges folded towards the center, meeting in the middle. When pressed, these folds create a clean, narrow strip ready to be sewn. This type is often used for creating decorative edges where a flat, neat finish is desired, or as an initial step before folding again to create a double-fold. It’s relatively simple to work with, but requires careful alignment during the sewing process.
Single-Fold Bias Tape
Single-fold bias tape has its raw edges folded towards the center, and then pressed. This creates a neat strip with two folded edges and two raw edges hidden underneath. It’s designed to be wrapped around a raw edge, with one side sewn to the wrong side of the fabric, flipped over, and then stitched down on the right side. This method results in a single layer of bias tape visible on each side of the fabric edge. It’s excellent for lightweight fabrics and offers a less bulky finish than double-fold tape, making it popular for delicate garments and simpler finishes.
Double-Fold Bias Tape
As the name suggests, double-fold bias tape takes the concept a step further. It starts as a single-fold bias tape (where the outer edges are folded towards the middle), and then the entire strip is folded in half lengthwise again. This creates a “W” shape when viewed from the end, with all raw edges fully enclosed within the folds. When applied, this tape completely encases the raw edge of your project, providing a highly durable and exceptionally clean finish. Double-fold bias tape is particularly versatile and is the most common choice for finishing exposed edges on blankets, placemats, necklines, armholes, and other areas where a robust, fully enclosed edge is desired, presenting a neat bias edge on both sides of the project.
The Challenge of Perfect Bias Binding for Beginners
Despite its critical role, bias binding can be a source of frustration for many sewers, especially those new to the craft. The inherent stretch of bias tape, while beneficial for curves, can also make it tricky to handle. Keeping the tape taut but not stretched, aligning it perfectly with the fabric edge, and ensuring consistent stitching can be a daunting task. Common pitfalls include uneven stitching, bias tape slipping out of alignment, puckering on curves, or a bulky finish due to improper tension. Traditionally, methods involve extensive pinning, pressing, and often multiple rounds of stitching, which can be time-consuming and still not guarantee a flawless result. This often leads to feelings of discouragement, as a beautiful project can be marred by a poorly executed binding.
Discover the Game-Changing Bias Binding Sewing Hack
Enter the brilliant sewing hack by AlejandraMezaDIY, which dramatically simplifies the bias binding process. This innovative technique bypasses many of the traditional difficulties, offering a streamlined approach that helps you achieve perfectly straight and even bias binding with minimal effort. The core of this hack lies in creating a simple, temporary guide using a piece of cardboard, transforming your sewing machine into a precise bias binding applicator. This method is especially effective for double-fold bias tape, which, while offering the cleanest finish, can sometimes be the trickiest to apply smoothly. This hack is not just a shortcut; it’s a smart engineering solution that ensures your bias tape stays perfectly aligned, allowing you to focus solely on sewing a straight stitch. It promises to eliminate the need for constant pinning and re-adjusting, saving you valuable time and greatly reducing the potential for error.
Step-by-Step Guide to the Cardboard Bias Binding Hack
This hack utilizes a double-fold bias tape, known for its ability to create a clean, professional finish by fully encasing raw edges. Remember, double-fold bias tape is characterized by its edges being folded inward towards the center, and then the entire strip is folded in half again, creating a compact, ready-to-use binding.
Step 1: Prepare Your Double-Fold Bias Tape
Before you begin, ensure your double-fold bias tape is neatly pressed and free of any kinks. This hack is specifically designed for double-fold tape, which comes pre-folded, making it an excellent choice for this technique. The precision of the existing folds will contribute to the success of your custom guide. If you’re using homemade bias tape, make sure it’s accurately folded and pressed twice to replicate the structure of store-bought double-fold tape.
Step 2: Create Your Custom Cardboard Guide
The brilliance of this hack begins with a simple piece of cardboard paper – a cereal box or similar thin cardstock works perfectly. Take your cardboard and replicate the folding pattern of a double-fold bias tape. Start by folding the outer edges inward towards the center, then fold the entire strip in half lengthwise. This creates a miniature cardboard version of your bias tape. Once folded, gently open the cardboard guide. Now, carefully insert your actual double-fold bias tape into this pre-creased cardboard, then fold the cardboard guide back in half, encapsulating the bias tape within. This ingenious setup effectively creates a custom channel or jig that will hold your bias tape perfectly in place. The best part? With this technique, you eliminate the tedious and often frustrating need to pin your fabric into the bias tape, saving you time and ensuring greater accuracy.
Step 3: Secure the Guide to Your Sewing Machine
With your double-fold bias tape nestled securely within its cardboard guide, gently insert the folded bias tape (with the cardboard) into your sewing machine’s presser foot, positioning it under the needle as if you were about to start sewing the binding directly. Next, take a piece of strong tape (painter’s tape or masking tape works well) and firmly secure the top of the small cardboard guide to the right side of your sewing machine’s throat plate or machine bed. Then, open the cardboard guide slightly and tape the other side securely to the left. This crucial step anchors the cardboard guide in place, creating a stable, immovable channel. This innovative setup will prevent the bias tape from shifting or wiggling as you sew, allowing you to maintain perfect alignment and focus entirely on guiding your fabric and sewing a consistently straight line. Ensure the tape is strong enough to withstand the vibrations of sewing but can be easily removed without leaving residue.
Step 4: Feed and Sew Your Fabric
Now comes the moment of truth! With your cardboard guide firmly in place and the bias tape threaded through, take the raw edge of your project fabric and gently slide it into the opening of the folded bias tape. The cardboard guide will ensure the bias tape remains open and perfectly aligned, making it incredibly easy to insert your fabric evenly. Once your fabric edge is nestled within the bias tape, begin to sew as you normally would. The genius of this hack lies in its stability: the bias tape is held perfectly still by the cardboard guide, which in turn is taped to your machine. This means you no longer have to struggle with simultaneously aligning the bias tape, guiding the fabric, and maintaining a straight stitch. Your only focus becomes feeding the fabric smoothly, ensuring that it remains fully encased within the bias tape. This dramatically simplifies the entire binding process, allowing you to achieve beautiful, professional-looking results with unprecedented ease and precision.
Benefits of Using This Ingenious Sewing Hack
Implementing AlejandraMezaDIY’s cardboard bias binding hack offers a multitude of advantages that can transform your sewing experience:
- Unmatched Accuracy and Precision: The fixed cardboard guide ensures the bias tape stays perfectly aligned with your fabric edge throughout the entire sewing process. This eliminates the common issue of uneven binding and results in beautifully straight, consistent lines, even on long edges.
- Significant Time-Saving: By removing the need for constant pinning and frequent adjustments, this hack drastically cuts down the preparation and sewing time. You can move through binding tasks much faster, allowing you to complete projects more efficiently.
- Reduced Frustration for Beginners: Bias binding can be a major hurdle for those new to sewing. This simplified method demystifies the process, making it less intimidating and more enjoyable. It builds confidence by helping beginners achieve professional-looking results from the start.
- Professional Finish Every Time: The consistency provided by the guide ensures a clean, neat finish that rivals store-bought items. Your projects will look more polished and expertly made, enhancing their overall appeal.
- Eliminates Pinning: Say goodbye to pricked fingers and the time spent meticulously placing pins. The cardboard guide securely holds the bias tape, freeing your hands to focus solely on guiding the fabric through the machine.
- Versatility for Various Projects: While demonstrated with double-fold bias tape, the core concept of creating a guide can be adapted for various binding widths and types, making it a valuable technique for a wide range of sewing endeavors, from garments to home decor.
Pro Tips for Flawless Bias Binding
To ensure your bias binding is always impeccable, even with this fantastic hack, consider these additional professional tips:
- Pre-Press Your Bias Tape: Even if using pre-made tape, a quick press with an iron can sharpen the folds and make it easier to work with, especially for the initial setup in the cardboard guide.
- Prepare Your Fabric Edges: Ensure the raw edge of your project fabric is cut evenly and neatly. Trim away any stray threads. A clean edge will slide into the bias tape more smoothly.
- Practice on Scrap Fabric: Before tackling your main project, do a test run with the hack on a scrap piece of fabric and bias tape. This allows you to adjust your needle position, stitch length, and gain confidence with the feeding process.
- Adjust Stitch Length: A slightly longer stitch length (e.g., 2.5-3.0 mm) can often produce a neater and more even result on bias binding. Experiment on your scrap fabric to find what works best for your machine and fabric type.
- Maintain Even Pressure: While the guide does most of the work, consistently feeding your fabric without pulling or pushing too hard will ensure an even application of the bias tape.
- Dealing with Curves: This hack works wonderfully for straight edges, but it can also assist with gentle curves. For tighter curves, the flexibility of the bias tape will still allow it to conform. The key is to feed the fabric slowly and gently manipulate it as it enters the bias tape, letting the tape’s natural stretch do the work. The guide helps keep the tape stable even on mild curves.
- Choose the Right Thread: Use a high-quality thread that matches or complements your fabric and bias tape. Polyester all-purpose thread is a versatile choice.
Conclusion: Transform Your Sewing Projects with Effortless Bias Binding
The journey to mastering bias binding doesn’t have to be fraught with frustration. Thanks to innovative sewing hacks like the one shared by AlejandraMezaDIY, achieving a professional and impeccable finish is now more accessible than ever. This ingenious cardboard guide simplifies a once challenging task, making it incredibly easy to create perfectly straight and evenly applied bias binding on any project. By eliminating the need for constant pinning and allowing you to focus purely on guiding your fabric, this trick saves time, reduces error, and ultimately elevates the quality of your handmade items. Whether you’re a seasoned sewist looking for a more efficient method or a beginner eager to achieve polished results, this hack is a game-changer. Embrace this clever technique, and watch as your sewing projects transform with beautifully bound edges that speak volumes about your craftsmanship. Don’t hesitate to give it a try – you’ll wonder how you ever sewed without it!