
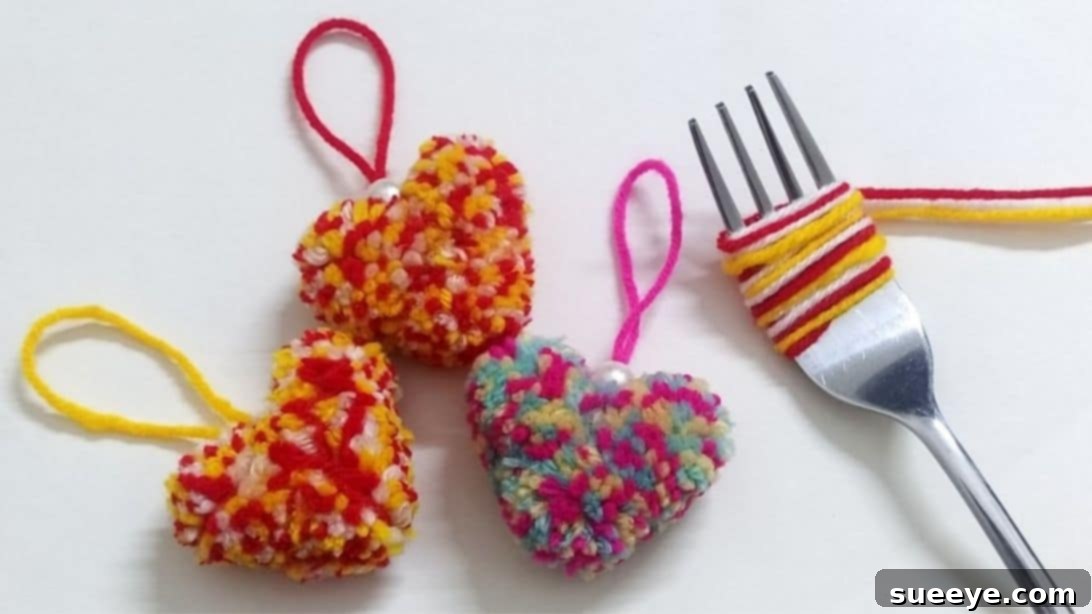
Welcome, fellow craft enthusiasts, to a delightful journey into the world of handmade charm! Valentine’s Day, with its celebration of love and affection, often inspires us to create something special. While sweet treats are a classic, there’s also an undeniable joy in adorning our spaces with heartfelt, handmade decor. For those who cherish DIY projects but sometimes prefer a quicker, less intricate approach, this tutorial is an absolute gem. Forget complicated patterns or extensive supply lists – we’re diving into a project that is not only incredibly easy to master but also allows you to produce a plethora of adorable ornaments in a single crafting session. You won’t believe how little you need to bring these charming creations to life: just a simple fork and a selection of colorful yarns. This ingenious method, beautifully shared by Aachees World on YouTube, transforms everyday items into heartwarming decorations that are perfect for gifting, decorating, or simply adding a touch of handmade warmth to your home.
Easy DIY Fork Pom-Pom Heart: A Charming Craft for Valentine’s Day & Beyond
There’s something uniquely satisfying about crafting, especially when the result is as charming and versatile as these yarn pom-pom hearts. Whether you’re a seasoned crafter or just starting your DIY adventure, this project promises a rewarding experience. It’s perfect for adding a touch of festive flair to your Valentine’s Day celebrations, but don’t let its seasonal appeal limit your imagination! These delightful hearts can brighten up any space, serve as thoughtful gifts, or even become charming embellishments for other craft projects throughout the year. The beauty of this technique lies in its simplicity and accessibility, proving that you don’t need a craft store full of specialized tools to create something truly lovely.
Why This Fork Pom-Pom Heart DIY Is Perfect For You
In a world often filled with complex projects, the allure of a simple yet impactful DIY is undeniable. This fork pom-pom heart tutorial stands out for several reasons:
- Effortless Creation: Using a common kitchen fork dramatically simplifies the pom-pom making process, making it accessible even for beginners or children (with supervision).
- Budget-Friendly: All you need are a few basic supplies – yarn, a fork, and a needle – most of which you might already have on hand, keeping costs minimal.
- Time-Efficient: Each heart comes together quickly, allowing you to create multiple pieces in one sitting, ideal for batch crafting or last-minute decorations.
- Highly Customizable: Experiment with different yarn colors, textures, and bead choices to match any theme or personal preference.
- Versatile Decor: These charming hearts are not just for Valentine’s Day; they can be used as garlands, keychains, gift toppers, or simply as delightful accents around your home.
This project is a testament to the idea that some of the most beautiful creations come from the simplest methods and materials. Get ready to transform ordinary yarn into extraordinary expressions of love and creativity!
Materials You’ll Need
Before we embark on this delightful crafting adventure, gather your essential supplies. The beauty of this project lies in its minimal requirements, making it incredibly accessible for everyone. Here’s a detailed look at what you’ll need:
- Woolen Yarn (three different colors recommended): The heart of your project! Woolen yarn is ideal because its fibers are naturally fluffy and hold their shape well, resulting in plump, soft pom-poms. Using three different colors allows for a vibrant and multi-dimensional look, but feel free to experiment with two colors, variegated yarn, or even a single shade for a monochromatic effect. Consider various textures for added character.
- Embroidery Needle or Any Needle That Could Fit a Yarn In: This needle will be crucial for threading the pom-poms together and adding the decorative bead. An embroidery needle typically has a larger eye, making it easier to thread with thicker yarn. If you don’t have one, any needle with an eye large enough for your chosen yarn will work perfectly.
- Bead: A single bead will add a lovely finishing touch to your heart, serving as a decorative accent at the top. Choose a bead that complements your yarn colors and is appropriately sized – not too heavy to distort the heart’s shape, but large enough to be noticeable. Wooden, glass, or plastic beads are all excellent choices.
- Fork: The star of our show! Any standard dining fork will suffice. The tines of the fork act as a perfect mini-loom for wrapping your yarn, simplifying the pom-pom creation process dramatically.
- Sharp Scissors: While not explicitly listed in the original, sharp scissors are absolutely essential for cutting yarn cleanly and for precise trimming to achieve that perfect heart shape. A small, sharp pair of craft scissors will offer the best control.
- Ruler or Measuring Tape (Optional but Recommended): For consistent pom-pom size and yarn length, a ruler can be very helpful. This ensures all your hearts are uniform if you’re making a set.
Having all your materials ready before you start will make the crafting process smooth and enjoyable.
Crafting Your Adorable Yarn Hearts: Step-by-Step Directions
Step 1: Creating the Fluffy Pom-Poms
The foundation of your charming heart lies in perfectly formed pom-poms. This initial stage involves a simple yet clever technique using your fork. Precision here will contribute to a beautifully shaped final product.
- Prepare Your Base Yarn: Begin by cutting a piece of woolen yarn, approximately 4 to 6 inches long. This will be your tying string. Take this short piece of yarn and carefully fold it in half. Position this folded yarn over the middle gap of your fork, allowing both ends to hang down either side. It’s crucial to keep a firm but gentle hold on both ends of this base yarn throughout the wrapping process; this ensures it stays in place for tying later.
- Wrap the Fork with Main Colors: Now, take your chosen three different colors of yarn (or your preferred color scheme). Start wrapping these yarns together, in a sideways motion, around all the tines of the fork. The key here is consistency. Wrap the yarns exactly 20 times around the fork. Try to keep the tension even, not too tight to bend the fork, nor too loose that the yarn slips off. Wrapping 20 times creates a dense enough bundle for a fluffy pom-pom. Once you’ve completed 20 wraps, cut the excess yarn from your working bundle.
- Secure the Yarn Bundle: With the wrapped yarn still on the fork, carefully take one end of the initial long, folded yarn (the one you placed in the middle gap) from the back of the fork. Bring it over the top of the wrapped yarn and meet it with the other end of the same yarn at the front. Tie these two ends together tightly. A double knot is recommended to ensure the bundle is securely locked in place. This knot forms the core of your pom-pom.
- Remove and Double-Tie: Gently slide the entire yarn bundle off the fork. It should now resemble a tightly cinched bow. To reinforce the pom-pom’s structure and prevent it from unraveling, take the same two yarn ends you just tied and bring them around to the back of the bundle. Tie them again, creating a second secure knot on the opposite side. Trim any excess from these tying ends, ensuring they are flush with the bundle.
- Form the Pom-Pom: Now comes the satisfying part! Using your sharp scissors, carefully start cutting through all the looped yarns around the perimeter of your bundle. You’ll see the loops open up, transforming the neat bundle into a collection of individual yarn strands. Continue cutting until all loops are snipped, revealing a small, shaggy pom-pom. Don’t worry if it looks a bit unruly at this stage – we’ll refine it next.
Repeat this process to create two more identical pom-poms. You’ll need three pom-poms in total to form one heart. Aim for consistency in wrapping and tying to ensure your pom-poms are roughly the same size and density, which is key for a well-proportioned heart.
Step 2: Shaping and Embellishing Your Heart
With your three fluffy pom-poms ready, it’s time to transform them into the charming heart shape and add the final decorative touches.
- Refine Your Pom-Poms: Before assembling, take each pom-pom and give it a good trim with your sharp scissors. Snip away any uneven strands until each pom-pom is rounder, smaller, and has a tighter, more uniform fluff. This “haircut” makes the pom-poms denser and easier to shape into the desired heart form. Gently fluff them with your fingers to ensure an even appearance.
- Assemble the Heart Base: Thread a long piece of yarn onto your embroidery needle. This yarn should be long enough to string all three pom-poms and still have ample length for tying and creating a loop. Carefully insert the needle through the center of the first pom-pom, then the second, and finally the third. Arrange the three little pom-poms in a line. Once all three are threaded, pull the yarn upwards until the pom-poms are snug against each other. Tie a tight knot at the very top of the yarn, directly above the last pom-pom, to secure them in position. Trim any excess from these tying ends.
- Shape the Heart: Now, for the magic of shaping! Take your scissors and begin trimming around the assembled pom-poms. The trick here is to trim the sides diagonally, gradually enhancing the curves that will define the heart shape. Focus on creating an indentation at the top center of the three pom-poms to form the “V” of the heart, and gently round out the bottom. Continue trimming, rotating the heart as you go, until you achieve a symmetrical and pleasing heart shape. This step requires a bit of patience and an artistic eye; don’t be afraid to take your time and trim small amounts at a time.
- Add a Decorative Bead: Once your heart is perfectly shaped, it’s time to add a special touch. Re-thread your needle with another piece of yarn (or use the existing one if it’s long enough). Insert the needle through the middle of the top section of the heart, bringing it out through the very top center. Slide your chosen bead onto this yarn. Once the bead is in place, tie a secure knot directly above the bead. This knot will anchor the bead. Trim any excess yarn above the knot, then gently pull the yarn downwards until the knot tucks neatly into the top of the bead, effectively hiding it and securing the bead firmly. This creates a neat, finished look.
- Final Touches: At the very bottom end of the yarn that now runs through your heart and bead, tie another secure knot. This knot can serve as a stopper if you plan to hang the heart, or simply as a neat finish to the dangling yarn. Cut off any remaining excess yarn below this final knot. If you wish to create a hanging loop, ensure you leave enough yarn above the bead to form a loop before tying the final knot.
Congratulations! You’ve just crafted an adorable yarn pom-pom heart. The beauty of this project is its repeatability. Make many more of these charming hearts, experimenting with different yarn colors, bead types, and even slight variations in size. They look wonderful individually or grouped together for a greater impact.
Creative Ways to Use Your Charming Yarn Hearts
Once you’ve mastered the art of creating these delightful pom-pom hearts, the possibilities for their use are endless! Here are some creative ideas to inspire you:
- Valentine’s Day Decor: The most obvious choice! String them together to create a charming garland, hang them individually from branches or doorknobs, or scatter them on a table as a festive centerpiece.
- Gift Toppers: Ditch traditional bows and add a handmade touch to your presents. A small yarn heart can elevate any gift, making it feel extra special and personal.
- Garlands for Any Occasion: While perfect for Valentine’s, change the colors to match other holidays or themes. Pastel hearts for spring, red and green for Christmas, or school colors for graduation parties.
- Keychains or Bag Charms: Add a sturdy keyring to the top loop, and you have an instant, adorable accessory for your keys, backpack, or purse.
- Embellishments for Clothes/Accessories: Sew or glue smaller versions onto hats, scarves, sweaters, or even hair clips for a unique, personalized touch.
- Kids’ Craft Projects: Supervise younger crafters as they create their own hearts. It’s a fantastic way to develop fine motor skills and encourage creativity.
- Home Decor Accents: Place them in a decorative bowl, hang them from a window, or use them to adorn curtain tie-backs. They add softness and texture to any room.
- Bookmarks: Attach a heart to a long piece of yarn or ribbon to create a lovely, unique bookmark for your favorite books.
Let your imagination guide you! These little yarn hearts are incredibly versatile and can bring a touch of handmade warmth and joy wherever they go.
Tips for a Perfect Pom-Pom Heart
Achieving consistently beautiful pom-pom hearts is all about a few key techniques and a little practice. Keep these tips in mind as you craft:
- Yarn Quality Matters: While any yarn can work, wool or acrylic yarns that are soft and fluffy tend to yield the best results for dense, full pom-poms. Avoid very slippery or thin yarns if you’re aiming for maximum fluff.
- Consistent Wrapping Tension: When wrapping the yarn around the fork, try to maintain an even tension. Too loose, and your pom-pom will be sparse; too tight, and it will be difficult to tie and remove from the fork.
- Sharp Scissors are Key: This cannot be stressed enough! Dull scissors will fray the yarn and make the trimming process frustrating, resulting in a less neat finish. Invest in a good pair of sharp craft scissors.
- Don’t Be Afraid to Trim: The shaping process for the heart requires careful trimming. It’s better to trim small amounts repeatedly than to cut too much at once. You can always take more off, but you can’t put it back on!
- Experiment with Colors and Textures: Don’t limit yourself to three solid colors. Try variegated yarns, different yarn weights, or even combining a plain yarn with a sparkly one for unique effects.
- Practice Makes Perfect: Your first heart might not be absolutely flawless, and that’s perfectly normal! The more you make, the better you’ll become at judging tension, tying knots, and shaping.
- Secure Knots: Always double-knot your yarn securely, especially when tying the initial bundle and attaching the bead. This prevents your beautiful creations from falling apart.
By following these simple tips, you’ll be creating a collection of perfect, adorable yarn hearts in no time.
Conclusion: Unleash Your Inner Crafter!
Crafting these easy DIY fork pom-pom hearts is more than just making a decoration; it’s an opportunity to infuse your space and gifts with personal charm and warmth. This project proves that creativity doesn’t require elaborate tools or advanced skills—just a little yarn, a common fork, and a desire to create something beautiful. Whether you’re preparing for Valentine’s Day, looking for a unique handmade gift, or simply want to add a cozy touch to your home, these delightful yarn hearts are a perfect choice. They’re quick, cost-effective, and incredibly satisfying to make, bringing a smile to anyone who sees them. So grab your yarn, find a fork, and let your creativity blossom. You’ll be amazed at the charming creations you can craft with such simple beginnings!
*These inspiring images are all credited to Aachees World via YouTube. Be sure to check out their channel for more fantastic DIY ideas and follow for fresh content!